DIY soft toy ideas. DIY soft toys
Sewing fabric toys with your own hands with patterns is much easier than without them, and therefore this article contains detailed master classes on sewing toys for the home and children, so that even beginners can cope.
A selection of master classes
You can sew soft toys from various fabrics and materials - felt, fleece, cotton, old sweaters or jeans - using additional decorative elements (beads, buttons, accessories). The main thing is to consider the purpose of the toy: for decoration, as a pillow or for play. For stuffing you can use padding polyester, holofiber or polystyrene balls.
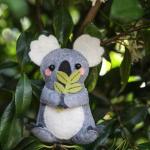
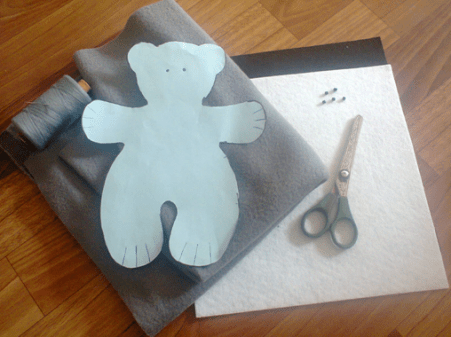
Simple toys can be sewn from felt. They turn out funny and cozy, and you can even sew them with a child. For example, you can make this cute koala:

For sewing you will need:
- felt in gray, white (beige), black, pink and green;
- pattern;
- floss threads;
- padding polyester or other filler;
- needle;
- scissors;
- pencil;
- small black beads for eyes;
- glue gun
Progress:
- Let's make a pattern and transfer it to the fabric with a pencil;

- We will cut out all the necessary parts from felt, taking into account small allowances (2-3 mm);
- Using a glue gun, glue the nose, cheeks, tummy to the front part and sew on beady eyes;
- We embroider a mouth with threads;

- For security, we sew the tummy with white threads;
- We make the paws: we sew the claws between two parts, sew the paws on the sides and stuff them;

- We sew together two parts of the body, sew in the ears (like claws) and stuff the koala with padding polyester;

- Using a glue gun, carefully glue the legs to the body;
- We glue and stitch a eucalyptus leaf so that we get veins;

- We “hand” the koala a leaf and glue it on.

Koala is ready!

You can also sew felt bear cubs:


If you don’t know what to do with old jeans, especially if the fabric is still quite usable, then you can use them to sew toys. Denim fabric can make such a beautiful and stylish whale:


Required tools and materials:
- denim;
- filler (holofiber or polystyrene);
- pattern;
- threads;
- two buttons;
- needle or sewing machine.
Progress:
- We make patterns for the belly, tail, back (two parts each) and fins (4 parts);
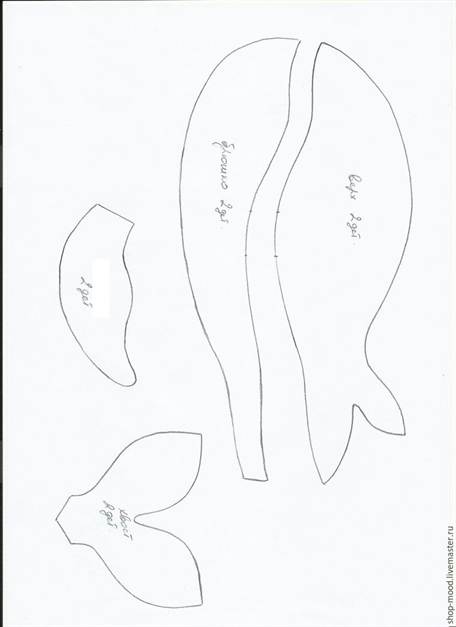
- We transfer the details to the fabric from the wrong side and cut them out taking into account the allowances (for the tummy, the front side is the wrong side!);

- We sew the parts of the back, tail and fins, turn them right side out (for beauty, they can be sewn along the edges and in the middle several times);


- On each part of the abdomen we make folds and stitch (this is an imitation of whalebone);

- We sew the fins to the back and connect it to the belly;


- Sew on the tail;

- Sew up the tummy, leaving a small hole near the tail;

- We stuff the whale with stuffing and sew up the hole.

Keith is ready!

Small toys can decorate a home, make it cozy, and also act as a fragrance. For example, like this tilde style coffee bear:

To work you will need:
- dense fabric (linen or calico) in light colors;
- pattern;
- padding polyester;
- pins;
- cotton buds;
- brush;
- threads;
- needle;
- buttons and ribbons;
- coffee, cinnamon, vanilla.
Progress:
- We make a pattern, transfer it with a pencil to the fabric from the wrong side and cut it out, taking into account small allowances;


- We make a solution with which we will saturate the fabric: pour two teaspoons of coffee, cinnamon and vanilla into a bowl and pour boiling water over it (if the coffee is ground, you need to simmer for 5 minutes), then decant;

- We cover the parts with the solution in several layers and let them dry;

- We sew the parts together from the wrong side, leaving a small hole on the side;

- Turn the toy right side out and fill it evenly with filler, helping with a pencil;

- We sew up the hole with a hidden seam;

- Draw a face (you can use blush for the cheeks) and decorate with ribbons.

The bear is ready!


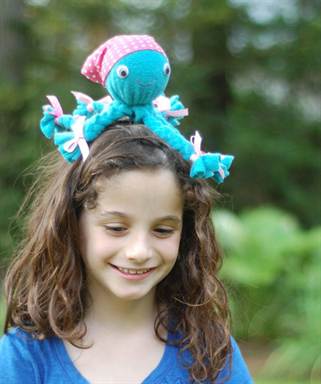
Children's toys should be bright and cheerful. This is exactly what this fleece octopus looks like:
Materials and tools:
- blue fleece 40×40 cm;
- pieces of fleece (or felt) in gray, black and white colors;
- cotton fabric with polka dots (or other);
- a small ball (for example, a tennis ball);
- bright ribbon (about 2 m);
- scissors;
- threads
Previous master classes were with patterns, but for this you will not need them.

Progress:
- Determine the size of the “head”: wrap the ball in the middle with fabric, wrap it tightly with threads and straighten the fabric (there should be traces of the threads);

- Taking into account how much fabric is needed for the ball, we cut off a square from each corner and make 6 cuts on all sides (do not go beyond the thread marks);

- Again we wrap the ball in fabric and rewind it tightly with thread;
- We make legs from strips: we braid braids from three strips (there should be 8 legs in total);

- We decorate each leg with a ribbon bow;

- We make a face: we sew on the eyes, tie a scarf made of fabric, embroider the mouth.

New Year's textile toys have become popular over the past few years. In addition to being practical and safe, as they are unbreakable and can be vacuumed or washed, these toys provide the coziness and warmth that is so necessary on cold winter days. Needless to say, the joint creation of such toys will provide an opportunity to communicate and become closer to family.


Sewing Christmas tree decorations is very simple. It is enough to select templates, fabrics and take the necessary tools for sewing.
Materials and tools:
- cotton fabric;
- padding polyester;
- templates;
- pencil;
- pins;
- scissors (preferably grooved);
- needle;
- threads
How to make Christmas tree toys:
- We cut out the templates and transfer them to the fabric from the wrong side;


- We cut it out with allowances (3-5 mm) and sew it up, leaving open spaces for stuffing (for convenience, you can do the opposite: sew it up and then cut it out);


- Turn it right side out and stuff it with padding polyester;


- Sew up the hole with a blind stitch.


Video on the topic of the article
You can watch how to sew a toy in a selection of videos.
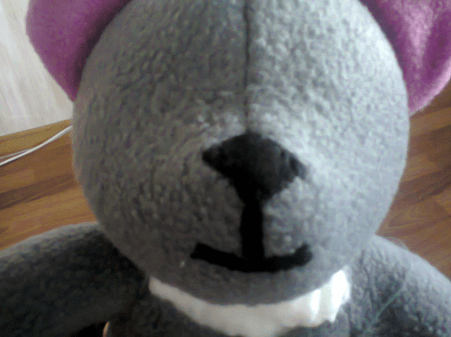
You won’t find any kind of soft toy in the store today—the choice is simply enormous. But you must admit that a toy made with your own hands will be unique, valuable and even more “soulful”. What soft toy is popular with both girls and boys? Of course, little bear! I suggest you don’t put it off and sew one or even a couple of cute bear cubs.
Popular patterns for sewing soft toys
Bears have always been the most popular among soft toys.
Traditionally, bear cubs are sewn from plush or any other fabric with soft pile.
A classic teddy bear can be sewn using this pattern:

For fans of cartoons about Winnie the Pooh, I suggest sewing this funny little bear in our Soviet

or the Disney version.

If you have your own rich imagination, then you can independently come up with a pattern for your own bear.
Master class on sewing soft bears with your own hands
My favorite material for making soft toys is fleece. This material is soft and pleasant to the touch. Moderately stretchy, easy to cut, does not warp when cutting.
In addition, the seams on it are less noticeable and look neat.
I suggest you choose to sew one of the proposed teddy bears.

One of them is very simple - even a novice needlewoman can handle it, the other is a little more complicated.
Necessary materials
For the simplest and easiest bear I needed:
- Fleece.
- Two pieces of felt, black and white.
- Sintepon for stuffing.
- Scissors.
- Needle and thread.
- Four black beads.
We take the pattern and, if necessary, increase or decrease it to the desired size

and cut out two identical parts, not forgetting to leave a small distance at the edges for the seams.

Step 1. Trace the pattern, leaving space for the seams
After we have cut out both parts, we hand baste them with thread.
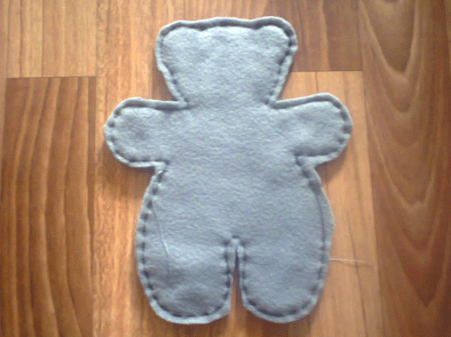
Step 2. Connect the two parts and sew with a running stitch
Then we sew both parts together. It's better to use a sewing machine, of course.

Step 3. Sew according to basting
but you can also carefully sew it by hand.
We do not sew completely. Don’t forget to leave a small hole on the side according to the pattern so that you can turn the workpiece out later.
Turn the bear right side out and straighten it carefully and carefully.

Step 4. Turn the workpiece right side out
Then we take a padding polyester and stuff the toy.
Instead of padding polyester, you can use foam rubber, cotton wool, holofiber or any other filler that you have on hand.
It is very important to carefully and evenly fill the toy, try to avoid the formation of thickenings or, on the contrary, too loose spaces.
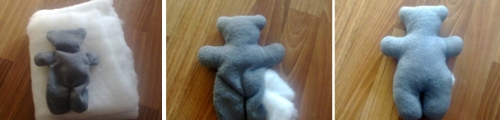
Step 5. Fill the bear with padding polyester
After stuffing, sew up the remaining hole with a blind stitch.

Step 6. Sew up the hole with a blind stitch
We cut out an oval - a nose - from black felt, and a very small spot on the nose from white felt, and sew it on or glue it with special fabric glue.
I used Moment Crystal glue.
We embroider the paws with black thread.
Sew on beads - eyes and buttons.

Step 7. Sew the paws and make the face
Let's tie a beautiful bow from a satin ribbon and lighten up the cheeks. The bear is ready!
The second bear cub is a little more complicated.
To make it, I used this pattern and again took my favorite fleece.
You can use the material that you like best. It could be: faux fur, velvet, wool, velor, terry cloth or even knitwear.

I took fleece in two colors (I needed a small pink piece for the ears and legs of the bear), thread, needle, scissors, padding polyester or any other filler, two buttons or two ready-made eyes (they are sold in handicraft stores).
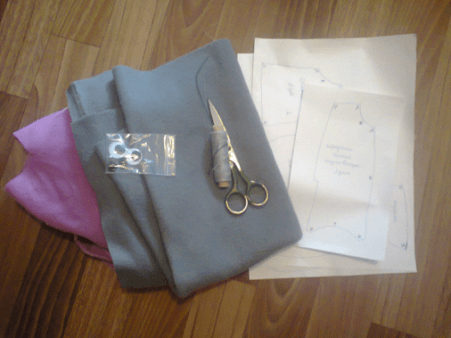
Material for the second teddy bear
We will prepare all the necessary patterns, according to which we will cut out all the details of our teddy bear.

Step 1. Make a pattern and cut out all the details
Now let's start stitching.
First we sew the head: ears, two back parts of the head, two front ones. Then we assemble all three resulting elements together in accordance with the pattern.

Step 2. Sew the head
Let's move on to the body.

Step 3. Assembling the body
The result is something like this:

Step 4. You should get the same workpiece
Sew the upper legs and sew them to the body. We also sew the pink feet to the lower legs.

Step 5. Sew on the upper and lower legs
Attach the head, leaving a hole for stuffing the toy.

Step 6. Sew on the head, leaving a hole.
Fill it evenly and carefully.
From a piece of black felt, cut out a nose and two stripes to form a muzzle and sew them on.
Step 7. Stuff the bear and sew on the face
Then we sew on the eyes. Once again we check the uniformity of the stuffing and sew up the remaining hole with a hidden seam.
Toys are something that attracts both adults and children; they are completely different and serve different purposes.
DIY fabric or textile toys are one of the safest and most attractive types of toys for children. Children can play with them from early childhood, but soft toys do not lose their relevance even in adulthood. For example, it has now become fashionable to give and decorate home comfort with homemade interior toys. As a rule, such toys are not cheap, so many consider them a sign of luxury and prosperity.
Even the simplest toy, made with high quality and with love, can become very valuable and necessary in someone’s family!
For example, my daughter’s favorite toy is the owl Angela, which I made for her a couple of years ago, now she won’t part with it and takes it to bed with her on walks, to the store, to the dacha (at least they bathe separately)) In general, she liked it. I think most children either have a favorite toy or really want to have one.
Therefore, today I propose to make a beautiful toy as a gift, and only you will decide for whom it is for!
Below I have collected templates with patterns for toys, as well as a step-by-step master class on making them.
How to easily sew a soft toy. DIY soft toys for beginners with templates
For beginning craftswomen, it will be easiest to sew from a simple pattern.
For example, take a bear template and print it on a printer, enlarging it to the required size, but you can also redraw it on paper, to do this, enlarge the template you like to the appropriate size on a computer monitor, attach a white sheet of paper to the screen and carefully trace all the contours of the pattern with a pencil.

Then cut out the paper template along the contours.
Choose a beautiful fabric for the toy.
If this is not a complex toy, for example, like the bear in the photo, then here you will need to fold the fabric in two with the right side inward, you can secure it with pins for convenience so that it does not slip, then attach a paper template to the fabric and trace the contours along the fabric with soap or chalk.
We cut out the fabric blanks, leaving allowances for the seams.
We machine sew it with a regular straight stitch, leaving a small hole so that we can then turn the toy right side out.
You need to make notches along the folds so that the fabric does not pull in these places.

Now the toy is turned right side out and stuffed with padding polyester, padding polyester or other similar fillings.
You should not fill it too tightly, but so that there are no empty areas left, the filler must be distributed evenly.
The hole through which it was stuffed is finally sewn up with a hidden stitch.
We glue or embroider the toy's eyes, mouth, and nose.
We add beautiful details, for example: a bow, a flower, a scarf, buttons, or you can even sew clothes. There is a huge field for creative experiments here.

Realize your idea!
A simple cat pattern made from fabric.
Another easy-to-sew pattern is the cat pattern.
It is sewn and cut according to the same principle as a bear, only here two parts are cut out.
This is the cat itself in two parts and the tail, also in two parts.
They are sewn together separately, small holes are also left for turning them inside out and for stuffing with stuffing, then the tail is sewn to the base of the cat.
You can decorate it however you like.

This is the cat I got.
Gave it to my sister for home comfort)

How to sew a complex toy? DIY fabric ball, interesting idea
I think a toy that is more difficult to make is one that contains many parts and is assembled in a certain order.
One night an idea came to my mind, why don’t I sew a ball out of fabric, it seemed so simple in my head, but when the idea came to fruition, without an example it was difficult to understand what to cut, how much to cut and how to do it all correctly later sew.
Therefore, I am sharing an example that I used.
You will need two templates, a hexagon and a pentagon. We transfer them to paper, or better yet, to cardboard.

We need to cut 20 hexagons and 12 pentagons from the fabric. I used two colors of fabric, but this is not necessary, you can make it completely monochromatic or, on the contrary, colored, it’s at your discretion.
Once you have cut the required number of polyhedra, it is better to lay them out so that you can visually understand how you will sew them together.
This is what the ball layout looks like. 
Another layout option

This version of the ball is made of felt, it is easier to sew.
I chose to sew from calico and on a sewing machine, so I still need to leave seam allowances on the fabric. And iron the seams. There is no need to do this on felt.
Simply sew all the parts into two halves, and then these two halves are joined together. You need to connect from the wrong side, and then leave a small hole unsewn and turn it out through it.
Fill tightly with padding polyester and sew up the hole with a hidden stitch.

This is the ball I got - it turned out beautiful!


See also - article felt toys
Fabric toys step by step master classes with patterns.
I offer a few more ideas for interesting toys with step-by-step master classes.

Rainbow fabric fish


A ship made of fabric.


We offer you several master classes that will help answer the question of how to create soft ones. Useful tips and patterns are included with each one.
What is needed to create a toy?
List of basic items for creating a fabric toy:
- toy patterns;
- threads;
- textile;
- filler;
- needle.
- It is most convenient to sew on a sewing machine;
- choose a bright fabric, maybe with ;
- give preference to hypoallergenic filler such as holofiber;
- Ordinary children's clothing can also serve as decoration (for example, put a small blouse or T-shirt on the animal).
Master classes on their creation
If you have at least some drawing skills, then creating a pattern for a toy will not be difficult.
A do-it-yourself fabric toy pattern is created as follows:
- Draw it using the shadow of the existing toy. To do this, place a cat, puppy or someone else in profile in front of the lamp. After this, place a white sheet of paper so that the shadow of the toy falls on it. Trace the shadow with a pencil. The pattern is ready.
- You can also resort to fantasy. Make a sketch of the future toy. Divide it into parts (for example, body, head, legs, tail) and draw each separately. The parts must be drawn in profile.
Do-it-yourself fabric toy patterns (simple options) can also be made as follows: take an old toy, open it up and look at the details. This must be done carefully along the seam, without damaging the fabric itself. This way you will understand how to build a pattern and what it is.
Don't be afraid to experiment. Patterning fabric toys with your own hands, containing a minimum of details, is suitable for beginners. Then you can move on to bigger ones.
Cute cat
With your own hands? The pattern and manufacturing process will be discussed using the example of a cat toy.

- The pattern of the cat is given, so take it and print (redraw) it.
- Cut out all the details of the pattern and transfer it to the fabric using chalk, pencil or marker. Do not forget that we draw the contours from the reverse side, having previously folded the fabric in two layers.
- Sew the fabric parts clearly along the contour.
- Cut out the stitched pieces.
- Make a small cut in the center of the muzzle and turn it inside out.
- Make a small cut on the cat's body where you plan to sew on the muzzle, and turn the part inside out.
- Place filler inside the face and body.
- Sew up the cuts on the two pieces.
- It's the muzzle's turn. Make a nose out of thread or a piece of fabric stuffed with filling, sew on beady eyes and embroider a mouth out of thread.
- Sew the muzzle to the body.

The cat is ready. This toy can be used as a pillow or decoration on a door handle.
Magic snail
It is not at all necessary to do something complicated; if the pattern of toys made of fabric with your own hands contains simple details, then the craft will be ordinary.

From such ordinary elements you can make an absolutely magical soft toy.
Sequence of work:
- Print the pattern and cut out the pieces.
- Take two types of fabric - for the shell and body.
- Fold the fabric in half, right side inward.
- Attach the pattern pieces with pins and trace them.
- Sew the parts along the outline, leaving the space marked on the pattern with the outline.
- Turn out the parts through the remaining holes.
- Push the filler inside the snail parts, tightly and carefully.
- Sew the holes closed using a hidden seam.
- Sew the shell to the body.

Now you can decorate the snail, trusting your imagination. In the example presented, the toy is decorated using a patch made of a different fabric, onto which accessories in the same style are glued - bows, flowers, and other decorations. Using chalk, pastel or paint, draw blush and eyes, tie a bow on the neck, and glue a flower on top. And baste white lace to the junction of the shell and the shell.
Funny goat
This soft fabric goat toy, which you can sew yourself using the following pattern, will appeal to both children and adults.

Operating procedure:
- Transfer the pattern onto the fabric.
- Sew the fabric along the contour, leaving a small piece on the tummy, and cut it out.
- Turn out the part.
- Fill the body thoroughly with filler.
- Sew up the unsewn piece.
- Make a muzzle: sew small buttons or beads in place of the eyes, and embroider a nose and mouth under them with thread.
To make the goat original, sew a toy from abstractly colored fabric and decorate the horns and neck with bows.
Basic details of DIY fabric toy patterns
The simple details of this pattern allow you to make a whole menagerie. You just need to replace some of them - and you can sew a bear, a bunny, a cat.

For example, if a pattern for toys made of fabric (you have prepared several different versions of the parts with your own hands) contains a long tail - get a raccoon or a cat, long ears - a rabbit, leave it as is - a teddy bear, a curled tail - a pig, and if you add tassels on the pointed ears, it will turn out to be a little lynx.
The main thing is to choose the right color for the fabric and make a corresponding muzzle. That is, if you are making a raccoon, do not forget that it has black stripes on its tail and a mask on its face.
The undoubted advantage of the given pattern is that all four legs of the finished toy move, and the child will be interested in playing with it.
Teddy bear with blue ears

Such a wonderful bear can be made using the above pattern, without resorting to any additional changes in the details.
The procedure for creating a toy:
- Cut out the pattern pieces.
- We transfer the pattern to fabric folded in two layers. Choose a blue color for the ears and nose, and a different color for all other details.
- Sew the pieces together, leaving a little free space on each for turning and filling. On the body, head and ears there are details at the bottom, on the paws-arms - at the top, and on the paws-legs - at the top and bottom. Do not sew the foot parts together.
- Cut out the stitched pieces.
- Turn each one inside out.
- Fill everything except the nose and ears with stuffing. Pay special attention to your tummy.
- Sew the foot pieces to the bottom of each of the paws.
- Sew the head and all four legs to the body in a circle, trying to make
- Sew the ears onto the head, giving them shape.
- Make a muzzle: sew beads or buttons in place of the eyes, baste the nose and embroider the mouth.
The bear is ready! If desired, you can attach a ponytail to it. To do this, make another piece at least the size of the nose. Place it on the back of the bear and fill it a little with filler. Sew on the tail.
Add a neck scarf or scarf to the bear, and if it’s a girl, then bows on the ears.
Do not forget that toys should be bright and interesting, and all parts, including those used for decoration, should be carefully sewn or glued.
Handicraft is that type of activity when creativity and the use of technology are combined in a single process.
Today I want to cover the issue of technology in detail.
What fabric to sew a toy from
In order to choose the material for the toy that we want to sew with our own hands, we need to know the pros and cons of the fabric.
Below I have made a comparison of the main types of fabric used for sewing toys.
| Material name | Pros of work | Minuses | |
| Felt | A variety of colors, holds its shape, is easy to sew, does not fray, multifunctional. | expensive | For almost all types of toys: animals, birds, dolls, educational toys. |
| Fleece | A variety of colors, easy to sew, does not fray, multifunctional, washable, not expensive. | May roll up | For almost all types of toys: animals, birds, dolls, educational toys. For example, fleece can be |
| Fur | A variety of colors and textures for different types of animals. With some skill, sewing is easier than fabric ones. | It's pouring out. You need skill in cutting. Do not wash. Good fur is expensive. | For soft animal toys. |
| Knitwear | Variety of colors. Elastic, easy to sew, easy to shape the toy shape. Washable. | Good knitwear is expensive. | For dolls, educational toys. Less common for animals and birds. |
| Cotton | Easy to sew, a variety of colors, washable. Not expensive. | Doesn't keep its shape. | For dolls, educational toys. |

What to fill sewn toys with
Choosing a filler for a toy is quite simple. But it is worth paying attention to the characteristics of materials during operation. Comparison of the main types of filler with brief tips in the following table.
| Filler | Pros of work | Minuses | Which toys are most suitable for? | Where to get |
| Sintepon | Not expensive, soft, light, washable. | It needs to be distributed into a soft mass, which is labor-intensive. There may be lumps in the toy. | For all types of toys. | In "Fabric" stores. Sold by the meter. For an average size toy of 30-40 cm, you will need 0.5 meters. |
| Holofiber, synthetic fluff | Lightweight, washable, fits evenly, no lumps when stuffed. Very convenient to use. | Expensive. Sold in large packages. | For all. | In specialized stores for creativity. For one medium-sized toy, you can buy an inexpensive pillow, for example, at the Ikea store. |
| Batting | You can stuff the toy very tightly. | Heavy, cannot be washed. Not practical. | Animals, birds. | In Fabric stores. Sold by the metre. For an average size toy of 30-40 cm, you will need 0.5 meters. |
| Grass | Eco-friendly, good for small children. For a good sleep, for example. | It is costly and time-consuming to collect and dry. | Dolls are amulets, herbalists. | Forest, garden. |
| Groats | Weighting agent for stability of toys. | Do not wash. | Educational toys. | Kitchen cabinet :) |
When choosing a filler, consider who the toy is intended for. For kids who already run, toys usually need to be washed, so the filling should be practical.

When you have decided on the choice of toy - you have chosen the type of toy (animal, doll, educational), prepared the pattern, fabric, filling, threads, accessories (eyes, noses, antennae, etc.) you can start working.
The technology of sewing a soft toy contains several main stages.
Moving sequentially from one stage to another, you can easily sew any toy.
For ease of perception, I have included the stages of technology with descriptions in the table.
| № | Stages of technology for sewing a soft toy | Description, tips |
| 1 | Remove pattern | The pattern must be transferred to paper (if it is in a magazine) or printed. All parts must be signed with the name of the part, quantity, and the direction of the thread or fur must be indicated on each part. |
| 2 | Transfer the pattern to the fabric | This stage is very important, because The entire subsequent course of work will depend on how you carry out the preliminary work with the patterns. So, lay out the fabric folded in two with the right side inward. Lay out the pattern pieces on the fabric, starting with the largest ones and moving on to the smaller ones. Be sure to take into account the direction of the grain thread or fur, according to the pattern. Pin the patterns with pins. Trace along the outline. Next, draw seam allowances (usually 0.5 cm). Be sure to outline the details; this will help you easily sew a good toy. Label the fabric with the names of the parts and use arrows to indicate the thread. |
| 3 | Cut out product details | Cut out the parts of the toy along the seam allowance lines. The pins do not need to be removed until the actual sewing of this part. |
| 4 | Sew the details of the muzzle, make eyes, nose, mustache. | Making the muzzle: sewing the parts together and decorating it. Make the muzzle of our toy (or face, if it is a doll) depending on how the muzzle will be designed - it can be embroidery, appliqué, ready-made parts - eyes, nose, mustache. |
| 5 | Sew the remaining parts of the product | Sew starting with large parts (torso). Next are the smaller ones - paws, tail, ears. Basically, the parts are sewn from the wrong side, so you need to fold two parts of one part of the toy with the right sides inward, pin or baste (so that the fabric does not move when sewing), and then sew the part along the intended line. |
| 6 | Stuff toy parts | If you add balls or cereal, you need to start with them, placing this filler in the bottom of the toy's body (or in the bottom of the toy's limbs). You need to fill it evenly, straightening the filler inside the toy with your hands. In small parts you can use a knitting needle for stuffing. Be sure to form the correct shape of the toy with your hands and ensure that there are no lumps or distortions. |
| 7 | Collect product parts | Sew the head to the body with a seam “over the edge” using threads that match the color of the parts of the product. Try to make the seam invisible, the stitches small. Secure it well with a knot and hide the ends of the thread inside. To do this, after the knot, move the needle a little further a centimeter to the side and cut the thread to zero, the end of the thread will be inside the product. Sew on the remaining parts – paws, tail – in the same way. |
| 8 | Decorate the toy | Decorate the finished toy. This could be a beautiful collar for a dog or cat, a piece of fur in the form of a bang on a toy’s head, a bow or beads on the neck or head. In general, what is enough imagination and desire? |
When transferring a pattern onto fabric, be sure to take into account the pattern of the fabric, the grain thread and the direction of the fur.
Drawing allowance lines makes sewing easier and guarantees a symmetrically sewn toy as a result of the work.

What seam to sew toys
Different types of seams are used to sew toys. Based on the illustrations and descriptions below, it is not difficult to master the techniques of basic seams.
Running stitch
The simplest seam, but not very strong.
It is used to connect parts for easy sewing instead of pins.
It is very easy to sew along a straight line of stitches at equal distances.
I advise you to sew along the marked line.
Back stitch
The seam is strong, on the front side it looks like a machine stitch.
This seam can be used to connect toy parts, departing 0.5 cm from the edge. The connection will be strong.
You can also use this stitch to embroider eyelashes, eyebrows and mouths on animals.
Start as a running stitch, then go back and stitch the distance to the first stitch. Place the seam along the line.
Chain stitch
Used for finishing. Looks like a chain.
Overlock seam
It is used as an overcast edge of parts, both for decorative purposes and for connecting toy parts.
Blind seam
A seam is useful for joining parts from the front side.
The seam must be made with small stitches, carefully, without tightening the thread, otherwise the seam will be visible.
French knot
It is used to decorate the eyes of small animals (an example can be seen in the article), and also as the center of small flowers for embroidery.
Pierce the fabric with a needle and wind the thread two or three times around the top of the needle.
Loop the thread around the needle.
Without letting go, insert the needle into the fabric at the place where the thread was initially removed.
Secure the knot on the wrong side.
How to sew sequins
Sequins and beads are often useful for decorating toys.

How to properly sew the parts of a soft toy
Over time, each craftswoman develops her own secrets for working with this or that material.
Also, sewing toys has its own nuances.
If you use these tips in practice, the work will go smoothly, and the result will please not only you, but also your loved ones!
- The toy can be sewn on both the back and front sides, using different types of seams. As a rule, if the fabric frays, it will be sewn from the back side, if not, it can be beautifully decorated from the front side.
- When working, it is better to use a palette of thread colors, selecting threads exactly to match the color of the fabric. Then the product will be made with high quality.
- You can sew the parts of the toy on a machine or by hand. Large parts are usually sewn on a machine. And on the hands - small ones.
In this video you will see the process of creating a soft toy with your own hands.