Large fabric toys. DIY soft toys: patterns for beginners
Do you want a toy? Lay out $6,200,000. It is impossible to buy a sample for a large amount, because this is the maximum price of the most expensive doll in the world.
It's called the Birdman. In past centuries, this was the name of those who hunted for catching birds. Actually, the image of a Renaissance man was recreated by Christian Bine. This is a master from Switzerland who made a mechanical toy. It starts with a key.
The 120 cm Birdcatcher begins to play the flute, and the birds sitting on the left hand turn their heads to the sounds of the instrument. The working mechanism is made of stainless steel. The limbs and head of the toy are porcelain. The robes are made of natural satin, silk and velvet.
So far, there were no people willing to buy an elite doll. We hope that our proposal will find a greater response in the hearts of the public. Why spend on? Christian Bein made his Birdman himself. Let's try to make an author's toy and we. We will not take on complex mechanisms at the beginning of the journey. Let's start with the basics.
Making a soft toy
Question " how to make a soft toy” does not always require financial costs. You can make pretty bears, chanterelles, smeshariki and bunnies from improvised materials at home.
Surely, everyone has an unnecessary sock, a pair from which is lost or leaky. If the product is bright, it is quite suitable for the children's version of the toy. From a dark sock, you can make a conceptual version for adults.
Technology is one. But what individual features to give to your product, everyone decides for himself. Someone, for example, draws eyes, someone embroiders with thread, and someone uses beads.


So the photos have been viewed. Inspiration found. It's time to get down to the question how to make a toy", but to the process. Let's start with making a bunny. Pattern is not needed. Everything is done on . All you need is a sock, a synthetic winterizer, threads and a needle. For decor, it is proposed to use beads and plush balls.
The material for the toy can also serve as a piece of fabric left over from tailoring, or other needs. It is difficult to work with matter without a pattern. Therefore, you first need to draw a contour on, cut out a template from it, attach it to the fabric with needles, circle and cut it out. The next video will tell how to make a soft toy with your own hands.
The image of a cat, as they say, is the master's business. They make funny fat men, graceful predators, lazily lounging and mustachioed in love. In general, it all depends on the author's imagination and, at times, the shape of a piece of matter lying around at home.
If you want the toy to have fur, flannel is taken. This cotton fabric has a surface dotted with villi. We can also use velvet or faux fur. If the workpiece should stretch well during sewing, craftsmen use knitted fabrics.
The nature of the man-made animal, in part, depends on the nature of the fabric. So, from fleecy, dense, woolen fabrics, bristly wolves are obtained, serious, sometimes gloomy characters. From the same velvet, cute, friendly and cunning foxes, bunnies, bears are good.
Making rubber toys
Similar toys were made in Soviet times. But, then, rubber cords were used to weave figurines, for example, from droppers. They were cut into strips and started to form fish, robots, butterflies. The work was done manually. A machine has been created for modern versions.
Based on it, an industrial version is produced. She got a lot of people interested. Needlework lovers did not stop at bracelets, inventing and how to make a toy out of rubber bands.

However, you can create the simplest toys from rubber bands without using a machine. Even the crochet technique will not come in handy. So, for example, you can form a bouncing ball. Interested? Video "how to make a toy out of rubber bands", Further.
How to make a toy out of rubber bands without machine, figured it out. Now it's time to find out how to make a toy out of rubber bands on the machine. On it you can weave the same ball.
True, it will not be so elastic and springy, but it will fit perfectly as a keychain. But, we will present to your attention another video "how to make a toy". Let's make fish.
studying, how to make toys without a machine And how to make toys on the loom time must be taken into account. If the master forms a fish in 15 minutes, the beginner will take all 30-40. Therefore, it is better to proceed to the next model, having stuffed your hand well. The hare is not sketchy, but cute, only now, it requires at least 40 minutes.
Making paper toys
Now paper toys have completely migrated to the hand-made sphere. But, earlier crafts from sheets were produced on an industrial scale. How to make a paper toy factory people began to study at the beginning of the 19th century. Toga, in 1810 the first paper doll was produced.
Fenny (that was her name) was made by the London firm S&J. In 1812, paper dolls began to be sold in America. The novelty was expensive, acquired by wealthy people. The first models were flat.
That is, an image of a female figure and several variants of her attire were applied to an ordinary dense sheet. Small stripes departed from the outfits. They folded over the body. So the dresses were kept on the doll. Naturally, all the fragments had to be cut out.

How to make DIY toys in a flat version, there is no need to tell. If earlier factories hired artists to produce paper dolls, now it’s enough to have a computer at hand and.
Let's better understand how to make a toy at home volumetric plan. Boys, for example, will surely like this paper gun:
By the way, for voluminous toys, there are also templates. They are available online. You can print, cut out and assemble a Winnie the Pooh tiger, Sponge Bob, or a Teddy Bear. How do you like this cow?
To form a toy out of paper, it is not necessary to fold and cut something. In the origami technique, for example, all you need to do is fold. The simplest version of origami can be called airplanes, which, perhaps, everyone has done in their lives.
Complex patterns are assembled from many parts called modules. First, the required number of modules is added, and then a three-dimensional figure is formed from them, for example, a ball. We learn how to do such DIY toy. Video, Further.
Such a modular origami is suitable as a children's or Christmas tree toy, a souvenir. But, if a souvenir, a gift is being prepared, it is better to use the idea of a bouquet of toys. Compositions are made of both paper and soft figures. Let's pay special attention to this.
Making bouquets from toys
How to make a bouquet of toys? Just like a normal one. The only difference is that the "buds" will have to be sewn to the stems. The flowers themselves are, most often, teddy bears.
Instead of stems, as a rule, they take holders for balloons. The funnels at the top are ideal for planting and securing toys. question, how to make a bouquet of toys with your own hands, are devoted not only to hundreds of master classes and articles, but also television stories. Let's see one of them.
The scheme of actions is clear and even how much you have to pay for the original present, if you order it. If you make toys yourself, the bouquet will cost mere pennies.

There are not only non-standard approaches to the use of toys, but also their production. Finally, here is another example that is difficult to make at home, like Christian Bine's Birdcatcher.
How to make a toy, photo which is, but there is no production technology? This is a Japanese invention, the production secrets of which are not disclosed in the country of the Rising.
Externally, the toy is a plastic square with 8 ledges on the front side. Touching the pimples is accompanied by an effect similar to the bursting of bubbles in construction packaging. How this happens is not clear, but it is very pleasant to play. So, invent, sew, fold, because both children and adults love to play.
DIY toys: simple master classes, the best patterns, interesting ideas.
As the great Coco Chanel said, “Handmade things are a luxury.
It is not necessary for everyone to have them.
Anyone who wants to have them makes them himself or pays the master for his work.

Soft toy - the first association of plush baby bear. But there is much more to the concept of a soft toy. This is an interior toy Tilda, and funny toys in a car, and much more. This article contains a variety of types of soft toys, as well as techniques for their implementation and step-by-step master classes.

DIY soft toys
Such toys can be divided into several subspecies: for children and adults, interior toys, with practical use (for example, needle beds).

Also, toys can be divided according to the type of material used: fur, from cotton or linen fabrics, from felt, from fantasy fabrics.

Folk toys, as well as soft toys made in national needlework techniques, have regained particular popularity.
DIY soft fur toy
A fur toy created by one's own hands is especially warm and beautiful. For its tailoring, you can use both natural and artificial fur. Of course, it is much easier to work with artificial fur, but if you decide to sew a toy from natural fur, you will get a unique author's toy! First you need to decide on the pattern of the toy, the larger the finished product, the easier it will be to work. Small details are especially difficult for beginners.

Circle the details and cut out with a margin of 0.5 cm per seam. Unlike fabric, it is best not to use scissors when working with fur. If you don't have a special tailor's knife, use a sharp utility knife. Cut with sharp short strokes, do not drive the knife deep so as not to cut off the fur.

To sew the fur, it is necessary to apply two front sides to each other and straighten the fur outward. After sewing the toy, it is necessary to leave a small hole through which the toy is turned inside out and stuffed with filler. Previously, toys were stuffed with cotton wool, pieces of leftover fabric.
But such stuffing dries for a very long time when washing, and often after cleaning the toy was thrown away only because the stuffing did not dry out and mold appeared inside. Modern fillers are made of synthetic materials (synthetic winterizer and others), which dry quickly and well, do not stray and retain their shape. Having stuffed, it remains to sew with a hidden seam.

The final touch is the eyes, nose and mouth. You can embroider yourself, or you can buy ready-made accessories in the store.

Video: OFFENDED CAT / Do-it-yourself soft TOY
DIY soft toy made of felt
Today, felt toys are the most popular at children's master classes and needlework circles. But they appeared not so long ago, and there is even an exact date of their appearance.
 Margaret Steiff and her first dolls
 Enterprising German woman Margarethe Steiff came up with the idea in a housewives magazine to sew a soft toy with her own hands from felt. In the magazine, absolutely free of charge, Margaret published a pattern and a detailed master class. But in the note she said where exactly you can buy felt for such toys.
Such a move in 1879 made it possible to establish a toy empire in just a few years. The nuance was that the toys were both sewn at the factory, and they sold blanks for toys that could be sewn on their own. She left the empire to her children and grandchildren, and gave the world fashion for a soft toy.

Master class felt dog

For work you will need: brown, white and black felt, scissors, a needle and thread, beads or eyes for toys and a hot glue gun.

We print out the pattern, cut and sew each piece step by step.

Depending on the type of seam, you can create completely different textures of the toy.

If the parts are glued together, the toy can only be cleaned in a dry way. When wet, the parts will separate.


DIY soft toys made of fabric
Fabric toys appeared much earlier than felt ones. But with the advent of fur and plush toys, they were unfairly forgotten for some time. With the advent of plastic, even children's toys made of fabric fell out of use. But today, with a new wave of popularity for handmade, the popularity of a fabric toy has been revived again. The most popular interior toy today is Tilda.

When looking at the Tilda doll, one gets the feeling that the roots of this toy go far back to the Middle Ages. Not at all. The appearance of Tilda was in the 90s of the last century by a young designer Tony Finnanger. The girl was full of ideas and one of the many ideas was Tilda. Today, without it, it is impossible to imagine a gentle, homely interior. And craftswomen from all over the world are simply in love with Tony's idea and create prototypes to their taste.
 Tilda Angels
 Video: Tilda Master Class
DIY soft toys animals: chicken, fox, horse, penguin, pig and others
With the advent of the crumbs, you want to change the world for the better, create a special atmosphere at home. And the child - he is perfection itself, and so you want him to play with unique toys filled with mother's love.
DIY toys are easy. We have collected master classes of various animal toys from a variety of materials. Note that children under 2 years old put everything in their mouths. Therefore, the material must be natural, preferably lint-free. Wonderful fur toys are best given in the third year of life.


Pattern of a chicken, it can be sewn as for a baby and insert testicle toys. And you can create a miracle basket for Easter.
Video: Learning to sew the author's soft textile toy Elephant


Video: How to Sew a Penguin Finger Toy
Aleftinka pig pattern.

Pattern of a giraffe and his company.
 Pattern Cheerful Giraffe
  Flower Elephant Pattern

Since the release of Despicable Me, the world of toys has changed forever. Yes, everyone still loves bears, but at the sight of cute minions, kids and adults are delighted. Minions toys are the first to sell at exhibitions. Do you want to sew for your child? As easy as pie! It remains to choose a favorite character for your baby.
Video: Master class sew minion
DIY simple soft toys

For beginners, many details may seem too complicated and the desire to create will gradually disappear. For beginners, we have selected simple patterns, the connection of which even children can handle. These patterns are especially relevant in creativity lessons in schools.


Do-it-yourself bouquets of soft toys photo
 Bouquets of soft toys Bears
 Conservationists have been fighting the sale of fresh flowers for a long time, until someone brought bouquets of sweets or toys into fashion. Now this global trend is so popular that in some countries the sale of fresh flowers has been halved.
 Bouquets of soft toys Kitty
 Gathered for a holiday? Make a bouquet of soft toys yourself! This is a unique gift that will take pride of place in the bedroom of the birthday girl for a long time to come.
Video: Bouquet of toys. Master class for beginners
DIY soft toys pillows
 Garfield pillow toy
 Well, having touched the world of toys, it is impossible not to remember the pillow toys that fill the sofas of all needlewomen. These are favorite things for both families and guests. Please note that sitting on the sofa, few people can resist not to stretch out their hands and touch the half-toy. And children are happy to travel with their favorite soft toys, falling asleep to the noise of the roads.

Video: Owl pillow toy
Many consider childhood to be the happiest part of their lives. And the symbol of this carefree period are toys. This is probably why many adults are so happy to sew funny animals from felt, fleece and even chintz. But in order for the product to turn out neat, you must first learn how to build simple patterns of fabric toys with your own hands.
Dolls with soul
Rag toys perform several tasks at once. First of all, their texture is useful for the development of fine motor skills in a toddler. And besides, they:
- safe (there are no sharp and too small details in crafts);
- durable (they do not have elements that will break);
- interesting (there are many options for beating a felt toy).
Fabric choice
The most important stage of work is the choice of material for tailoring. Warm, soft, with a short nap felt as if created for cute and original little animals. In work, this fabric is not capricious, because:
- practically does not crumble;
- does not twist and does not move out;
- keeps its shape - in general, exactly what beginners need.
In addition to felt, textile toys - tildes - are also very popular. They appeared relatively recently, in the 90s, but have already won the hearts of millions. Linen, coarse calico, cotton, etc. are used for their manufacture. As for patterns, the basic principle of their construction is simplicity. Let's see it in practice!
6 elementary patterns
A paper pattern helps to make gizmos "as in the picture." For beginners, simple toy patterns are suitable, although they look so unique that more experienced needlewomen may also like them.
Little girl in a pink dress

Materials:
- sheet of paper (tracing paper or wallpaper);
- scissors;
- tailor's chalk;
- pencil;
- eraser.
Instruction:
- We draw an oval of the head, make marks for the eyes (they are closed at the chrysalis), cheeks and mouth.
- We draw a hairstyle. It consists of two parts - bangs with a parting in front and loose curls in the back.
- We make the markup for the dress in the form of a trapezoid.
- Let's get to the body. We draw the placed arms and legs.
- The final stage of building a pattern is shoes in the form of a semicircle with a clasp strap.
- Cut out the details.
- We transfer the outlines to the felt, cut it out and sew it with an overcast seam.
Please note that all the details of both simple and complex patterns of felt toys are cut out with your own hands without allowances.
funny puppy
All details of this model have clear outlines without ornate lines.

Materials:
- pattern paper;
- pencil;
- compass;
- scissors;
- tailor's chalk;
- felt 3 colors;
- filler.
Instruction:
- We draw a torso with three protrusions-legs.
- With the help of a compass, we outline two almost identical circles intersecting in the center. We wipe the extra lines - there should be a figure resembling a figure eight.
- We draw elongated ears, circles of spots (3 circles of different sizes), an oval of the nose and a tail hook.
- Cut out the details, pin on the fabric and outline with chalk.
- We sew all the elements with an overcast seam, adding a little filler.
elegant cat
A distinctive feature of tilde toy patterns is that only the outlines of the figure are drawn on paper, without precise detailing.

Materials:
- sheet A4;
- simple pencil;
- chalk for drawing on fabric or a bar of soap;
- scissors;
- filler;
- beads for the eyes;
- textile.
Instruction:
- On paper, draw the outlines of a sitting cat.
- Separately, draw 2 front paws - elongated ovals with three fingers on one narrow side.
- We make a tail - a voluminous hook.
- Cut out the details.
- We transfer the elements of the cat figure onto the fabric, make an allowance of 1-1.5 cm.
- Cut out, sweep on the wrong side.
- Turn inside out, fill and sew with a blind seam.
cute hare

Materials:
- paper;
- pencil;
- scissors;
- textile;
- filler;
- 2 beads.
Instruction:
- In one detail we show the whole figure of a hare with ears, front paws.
- Separately, we draw a template for the back leg, similar to a bell with 3 petals.
- Cut out elements.
- We transfer the details to the fabric, folded in half. Do not forget about allowances (1.5-2 cm).
- We cut off the hands and head from the paper pattern - we get the pattern of the suit.
- On the fabric we draw 2 such details.
- We sew, fill, and then, after stitching along the side seams, we put on the dress.
kind turtle
Kind slow Tortilla will not only become your child's favorite friend, but will also perfectly cope with the function of a soft pillow.

Materials:
- a piece of wallpaper or tracing paper;
- pencil;
- compass;
- scissors;
- fabric of two colors;
- filler.
Instruction:

Cheerful bear
Bears are the most favorite toys of more than one generation of children. Every adult had their own bear at an early age. You should not deviate from traditions - make “his” teddy bear for the little one.


Materials:
- paper;
- pencil;
- scissors;
- textile;
- filler.
Instruction:
- On paper, we draw the outlines of a bear: torso, head, ears, front and hind legs.
- Separately, we draw 2 circles of different diameters: a large one for the muzzle, a smaller one for the nose.
- Cut out the details.
- We transfer them to the fabric, sew, fill, detail the mouth and eyes with stitches.
Soft toys always attract children and adults. Especially if they are created with their own hands or the hands of a loved one - grandmother or mother. To some, it seems completely impossible to sew a soft doll or a teddy bear. But this is not so: having a pattern and imagination, everything is possible.
For the child and for myself
Love for toys is inherent in every person since childhood. Probably, many did not finish playing at one time, so adults love to sew soft toys with their own hands. It becomes an interesting hobby that makes all relatives and children very happy. Thanks to this passion, you can always prepare an interesting gift, there are no problems with the holidays - there is always an interesting, soft or fluffy souvenir. For the manufacture of toys, you can use not only new materials, but also things that are unnecessary in the house: old children's fur coats, sweaters, small tights, from which the child has already grown. This is a very profitable hobby that allows you to get rid of unnecessary things, scraps of fabric, pieces of leather. The interior of the apartments is always decorated, and a special comfort is created in the house thanks to the design.
Elephants, bunnies, horses...
Today, various soft toys are being created: animals, dolls and even cubes, books. Everything is soft and beautiful. To make soft toys with your own hands, patterns can be found in specialized literature or made up on your own. Often the pattern is removed from an old tattered toy: it is carefully ripped open, smoothed and transferred to cellophane. It can become the basis for making toys: with a little imagination, they modify it, turn a kitten into a bunny, or vice versa. Felt, fur, and bright chintz are well suited for sewing.

Today, many sew soft toys with their own hands: there are a large number of sites of needlewomen on the Internet. Here you can find workshops on sewing Waldorf dolls, Tild, animals, cartoon characters. An example is the characters of the School of Monsters. But still, bears, hares, elephants made of beautiful materials are more popular. Very cute elephants and bear cubs are obtained from bright fabrics. Beautiful and funny animals can be knitted or crocheted from different grades and types of yarn. In order to get soft wool, fluffy threads or mohair are taken. But even knitted toys are made according to certain patterns and patterns.

DIY soft toys
To make them, you need to make a pattern and cook:
- paper - tracing paper,
- scissors,
- pencil or pen
- needles and threads to match the color of the fabric,
- pieces of felt or thick coat fabric, plush, 20x30 cm in size,
- needles for fastening.
Many prefer the manufacture of soft toys from fabric and filler. To begin with, you can sew a small bunny, quite simple in design, but very cute.

Felt should be of two colors: one piece is white, the other - whatever it is or whatever the soul desires. With the help of materials at hand, you should cut out all the details from the felt, but do not forget to make an allowance for the seams - 5 mm.
Sequence of work
To make soft toys with your own hands, the patterns of which are also in this article, you must have a printer. But there is another way: to enlarge the image on the monitor screen to the desired size and, applying tracing paper, carefully redraw it with a pencil. Then cut and transfer to fabric.

Details should be cut out in the same quantity as in the diagram. The body is cut out of gray or blue material in duplicate. The tummy, eyes and nose are cut out and sewn to the front of the body in advance.

Everything is drawn up very carefully: the threads for sewing are taken to match the fabric: the marks on the tummy are sewn with gray threads, the eyes are white, the pupils are black. The mouth is embroidered, a smile is made. Soft toys made with your own hands should have a friendly expression on the muzzle.

Assembly of parts
Ears, paws, tail are sewn together, turned inside out and stuffed with padding polyester so that the layer near the hole is thinner. The back of the base should be put face up and place on it all the details that should be sewn in: ears, paws. The front part is superimposed on top, with a white tummy inward. Around the perimeter, everything should be stabbed with needles and carefully stitched with your hands or on a typewriter. At the bottom there is a hole for stuffing.

The stitched base is turned inside out and stuffed with padding polyester. The hole is sewn up and the tail is fixed at the back. It is placed two centimeters above the bottom seam. The bunny is ready and can sit on its own. Similar soft toys, the master class for the manufacture of which is described above, can be sewn in different colors. In the same way, a kitten can turn out.

2014 is coming to an end - the Year of the Horse. To sew one of them, you should use this pattern:

To copy it, just print it out or re-shoot it with tracing paper. First you need to enlarge to the desired size. But you should not make a very large horse: 18-20 cm in height is enough. All details are transferred to paper and cut out. Then you should place all this on the fabric, outline and leave an allowance for the seams. All parts must be sewn together: a hole is left for stuffing with padding polyester. Then ears are sewn to the head and eyes are made of black beads. With the help of yarn, a ponytail and a mane are made. The mane can be sewn onto a piece of braid, and then attached to the horse. To make the product look good, you should select the fabric and yarn of suitable shades.
Making a soft toy with your own hands is not at all difficult: you can buy materials for the product in special needlework stores.

You can find everything you might need in them: felt, yarn, accessories, filler and other components in order to make soft toys.

Today there are more and more enthusiastic people for whom sewing toys becomes an interesting hobby. Needlework can be done together with children, which has a positive effect on the development of taste, imagination of the child and promotes mutual understanding with parents.
What kind of soft toy you will not find today in the store - the choice is simply huge. But you must admit that a handmade toy will be unique, valuable and even more “soulful”. What soft toy is popular with both girls and boys? Of course, teddy bear! I suggest not to put it off and sew one or even a couple of cute bear cubs.
Popular patterns for sewing soft toys
Bears at all times among soft toys were in the greatest demand.
Traditionally, cubs are sewn from plush or any other fabric with a soft pile.
A classic teddy bear can be sewn according to this pattern:

For fans of cartoons about Winnie the Pooh, I suggest sewing this funny teddy bear in our Soviet

Or the Disney version.

If you have your own rich imagination, you can independently come up with a pattern of your own bear.
Master class on sewing soft bears with your own hands
For making soft toys, I like fleece the most. This soft and pleasant to the touch material. Moderately stretchy, easy to cut, does not warp when cutting.
In addition, the seams on it are less noticeable and look neat.
I suggest that you choose to sew one of the proposed bear cubs.

One of them is quite simple - even a novice needlewoman can handle it, the other is a little more complicated.

Necessary materials
For the simplest and lightest bear, I needed:
- fleece.
- Two pieces of black and white felt.
- Sintepon for stuffing.
- Scissors.
- Needle and thread.
- Four black beads.
We take a pattern, if necessary, increase or decrease it to the desired size

and cut out two identical parts, not forgetting to retreat along the edges a small distance for the seams.

Step 1. Outline the pattern, leaving a distance for the seams
After we cut out both parts, we baste them manually with a thread.

Step 2. We connect two parts and sew with a running seam
Then we sew both parts. It is better to use a sewing machine, of course,
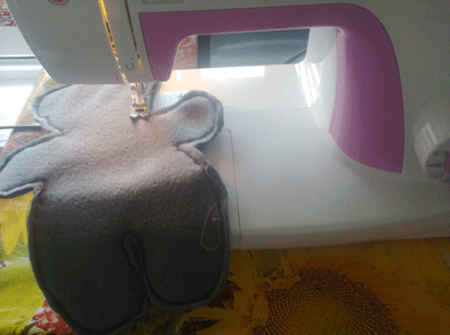
Step 3. We sew according to the estimate
but you can also carefully sew by hand.
We do not sew to the end. Do not forget to leave, in accordance with the pattern, a small hole on the side so that you can then turn the workpiece out.
We turn the bear on the front side, carefully and carefully straighten it.
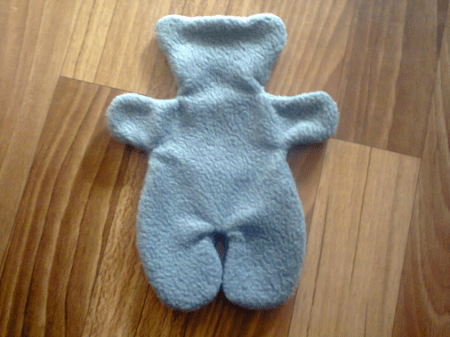
Step 4. We turn the workpiece on the front side
Then we take a synthetic winterizer and stuff a toy.
Instead of synthetic winterizer, you can use foam rubber, cotton wool, holofiber or any other filler that you have at hand.
It is very important to carefully and evenly fill the toy, try to avoid the formation of thickening or, on the contrary, too empty spaces.

Step 5. Fill the bear with padding polyester
After stuffing, sew up the remaining hole with a blind seam.

Step 6. Sew up the hole with a blind seam
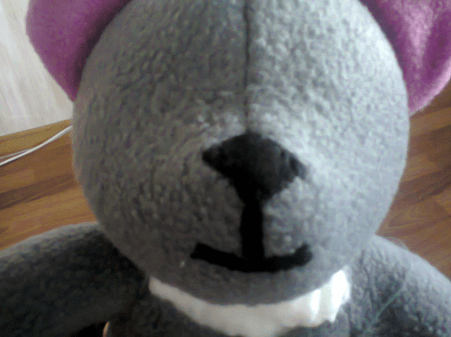
We cut out an oval from black felt - a nose, from white a very small speck on the nose, and sew or glue it with special fabric glue.
I used Moment Crystal glue.
Embroider paws with black thread.
Sew on beads - eyes and buttons.

Step 7. Sew the paws and make a face
We will tie a beautiful bow from a satin ribbon, brown the cheeks. The bear is ready!
The second bear cub is already a little more complicated.
To make it, I used this pattern and again took my favorite fleece.
You can use whatever material you like best. It can be: faux fur, velvet, wool, velor, terry cloth or even knitwear.

I took a fleece of two colors (I needed a small pink piece for the ears and legs of the bear), threads, a needle, scissors, synthetic winterizer or any other filler, two buttons or two ready-made eyes (they are sold in needlework stores).

Material for the second teddy bear
We will prepare all the necessary patterns, according to which we cut out all the details of our teddy bear.

Step 1. We make a pattern and cut out all the details
Now let's start sewing.
First we sew the head: ears, two back parts of the head, two front ones. Then we collect all three resulting elements together in accordance with the pattern.

Step 2. Sew the head
Let's get to the body.

Step 3: Assembling the Body
It turns out this preparation:

Step 4. You should get the same blank.
We sew the upper paws and sew them to the body. We also sew pink feet to the lower paws.

Step 5. Sew on the upper and lower paws
We attach the head, leaving a hole in order to stuff the toy.

Step 6. Sew on the head, leaving a hole
Fill it in evenly and carefully.
From a piece of black felt, cut out the nose and two stripes to form the muzzle and sew them on.
Step 7 Stuff the Bear and Sew on the Face
Then we sew on the eyes. Once again, we check the uniformity of the stuffing and sew up the remaining hole with a blind seam.


