Processing the neck of knitted items with knitting and crochet: description of the work. Several ways to knit a neck when knitting. Processing the neck of summer blouses with knitting needles.
Knitting the neckline is one of the most important moments in the process of creating any sweater, jacket or dress. A sloppily made, unevenly sewn or stretched neckline will ruin even a beautiful and original product. How to make it frame it, emphasizing only its advantages? We'll talk about this in today's master class! Our tips and step-by-step instructions will help you quickly and easily learn how to knit and process various types of necklines, and the finished item will always look stylish and neat.
Option one: smooth edge
This type of knitting of the neckline is universal: it is suitable both for products for children and for framing “adult” clothes.
To create it, you should knit all the cast-on loops in seven rows of k. P..
Turn the knitting inside out and carefully, not tightly, using an overlock stitch, sew the edge to the finished product.
From the wrong side of the binding it will look like this:
From the front side, the processing looks perfectly smooth.
Option two: decorative small zigzags
Another simple decorative neckband that even novice craftswomen can do.
To begin with, we make seven rows of l. P..
We do the eighth row as follows: 2 l. p.vm. l..
Then we make a yarn over, and again 2 liters. p.vm., yarn over again, and so on until the end of this row.
Having reached the purl row, all stitches of the previous row should be knitted only purl.
Now we will need another joint. as an auxiliary stitch, we cast on loops from the cast-on row.
Now the binding is bent in half lengthwise along the pattern line. After this, right sp. grab the item from the far back..
We put it on the back, which is in front.
We knit from the front sp. 2 p.vm. facial (crossed and own). This will give us a row of small cloves.
This is how the processing should look from the inside out:
Front side of the neck:
Neck tying: video master class
Option three: tying the neckline with knitting needles using binding
This processing is the most popular and ultimately gives a one-piece neck, so the binding is done with circular knitting needles.
On the side, along the neckline, we collect stitches from the row located under the edge stitch.
At the end, we pull them out with knitting needles from each subsequent stitch, but one row lower - this way we smooth out the neckline.
Having reached the horizontal part, we pull out the loops from the edge loops with knitting needles. It is important to remember that, in order to avoid deformation of the cutout, you should skip every 5th loop.
Having finished casting on stitches along the entire length, we begin knitting in any usual way. You can, for example, do this with a 1 x 1 or 2 x 2 elastic band.
Option four: separate binding (first method)
This treatment is also universal for tying the necks of products for adults and children.
Using regular knitting needles, cast on the number of sts we need, then “rib” for seven rows.
Now we compare two loops - from the binding and from the neckline, and connect them using a free kettel stitch.
We start it from the wrong side, inserting the needle and thread immediately into the second loop, then bring the needle out from top to bottom to the back side through the first loop. Next, at the bottom we bring the needle into the third stitch, and from the front side to the back side into the second and then by analogy, thus connecting the frame and the cutout on both sides.
If we do everything correctly, the processing will look like this:
Neck with kettel stitch: video master class
Option five: separate binding (second method)
Another way to tie the neck separately.
Using knitting needles, cast on the required number of stitches, then use a 2 x 2 elastic band.
Having made 7 rows in this way, we perform double knitting. We remove the first edge with knitting needles without knitting, yarn over, l. p. and so on until the end of the row.
In the next row, remove the purl stitches without knitting, always keeping the thread in front.
Having reached the yarn overs of the previous row, we knit them with facial loops.
Turn the knitting over.
We continue further: reaching the yarn overs, knitting. from l. p., remove all other p. without knitting, always keep the thread in front. Having knitted three more rows, we divide the knitting in half into 2 separate sp. Close the loops on one of the joints. in the manner described above.
We smooth out this part well and the second one, which remains with open stitches for now. We apply the parts one to the other and sew them together with a quilt stitch.
We sew the part with open loops on the wrong side using an overlock stitch.
As a result, we will end up with processing like this:
Option six: double binding
We monitor the smoothness of the lines.
After processing the part and making the seams, we cast on circular sp. loops along the edge: divide the edge into sections of 10 cm each, cast on sts at the rate of “number of sts + 3-4 sts.” Now we alternate 2 liters. p. and 2 i. p. (“elastic band” 2 x 2) or 1 l. p. and 1 and. p. (“elastic band” 1 x 1), the number of p. is a multiple of four or, respectively, two.
Having knitted the frame, we loosely close all the stitches, cut the thread, leaving a long tail. We fold the knitting in half, turn it inward and pin it with pins, sew the closed edge to the neckline.
Option seven: V-neck (first method)
We start by casting on sts, as shown in the photo below.
After casting on the loops, you can start knitting 1x1 elastic.
The height should be selected depending on the type of product.
Upon completion of work, all items should be closed like l. p.. At the cape we sew the edges together using thread and a needle.
Option eight: V-neck (second method)
We cast on the loops in the usual way, starting from the shoulder side.
We knit one row of l in the circle. p., mark the corner p.. Then we continue, alternating l. p. and i. p., there should be faces on the corners. p., if necessary, here you can add or subtract additional p..
In all rows of elastic, we remove the corner and previous stitches together, as with knit stitches. knitting, and knit the next stitch and pull the removed stitches through it..
We make the binding of the width we need and close the loops. We perform angular decreases as when fastening the loops.
Variation tenth: with binding and Italian edge
We start like double binding, but for the elastic band we knit 1 x 1, alternating l. p. and i. P..
In the last 4 pp. take sp. half a size smaller and continue. knit the neckline.
In the first of the last 4 pp. every l. We remove the item, as with facial expressions. elm., and pull the thread past the point..
I. p. as i. P..
In the words r., each and. n. we remove, as with the inside out. elm., and stretch the thread in front of the stitch..
L. p. like l. P..
Once again repeat. these two r. and fasten the last point. R..
Variation eleven: “boat” treatment with elastic band
We process the neck with an elastic band. A basic diagram of the back is made, on which we draw another line and a finishing strip, 6 cm wide. The front diagram is similar.
We knit the front and back “squares” to the finishing strip, then knit 1 x 1 or 2 x 2 elastic for 3 cm, changing the sp number. through each 2-3 r. from larger to smaller, now we change sp. from smaller number to larger number at the same intervals. We complete the plank several times. R. auxiliary n. and, without closing the last paragraph. p., remove the knitting from the back..
We do the same with the front part, then we sew them along the shoulders, fold the strip in half, baste it, then the “boat” is sewn with a quilt stitch to the wrong side of the product.
Variation twelfth: “boat” in stocking stitch
A diagram of the product is made, on which we draw a new cutout line and a 2.5 cm strip.
Upon completion of the main work, knit. 2.5 cm stocking stitch, then several. R. auxiliary thread, do not close the st, remove the work from the sp. and make the front part. The basted boat is sewn with a kettel stitch, without passing the needle to the faces. side of the product - grab only half the thickness of the thread.
Closing neck loops: video master class
We will be glad if today's lesson helps you in your work. Even loops!
Tying the product with knitting needles is an important point in completing all knitting. A sloppily knitted or poorly sewn neckline can negate all previous efforts and make the knitted item unwearable. Therefore, it is very important to correctly calculate the neck. How to do it right? You will learn about this from our article. Here is tying a neckline with knitting needles, a master class on how to design a square neckline.
Examples of calculations can be found here:
1. V-shaped neck:

2.Crew Neck:

3. Rostock:

4. Shoulder bevel:

5. Armhole:

Method 1: simple binding
This is the most famous method, performed on circular knitting needles; it allows you to make a neckline without a seam.
Use a knitting needle to cast on loops along the edge. You can make a set from the edge, but the edge loops look sloppy in the product, so We recommend casting on loops from open loops, those below the edge ones. In this case, the loops are cast on differently on the round and straight sections of the neck.
On straight sections, the knitting needle is inserted under the edge loop and the thread is pulled out.

On the rounded areas, the cutout is aligned: the loop of the top row is knitted from the loop of the bottom row.

Having made the set, they begin to knit the neck. In this case, the first row is knitted with a 1×1 elastic band, alternately knitting and purling.

Having knitted the desired height, the loops should be closed with knitting needles or a needle (for an elastic edge).
If it is necessary to make the line of the beginning of the neck more convex, the first row is cast on with purl loops, and then knitted with an elastic band, as in the first case.

Method 2: kettle
This is the most beautiful, but at the same time time-consuming method. Tying with knitting needles is done separately, the strap is sewn (pinned) on both sides of the product.
We offer another tying scheme with double binding:

Important! The rounding line should be smooth.
After processing the part and making the seams, we cast on the loops along the edge of the neckline on circular knitting needles. To do this, we divide the edge into sections of 10 centimeters, on each we cast on loops at the rate of “the number of loops plus 3-4 loops.” If we knit the binding with a 2×2 elastic band, then the number of loops is a multiple of four. And if the elastic is ordinary, 1×1, then it is a multiple of two. Having knitted double-width binding, loosely close the loops. Cut the thread, leaving a small tail. Then, folding the tape in half, turn it inside and pin it. Sew the closed edge to the neckline.
Method 3: Rectangular cutout

We knit a series of knit stitches in a circle, marking the corner loops with a thread of a different color. Then we knit by alternating knit and purl loops, making sure that the knit stitches fall on the corner loops (where necessary, you can add and subtract a loop). In all rows we remove the corner and previous loops together, as in knitting, and knit the next loop and pull the removed loops through it. Having knitted the required width of the binding, close the loops. Angular decrease should also be performed when fastening the loops.
Method 4: V-Neck Trim
This method of neck design is unlikely to ever go out of fashion. Knitting a v-shaped neckline is given in the master class:


Method 5: tying the neck with patterns
There are many options for tying the neckline and edges with patterns. We offer interesting patterns for tying edges with knitting needles below:


In order for any knitted product to have a finished look, you need to beautifully decorate its edges. This also applies to the neck any sweater, sweaters or vests. Besides the fact that it is knitted in different ways, it can be tied in several ways. If you are going to work the neckline with knitting needles, you can find a detailed description of the design of each neckline below.
You can also use a hook to decorate the cutout. But this will only be available to those who are familiar with it.
It must be said that the neckline can be:
- rectangular;
- round;
- toe (or V-shaped).
Hence, tying it can be done in different ways.
You can beautifully decorate the V-shaped neck of a summer blouse, top or light sweater using a crochet hook. With its help, beautiful lace collars are knitted. You can use the same threads you used to knit, or you can choose something summery, contrasting.
If a lace collar does not suit the style of your knitted item, you can use a crochet hook to make the edge with beautiful tubercles or an openwork picot pattern. But the easiest way for an everyday item is to crochet the edge of the product using simple single crochets, or make a double crochet stitch.
By the way, on the website pochti-vse.com.ua you will find a thousand useful little things that will help you do handicrafts.
This method is the simplest and therefore the most common. To knit the neck of the product, you will need circular knitting needles of a smaller diameter than those with which the product was knitted, and threads. In this case, it is knitted in one piece and will not need to be sewn.
Working with one knitting needle and thread, cast on loops along the edge of the product. On rounded sections of the cutout, the knitting needle should be inserted not into the edge, but into the loop underneath it. Thus, the cutout of the product is adjusted, all flaws are smoothed out or incorrectly closed loops.
The thread is picked up with a knitting needle and the resulting loop is brought to the front side of the knitting. It remains on the knitting needles, and the set continues in the same way. In order to get the same number of loops in certain areas of the neck, you need to divide its front and back parts in half and control the number of loops cast on. If this is not done, then the already knitted neck may turn out oblique, which will ruin the entire product.
If the set of loops is carried out on flat areas of knitting, then the knitting needle must be inserted under the edge and the thread pulled out. To prevent the elastic from being too large (in size) when tying the edge, you need to skip every fourth loop on even areas.
Having cast a certain number of loops, they begin to knit the collar. To tie a product using this method, a 1x1 elastic band or a 2x2 elastic band is suitable.
Having knitted the double height of the binding with the chosen knitting, the loops are hemmed using a needle on the reverse side of the knitting - from the wrong side.
There is also another way how to knit a neckline with knitting needles. To make the neckline more prominent, you need to knit the first row of cast-on stitches on the front side with purl stitches. Continue knitting now chosen elastic band.
Neck trim, knitted separately
 The method is quite complicated, but the result is worth it. If any product is treated with binding, knitted separately, it will look wonderful.
The main thing in this option is to correctly calculate the number of loops required for the binding. The work is done with a 1x1 elastic band. First, a simple elastic band is knitted - this is 2-3 cm, and then the knitting continues with a double elastic band. It's very easy to knit, that's just twice as long. This is because the elastic band is double and each row is one side of the elastic band, and not one row, as was the case with a simple elastic band. The knitting needles produce twice as many loops as when knitting regular elastic.
Three rows are knitted with a double elastic band, then the knit rows located through one are removed on one knitting needle, and the purl rows on the other. The loops from one knitting needle need to be closed and ironed, and from the other knitting needles need to be re-snapped with a thick thread, also ironed and gradually sewn one by one to the front side of the product using a quilt stitch. Work should start from the left shoulder seam.
When the front side of the neck is ready, we begin to design the back side. Using an overlock stitch, sew the closed loops of the binding to the neckline.
For those who have never designed the neckline of a product in this way, you definitely need to practice and do it just like that. The finished cutout on the product is no worse than the store-bought one. Try and you will definitely succeed.
V-neckline with knitting needles
Depending on the depth of the cutout, the method of tying it will depend. Personal wishes and preferences are also taken into account.
 A neckline tied with 1x1 elastic with an overlay will look great on both women's and men's items. If you tie such a neckline with a contrasting thread, the product will turn out more original. This combination would be appropriate for children's products.
To work, you need to cast on loops on the front side of the knitting, starting from the first loop of the cape to the left. The cast-on loops are knitted with a 1x1 elastic band until the intended height is achieved. Then they are closed, and with the help of a needle, two sides of the resulting binding beautifully stitched.
To make the neckline of the product unusual, you can use a “rice knit” pattern instead of elastic. Depending on the purpose of the knitted product, you can consider other knittings for tying.
Toe neck trim. Option No. 2
The loops are cast on in the same way as in option No. 1, only we will knit the binding in a circle. A 1x1 elastic band is suitable for this. We simply knit the first row, in the second row the central loop of the toe is removed as a knit stitch, the next one is knitted according to the pattern - knit or purl. Then the knitted loop is pulled through the removed ones. As a result three loops will make one.
This decrease is done in each row until the binding reaches the desired height. You can simply close the loops with knitting needles, or you can do this with a needle so that the edge remains elastic.
How to knit a rectangular neck or collar as in the photo
 We put on the knitting needles loops around the perimeter of the neck, knit the first row. Make marks in the corners. We knit the binding with a 1x1 elastic band; there must be knit stitches in the corners.
In each row of elastic, we remove the corner loop and the loops next to it, as in knitting. We knit the next loop, and then we pull the removed loops through it. This is how knitting is done each corner of the neck.
Having reached the desired height of the binding, close all the loops. Deductions in the corners are also made in the last row.
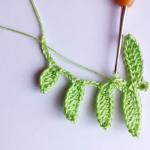
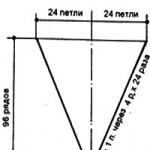
Step-by-step design of the neckline with cloves
This way you can only design a round neckline. Loops are cast on along the edge of the neckline, and seven rows are knitted in stockinette stitch. For those who have not yet memorized the names of the knittings, an explanation: in the front row there are facial loops, in the purl row there are purl loops. The following is a description of rows 8, 9 and 10:
- Row 8: knit 2 stitches together, yarn over.
- Row 9: purl all sts.
- Row 10: knit all stitches.
We knit a total of 15 rows. It is important to note that the row with yarn overs must be on the front side.
The resulting harness bends in half along the pattern line. The bottom edge is hemmed from the inside out with a needle.
Master Class. Making a neckline with a roller step by step
This collar design is suitable for the round neckline of the front and back. For work you need knitting needles and threads. The set is carried out in the traditional way on the front side of the knitting. Next, on the front side of the knitting you need to knit the front loops, and not the purl - purl. The height of such binding should be at least 5 cm. How to close the neck along the back of a jumper or other product? All the loops are closed, and the resulting fabric is twisted into the video.
This is how you can decorate the neck of a summer blouse, dress or children's demi-season items.
Below you can see an example of a neckline knitted with a roller, but crocheted.
How to tie a neckline? To tie the round neck of a sweater, you can use the following pattern.
- an empty cell is a front p.;
- circle - yarn over;
- triangle - two stitches together, knit stitch with a slant to the left.
The pattern is very simple, but the neckline tied with it looks so chic.
The following example, where the knitting of the neckline is clearly visible, is used for thick sweaters and demi-season sweaters. This collar can be knitted with knitting needles, you just need to correctly calculate the number of loops.
As can be seen from the picture and video, the loops of the front front of the sweater, which were intended for the neck, were not closed. They were preserved on a thick thread or on an auxiliary knitting needle. Thus, dialing them for the collar turned out to be (in this case) quite simple.
One of the ways to work the neck of a knitted product with knitting needles is to set loops along its edge and make a finishing strip. The appearance of the finished knitted product largely depends on how its open sections are processed. This is the armhole or bottom of the sleeve, neckline or collar flap.
One of the ways to beautifully process a neckline is a set of loops along its edge, which can be done with knitting needles or crochet. And subsequent execution on the cast-on loops of the finishing strip.
2 ways to cast on stitches for knitting the neck of a knitted product
Method 1 - knitting
You can make a set of knitting along the flying edge. Place the working thread on the wrong side of the product. Using a knitting needle in your right hand, bring a new loop from each loop of the piece to the front side and leave it on the working knitting needle.
Place the working thread behind the knitting and cast on the same number of loops in each segment. This technique will allow you to maintain symmetry in the finished part.


Method 2 - set of crochet loops
Flatten the edge from which the set of loops will be made, so that the braid of closed or edge loops is clearly visible. From the very first loop, crochet: the first loop and put it on the knitting needle.
Continue in the same way along the entire flying edge.
Feature of a set of loops along the neckline
Since the cutout has a rounded shape, it is better to carry out the work in the following sequence:
- When processing rounded lines, it is better to have a pre-prepared diagram, drawn along loops (cells). In accordance with this scheme, dial using one of the methods described above. See how to correctly calculate the decrease in stitches for the neckline.


- Remove the loops that are supposed to be decorated from the left knitting needle onto the auxiliary one. Wrap the working thread several times, but do not tighten. Transfer the stitches back to the left needle and knit them according to the pattern.
- The plank can be made in different patterns. The most common treatment for the neckline is 1 x 1 or 2 x 2 elastic. Various small openwork patterns or garter stitch can also be used. If you knit the bar with stockinette stitch, you will get a beautiful edge in the form of a roll.


- Start work on the right side. Correctly position the workpiece in front of you and determine the front and back sides.
- You can use a contrasting thread when finishing. This technique will hide the unevenness of the edge being processed, but requires special care when performing.
- To make finishing elements, use knitting needles or a hook that is a number less than the number of knitting needles used to knit the main piece.
- When knitting the finishing element, observe the tightness of the knitting of the main fabric and the edge loops. Finishing elements in a contrasting color stand out and attract attention.
/ 09.12.2018 at 19:29
Greetings, my dears. You will probably agree with me that in the life of every knitter, sooner or later there comes a moment when you want not only to knit as you used to knit, but to learn more and more new techniques in the struggle for the quality of your products. What suited you just yesterday doesn’t seem so perfect today and you want to improve something...
This is how things stand for me, in particular with the design of the neck. The question of how to knit a neckline beautifully and neatly began to worry me for a long time. There was a time when I just tied it with an elastic band. Then I tried to make it with some decorative elements so that it would harmonize with the overall appearance of the product. Here's how to this dress, For example:
Or to make it look like a false skewer. As for this children's sweater :

And from the outside it all looks beautiful and high quality. And from the inside? No, that's not it. The place where the loops rose along the edge of the neckline does not look very good from the wrong side... This means that you need to try to make sure that the edge of the neckline is hidden under the loops on both sides. So that it is hidden, like in a pocket, and the neck looks beautiful and neat not only from the outside, but also from the inside of the product. And to do this, you need to make sure that the loops along the edge of the neck rise simultaneously on both sides.
I watched on YouTube how girls suggested solving this problem by selecting loops with an auxiliary thread. But I didn’t like this method, since lifting the loops later from this thread turned out to be not so easy. And it’s not always possible to ensure that the number of loops on the outside and inside matches (but this is very important!).
And then I tried to do it differently. Instead of an auxiliary thread, use an auxiliary knitting needle. I’ll show you how I do this on a separate sample and specifically with threads of different colors so that you can see it better. If you want to try the method, I advise you to start mastering it on a small sample.
So, we need to lift the loops along the edge of the neckline. You will need 2 pairs of circular knitting needles - main circular knitting needles (the ones with which we will tie the neckline) and auxiliary circular knitting needles (much thinner than the main ones, the thinnest you have), as well as a hook. The hook should be a smooth metal one, without a thick plastic handle, so that you can easily remove the loops from it later.
We will lift the loops using a hook from the front side of the work, and from the wrong side, parallel to the edge, we place an auxiliary knitting needle and throw a thread on top of it (photo 1). We insert the hook under the edge and under the auxiliary needle so that the thread is to the right of the hook (photo 2):

Using a crochet hook, pick up the thread on the left and knit a loop. We have formed 2 loops located opposite each other - one on the hook and the other on the auxiliary needle (photo 3). We put the thread on the auxiliary knitting needle again, insert the hook in the same way and knit a loop. Now we already have 2 pairs of loops (photo 4):

We do this every time: before knitting a loop, we throw the thread onto the auxiliary knitting needle and then knit a loop from under the knitting needle. In this case, you need to ensure that the thread is wound tightly onto the auxiliary needle. The process, of course, is a little troublesome at first, but then you get the hang of it.
As soon as there are several loops on the hook, we slip them onto the main knitting needle. This is how the design turns out over time:

And also, when we throw a thread on an auxiliary knitting needle, an additional “spiral” can be wound with thread on its flexible part. You just need to periodically remove it through the other end of the knitting needle.
Over time, we will get an edge framed by pairs of loops on both sides on two pairs of ring knitting needles. Moreover, the number of loops on both sides will be exactly the same (if you did not forget to thread the thread each time before tying a loop):

If the neck has a fastener (the rows are not circular)
If the neckline has a fastener, that is, the row is not circular, then lifting the loops along the entire neckline, turn the knitting to the wrong side and first knit the loops from the main knitting needle (those that were cast on the face of the work). Now we are on the wrong side of the work. We knit the first row with facial loops (and they will go purl along the face, that is, they will imitate the appearance of a loop). Now we turn the knitting to the front side, we now have the thread on the right at the beginning of the row:

We take it and use the same thread to knit the loops of the auxiliary knitting needle with knit stitches, and so that the main knitting needle does not interfere with us, we simply move it along the fishing line.
What do we have at this stage? An imitation of a quilt stitch was laid across the face and back of the work, using thread from the same ball. And then we will knit a double (hollow) elastic band. We now have the working thread on the wrong side of the work. We position both knitting needles (main and auxiliary) so that loops can be knitted from them simultaneously:

And then like this: with the main knitting needle we will take the loops from each of the two knitting needles in turn: we knit a knit stitch from the auxiliary knitting needle, then we simply take off the loop paired with it from the main knitting needle (thread in front), and so on we alternate - we knit from one knitting needle, from We'll reshoot the other one. And now the loops of both knitting needles end up on one main knitting needle:

We knit like this until the end of the row. We knit the last pair of loops from two knitting needles together. We knitted the first row of double ribbing. We turn the knitting and knit the second row of double elastic: we alternate - we knit the loops removed in the previous row, and remove the ones knitted in the previous row (the thread is in front of the work). We purl the last 2 stitches in the second row of ribbing together to form an edge loop and join the edges.

We knit the second row of double elastic.
Then we knit 2 more rows with a double elastic band (one row on each side) and finish on the front side. We turn the knitting, and since now we need to knit on the wrong side, we knit 2 loops together with the wrong side:


If the neckline is knitted in the round
If your neckline does not have a fastener, that is, it needs to be knitted in the round, then we raise the loops in the same way. And then, if you don’t want to knit a double rib in the round, you can proceed as follows (you will need another pair of circular knitting needles of the same thickness as the main ones).