Rowan leaf crocheted pattern. Do-it-yourself rowan branch: we make our own interior decorations on the theme of nature
Let's get in touch with you?
A sprig of rowan can be useful for various situations. For example, it can turn into a brooch or a stylish decoration for a handbag, scarf or children's backpack.
Or it can be a bright addition to your new crocheted toy. For example, my autumn-winter sparrow took with him a bunch of rowan berries (crocheted, of course) to contrast with the pale feathers and warm colors of his hat and scarf.
It would seem like a trifle, but this twig greatly decorates the small, modest bird...
So, to crochet rowan we will need:
- cotton yarn Yarn Art "Violet" (250m/100g) orange and green colors
- hook No. 1.5 (or another number convenient for you)
- a little filler
- jewelry wire, diameter 0.3mm
- small brown beads
- tape (you can use green floss threads instead)
- a little patience and time
VP - air loop
St - column
CC - connecting post
Etc. – increase
Ub. – decrease
Sc – single crochet
Pssn – half double crochet
Dc - double crochet
1. Knit rowan.
1st row: knit 2 ch, knit 6 sc in the second loop from the hook. = 6st.
2nd row: (1sc., etc.)*3 = 9st.
3-4 rows: 9sc. = 9st.
insert filler into the part
Row 5: (1sc, dec)*3 = 6st.
Pull the hole, fasten and cut the thread.
The number of berries depends on how large a bunch of rowan berries you are going to knit.
2. Knit a leaf.
1. Cast on a chain of 13 ch. Starting from the second loop from the hook, knit 1dc, 1dc, 3dc, 1dc, 1dc.
2. (Cast a chain of 13 ch. Starting from the second loop from the hook, knit 1 sc, 1 hdc, 5 dc, 1 hdc, 1 dc) * repeat 3 times
3. Cast on a chain of 4 ch. Starting from the second loop from the hook, knit 3 sc. Make 1cc. under a single crochet of a leaf on the opposite side. Cast on a chain of 10 ch. Starting from the second loop from the hook, knit 1dc, 1dc, 5dc, 1dc, 1dc. Make 1cc. under the last single crochet of the leaf on the opposite side (at the same point as before knitting this leaf).

4. (Knit 3 sc along the chain. Cast on a chain of 10 ch. Starting from the second loop from the hook, knit 1 sc, 1 hdc, 5 dc, 1 hdc, 1 dc. Make 1 dc under the last single crochet of the leaf on the opposite side (on that the same point as before knitting this leaf).)* repeat 2 times.
5. Knit 3sc. along the chain. Make 1cc. under the last single crochet of the leaf on the opposite side. Dial 7vp. Starting from the second loop from the hook, knit 1dc, 1dc, 3dc, 1dc, 1dc. Make 1cc. under the last single crochet of the leaf on the opposite side (at the same point as before knitting this leaf).
6. 5sc. along the chain.
7. Tie the leaf “crawfish step”.

Crochet bunch of rowan - assembly
1. Cut a piece of wire approximately 5-6cm long. Place the bead on the wire and bend it in half. Thread this wire into the center of the berry (put it on like a bead).


3. Form branches, collecting 2-4 berries in bunches (we twist their wires together). We wrap the small wires around the long one.

4. Wrap 2-3 cm of wire after the bead with tape to cover the place where the short wires are attached.

5. Collect bunches into one bunch. Do not twist the wire until the end.

6. Place the leaf on the wire and then twist it to the end.

7. Wrap tape around the branch before and after the leaf. Secure the horse tape with glue for reliability.

So the crocheted bunch of rowan berries is ready!

It can be larger if you tie more berries. But for my sparrow there was no need for more.
If this master class was useful to you, share the link to it on your social network - it’s not difficult for you, but it’s nice for me :-)
If you have any questions, ask them in the comments.
I wish you pleasant creativity and see you again (subscribe to the blog news so as not to miss a new master class - the subscription form is in the side column on the right)!
A knitted panel will decorate your favorite relaxation area.
MATERIALS: twine for knitting a plate, hook No. 2.5; remnants of green and brown yarn for a branch, hook No. 1.6; remnants of red yarn in pink shades.
Size: plate diameter 25cm.
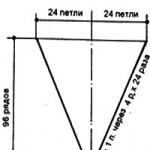
PERFORMANCE: The plate is knitted according to diagram 1.
Tie 10 ch. and close the connection in a circle. Art.
1 p.: 3 ch. and 15 tbsp. s n. to the circumference of the circle, close the r. conn. Art.
2 p.: 3 ch, 1 tbsp. with n., 2 v.p., * 2 tbsp. with n., 2 v.p. * - repeat 7 times and close r. conn. Art. (st. knit above the st. of the previous row). Starting from the 3rd row, knit according to ex., adding from * to * 1 tbsp. s n. and 1 v.p.
Branch: Knitted with brown thread. Hook No. 1.25 according to diagram 2. Tie 40 ch. branches + 1 more ch, 1 tbsp. b/n in the 3rd p. chain. and another 6 tbsp. b/n above v.p. flail Start doing the 1st rowan brush: 5 ch. - base of the brush + 5 v.p. - branch “a” + 3 v.p. for the leg of the berry.
Knit a berry leg: 1 v.p. lifting and 2 tbsp. b/n, then complete the connection. Art. over the last 5th p. of twig a” and perform the 2nd leg for the berry, then the 3rd, 4th and 5th. On the remaining 4 sts of branches “a”, knit 1 tbsp. b/n, complete the connection art. on the 5th chain. brushes of rowan and then alternately perform 2 more branches of V. Thus, tying 3 branches along the remaining 4 v.p. tie the brushes 4 tbsp. b/n. From the 1st bunch of rowan to the beginning of the 2nd, knit 20 stitches along the chain. b/n, make the 2nd brush of 5 branches “A” with 5 legs for berries each. Having knitted the 2nd tassel, knit on the remaining ch. branches of Art. b/n.
Leaves: fasten the green thread to the branch in the places marked in c. 2 and knit according to cx. 3. For the leaf stem, tie 20 chain stitches. and knit sheet “B” according to diagram 4. Then knit 2 connections along the chain. Art. and complete sheet “B” on cx. 4, go to the other side and complete sheet “G” according to diagram. 4, repeat knitting leaves “B” and “D” 2 more times, knitting 3 connections along the chain between pairs of leaves. Art.
Berries: cut strips of paper 5-7 mm wide and 100 mm long, twist each strip into tubes and use a needle with red thread of different shades to wrap them, while simultaneously sewing twigs “A” to the stem. On the other side of the berry, embroider a “star” with brown thread.

Size: 23.5x30cm.
Knitted from “Iris” type threads with a 0.75 crochet hook. It took approx. to form the berries. 20gr. cotton thread with lurex, approx. 25gr. green thread, a little
raspberry and brown, and very few melange pinks. There are some black ones with metanite on the mesh. You will also need a piece of black calico for the background and some PVA glue.
Having already had a frame, stretch a strong white fabric, such as chintz, onto a piece of polystyrene foam and secure it on 4 sides with tailor’s needles. Draw the outlines of the future picture. Skip 2cm. and draw another outline. These 2cm. will be for tightening on the back side of the picture. Next, we knit the elements of the berries according to the pattern into girth and leaves.

- interesting selection for the site!!!
- How to crochet an elastic band and patterns of varying difficulty for training

The leaves can be of other sizes if you change the number of chain stitches. We form branches from bottom to top using a chain of air loops + single crochets, connecting the leaves with a connecting loop as we knit. Place the branches face down on the canvas of the future painting, pin them with needles, and then secure them to the fabric with a basting. In the same way, form rowan bunches from the “berries”.
You can change the arrangement of elements and colors at your discretion. This is exactly the case when you can use the remainder of the thread, which the knitter always has. Next, along the outer contour, we pierce a needle into each corner and tighten a round elastic band with a diameter of 3 mm. along the contour. Baste the elastic tightly to the fabric. When making an irregular grid, an elastic band is helpful. The elastic band should be smaller than the outline itself in order to sufficiently tighten the picture to the reverse side. At the end of the work, if it is not enough, then lace it additionally. Now let's start making an irregular grid over the free space.
Carefully separate the work from the fabric, turn it on the face, secure it with needles and make the tails of the bunches by tying them with chain loops and a chain of chain stitches + single crochets. We stretch our work onto the pre-pasted format with background fabric and insert a frame. Ready! Good luck!
In autumn, nature is full of bright colors, which makes anyone incredibly happy. Every autumn there are several bright days, when the sun is still warm, the leaves are glowing with red-orange colors, and the mountain ash is waving its red tassels. Today we will talk about how to make a rowan branch quickly and easily with your own hands.
We sculpt a rowan branch with our own hands from plasticine in MK
Plasticine is an excellent material for modeling enthusiasts. Children especially love to sculpt something from plasticine. Making a rowan brush from plasticine with your own hands is very simple; for this we need very little material:
- Plasticine black, black, orange, green, brown;
- Scalpel or plasticine knife;
- Modeling board;
Instead of a board, the basis can be a sheet of colored cardboard. You need to take a piece of brown plasticine and roll it into a rod of arbitrary length, up to half a centimeter thick, this will be the basis for the twig. We cut the workpiece into any number of branches and branches, you can make 2-4 pieces, on one side we make an end converging into a thin line. Then we mold the blanks in the shape of a twig onto the base.
Let's start sculpting rowan berries. We tear the orange plasticine into small pieces and roll into pea-sized balls, about 10 pieces. You need to glue a small black or brown dot to each berry. To make the berries look like real ones, you need to make small cuts or scratches at each point.
We sculpt the leaves from green and yellow plasticine, you can also add a few orange ones. The leaves should not be too large; after you cut out several leaves from a block of plasticine, you should give them a design; this can be done perfectly with a toothpick
The finished composition should be similar to the one shown in the photo.

Crochet rowan with diagrams and job description

The leaf is knitted according to this pattern.
- Cast on 10 air loops (VP) in the chain.
- Next we knit in the back loop, insert the hook into the second loop and pull it out.
- Yarn over.
- Insert the hook into the next back half loop and pull out the loop. There will be two loops on the hook.
- Yarn over to the end of the chain and pull out a loop in the next back half loop. There should be a total of 18 loops on the hook.
- We close the loops. We make a yarn over. Pull the yarn through the first three loops in one go.
- After yarn over, pull the thread through the next three loops again. Repeat until there are 4 loops left on the hook.
- Yarn over three loops; there will now be 2 loops on the hook.
- Yarn over and pull the thread through the remaining 2 loops, the row is closed, and 1 loop remains on the hook.
- After this, the second side is knitted, the knitting is turned to the other side and knitted on the opposite side with a chain of air loops, each time inserting the hook into the remaining half-loop
- Insert the hook into the second loop from it, pull it out and yarn over.
- Pull out the next loop, leaving four loops on the hook.
- Repeat until the end of the chain.
- Closing the loops. Yarn over Pull the thread through three loops at a time. Repeat yarn over and pull through. Until there are four loops left.
- Yarn over Pull through three loops, two remain.
- Yarn over, pull through two.
The second side of the leaf is also ready.
There is also a scheme for berries:
- Cast on a chain of 4 chain stitches, then close into a SS circle.
- 8 single crochets in a ring. Do not close the circular row SS.
- Continue sc over completed row.
- Insert the hook into the ring each time.
- In total, perform 44 single crochets in the round.
- Single crochets will be placed on top of each other, tie tightly and form a berry.
- Break the thread and unroll the work. The wrong side of the knitting is the front side for the berry.
By making several berries and leaves in this way, you can form a crocheted composition.
Let's look at another simple option - a sprig of rowan from beads
For lovers of bead weaving, there is also an option for a rowan branch.
For this we need small green beads, cutting, red-pink beads, brown beads, cutting. We will weave on a base of copper wire.
The first step is to make a rowan tassel. To do this, we collect branches of any length brown, and at the tip a red-pink bead is secured with a brown bead. You need to make about 12 of these berries. Several rowan trees can be attached to one branch.
- 1 piece;
2-4. 2 pieces each;
5-7. 3 pieces each;
8-10. 4 pieces each;
11-13. 5 pieces each;
14-16. 4 pieces each;
17-19. 3 pieces each;
20-22. 2 pieces;
- 1 piece.
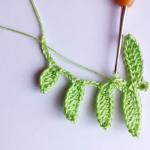
Each branch has 13 leaves. The general view of the composition is shown in the photo.

We learned how to make a rowan sprig using three different needlework techniques. As you can see, this is not difficult to do. This craft will be a rather colorful decoration for your room. We also invite you to watch a short video collection on how to make a sprig of rowan quickly and easily with your own hands
Video selection on the topic of the article
Crochet rowan: decorate crocheted hats
This master class is presented in step-by-step photo format only for leaves and berries. There is no description for the cap.
Difficulty level: average
Yarn:
For leaves- Coast Eldorado Crochet Cotton No. 6, 50 grams = 175 meters, color - Melange (yellow-orange-brown).
For berries- Coast Eldorado Crochet Cotton No. 12, 50 grams = 285 meters, color - red.
Additionally, black and brown were used for the twigs and stamens.
Hooks: For leaves - 1.75 mm; for berries - 1.5 mm.
Dimensions:
leaf- 3 cm long, 1.5 cm wide.
Berry- 1 cm in diameter.
These elements are made using the freeform technique.
Standard terms for hook are used.
Legend:
Air loop (AP)
Connecting post (CC)
Single crochet (SC)
leaf
| Dial a chain of 10 VPs |
 |
 |
|
|
And pull out the loop |
 |
 |
|
|
Insert the hook into the next back half loop and pull up a loop. |
 |
| Work (yarn over and pull a loop from each back half loop) to the end of the chain. There should be 18 loops on the hook. |
 |
|
We begin to close the loops. |
 |
|
Pull the yarn through the first 3 loops at once |
 |
 |
|
| Pull the yarn through the next 3 loops at once |
 |
 |
|
 |
|
The first side of the leaf is ready. |
 |
| Turn the knitting and work on the opposite side of the VP chain. Each time, insert the hook into the remaining half-loop. Insert the hook into the 2nd loop from the hook |
 |
| Pull out the loop |
 |
| Yarn over |
 |
| Pull through next loop = 4 loops on hook | |
| Continue working in the same way until the end of the chain = 18 loops on the hook. |
 |
| We begin to close the loops. Yarn over |
 |
| Pull the yarn through the first 3 loops in one go |
 |
| Yarn over |
 |
|
Pull yarn through next 3 stitches in one go |
 |
| Repeat this operation (yarn over, pull the thread through the next 3 loops) until there are 4 loops left on the hook |
 |
| Yarn over, pull yarn through next 3 loops. There will be 2 loops left on the hook. |
 |
| Yarn over and pull the yarn through the remaining 2 loops on the hook, thereby completing the row. There is 1 loop on the hook. The second side of the leaf is also ready |
 |
| Turn the knitting back to the right side. Insert hook into nearest loop and sl st to secure. |
 |
| Break the thread and fasten. |
 |
Berry
|
Perform a chain of 4 VPs and close them into a SS ring. |
 |
| Continue sc over the completed row without chaining off the sl st rows. |
 |
|
Insert the hook into the ring each time. |
 |
|
Work a total of 44 sc in the round. |
 |
|
Break the thread and fasten. |
 |
|
Turn the work around. |
 |
The applique can be sewn onto the finished product, in which case it will be necessary to embroider the branch trunks at random, or assembled into a separate composition as desired.