Master class “Candy bowl made from napkins. Unusual crafts from napkins - step-by-step do-it-yourself master class Manufacturing manual
A beautifully set and decorated table always pleases the eye and stimulates the appetite. But setting a children's table should be special - a large number of bright colors are welcome here, as well as the use of a variety of hand-made elements. This is exactly what a paper napkin candy bowl is, which anyone can make by following the proposed step-by-step master class.
To work, you will need a paper napkin, the size of which will determine the size of the candy bowl, as well as a glass.

First, let's completely unfold our napkin and begin to bend all its corners towards the center. As a result, the blank of the future candy bowl takes the shape of a square.

We repeat the same steps (bend the corners towards the center), our square has become smaller.


Let's do the same thing again.
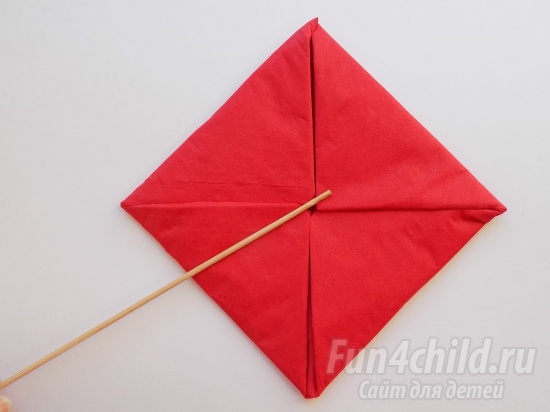
Now the blank of the future candy bowl needs to be turned over to the other side.

Again, bend all the corners towards the center. As a result of all these actions, our square has become even smaller and denser.

Now let’s proceed directly to the formation of the candy bowl. To do this, turn our workpiece over and place it at the bottom of the glass. This is what we will need to form the walls of the candy dish. To do this, take the very top corners and carefully pull them down.

Then we take the next corners and straighten them in the same way. Finally, you need to bend the last 4 corners down. This is how we formed the bottom of our candy bowl and its walls.

Remove the craft from the glass, the paper napkin candy bowl is ready.
Nothing is impossible for a creative person. He is able to make a craft with his own hands from just about anything. There are enough ideas for such needlework. The main thing is to choose a material that you like. Models made from napkins turn out to be very original. What can be done, how to work with napkins, where to use such a craft - this will be discussed in the article.
Craft materials
Materials for crafts can be divided into two groups.
The first will include specially prepared material, which can be purchased in the form of various sets designed for making crafts with your own hands. This could be a set of polymer clay, a set of floss threads, a set for embroidery with beads, a set of elastic bands for weaving and many others. This group also includes items that we buy in stores for household purposes, but they can also be used for making crafts. These are matches, napkins, cotton swabs and pads, coffee beans, flour, cereals, etc.
The second group includes the so-called things that are at hand, for which you don’t have to go to the store specifically, moreover, they go to waste: empty bottles, shells, milk cartons, egg honeycombs, juice boxes , various plastics, etc.
In this article we will look at what can be done and how to apply such a craft.
Rules for working with napkins
As a craft material, paper napkins are valued for their softness, pliability, beauty and variety. They are easy to bend and do not stain the skin. They are available and inexpensive.
It is necessary to name some rules when working on crafts from napkins: what can be done, how to fold, what fastening materials to use.
- When folding and bending the napkin, you need to apply a minimum of effort, since it is a very fragile material and can tear under strong pressure.
- When working with napkins, you need to make sure that your hands and the table surface are dry, as water can cause the napkin to get wet.
- When working with napkins, your hands must be clean, otherwise the material will quickly get dirty.
- Origami is most often made from napkins, so no fastening materials are required.
Following these rules, let's try to make a lotus from napkins.
Paper flower
A real table decoration will be made from paper napkins. Made using this technology, it can perform several functions on the holiday table. This wonderful decoration combines a vase for sweets and a set of originally designed napkins, which are used for their intended purpose.

To make it, we will take the following materials and tools:
- napkins of three colors;
- scissors;
- threads;
- fork;
- awl.
Let's start making the flower. It will consist of napkins folded as follows. Take a napkin, fold it in half diagonally, then at a right angle along the folded side. Next, we open it and bring the sides towards the center line. Turn over and bend the small triangles up. Turn over and fold in half. Thus, we will prepare five triangles of the same color for the base and twenty for the petals.
We take an awl and make two punctures along the short side. Using a thread and a needle, we fasten the base first along the lower puncture, then along the upper one, and carefully straighten the petal to make a boat.
We insert napkins of a different color, which will act as petals, into the place where the two lower ones are joined at the base with the long side. We help them get into place with a fork. The second row of petals is applied in a checkerboard pattern. There will be four rows in total.
The finished lotus from napkins can be used as a vase for sweets.
For this craft you will need napkins of two colors, cardboard, scissors, and glue.
First, let's prepare a number template by cutting it out of cardboard with scissors.
Next, let's start making an element from a napkin. To do this, unfold the paper napkin and fold it diagonally. Now, very carefully, so that you get an even thin tube, roll it diagonally, leaving 4 cm. From one end we begin to twist it into a tight ring. We turn the tip up and hide it behind the wall. We very carefully turn out the remaining triangles on top so that the bud is inside them. The result was a very beautiful unblown rose.
On the cardboard in the middle we glue the base of a number from such roses, for example, one. On the sides we decorate it with roses of a different color.

Using this technology, you can make any numbers from napkins.
Unusual tree
This craft can be used as a decorative element in the hallway or living room. The tree is bright, original, and does not require watering or lighting.
First, let's make a wood element. To do this, cut the napkin into four squares and fold one on top of the other. It is better to take a three-layer napkin, so the element will turn out more magnificent. Then we fasten it in the middle with a stapler, cut out a circle, make small cuts around the perimeter and begin to bend it inward layer by layer. We leave the last layer unbent and carefully open the flower from the middle. It turns out to be a very lush elegant element.
We take a decorated stick, attach a ball to it and secure the entire structure with plaster in a flower pot. All that remains is to decorate the ball with the prepared elements, and the napkin tree is ready.
You can also lay out a tree made of napkins on a holiday table. Then they can be used for their intended purpose.

Crafts from napkins
Crafts made from napkins are unusual and festive. We have looked at what can be done in great detail.
You can also decorate the table with a fluffy New Year tree. Roses and carnations in a vase will also look very elegant. The heart applique is very easy to make and romantic. Bright birds and butterflies can be hung on the branches of the Christmas tree. A white swan will look very elegant on a holiday table.

Crafting from paper napkins is very easy. They are inexpensive and always on hand. Using basic elements, you can create something unique and original. Such crafts look very good on the holiday table and can surprise guests with them.
A bouquet of sweets is a wonderful gift; it is a real surprise that will always be unique. It can be given as a gift for a birthday, March 8, or any other holiday. Today I want to suggest making a bouquet of candies using colored paper napkins. This method is very fast and requires minimal costs.
To create one flower we will need:
- 2 or more paper napkins (the more napkins, the more magnificent the flower);
- candies (it is better to use small candies);
- one wooden skewer;
- green corrugated paper;
- scissors;
- tape or thread;
- file or wrapping paper;
- stapler;
- pen or pencil;
- glue (pencil glue or PVA).

So let's get started!
Step 1. Cover the candy with a small piece of file and attach it with thread or tape to the blunt end of the skewer (no need to pierce the candy!).

Step 2. Take 2 napkins. You need to fold them in half, now on the outer part of the napkin we draw the outline of our flower, as shown in the photo.

Step 3. Cut it out.

Step 4. Open the cut out flower and fix it almost in the middle with a stapler so that the flower does not fall apart.

Step 5. For reliability, you can tape the candy to the skewer with tape. Then we thread the cut out flower to the base of the candy.
Step 6. To prevent our napkin from falling, it must be secured with a small piece of tape.

Step 7. We begin to lift one layer at a time so that the flower becomes lush. As a result, we should have 8 layers (if we use 2 napkins).


Step 9. Cut a long strip of 1 cm wide from green crepe paper and a small square of 5 x 5 cm.

Step 10. Cut out a quatrefoil from the square.

Step 11. Using glue, wrap the skewer with a long pre-prepared strip.
Not all needlewomen know that you can decorate the interior or prepare an inexpensive gift for your family or close friends using ordinary paper napkins. Decorations for the holiday table, New Year's toys, snowflakes for the Christmas tree, origami animals, Christmas decoupage and other decor are just a small part of what can be made from this simple material. Detailed and step-by-step master classes, as well as visual photos presented in this article will help you quickly and correctly make crafts from napkins with your own hands. Your children can also participate in this exciting process, since a common craft activity not only brings the family closer together, but also contributes to the development of the creative abilities of your kids.
Rainbow monogram
Once you've redecorated your children's room, as a finishing touch, you can place your child's monogram on the wall, decorated with a rainbow pattern made from paper napkins. For this we will need the following materials:
- Simple pencil;
- Napkins in seven colors of the rainbow;
- Thick cardboard;
- Loop cord;
- Glue - moment or PVA;
- Ruler and scissors;
- Additional decor for decoration - leaves, ladybugs, flowers, butterflies.
Step by step guide
- The first step is to make a sketch of the monogram from the intertwined initial letters of the last name and first name.
- Next, the image is transferred on an enlarged scale using the technique of cells onto an A4 sheet. You can do this part of the work on a computer.
- After carefully cutting out the letters, a monogram template is created, which is traced onto cardboard and cut out.
- On the front side, markings are made from top to bottom into seven equal intervals. It is better to mark the strips at an angle, although a straight, arced or zigzag arrangement is allowed.
- Multi-colored napkins should be cut into squares, the size of which is selected independently, based on the desired size of the resulting balls when rolling.
- First, red balls are made and glued to the top strip, then orange ones to the next strip, and so on until the end, in accordance with the order of the colors in the rainbow. That is, the next one will be yellow, then green, blue, indigo and violet.
- After drying the monogram under a stack of books, all that remains is to glue a loop to it on the reverse side, add decor and hang the decoration on the wall.

A bright and beautiful rainbow monogram made from napkins will be an excellent addition to the interior, and the kids themselves will certainly be happy with such a decoration.


Beautiful flowers
It’s easy to make a festive decoration for a table or gift box in the form of flowers from paper napkins. For work we will need the following materials:
- Scissors;
- Glue stick or PVA glue;
- Strong thread;
- A tube that acts as a stem if you plan to make a bouquet.
Step-by-step master class
- The napkin is folded into an accordion with the width of each fold equal to one centimeter. To make the product neat, it is advisable to make markings on both sides.
- Without unfolding the accordion, you should place its flat side on the table and fold it in half to find the middle. Along this line, the folded napkin is tied with a strong thread.
- The free ends of the accordion are rounded off using scissors.
- All that remains is to fluff the flower and glue the folds together to create a spectacular corrugated circle.


You can fasten together several flowers of different sizes. The resulting terry version will look great as a decoration on a box, photo frame or in a bouquet, especially if you attach the flower to an improvised stem - a tube.
Spectacular Rose
Crafts made from napkins in the shape of roses are very beautiful and unusual. To make them yourself you will need:
- Single-layer napkins;
- Scissors;
- Decorative ribbon or thread;
- Soft wire;
Manufacturing Guide
- One of the napkins needs to be cut into four equal parts. One of them is folded in half and twisted along the short side into a loose cylinder. On one side it is pulled together with a thread. This will be the base of the flower core.
- The remaining squares are cut diagonally. The right corner of the resulting triangle is bent, and the remaining ends need to be wrapped loosely around the core, securing the resulting petal with thread. Their number may vary and is determined during the work.
- To make a bouquet, stems are made. This can be thick copper wire wrapped in a strip of napkin of the desired color. You can attach a piece of paper during the wrapping process.


Rose is a symbol of love and perfection. This is an excellent decorative item that can become an original decoration for your interior.
flower composition
An interesting flower arrangement can be made from several multi-layer napkins. List of required materials:
- Scissors;
- Stapler;
- The base, which can be used as a foam ball or newspaper crumpled into a ball, wrapped with threads to fix the shape.
- PVA glue.
Do it yourself
- A circle with a diameter of approximately 14 cm is cut out of a napkin. This size may vary depending on the dimensions of the napkin and the size of the flowers being made. To give the flower greater expressiveness, the edges of the circle are outlined with a bright felt-tip pen in a color contrasting with the general background.
- Exactly in the middle, the cut out circle is fastened with a stapler with two staples crosswise.
- Now the top layer separates and rises, folding in a beautiful zigzag. All subsequent layers are laid out in the same way.
- Having made about 16 flowers, you can attach them to the base with glue, placing them over the entire surface of the ball, close to each other.
- Next, you can place green paper leaves between the flowers, this will give the composition a more impressive look.
- All that remains is to put the glued ball in a beautiful flowerpot or vase, making it a full-fledged decorative element of the interior.


Such a composition can be made not only from paper napkins, but also from other suitable material, such as corrugated paper or colored felt.
Refined spring vase
Crafts made from napkins are not limited to just flowers. From this wonderful material you can make or decorate almost anything, for example, a decorative flower vase. To make an unusual vase, you will need to stock up on the following materials:
- Napkins with elegant plant or animal patterns;
- Can – tin for coffee or juice;
- Acrylic white paint and putty;
- PVA glue;
- Stack;
- Brushes.
detailed instructions
- The jar is coated with paint on both sides, and then dried in a well-ventilated area.
- The top thin layer, where the pattern is located, is carefully peeled off the napkin. The fragments of the picture needed for the composition are cut off with your fingers. It is not advisable to cut them with scissors, as in this case the edge will be too smooth.
- The next one-color layer is glued to the outside of the prepared jar, tearing off small pieces according to the papier-mâché principle.
- Acrylic putty is applied in uneven strokes along the upper cut of the can, masking it.
- Next, on one side of the future vase, from top to bottom, a trunk and branches are formed using putty using a stack.
- The adhesive composition is diluted from one and a half parts PVA glue and one part water. Fragments with leaves, birds, butterflies, forest animals are placed on the surface of the jar in accordance with the compositional design and are carefully coated on top with a brush with an adhesive solution. During gluing, it is important to apply movements from the center of the fragment to the edges, carefully but carefully smoothing it, trying not to tear it.
- Having covered the entire surface of the vase, paint the neck to match the main background. To paint the branches and trunk, use brown paint to fill in all the irregularities.
- After the trunk has dried, decorative protrusions are highlighted with golden paint using a sponge. To do this, the sponge is lightly pressed against the desired area of the improvised trunk without indentation. A slight golden effect can be created over the entire surface of the vase.

A DIY vase is a beautiful and affordable accessory that allows you to transform your interior.
To secure the decor, the dried surface is coated with colorless varnish. Bouquets of wild and garden flowers will look great in such a vase.
Unusual vase with three-dimensional ornament
If you urgently need a tall vase for your favorite flowers, but the store does not have products that match the interior of the room, you can easily make it from scrap materials, spending a small amount of money. Materials for making a vase:
- PVA glue;
- Can-opener;
- Scissors;
- Paper towels that match the color of the wallpaper;
- Three or four cans of peas;
- Napkins of a contrasting color to the main background;
- A simple pencil.
Step-by-step master class
- First, empty jars are prepared. One remains with the bottom, and for the rest it is cut out.
- Next, the prepared jars are placed one inside the other, forming the desired height of the future vase.
- Using PVA glue, the structure is covered with paper towels. You will need at least three layers.
- After complete drying, a drawing is applied with a simple pencil. It is more convenient to make it from large geometric shapes that make up an interesting abstract composition. It can also be hearts, flowers, butterflies in accordance with your own creative ideas.
- From squares cut from napkins, balls are formed, which are filled with the depicted figures by gluing.

Crafts from napkins for interior decoration (photo)
Crafts made from napkins can also serve as an excellent decor for any festive event. Decorating a wall with ordinary paper napkins and creating a cheerful atmosphere is not difficult even for beginners in this matter. For this we need:
- Napkins;
- Scissors;
- Stapler;
- PVA glue;
- Fishing line or thread.
Making decor from napkins
- We take napkins in the desired color scheme. It is better to combine several colors, so the festive decor will turn out more elegant.
- We unfold the folded napkin completely and from this position we begin to fold it into an accordion. You need to fold it so that each new bend coincides with the previous one; the width of the folded bend (strip) should be approximately 2-3 cm.
- After the entire napkin has been folded, it needs to be thoroughly ironed with your hand on both sides so that each wrinkle is clearly defined.
- Carefully fold the napkin in half along the marked center. In total we will need three such accordions, so we are making two more.
- Next, take scissors and round the edge of the folded napkin. We try to do this so that the edges of the accordion do not move and the cut is even. You can cut napkins in different variations so that the finished products differ from each other.
- Taking the edges of the napkin, we bring the upper and lower parts together to form a semicircle, fix it with a stapler or PVA glue. We proceed in a similar way with each accordion.
- All that remains is to glue all our blanks together. As a result, we should get a corrugated circle resembling a flower.
- Finished products are hung on a thread or glued to the wall with double-sided tape.


You can make crafts from napkins with your own hands in various ways, but we have brought you the most popular and simple ones that anyone can handle.
Irina Averina
I bring to your attention the production candy bowls. To begin with, I did it myself. The girl showed them they liked it. We figured out what we could use it for. Many ideas arose, some of them them: game "Shop" to lay out candies and put it on display in the store. For a gift to your friends.
When we started making it and our boys became interested, they liked it (the process itself).
That's how we got this one candy bowl.
My master class is shown.
For work we need:
Paper napkin, good mood.

unfold napkin and begin to bend each corner towards the center napkins.


After this, we bend all four corners to the center again.


This is the part we got, bend all four corners again, we succeeded in bending the corners to the center three times.
After this, we turn the part over and bend all four corners to the center again.

To make the next step more convenient, I used a small glass (upside down) Place our part on the bottom of this glass and bend the corners. You need to bend it carefully so as not to tear it. napkin. Children need help.

After this, bend the corners again.

Once again

Turn it over and place the vase on the table.

Publications on the topic:
Hello, dear colleagues! I suggest you and your children make such interesting flowers. This is a wonderful decoration for the interior. Materials.
Greetings to all guests who visited my page! It's no secret that all women have a sweet tooth. Let's make a candy bowl together as a gift. For.
Hello, dear colleagues! It is pleasant to note that even in such a remote place as ours you can get acquainted with the best practices of preschool institutions.
H4]We will need: napkins of different colors; threads to match the color of the napkins and of course patience! 1. We fold the napkins in two pieces - one.
Master class “Christmas tree made from napkins”. For a master class on an unusual Christmas tree made from napkins, I will need: Whatman paper, napkins of two colors (dark.
I would like to offer you a master class on making an unusual painting. For work we will need: - Napkins selected by color.
Master class “Doll from napkins” For the Maslenitsa holiday, you can make a ritual doll from paper napkins with your children. For the manufacture of.