Postcard in the shape of a chocolate bar. Chocolate card - a stylish compliment for all occasions
It's always nice to give gifts to family and friends. You always want to please and surprise them at any celebration. This could be an anniversary, birthday, wedding or anniversary, birth of a baby, christening and others. We often think twice before choosing the right gift, so that it matches and is really needed by this person.
Giving some trinket is very banal and unreasonable, but making an original gift with your own hands is quite sincere and romantic. For example, a postcard in the shape of a box will look very good; such a postcard is also called a chocolate box. We discussed it in one of the previous articles.
This card is not only a greeting card, but you can also put in it your favorite chocolate that the person you want to congratulate loves. The chocolate maker can also be given as an ordinary gift, just to thank someone. The original packaging will remain a long-lasting memory, and the chocolate will decorate your tea party and give you a sweet sensation.

In order to make a chocolate postcard using the scrap technique, we will need the following materials.
- A sheet of cardboard of the desired color;
- Several sheets of scrap paper;
- Figured hole punch;
- Paper napkin;
- Template diagram for making a workpiece;
- Ribbons, half beads, flowers, cutting with stamped text;
- Double-sided tape, pencil, ruler, PVA glue, rubber band.
Master class on creating a chocolate bowl using scrapbooking technique
So let's get started! We make a cardboard template for a postcard: to do this, we measure the required dimensions and get a template like this with a pocket, as shown in the photo below.

All the necessary materials that we need can be seen in the photograph.

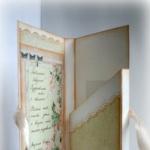
We fold our template, bend all the invisible lines, and get something like this on the outside.

And, accordingly, inside.

Using this template, applying it to a clean thick sheet of whatman paper or cardboard, we measure the dimensions and cut out the very base of our chocolate bowl. We make bending lines using a ruler and a special stick, more details can be seen in the photo.

Then we cut two pieces of about 9-10 cm of satin ribbon and glue these pieces approximately in the center on the top and bottom base with double-sided tape. We see more details in the photo.

We cut out the top blanks from scrap paper for the top, back inner parts of the chocolate bowl, as well as for the pocket. We make the edges curly using a hole punch. After we have completely glued our main workpiece with PVA glue, we glue all the pieces of scrap paper onto double-sided tape, as shown in the picture below.

We fix the inside corners of the pocket with double-sided tape, as shown below.

Now we use a glue gun to glue the entire decor to our liking. First, glue a paper napkin with tape or PVA glue approximately in the center to the front of the chocolate bowl, then a die-cut with a congratulatory text, and finally glue half beads and paper flowers. For beauty, you can sew a metal pendant onto one edge of the ribbon. The product is ready, put a chocolate bar in it, tie a beautiful bow and the gift is ready!
Video tutorials for beginners
Now is the time to see how the professionals work. We present video lessons with professional MKs.
Now, for sure, after watching the video lessons, you can do everything! We also recommend it. Give gifts, please your loved ones and be happy!
When you are afraid of making a mistake with a gift, you can always replace it with a banknote. What if you add a chocolate bar to it? The result will be a wonderful gift that will be received with gratitude and surprise, no matter who it is intended for: a child, a colleague or a school teacher. Among needlewomen, the so-called chocolate boxes (i.e., envelopes for chocolate and, perhaps, a pocket for a bill) are becoming popular, which, of course, can be made with your own hands and decorated to your liking. Our master class contains detailed instructions for beginners, which will allow you to master the basics of creating a chocolate bowl decorated with corrugated paper flowers tied with ribbons.
To make a chocolate maker with your own hands, you needed:
pearl-colored designer cardboard;
regular cardboard of golden color;
unbleached or pearl-colored corrugated paper;
mother-of-pearl white or yellowish buttons;
white or pearl-colored satin ribbons - 0.5 and 1 cm wide;
sewing needle;
sewing thread of unbleached color;
PVA glue;
hot silicone glue in a gun;
double-sided bulk and non-bulk tape;
a simple pencil;
stationery knife;
breadboard knife;
figured hole punch (in our case, with a heart);
a knitting needle or toothpick for making folds;
self-healing cutting mat.

How to make a template for a chocolate bowl with your own hands
The dimensions of the chocolate bowl will differ in each case. If you plan to give a banknote and a chocolate bar, the size of the finished chocolate box according to our master class will determine the larger item. This is a chocolate bar.
I have designer cardboard already folded to fit postcards, but I advise you to take an A4 sheet (as a rule, the chocolate bar easily fits with the long part of the wrapper to the narrow part of the sheet, and the width of the chocolate bar is laid out three times along the long part of the sheet).
Look at the template shown in the photo.

Let's look at the template. We look at the rectangle “pocket fabric for chocolate”. This is our size of the chocolate bar plus 0.5-1 cm in width and height so that the chocolate bar fits freely into the chocolate bowl. Please note: the parts per volume are exactly equal to the thickness of the chocolate bar. It shouldn't be loose.
The pocket fabric for bills and chocolates are the same. But the width of the body of each pocket may differ: I made a deeper pocket for the chocolate bar. However, other than the visual effect, it doesn't really matter. Because our handmade chocolate bowl will be tied with ribbons, and the cutouts of the pockets will face the center, and both the money and the tied chocolate will have no chance of falling out of the chocolate bowl.
In addition to the large rectangle from a sheet of designer cardboard, we also cut out two ends of the pocket for the chocolate bar. The shaded parts are places for gluing; they can be of any width. Attention - to the rectangle inside the end. Its narrow part is equal to the thickness of the chocolate bar, and its long part is equal to the body of the chocolate pocket (the narrow part of the rectangle on the right).
If your sheet of designer cardboard does not fit the described template, we make a chocolate bowl from two sheets; We simply cut the template along any of the folds and add the missing fragment from the second sheet, while adding a 0.5-1 cm strip for gluing for applying glue.
DIY chocolate card: making the base
We cut out a rectangle of the required size (see the chocolate bowl template above) and mark the fold lines with a pencil. We press the folds under the ruler from the wrong side of the designer cardboard using a skewer, toothpick or a not very sharp knitting needle. The main thing is not to break the cardboard!

Don't forget to wipe the pencil lines with an eraser.
We don’t remove the ruler—we use it to bend our cardboard. This measure will allow you to avoid creases, the folds will turn out beautiful and neat on both sides.

How to make a chocolate bowl with your own hands: interior decoration
Along the slices of the rectangle, i.e. along the body of two pockets, we go through a figured hole punch. You can use curly scissors or cover the cut with paper decorative tape. At first I made the hearts at a considerable distance from each other, but then I added more holes.


We cut out two rectangles from golden cardboard, each side of which is 1 cm smaller than the dimensions of the fabric of each pocket. For example, the pocket fabric for a chocolate bar or a banknote is 10x20 cm. Then the golden rectangles will have dimensions of 9x19 cm (i.e. 10-1=9 and 20-1=19 cm).

Rectangles along the wrong side can be marked with a pencil, but it is better to cut them out using a stationery knife under a ruler: then the cuts will be clearer, and along the edge of the rectangle we will avoid the annoying formation of small creases that can appear when cutting with scissors.
One of the rectangles will be used to decorate the front side, and we will need the second to decorate the backing for the bill. Moreover, I have a place where parts of designer cardboard are glued together, which I really wanted to disguise.
In two corners of one golden rectangle I made two holes with a heart hole punch.
We glue it with hearts to the center of the chocolate bowl on the canvas of the money pocket so that on each side around the golden rectangle there is a white border 0.5 cm wide. For gluing, I recommend PVA glue, after which the workpiece is placed under a press for 10 minutes - for better setting.

We must take care of the ties now, when decorating the inside of the chocolate box, otherwise later, when the pockets are ready, threading the ribbon will be extremely inconvenient.
We cut the ribbon of sufficient length: it is necessary that the ribbon clasps the chocolate bowl along its narrow part and can be freely tied to a bow. It is recommended to iron the tape before use.

So, from the height of the pocket fabric, we subtract the width of the prepared tape and divide the resulting number by two. If the height of the pocket fabric is 21 cm, and the width of the tape is 1 cm, then (21-1): 2 = 10 cm. We measure 10 cm from the top of the pocket fabric for the chocolate bar and make two vertical cuts with a stationery knife 1 wide -1.2 cm. We thread the tape into these holes, as shown in the photo.

We move the tape so that its center falls approximately on the inner fold of the chocolate bowl.
Let's return to the formation of pockets.
Using a template, cut out the ends of the pocket from designer cardboard - 2 pcs. We make the folds.

Cut off the corners.

On the front side of the cardboard on the wings, which are shaded on the template, we apply two narrow strips of double-sided tape. In this case, it is convenient to use it.

We remove the protective paper from one part of each end and glue a chocolate pocket to each side of the body.

We remove the protective paper from one end and seal the pocket, carefully aligning the fold of the end part with the cut of the fabric. We do the same for the second side. We get a good pocket.

We return to the bill pocket. Apply a thin strip of PVA glue to the upper and lower narrow parts of the body of the money pocket and leave the pocket under pressure.
The inside is ready.
DIY chocolate maker using scrapbooking technique: elements of exterior decoration
Let's move on to the most interesting part: the exterior decoration of the chocolate bowl. We have already cut out the golden rectangle - and now we will glue it with PVA or double-sided tape. Please note: we pull the tying tape along the outer part so that it is in the right place. And glue the golden rectangle onto it.

We cut out another rectangle from the same designer cardboard. Each side should be 1 cm smaller than the golden rectangle. We will paste the white rectangle on voluminous double-sided tape to give volume to the cover of the chocolate box.


Congratulation
We make a congratulatory sign: we write words of congratulations on a small rectangle of designer cardboard. From the remains of golden cardboard we cut out a rectangle, each side of which is 1 cm larger than that of a light congratulatory sign.

We are putting them aside for now: we will return to them at the final stage of making the chocolate maker.
Flowers
We cut out small rectangles from corrugated paper, approximately 7x5 cm (for each flower - one such rectangle).

Pay attention to the direction in which the paper is compressed: this is important.

We cut along the perimeter, cutting off the folds and rounding the narrow part of the rectangle into a petal.


We take the opposite parts of each oval and twist it in the center so that we get two petals.

Now we take three such pairs and sew them into a flower with a regular sewing needle. This requires some skill, so prepare a little more cut paper than you really need for the card: you will be able to choose the most successful flowers.

We do not cut the thread: another 2-3 stitches are used to sew the button into the center of the paper flower. After this, we bring the needle to the wrong side of the flower, make a knot and cut the thread.

For the chocolate card I needed 3 flowers.

Leaflets: from ribbon and “cutting”
As you can see, I have two types of leaves on the chocolate bowl. For the first one, I cut narrow white ribbon into small lengths so that I could fold them into loops. I secured the edge of the loop with thread—literally a couple of stitches.

From the remains of golden cardboard, I cut out two rectangles, right on which, on the wrong side, I drew branches with leaves by hand.

It is convenient to cut them with a breadboard knife. If you don’t have such a knife, you can use nail scissors.

These are the leaves I got.

DIY paper chocolate maker: cover assembly
Warm up the glue gun. At this time, we determine the location of the finished elements of our chocolate maker.

The bottom layer will be twigs. We put two drops of hot glue and embed our branches in them.

Then we put one large blot in the place of one of the flowers. We quickly insert the leaf loops from the ribbon into this blot and the flowers themselves on top. We need to work quickly. We repeat the same for the other two leaves. It seems everything worked out.

I also placed the congratulatory tag on silicone glue: firstly, the gun was already warmed up anyway, and secondly, additional volume in this place would not hurt. I placed the gold backing under the corner, and the sign directly.

The handmade chocolate maker according to our master class is ready.


But if there is no time left to buy chocolate, a gift of money will help out. We’ve already told you once that we hope this article will help you present a truly beautiful gift.
Eva Casio specially for the site
A small sign of attention can sometimes lift your mood for a long time and make a person smile. And if you attach a sweet gift to this sign of attention, then a positive charge of long-lasting action is simply guaranteed!
For those who have a sweet tooth, I suggest making a cute chocolate bowl with pockets for tea or coffee. Such a gift can be given to work colleagues, educators or teachers, or a loved one with the words: “This is a small gift for a short break” or “Just for tea.” In any case, the person will be pleased.

To make such a chocolate box you will need: cardboard (can be colored or any decorative one), decorative paper for scrapbooking (you can use regular office paper and print various patterns on it on a color printer), glue stick, ruler, scissors, various materials for decoration (rhinestones) , beads, feathers, artificial/paper flowers, lace, etc.), a chocolate bar and three individually wrapped tea bags. By the way, if you don’t have sheets of cardboard at hand, an office binder is perfect.


The base of the chocolate maker is a cardboard rectangle 22 cm wide and 17-18 cm high. In the middle of the rectangle, draw vertical lines with a pencil at a distance of 2 cm and bend the rectangle inward along them. You should end up with something like a cover. Then we start making pockets for chocolate and tea.

For a chocolate pocket, cut out a rectangle measuring 10*12 cm from cardboard, make two folds 1 cm wide on three sides (sides and bottom). Make cuts on the folds (see picture) and glue the side folds to the bottom ones.


For tea pockets, cut three rectangles, each 14 cm high and 9 cm wide. We bend the edges, retreating 1 cm. Then we divide the rectangle into 2 parts (6 and 8 cm each) and fold it. We round off the upper edges for the most part, and cut off centimeter folds from the lower (smaller) part. Glue the bottom part to the folds from the top part - the pocket is ready.


We decorate our pockets and the base of the chocolate box with decorative paper (lace, cut-outs, drawings) as your imagination dictates (or the photo below). Then we glue our pockets to the base: on one side we glue a pocket for chocolate from the bottom, on the other - three pockets for tea (they need to be glued one on top of the other, starting from the top).

We finally decorate the chocolate bowl both inside and outside, if desired, glue ribbon ties (they stick well with double-sided tape).

.jpg)


Such a chocolate maker can not only be a pleasant little gift, but can also easily replace a money envelope for a celebration if you put not tea in your tea pockets, but a rolled up bill.

Dare, create - do something nice for yourself and those around you!
Hi all!
Today I will finally fulfill my promise and tell you how I made this chocolate maker:
However, the object of our attention will be the interior design. I have already said and I want to repeat again: the idea of such a design does not belong to me, but to a talented person unknown to me, who posted a photo of his creation on the Internet. Here I will show and tell you how I made a chocolate bowl with such pockets.

For work we will need cardboard, scrap paper, glue, cutting and creasing tools. I do not mention decorations here, because the decor of the outer part of the chocolate bowl will not be included in the master class. But what else will not hurt you when working with its “insides” is a real chocolate bar and tea bags :) I will tell you here all the parameters of my pockets, but keep in mind that they are tested only on a certain type of chocolate and tea :)
So, let's start preparing the parts for our chocolate maker.
For its base, cut out a 17x22 cm rectangle from cardboard and crease it in the middle (at a distance of 10 and 12 cm from the edge).

The second detail is the future pocket for chocolate. It starts with a 10x12 cm cardboard rectangle. We make folds on the rectangle, as shown in the photo. The distance between adjacent lines is 1 cm. We crease the long side on both sides, and the short side on one side.

And one more type of parts for which we need creasing. These are future pockets for tea bags. We take rectangles measuring 8.8x14 cm. We bend along the long sides on both edges at a distance of 1 cm from the edge. We also make a fold line across, dividing the 14 cm side into 6 and 8 cm.

The creasing tool can be put aside. Now we have to make several cuts. Let's transform the chocolate pocket like this (I think you can easily do this by comparing two photos)

We cut the remaining punched squares on one side and turn them into “ears”:

Then we simply bend our part along all the fold lines -

... and it will fold itself into a pocket like this. We glue the “ears” to the “bottom” of the pocket, and we also glue the transverse strip along the edges.
What you see in the photo below is the back view of the pocket. We will then glue it to the base using these folded edges.

Now let's take care of the tea pockets. From our blanks we cut out such a part (we cut off the edges of the shorter half)

We bend it and we get this nice pocket. I rounded the corners of the valves with a special hole punch.

Glue the front side to the valves. We repeat the entire procedure with two other pockets :)

That, in fact, is all the difficulty:) all that remains is to glue the pockets to the base (previously covered with scrap paper). Don't forget to try on the chocolate and bags :)
Most people want to give their loved ones something special and want the gift to be remembered for a long time. You can always give money, but it won't surprise you. It’s another matter if you add a beautifully decorated chocolate bar with tea to it. Almost everyone loves chocolate very much and will be happy with such a gift, especially if you give it for the New Year.
A chocolate box is an envelope in which chocolate or a pocket for banknotes is packed. Such an interesting product can be made to your taste and with any color.
Now we will look in detail at the basics of making a chocolate bowl, which is decorated with corrugated paper flowers tied with ribbons. Which tools You will need to create a chocolate maker:

Gallery: DIY chocolate maker (25 photos)


How to make a chocolate bowl with your own hands
 The size of the chocolate bowl varies due to many factors that are determined during operation. Take a sheet of A4 and find template for work and study the sizes.
Then let's get started creating the basis: Cut out a rectangle of the required size and mark the fold lines with a pencil. Take a ruler and press the folds from the wrong side of the designer cardboard using your knitting needle, but be careful not to tear the cardboard.
Then we erase the lines that we drew with a pencil, we do not remove the ruler, we continue to bend the cardboard with its help. This measure helps to avoid creases; the box and folds will come out nice and even on both sides.
Now let's move on to the interior decoration. Draw along the cuts of the rectangle figured hole punch or you can use curly scissors and decorative tape. First, we make hearts at a certain distance from each other, after that we add more holes.

We cut out two rectangles from cardboard with a golden tint, each part is 1 cm smaller than the dimensions of the canvas of each pocket. For example, the pocket fabric for bills and chocolates is 10x20 cm.
The rectangles that are on the wrong side can be marked with a pencil and cut out using a stationery knife and a ruler. In this case, the cuts will be clear and even; if you choose simple scissors, creases may form.
We will take one of the rectangles to decorate the front side, and we will need the second to decorate the backing for the money.
In the two corners of the rectangle with a golden tint, we make two holes using a heart hole punch. We glue it with hearts in the center of the chocolate bowl onto the bill paper so that on each side of the rectangle there is a white border with the width we need. To glue everything together, it is better to use PVA glue.
After all these actions place the workpiece under the press for ten minutes for good rolling.
More you need to take care of the ties in advance, otherwise it will be difficult to thread the ribbon later. We cut the ribbon to the required length, then make sure that the ribbon wraps around the chocolate bowl along its narrow part and can be freely tied into a bow (before work, you need to iron the ribbon).
 We make cuts according to the diagram and thread the tape through the holes. We move the ribbon so that its center falls on the inner fold of the chocolate bowl.
Let's move on to creating pockets again.
Using the template, we cut out two ends from cardboard, make bends and cut off the corners. We apply two strips of tape to the front side of the cardboard wings, remove special paper from each part of the end and glue a chocolate pocket to each side of the body.
We pull off the protective paper from one end and seal the pocket, and do the same with the other side. Let's move on to the banknote pocket: apply a small strip of PVA glue to the top and bottom of the money pocket and leave the pocket under pressure. That's it, the inside is ready.
DIY chocolate maker scrapbooking, master class
 This unique technique, which is needed to create the correct external finishing of the elements. After we have made a golden rectangle, we glue it with PVA to the desired surface. Then we cut out another rectangle and stick it on a large piece of tape to increase the volume of the cover of our chocolate box.
Scrapbooking technique not very popular, but very simple. In the end, you can choose any packaging to your taste, design it beautifully and pack it.
The most common chocolate bowls

Conclusion

DIY chocolate maker: photo


Similar articles
 How to teach a child to say letters What causes incorrect pronunciation
 Women's lace-up boots without heels: models, fashionable combinations and recommendations What to wear with blue lace-up boots
 Chocolate card - a stylish compliment for all occasions
 How to choose the perfect coat: stylist's advice