DIY handmade puffs. Master class with photos and diagrams
The decor of clothing in the form of folds arranged in rows is called puffs. The word “bouffe” itself, translated from the French “bouffer”, means to puff up.
In the 18th century, women were madly in love with dresses decorated with puffs. Initially, evening dresses and festive costumes made from expensive fabrics, such as velvet or silk, were decorated with such decor. Puffs were often decorated with beads. The result was real splendor, consisting of volumes, shapes and patterns that gave the outfits a truly royal chic.
Dear seamstresses made the puffs with their own hands for these brilliant outfits exclusively according to individual orders and only by hand.
How to make puffs with your own hands
The appearance of hand-made bouquets can be original and varied to suit every taste. The most popular honeycombs are in the shape of diamonds, rectangles and squares.
Of course, the creation of which will require professional skill and handicraft talent. However, there are simple schemes that allow you to independently add such decorations to clothes, such as “waffles”, which, by the way, are back in fashion today.
Hand puffs in the shape of diamonds and squares
Diamond puffs can be made from any type of fabric. The material consumption for making the trim is twice or three times more than the finished finish - it is determined by the type of puff, the depth of the folds and the type of material.
In this article I want to present one of the basic schemes for classic waffles.
The manual bouffant pattern is very simple. First, markings are made on paper, which is then transferred to the fabric from the wrong side.
To form a diamond-shaped puffed finish, mark the honeycomb locations on the back of the fabric - they must be located in a certain order.
Start by drawing a grid. Honeycomb buffs are marked using a grid of dotted lines. Place the dots at a distance of, for example, 4 cm from each other and 4 cm between rows. Connect the points together with straight segments according to a checkerboard pattern - these are the finishing connection lines.
Buffer assembly After this, the fabric is basted, and it is captured only at the points marked in the diagram.
At the starting point of the first puff, place a bartack, then insert a needle into the end point of the line and pull the fabric together. It is important to make a high-quality fastening - to do this, stick a needle into the fabric and wrap it with thread twice.
Attach the lining to the wrong side of the trim, then the honeycomb puffs will not warp and the folds will not move.
Scheme for honeycomb buffers

Assembled honeycomb buffs

Ready-made honeycomb buffs
Puffs with buttons
To make this unusual type of puff, small, fairly durable plastic circles or buttons with a diameter of 6-8 mm are used.
On the wrong side of the fabric, mark the pattern of hand puffs using dots arranged in a checkerboard pattern. The distance between the points depends on the properties of the fabric and model.

Around each designated point, draw a circle with a diameter twice the size of the circle or button. Place a series of small hand stitches around the circumference, place a button in the middle and pull the thread. Finally, secure the stitching.
After this, carefully pull the thread and pull the material together so that an even “accordion” appears. Then turn the fabric right side out and fasten the resulting edges of the fabric in a checkerboard pattern. If desired, they can be decorated with beads at the same time.
I decided to find out what it is puffs? After looking at a bunch of material, I found out that puffs are called drapery or, more simply, various beautiful folds in the fabric. If translated literally from French, the word bouffer means “to swell” :)
It turns out that you can decorate a lot of things using puffs! Pillows, bedspreads, curtains and even clothes!


Marking and assembling buffs
Puffs are sewn mainly by hand according to special patterns. The fabric consumption for assembling the puff will vary depending on the pattern. It is recommended to take fabrics approximately 2 times larger than the area of the area with the puffs in finished form.
In order to accurately and correctly assemble the puff, it is better to transfer the design or marking directly onto the fabric. It is better to do this with a marking marker so that you can easily remove the marks later.

Collect puff from the wrong side means making all seams inside out. In this case, it’s not so scary if the markings remain or if the seams are imperfect in some places.

If the bouffant is assembled from the front side, then you have to be extremely careful! All seams must be perfect; beads or seed beads can be sewn into the joints.
As an example, I will give a step-by-step assembly of the “Flowers” buffet.


Then from the collected flowers you can sew, for example, a pillow! Isn't it beautiful?

Types of buff assembly
Now watch the video and learn a lot of interesting things about the existing types of puff assembly.
Master Class

Manufacturing diagram.
Making puffs begins with marking the fabric of the product. Having determined the type and location of the puffs, apply markings to the fabric. I offer my own version of applying the marking scheme to the fabric. Transfer the pattern you like onto paper, for example, into a checkered pattern, in order to scale the size of the puff. If the buff element turns out to be too large or, on the contrary, small, it is easier to increase or decrease it in cells. On the resulting paper diagram, pierce the stitching points with thread, for example, with a sharpened pencil, placing household items under the paper. sponge The result was a sheet with a row of holes. Lay the fabric of the future product on something soft, for example, a sofa armrest. Place the sheet on the fabric, pin it in the corners so that it does not move while working. Insert pins with bright tips into the holes. 
Hold the pins and carefully remove the sheet.

An even row of pins with bright heads will remain on the fabric, along which it will be easy to make markings for future puffs, for example, with a marker if the fabric is thick, with a ballpoint pen, etc. Chalk and soap are not suitable, because... will be erased during work.

The pattern can also be transferred to fabric by simply laying the fabric out on a table and placing dots along the holes.
I recommend trying to sew several puff elements on a test fabric in order to determine the size of the elements and the amount of fabric ().
The fabric consumption for puffs is usually twice the area of the area with the puffs in finished form. Depending on the pattern, the puffs are marked on the front or back side of the fabric so that traces of the markings can then be removed. The dots are connected with strong threads to match the fabric. In my opinion, it is easier to assemble puffs that are made from the wrong side. The main thing here is not to leave punctures on the face, and it’s not scary if traces of markings remain. If you are assembling “front” puffs, sew beads at the points connecting the points, if, of course, they fit there according to the model. And further. To avoid confusion, mark not only the points, but also the directed lines connecting them. The scale of marking depends on the scale of the product. To understand what you need, make a mockup. Clothes, curtains, sofa pillows - wherever you use puffs - it will be chic! Fabrics preferable are plain pile or silk.
Puffs "braided"
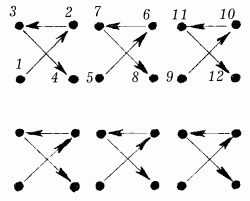
The puffs are assembled on a strong thread, and the needle is inserted and removed so that the point is in the middle.


Then the thread is pulled so tightly that the resulting folds stand, but they can be moved. Each two ends of the thread are tied with a knot. The next puncture is made under the starting point.


The puffs shown in the picture are made from several zigzag embroidered rows.
And again the thread is pulled so tightly that the resulting folds stand, but they can be moved. Each two ends of the thread are tied with a knot.


Repeat the previous steps and continue working all the way down the row.
The threads forming the puffs will lie in a zig-zag pattern.


The beginning of the second row will look like this. All subsequent actions are similar to the previous row.

Type of insert: back and face in finished form:


(Source: beloshveika.by)


The point indicated by the arrow is the contraction point.


Buffets "Waffles"


Buffs "Waves"

Puffs “Flower”


Buffs "Squares"

manufacturing scheme:


The white pillow is a "wave" (wrong side) manufacturing scheme:

Floral (from the face)

Variation of floral

Waffle (from the face)

Basket (wrong side)

We decorate a sweatshirt with puffs
Manufacturing scheme:


Drapery on fabric in the form of beautiful folds is called puffs. Puffs are lush, voluminous folds in fabric that are laid in a certain way. With their help, the canvas is transformed into a completely new and original material. They are often used to decorate various parts of clothing, sleeves, hems or sides of skirts, dresses, as well as textiles - pillows, bedspreads, curtains and even furniture.
Folding technique
Thanks to a simple technique, puffs look original and beautiful on fabric. The stitches secure the fabric and create voluminous folds. The technique is performed according to the diagrams. At first it seems that they are complicated, but in fact the patterns are simple and are quite suitable for beginners who love needlework.
To make stitches and folds of figured puffs, dots are placed in parallel rows on the wrong side of the fabric at a distance equidistant from each other.
The rows with dots should run parallel to the weft and warp threads of the fabric, then the finished gathers will be smooth and beautiful.
Marking and assembling the puffs is done manually; marking is best done with a special marker, which can be used to draw on the fabric in order to easily remove the markings at the end. Fabric consumption depends on the pattern; it is better to take fabric twice the size of the area on which the finished folds will be located.
The marking can be on the back or front of the material, it depends on the pattern of the puff.
Suitable materials include silk, pile, and thick gabardine. If you do it on the front side, you need to be careful. The seams in this case must be perfect. You can sew beads or seed beads at the connection points; if the finish is in harmony with the design, then it will turn out more original. Schemes can be marked not only with dots, you can mark the direction of the line so as not to get confused. The scale of marking will depend on the area of the product; it is better to make a layout.
For example, the “Flowers” drawing looks like this; the photo shows the step-by-step technique.
DIY puffs for beginners: step-by-step instructions
For assembly you need to use a strong thread, its color should match the tone of the material. The needle must be inserted and removed so that the point remains in the middle.
Next, you need to pull the thread tightly so that the folds “stand” and at the same time they can be moved to the center. Each two ends of the thread are tied into a strong knot. Then the next puncture is made under the starting point. The rows are made zigzag. The thread is tightened again and knots are made.
The beginning of the second row is shown in the picture, the next steps are the same as in the first row. This is what you get on the back and front sides in finished form.
Assembly diagrams for making puffs with your own hands, various options
For example, you can make a pillow with a Braided pattern in the following way:
- The points are marked from the inside out, the seams are also made from this side;
- Each line is sewn from left to right, secured with knots at the end. If the fabric is thin, the distance between the points should be 1.5 cm, if dense, then 2 cm;
- 1st row: connect points 1 and 2 with a small tack (a few stitches will be enough), then connect 3 and 4 points, without needing to tighten points 2 and 3;
- 2nd row: Do as shown in the diagram, connect the dots to make a chess move relative to the connections of the dots in the top row.
Handmade buffalo pillows, stylish and beautiful interior decor
Interior decor plays an important role in the design of a room, adding style, grace, beauty, romance, and individuality to any room. Handmade decorative pillows are a real art. They will decorate any sofa in the living room, bed in the bedroom, armchair, chair, and such products will definitely not be found anywhere else. They look impressive, stylish and beautiful.
Puff pillows can be made from any fabric and with different patterns, you just need to be patient and have the necessary tools (thread, needle, scissors). An example of a pillow with a “Chess” pattern. The scheme is simple, the drawing is original and beautiful.
Take a thick, plain fabric that doesn’t wrinkle, it could be gabardine for curtains. Make a square with dimensions of 52x52 cm, add 1 cm allowances on all sides. From the inside, mark lines, 5 and 2.5 cm, alternating them. The result should be 7 squares of 5 cm and 6 strips of 2.5 cm.
Puffs - voluminous beautiful folds on fabric - are gaining popularity among needlewomen. And this is not surprising, because they are so beautiful! With their help, fabric can be transformed and even the most plain thing can become a work of art, especially if the pattern is made in the shape of a heart. In addition, making puffs with your own hands is not at all as difficult as it seems.
The word “bouffer” itself is French and is translated as “to swell.” Puffs are used to decorate any textile product. You can see beautiful puffs on curtains, on a dress or skirt, on pillows and bedspreads, and on bags. Even furniture can be decorated with their help.


On the Internet you can find many videos and photos with explanations, as well as various master classes on how to make such beauty yourself.
Fabric selection

In fact, your choice of fabric is almost unlimited; puffs can be made on any fabric. However, it is worth following some tips.
In terms of color, it is best to give preference to plain fabrics or with a small repeating pattern (polka dots, for example). The fabric should be dense and drape well, otherwise the puffs on it will look unattractive. Satin, velvet, silk, gabardine, curtain fabrics and others fit this description perfectly.

The amount of fabric depends on the size of the product, however, remember that you should always take extra. For puffs, you will need more fabric than for regular products, so feel free to multiply the length of the product by at least 1.5, or even 2.

What we need:
- As stated above, you will need a diagram;
- Ruler;
- Needle and thread;
- Scissors;
- Chalk or marker for marking;
- Textile.
A small nuance: it is best to select the threads as closely as possible to the color of the fabric, since they should not be visible on the finished product.
Execution technique

The technique of making buffs is quite simple, and the result looks amazing. The main tool in making buffs is diagrams; without them you won’t succeed. Schemes can be found on the Internet, in magazines for needlewomen. And if you are already quite good at needlework, you can try to come up with your own pattern.
When you see the diagram for the first time, you will probably think that something complicated awaits you. But this opinion is wrong: patterns for puffs, especially basic ones, are suitable for beginners.

The stitches are made on the wrong side of the fabric, the rows running parallel to each other.
Marking and assembling puffs on fabric is almost always done by hand. It is very convenient to mark the pattern on the future product with a special marker, which in the end will be perfectly removed from the fabric.
The implementation of the scheme begins with drawing up a grid on paper and transferring it to fabric.

You can assemble or sew a puff from the wrong side or from the front side. In the first option, it is not necessary to remove the markings, and the seams may not be perfectly even in places. But in the case of sewing on the front side, you need to be extremely careful. Any awkward movement can ruin the entire look of the product. Beads or other small decorative elements can be sewn into the seam junctions.
Variety of options
There are a huge variety of patterns for making puffs on fabric. And knowledgeable needlewomen often invent something new and original, so keeping up with all possible schemes is unrealistic. Let's look at the main ones.
The most popular puff pattern is “braided”. The seams in it are made from the wrong side, so it’s okay if the first time it turns out a little imperfect.

First, mark the thread connection points according to your chosen pattern on the wrong side of the fabric. Then, after threading the needle, begin stitching from left to right, tying knots at the end.
On thin fabric, the distance between the points should not be large, but on thick fabric, you can increase it slightly.
In the first row, connect 1 and 2 points, then 3 and 4. Do not connect 2 and 3. In the second row, do it as shown in the diagram - in a checkerboard pattern in relation to the first row. And so on.

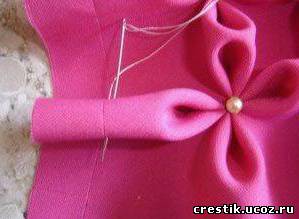
The next pattern is “floral”, in which the seams will be from the face, therefore, when choosing such a pattern, you should immediately get ready for serious work and try not to be distracted from the process.


We also mark the mesh on the fabric. Then we sew the first square, as shown in the photo below.

Tighten and secure with a few stitches.


You can add a bead to make the bouffant flower look prettier.

There is also this type of puff - “wave”, sewn from the inside out.

The pattern is very similar to the “braided” one, only this time the rows are not staggered, but are located equally under each other.

The next scheme, which will certainly not leave young girls indifferent, is the “heart”.