How to make a rug out of the tops of old boots. What can be done with a boot before throwing it away
What a pity it is to throw away your favorite old boots. I have an idea how to prolong their life for the benefit of myself or for the child. For this, boots with a long shaft are suitable, natural fur or other good insulation. From them we will cut out excellent insoles for the new winter shoes, which will give more thermal insulation and will keep your feet warm.
1. So, we have old boots that are no longer suitable for wearing, but they still have a long shaft with warm fur intact. We cut off the tops, and discard the lower part of the boots.

2. If the tops of the boots are high enough, then you can make insoles for yourself, for your husband, and for your child. Estimate how many insoles are enough. Take the shoes that you will insulate, remove the native insoles from it and attach them to the cut-off tops. Trace around with chalk or pencil for easy cutting.
In this case, use not only the fur lining itself, but also the top layer - the skin. This will give the insoles extra density and help retain more heat.


3. As a result, we will get such insoles. In the center of the photo - native insoles from boots, which we will insulate, along the edges - insoles cut from the tops. A pair of fur and a pair of leather.

4. Then you need to glue the leather and fur insoles together. Then glue them to the insoles of the boots. Glue so that the fur remains on top. Feet will be softer and more comfortable. The resulting insoles should not be glued inside the boot, because sometimes they need to be removed, dried or ventilated.

Light boots are so beautiful, but unfortunately their age is very short. Either you stumble with your toe somewhere, or I don’t know where the scratch came from ...
Here was an idea how to update such boots and extend their life. The best thing about this makeover is that the boots can be worn, and not just indoors or on stage.
So we have light boots that need updating.

First you need to carefully degrease the surface of our boots. We use alcohol for this. In case of its absence, you can use a dishwashing detergent. This is practically the most important stage of our work. If you cheat at this stage, then the painting will quickly fly off. Therefore, we are not lazy at the preparation stage.

It is clear that in the process of wearing the boots received scuffs and scratches, so we cover them entirely with a thin layer of paint. I advise you to take white acrylic silver from paint and add literally half a teaspoon to it acrylic paint bronze color. Mix the paint thoroughly and cover the entire surface of the boots with a thin layer. (Recommendation for paint color: it can be any, but it must be a little darker than the color of the boots, otherwise it will be difficult to paint over scuffs and scratches. You will have to apply a thicker layer of paint on these places, and this does not look nice). The paint on the boots should be applied with small strokes with a brush, in different directions.


We let the boot dry and already admire the result.

 Now let's start decorating. To do this, you can use a ready-made acrylic outline, but you can also use the white acrylic silver that we already have. We put the paint in a bottle, which has a nozzle with a thin tip. (You can use a tube of oxidizing agent from hair dye).
Well, everything, now it all depends on your mood and desire.


The soles and heels also need updating. Carefully paint them with black acrylic paint.

Now let's decorate. We do this with small touches, a washcloth painted in bronze.

Heels and soles must be varnished. It is better to cover in two layers, after waiting for the drying time between layers. (Recommendation for choosing a varnish: it is better to use acrylic parquet, it dries quickly and holds well).


Here are all your favorite boots back in use.

Get inspired and create! Good luck!!!
Thanks for the idea Olga Tomash!
If it is a pity to throw away old boots, because they are made of excellent quality material, it is worth finding a new use for them. Here are a few interesting ideas what can be made from old leather boots.
Stylish clutch or small handbag

If the problem is only in a cracked sole, you can sew a chic clutch or a stylish small handbag from the leather part of the boots.
From our master class you will learn
With the help of decorative elements such as rhinestones, beads, bows, brooches, you can decorate the product and mask small scuffs or holes.Warm insoles

photo: sdelaysam-svoimirukami.ru; makezine.com
Autumn and winter boots usually with natural fur, tsigei or wool insulation. Therefore, from an old pair, you can make insoles for other shoes. To do this, you need to stand on a piece of paper and circle the contour of the right and left legs with a felt-tip pen. Then transfer the patterns of the insoles to the skin from the boots and cut them out.
Light slippers or flip flops

Old boots make great slippers and slippers.
Small corners

To do this, cut out the details of the desired shape and size, sew them together to store coins and other small things, which are full in every home.
flower pots

Lovers of decorative flowers and plants can use old boots to make original and durable planters.
Stylish chair cover

To update one chair, you will need two boots, the tops of which must be cut and sewn together. Then cut out of them a part slightly larger than the seat of a chair or stool and fix the cover.
Exquisite bracelet
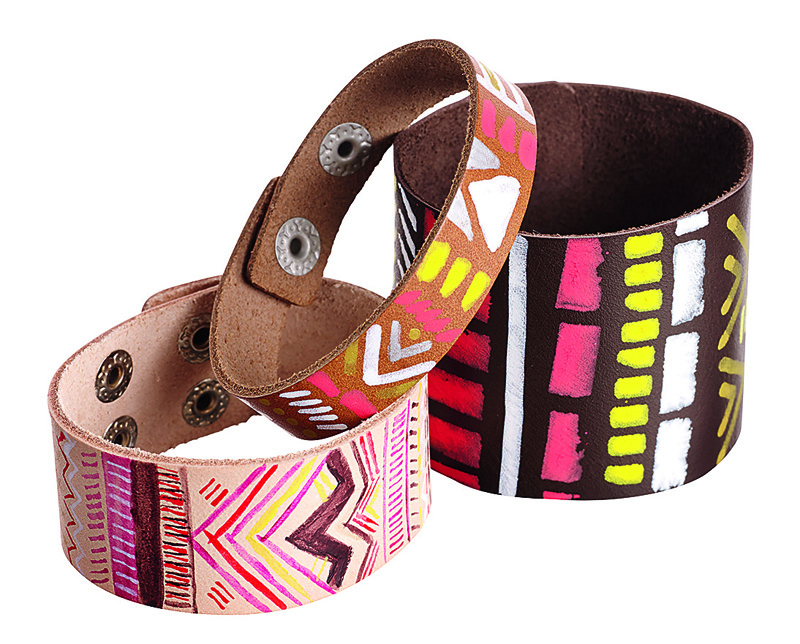
For lovers of unusual jewelry, old leather boots are an excellent material for creating rocker style.
From our master class you will learn.
Leather sheaths for knives

Very comfortable and desired accessory not only for hunting knives. Such a cover can be sewn for knives that are used for hiking, picnics, trips out of town.
Cover for a book or diary

Making your own cover is easy! Take the most common cover and make a pattern for a leather cover according to its pattern.
, read the site
Decorative lampshade

Cone-shaped parts are cut out of the skin and sewn together. From above and below, metal rods fix the sides and put the lampshade on the lamp.
Baby mittens

For children up to a year, fingerless mittens are usually made. If the top of the boots is made of soft leather or suede, and inside is fur, then such material is suitable for making mittens for the baby. It is necessary to cut 4 identical parts and buttonhole stitch sew them together from the front side with the fur inside, leaving the hole for the handle open.
Case for glasses

Medium-density leather will make excellent eyeglass cases, while sewing them is not difficult. It is enough to cut out two identical rectangular parts from the tops of old boots a little bigger size than glasses and sew a case out of them.
If it is a pity to throw away old boots, because they are made of excellent quality material, it is worth finding a new use for them. Here are some interesting ideas for what you can do with old leather boots. Stylish clutch or small handbag
If the problem is only in a cracked sole, you can sew a chic clutch or a stylish small handbag from the leather part of the boots. From our master class you will learn how to sew a clutch bag made of genuine leather
With the help of decorative elements such as rhinestones, beads, bows, brooches, you can decorate the product and mask small scuffs or holes. Warm insoles
photo: sdelaysam-svoimirukami.ru; makezine.com Autumn and winter boots usually with natural fur, zigeika or wool insulation. Therefore, from an old pair, you can make insoles for other shoes. To do this, you need to stand on a piece of paper and circle the contour of the right and left legs with a felt-tip pen. Then transfer the patterns of the insoles to the skin from the boots and cut them out. Light slippers or flip flops
photo: instructables.com Old boots make great slippers and slippers. Small corners
To do this, cut out the details of the desired shape and size, sew them together to store coins and other small things, which are full in every home. flower pots
photo: homeepiphany.com Lovers of decorative flowers and plants can use old boots to make original and durable planters. Stylish case on a chair
photo: collegelifediy.com To update one chair, you will need two boots, the tops of which must be cut and sewn together. Then cut out of them a part slightly larger than the seat of a chair or stool and fix the cover. Exquisite bracelet
For lovers of unusual jewelry, old leather boots are an excellent material for creating ethnic and rocker style leather bracelets. From our master class you will learn how to make leather bracelet with rivets. Leather sheaths for knives
A very convenient and necessary accessory not only for hunting knives. Such a cover can be sewn for knives that are used for hiking, picnics, trips out of town. Cover for a book or diary
Making your own cover is easy! Take the most common cover and make a pattern for a leather cover according to its pattern. How to quickly and easily sew leather covers, read on BurdaStyle.ru
photo: favecrafts.com Cone-shaped pieces are cut out of leather and stitched together. From above and below, metal rods fix the sides and put the lampshade on the lamp. Baby mittens
photo: alaskafurproducts.com For children under one year old, fingerless mittens are usually made. If the top of the boots is made of soft leather or suede, and inside is fur, then such material is suitable for making mittens for the baby. It is necessary to cut out 4 identical parts and sew them with a buttonhole seam to each other from the front side with the fur inside, leaving the hole for the handle open. Case for glasses
Medium-density leather will make excellent eyeglass cases, while sewing them is not difficult. It is enough to cut out two identical rectangular parts slightly larger than glasses from the tops of old boots and sew a cover out of them.
Required for work:
90 g (one skein and even then not a whole one) YarnArt Pearl threads (violet color, 115).
- Hook number 3.5.
- Shoe awl (it has a hole or a hook at the sharp end).
- Clay Moment-crystal or Secunda - in general, any transparent.
- Shoes made of artificial suede (it does not shine and the threads slip less on it).
First, with an ordinary awl, you need to make holes in the leatherette of the shoes, no further than half a centimeter from the sole. It is better, of course, to make holes as often as possible. It is possible at a distance of 1.5-2 cm from each other and the problem of gaps was solved. Then it is necessary to stretch a thread into these holes - the same one that was knitted. The toe makes it harder to do this. Basically, for the toe, you need a shoe awl. In other places, you can simply flash with a thick needle. Bring the ends of the threads out, they can be hidden in knitting, but inside they can interfere.

This is how the holes look from the inside (from the inside they are back to back and are not visible if you do not bend so much)
Tie the resulting stitches with single crochets, and fill the gaps between the stitches with a chain of air loops- the number is determined by distance. It is better to start knitting in the middle of the inside of the shoe - this is the most inconspicuous place and it is best to hide the transitions to the next row there.
On the resulting row, impose more single crochets. And lower this row down - he closed the transition to the sole.
And again in the same warp threads and in air loops, knit a row of double crochets. But not to the end - tie the previously knitted ribbon lace detail in front.

We take this detail according to the scheme.

By attaching this detail to the toe, it becomes clear to what place it is necessary to knit the double crochets and, after the last column, attach the detail to the row. Double crochet and double crochet, as required by the lace detail, and continue double crochets on the other side of the shoe.
Then we take it no longer in a circle, but from the right side of the lace to the left. So, changing the double crochet and without, so that you can knit a pico of three loops back from the lace in the last row. It turns out the shoes were knitted with a ladder. The last row turned out on top of the heel.
In the photo, you can make out the ladder and the change of columns with and without a crochet. This is just the inner part of the shoe, the most inconspicuous.


If somewhere something turned out uneven - it's not scary. At the end of the work, having fixed and cut off all the threads, you can stretch the fabric so that a row of picot protrudes beyond the top of the shoe and glue the top of the shoe with glue to glue the knitted fabric.


