Crochet starfish. Knitted fish, turtles, snails, dolphins, lizards Description of knitting only crochet starfish
Knitted starfish
We will need: cotton threads, hook, scissors, beading line, beading needle, beads, stuffing filler

We knit the skeleton of our starfish: we collect 14 air loops, turn back and knit 13 columns (st), and so we knit 5 asterisk handles (or legs, as you like)

Then we tie the skeleton in turn to each handle: half-column (pst), 3 st, double crochet (st with n), 2 st with n in one loop, 3 st with 2 n in one loop, 2 st with n, st, st . We reached the top in one loop st, st with n, st. Then we go down to the base: st, st, st with n, 2 st with n in one loop, st, 2 st with n in one loop, 3 st with 2 n in one loop, 2 st with n in one loop, st with n, st, st, pst, at the base of the pst, and then repeat the same on each petal
3.
We fold the handles at the base and tie them together with four columns.
Then we tie the handle with simple columns, knitting the sharp tip in one loop in this way st, st with n, st
4.
We knit the second asterisk in a mirror image. As a result, we get the following blanks:
5.
We sew an asterisk with a fishing line. I sew with a hidden seam on the face, without turning it inside out. Through the last non-stitched handle we fill with filler and sew to the end.
6.
Now it remains to decorate our star with beads and decide what it will be: a brooch, hairpin or something else.
7.
TURTLE
TURTLE
You will need: about 100 g of melange black and green yarn, and the remains of black yarn; crochet hook (number is selected based on the thickness of the yarn).
Weave: art. single crochet; Art. with a crochet.
DESCRIPTION OF WORK
SHELL. Melange yarn tie a chain of 4-ch, close in a circle, tie it with the 6th tbsp. Art. without a crochet. Then knit in a spiral, knitting from each 2nd tbsp. without crochet 2 tbsp. single crochet until you get a circle of 40 tbsp. without a crochet. Knit with black yarn in 2 additions 1 row without additions. Knit the next row with melange yarn without additions, capturing st. of the previous row from the bottom so that the black stripe becomes a rim.
Next, knit with melange yarn, knitting 2 tbsp in the 1st row. in every 8th st. of the previous row, and in the next 3 rows in each 9th, 10th and 11th, respectively. Moreover, between the 2nd and 3rd rows associated with additions, tie 1 row of st. single crochet without additions (= 60 st. single crochet).
Knit 1 row with black yarn in 2 additions, and 6 more rows with melange yarn, as described above, doubling in the rows, respectively, every 10th, 11th, 12th and 13th stitch. without a crochet (= 84 st.).
Knit 1 row with black yarn in 2 additions, knit the next row with melange yarn without additions, as described above. Next, knit a frill with melange yarn. The first row without additions. In the 2nd row in every 2nd st. of the previous row, knit 2 tbsp. without a crochet.
In the 3rd row in every 3rd st. of the previous row, knit 2 tbsp. without a crochet. Knit the 4th row without additions. Then knit 1 row of st. single crochet with black yarn in 2 additions.
For the BELLY, knit a flower with black yarn, to do this, knit a chain of 4 ch, close it in a circle and knit 6 tbsp. without a crochet. Then in each st. knit on the “bumps” - * yarn over, insert the hook into the loop, yarn over, pull up the loop *, from * to * repeat 5 more times without dropping the loops from the hook, then yarn over, pull the hook through all loops except one, yarn over, stretch hook through the remaining 2 loops. Once again, pull the hook through the loop on which the “knob” sits, knit st. without a crochet and one more art. without a crochet in st., which is located at the base of the "knob". Tie a flower st. without a crochet in every 2nd st. the previous row. In a row it turned out 25 tbsp.
Continue knitting, knitting 2 tbsp. without a crochet in every 3rd st. the previous row. In total, knit 7 rows with black yarn.
Next, knit 7 rows of melange yarn, alternating rows without additions and rows with additions, in which knit from 1 tbsp. - 2 tbsp. without a crochet, respectively, from every 5th,
7th and 9th. Knit 1 row of black yarn in 2 additions.
HEAD. With melange yarn, knit a chain of 4 ch. and close in the ring st. without a crochet.
In the resulting ring, tie 6 tbsp. without a crochet.
Then knit 1 row in a circle, knitting from each st. - 2 tbsp. without a crochet. Next, knit, alternating 1 row of Art. without a crochet without additions and 1 row, knitting from each 2nd st. 2 tbsp. single crochet until you get a circle 40 tbsp wide. without a crochet. Knit 1 row with black yarn in 2 additions. Then knit 6 rows of melange yarn st. single crochet without additions, and tie the first row as described above with the formation of a "rib".
Next, knit 4 rows, knitting together 4 times each 3rd and 4th tbsp., Finish the row of tbsp. without a crochet. Next, knit, knitting in each row 4 times the 2nd and 3rd tbsp. together. In the process of knitting, fill the head with padding polyester. Sew the resulting "proboscis" to the head. Edge the edges of the "proboscis" with black yarn with a chain of VP. Knit a chain of ch from black yarn. about 22 cm long, lock into a circle and sew it around the head at a 45 angle (to the black stripe knitted earlier.
EYE. With yellow yarn, knit a chain of 4 ch. and close in the ring st. without a crochet.
In the resulting ring, tie 6 tbsp. without a crochet. Then knit 1 row in a circle, knitting from each st. - 2 tbsp. single crochet until you get a circle 20 tbsp wide. without a crochet.
Knit the next row with black yarn without additions. Break the thread, leaving the end 15 cm
and with a needle, make the pupils by passing the thread through the center of the eye. Sew a yellow bead to the pupil. Tie the second eye in the same way.
PAW. With melange yarn, knit a chain of 4 ch. and close in the ring st. without a crochet. In the resulting ring, tie 6 tbsp. without a crochet. Then knit 1 row in a circle, knitting from each 2nd st. - 2 tbsp. single crochet until you get a circle 20 tbsp wide. without a crochet. Knit the next row without adding. Then knit 1 row, knitting from each 4th st.
- 2 tbsp. single crochet (= 25 tbsp.).
Knit 5 rows without adding, then knit 1 row, knitting together every 3rd and 4th tbsp. Knit 6 rows without adding.
Stuff the paw with synthetic winterizer. Tie the heel, for this, with yellow yarn, tie a chain of 4 ch. and close in the ring st. without a crochet. In the resulting ring, tie 6 tbsp. without a crochet. Then knit 1 row in a circle, knitting from each 2nd st. - 2 tbsp. single crochet, only 3 rows.
Knit the next row with black yarn without additions. Sew the heel to the paw with black yarn and embroider the fingers with black yarn. Tie 3 more paws.
ASSEMBLY. Sew the paws to the shell.
Fold together the armor and abdomen and sew them together, filling with padding polyester. Sew eyes to the head.
Sew the head behind the back of the head to the shell so that the head rests on the frill between the front paws. Knit a chain of 160 ch. with black yarn in 2 additions and decorate the shell with it, dividing it into 4 sectors (see photo).
Luxurious piece of furniture - a pillow in the form of a star, knitted.
Consider an example of knitting a pad for 108 loops. She gets pretty small. If you want more - take thicker yarn. And below you will find a video tutorial with calculations for knitting such a pillow for 220 loops.
So, we collect 108 loops and distribute them on six knitting needles. It turns out 18 loops on each knitting needle. then we close the spokes with a ring. Knitting such a pillow is similar to knitting socks or mittens. Now you need to knit in a circle. Star knitting pattern:  We knit 7 loops with facial knit and make a broach: remove 2 loops on the right knitting needle (we start the knitting needle under the loops on the left).
We knit the next loop with facial knitting. We stretch this front loop through 2 removed loops. Leave the removed loop on right spoke.
The number of loops has been halved, and if we count the decrease in loops along the entire row, then it will be 12 loops. In the place where we make broaches, a beautiful convex pigtail gradually forms, dividing the beam into 2 halves.
After the broaches, we knit 7 LP (facial loops), and we knit the remaining loop with purl. We distribute the loops on six knitting needles 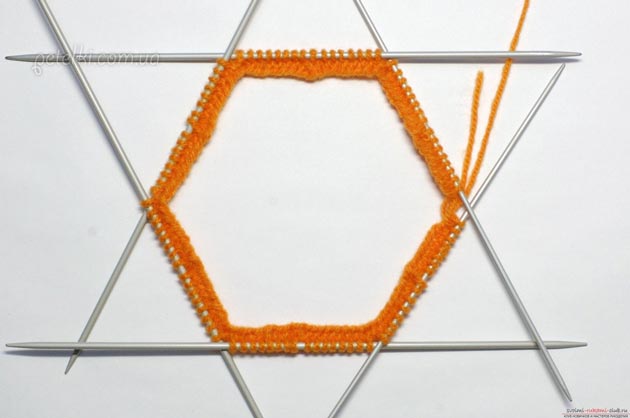 3 row: we knit 6 loops with facial knitting, we make a broach and we knit the remaining loop as a purl. We stretch the front loop through the two removed
  Leave it on the right needle
  The number of loops is reduced by two
Third row  4 row: we knit 5 facial loops, make a broach and knit the last loop with a purl. Fourth row
  5 row: we knit 4 facial loops, make a broach and knit 1 purl loop. Fifth row
  6 row: we knit 3 loops with facial knitting, we make a broach, we knit 3 loops with facial knitting and 1 loop - purl. Sixth row
  7 row: we knit 2 loops with facial knitting, we make a broach, we knit 2 facial loops and 1 wrong side. Seventh row
  8th row: we knit 1 loop with the front viscous, we make a broach, we knit 1 front and one purl loop. Eighth row
9 row: behind the first two loops on the left we draw a knitting needle and transfer them to the right side. Now we knit a front viscous loop and draw it through the two removed ones. Knit the next stitch in purl stitch. We knit the remaining two loops like this: we make a broach and knit with a purl. At this stage, there is a high probability of loops jumping out of the knitting needles. To facilitate work, you can divide the loops on three knitting needles.
Ninth row  Tenth row
  10 row. We knit one front for two loops.
11 row. We repeat: we knit two loops with one front. Eleventh row  We tighten the loops that remain on the knitting needle to the middle, hiding the end inside. We tighten the loops
It remains to tie the second half of the pillow and sew them. You can use a synthetic winterizer as a filler (but do not overdo it, it is better not to stuff too much so that the pillow is soft). finished sprocket 
A crochet crochet star is a simple product, but at the same time an interesting and versatile item. Can be made in the shape of a star soft toy baby, a napkin on the table or a rug on the floor, a blanket, Christmas decorations and many more options. Thus, having spent quite a bit of time and effort, you can create a beautiful and useful masterpiece with your own hands.
Christmas tree decoration "Star"
Bright Star, crocheted from motives different colors, will become a worthy decoration of the New Year's beauty. As it rotates, its faces change colors. If the lower faces are not connected, then the star can be put on the top of the Christmas tree, where it will become the main decoration.
So let's get started. For work we will need:
- some mercerized cotton yarn in three colors;
- remnants of white or silver yarn for tying;
- hook number 2.
First, we need to connect 3 motives according to the scheme.
And then starch them to keep their shape.
Fold the motives, and tie their faces with a white thread with a single crochet.
In the upper part, tie a chain of air loops and close it into a loop.
The decoration is ready.
New Year's star: video mk for beginners
Soft crochet starfish
Volumetric soft star, crochet can serve as a toy for a baby, a piece of furniture or a needle case for a needlewoman.
For work need to cook:
- remnants of blue yarn;
- hook with the corresponding number;
- filler.
We need to connect two circles. To do this, crochet 2 air loops, and then:
1r. - 6 tbsp. b / n in the second loop, (6);
2r. - 6 times we perform an increase, (12);
3r. - repeat the pattern 6 times (1 tbsp b / n + increase), (18);
4r. - 6 times (increase + 2 tbsp b / n), (24);
5 p. - 6 times (3 tbsp b / n + nailing), (30).
In the first round working thread you need to fasten and cut, and continue knitting with the thread of the second round.
Now we turn to knitting rays. To do this, in the first row in the second circle, we perform 7 tbsp. b / n, after which in the first circle we do 7 tbsp. b/n, (14)
In the second row from 1 loop in the second circle - 5 tbsp. b / n, decrease, 5 tbsp. b / n, decrease, (12)
3r. - decrease, 4 tbsp. b / n, decrease, 4 tbsp. w/n, (10);
4r. - 3 tbsp. b / n, decrease, 3 tbsp. b / n, decrease, (8);
5r. - reduction, 2 tbsp. b / n, decrease, 2 tbsp. b/n, (6).
Fasten and cut the working thread, and pull off the loops.
We fasten the thread to the extreme loop of the previous ray of the first circle
And then we knit in the second circle
14th Art. b / n do instead of attaching the thread.
We also knit the remaining rays - constantly capturing the extreme loops of the previous beam. When knitting the latter, we capture the extreme loops of adjacent rays
The shape and length of the rays can be adjusted. For example, if you make a decrease through the row, then they will be narrower and longer, and if there are 4 decreases in a row, then they will be short and plump.
Master class crochet pillow in the shape of a star
A gentle and soft star will be a worthy decoration of the interior in your home, or will become original gift for friends and relatives. Knitting a pillow is not difficult, even beginner needlewomen can easily cope with this task.
What we will need:
- finished fabric yarn;
- suitable hook;
- patches of quilt / felt / felt;
- filler.
For knitting, it is better to use yarn of the same thickness. But if, suddenly, for one side it is thicker, and for the other - thin, the final size finished part will be adjusted by the number of circles. After each row, the yarn should be pulled out so that the fabric is even and does not twist.
So let's get started. We start knitting from the central part of the star.
1r. - we collect 3 ch, we perform 9 double crochets into it, and then we connect (connect with a column) and tightly tighten until it is completely closed.
2r. - again we dial 3 ch, in the next loop we make 2 columns with a crochet and continue to perform 2 dc in each loop. At the end of the row we do 1 dc in the next. loop and connecting column in the 3rd ch.
3r. - 3 ch, 9 * (1 dc in the next st, 2 dc in the next st). Next, 1 dc in the next st, 1 dc in the last loop. We finish the row with a connection column in the 3rd initial ch.
4r. - 3 ch, 9 * (1 dc in the next 2p, 2 dc in the next p.). Then, 1 dc in the next. 2p, 1 dc in the last p. Finish a series of connections. Art. in the 3rd initial v.p.
5r. - 3 ch, 9 * (1 dc in the next 3p, 2 dc in the next p.). 1 dc in the next. 3p., 1 dc in the last. p.
6r. - 3 ch, 9 * (1 dc in the next 4p, 2 dc in the next p.). 1 dc in the next. 4p, 1 dc in the last p. Connect.st in the 3rd initial v.p.
We do not cut the working thread.
We turn to crocheting the first beam.
1r. - we do ch 3 from the end of the 6th row. Then - 1 column. with nak. in the next 11 loops. We unroll the product.
2r. - we perform the connection. Art. in the 2nd loop from the hook and ch 3 Next - 1 column. with nak. in the next 9 loops. We unfold the product again.
3r. - Comm. Art. in the 2nd loop from the hook + 3ch. 1 pole. with nak. in the next 7 loops. Turn.
4r. - Comm. Art. in the 2nd loop + 3ch Then, 1 column. with nak. in the next 5 loops. We turn the canvas.
5r. - Comm. Art. in the 2nd loop + 3 ch Then, 1 pillar. with nak. in the next 3 loops. Rotate the canvas again.
Now let's do the rest of the rays.
1r. - we make a standing connecting column, as shown in the figure, in the next stitch (3 air loops) of the previous beam. Then, we perform 2 air.pet. and 1 pole. with nak in the next 11 pet. We develop the product.
3r. - Comm. pillar. in the 2nd pet. from hook. 3 air. pet. 1 pole. with nak. in a trace. 7 pet. We rotate the product again.
4r. - Comm. pillar. in the 2nd pet. from hook. 3 air. pet. 1 pole. with nak. in a trace. 5 pet. Turn.
5r. - Comm. pillar. in the 2nd pet. from hook. 3 air. pet. 1 pole. with nak. in a trace. 3 pet. Turn.
6r. - Comm. pillar. in the 2nd pet. from hook. 3 air. pet. 1 pole. with nak. in the same loop as 3 air. pet. And next. loop - 1 column. with nak. Cut the thread, fasten the end.
edging. We start with the base of any beam. We make 1 standing connecting st-to. Then, 13 connecting stitches are performed evenly up one side of the beam. 3 air. loop 13 connecting studs evenly down the other side of the beam. Thus, we tie the remaining beams and connect them with the first connecting column. Fasten the thread, cut it, and hide the tail in weaving.
Assembly. So that the filler does not “leak” through the holes in knitting, we use patches of a quilt as a lining (or felt, felt). We cut out stars from the lining material, which correspond in shape and size to our connected ones. The color of the lining should be taken into account, it should not contrast with the yarn. For example, white felt is more suitable for a light thread, and felt is more suitable for a dark one.
We will connect all the layers in this order - star, lining, lining, star.
We start with any stitch. We make 1 standing connecting stitch through 2 inner loops of each stitch
We make 1 such stitch in each loop until one beam remains. We stuff the pillow with filler between 2 layers of lining fabric.


