Openwork elegant crochet tunic. Crocheted tunic patterns and description
MerlettKA () all posts by the author Tunics are the same jumper, but slightly longer than usual. Tunics are great with jeans, leggings or even tight pants. It all depends on the design, color and style. Although there are exceptions, tunics usually don't go well with skirts, but again, it's the cut that really comes into play. Nowadays, knitted tunics are becoming more and more popular, and the whole snag is that tunics are slimming and at the same time look very impressive, while the fact that knitted tunics are just an ordinary winter clothes. There are a great many models that are perfect for the warm season - openwork and mesh - you can even wear them on swimwear. Moreover, openwork tunics can add style to a woman, as well as hide figure flaws, if any. Looks great with skirts and trousers. And just a lining under an openwork tunic can make a cute short dress out of it. For more beautiful appearance it is desirable to crochet tunics; with buttons, they would also look very stylish.


Tunics are a versatile piece of clothing. They can be worn both on the beach and on a date, combined with jeans or used as a dress. A tunic that will become the highlight of your image can be knitted by yourself - using a hook or knitting needles.
With the advent of summer, all fashionistas want shine in beautiful clothes. An important attribute both beach and casual fashion is not only a beautiful swimsuit or short shorts, but also tunic.
In the markets and shops there is a motley variety of such goods, but it will be a pleasant experience tie a tunic with your own hands. In this article, we will look at variety of options and tunic knitting patterns.
Crochet beach tunic: photo, diagrams, description
If you have never held a hook in your hands and do not know which side to start knitting from, do not despair, all this is quite you can learn. Over time, you will get a good hand and will be able to knit beautiful products for yourself and children.
But at first you should not take very complex work with intricate patterns, it is better to practice in advance for simpler jobs. In order to correctly tie the product, you must thoroughly study knitting scheme. It would be better if you have a detailed description and an approximate view of the finished product before your eyes.
Tunic crochet
The most important thing to understand is that even if you pick up a hook for the first time, you should not buy for it. cheap yarn. Because if you get a tolerable outfit, then a different thickness or color of threads that inexpensive yarn sins with can ruin all your hard work.
Also an important nuance will be correctly selected hook- it should lie well in the hand, be not too small and sharp enough. Choose the tool so that you it was comfortable to hold, and check the sharpness - the hook should pass well through the loops, but not injure your hands.
The most simple circuit crochet tunic consists of three parts. The first detail is in the chest area, so it is important to measure the chest girth correctly and add a couple of centimeters so that the future product does not hamper your movements. For convenience, tie one line and measure yourself to understand how many loops you need approximately in order to tie part number 1.
 Beach tunic scheme
 First row you will knit air loops. After that, it will be necessary to expand the work and start doing the second row. Initially, choose a pattern, because from the second row you will already start knitting with the selected elements.

 Sequence of actions when performing an air loop
 For your first work, you can simplify the knitting of a tunic - do not make cuts. To do this, the first part will need to be connected with a length of no more than 8 cm
Second detail starts from the middle of the chest and ends where you determine your length. start knitting above. In order to do the job as accurately as possible and bring all the measurements in line, it would be best to do pattern. In this case, while knitting, from time to time you will need to apply your work to the pattern and check the accuracy of measurements.

 Pattern for making a tunic
 To start the second part you do 2-3 air loops, three lifting air loops and then, if desired, knit one or two loops with a crochet. Thus, you will knit a beach tunic to the bottom of the product, but it is important to understand that you are doing this part in duplicate - this will be the front and back.

 Crochet loop
 Detail No. 3 there will be directly straps of the product. It all depends on your desire and imagination - you select the desired width, length and pattern of the straps. by the most simple option there will be a width of about 3 centimeters, where at first there will be air loops, and then double crochet loops.

 Types of straps
 Your beach tunic is almost ready. Now in front of you are four separately linked products and you need to sew them into one beautiful summer tunic. Moisturize a little first. knitted details and lay them out on a flat surface, after that they get the right shape.
After the product has dried, sew back and front.
Make sure that the front and back of the tunic had the same length, if you didn’t initially think that it would be a little longer at the back. When the second part is ready, sew it with the first, and then sew on the straps.
Your beach tunic anyway will have a great view, because you will choose your favorite color for her, beautiful pattern and put your work and a piece of your soul into the product.
Video: Crochet a beach tunic tutorial
Crochet tunic for overweight women schemes
Beautiful knitwear looks equally elegant on women of any age and physique. For curvaceous women there are many options for patterns and patterns for knitting tunics. The only difference in knitting a tunic for large women is the amount of yarn used.
Very nice dress for obese women there will be a tunic crocheted with a pattern called "A pineapple". Such a tunic will look modern, but at the same time look beautiful and elegant on ladies with magnificent forms.

 Tunic in the pattern "Pineapple"
 The advantages of such a product are:
- Good match with trousers or skirt
- Stylish and bright look
- When washing, the product does not shrink and does not stretch
- Great outfit for hot weather
- Price
It is the value of the goods that can become important criterion, in order to buy yarn and practice knitting at home. Finished knitwear, and also self made cost fabulous money.
Pattern "Pineapple" is one of the most beautiful knitted patterns, which can be used not only for knitting a tunic, but also skirts and light cardigans.
 Scheme of the pattern "Pineapple"
 In order to tie the product you will need 500 g yarn and hook number 2.
A tunic with this pattern is knitted in the round and starts at the neckline. In order to do this part, you must first 199 loops. From the first loops, it will seem to you a very difficult and long process, but over time, all your movements will reach automatism.
After two hundred loops knit three rows of chains seven loops. Further on the diagram you see how to knit the remaining five rows. With such patterns you will knit the back and front.

 Crochet chain
 After that, you need to do the sleeves. You also need to knit the sleeves in a circle - knit 22 loops and connect the edges of the sleeve at the level of the notch. The number of loops is determined depending on the desired length of the sleeve.
Tunic with pineapple pattern undoubtedly, it will catch the eye not only of people who understand fashion trends, but also of everyone around, since the beauty of the pattern cannot but draw attention to your outfit.
Video: Crochet Pineapple Pattern
Knitted beach tunic: photos, diagrams, description
No less beautiful and stylish outfit is obtained if you use not crochet, but knitting. Many people remember from childhood how grandmothers and mothers took yarn in front of the TV in the evening and knitted blouses, sweaters and warm socks. You can knit for yourself beautiful tunic for a holiday at sea. Detailed description and the diagram is provided below.

 Scheme of knitting a tunic with knitting needles
 It will be very nice to combine several colors in a beach tunic- it will be good to use blue, mint and white. Blue and mint will look good against the background of the sea breeze, and white will set off tanned skin.
For such a tunic, you will need 150 g yarn of three colors and knitting needles from the fourth to the sixth number. Looks very symbolic wavy pattern for a beach tunic.

 Wavy knitting patterns
 Number of rows will be different for each craftswoman - it all depends on the desired length. It is important to make a pattern in advance in order to navigate the measurements and the number of loops in a row. All odd rows knit facial loops, even - purl.

 Front loop spokes
  Two ways to purl
 Back and front must be knitted in separate parts, after completion, sew the two parts into the finished product. The prerequisite will be color bar control- make sure that the stripes on the back and front are on the same level, otherwise the finished off-set patterns will not look very good.


 Scheme of a tunic with knitting needles
 If you have not previously picked up knitting needles, then you can perform a simpler pattern, which will not require line level comparisons. Actual on the beach tunic with wavy pattern can be knitted after several workouts on simpler products.
 Ready knitted tunic
 Knitted tunic for obese women
Regardless of your physique, you can choose a beautiful tunic pattern curvaceous woman. In order to knit such a blouse you will need 600 g of yarn and knitting needles with number four and five.
It is advisable to make the tunic a little looser and buy for its manufacture acrylic yarn. Thus, the flowing thread will make your silhouette more slender. To give lightness and freedom of action, cuts can be made on the sides.
To get started you need make a pattern desired product - this is a prerequisite for the tunic to turn out right size and forms.
An excellent solution for a pattern will be garter stitch or pearl pattern and smooth surface. Patterns you can see on the diagrams. Even if you knit a tunic with knitting needles, it is better to fasten the neck, sleeves and bottom with a hook.

 Garter stitch
  Knitting "Smooth" knitting needles
 Before you start knitting the thread must be folded in half. Initially, the product will consist of two parts - front and back.
On the back we start knitting with a pearl pattern. We knit six rows for them 86 loops. After that, we continue knitting with satin stitch and knit with this pattern for about 12-15 centimeters and four rows of garter stitch.

 Pearl pattern knitting
 At about this level, we should have room for sleeves - this part tie with four loops at both sides. Then we look at the scheme and alternate patterns, as shown in the figure.
We also start from the front with 86 stitches and six rows to be knitted with a pearl pattern and continue stockinette stitch, alternating with a pearl pattern and garter stitch. For more details on the number of rows, see the diagram.

 Tunic pattern
 After you have made two parts of the future product, you need pin the details on the pattern Moisten a little and wait for them to dry completely. Thanks to this, the product will be evenly stretched and your tunic will not have blown out or overly compressed loops.
In many tunics, for simplicity and convenience, the back is made simple. monochromatic pattern. In this case, the back and front will be in the same style - they will contain three patterns, which will positively affect the beauty and sophistication of the tunic.
After the parts are dry, sew them into one piece. If you knit this tunic according to the induced pattern, then, undoubtedly, you will succeed very beautiful product, which can be worn both for work and meetings with friends.
Other options for knitted tunics:

 Elegant two-tone tunic
 Who doesn't want to have unique and beautiful things in their wardrobe? Such that they were in a single copy and the probability of meeting a person on the street in the same outfit was minimized! This can be achieved if you make yourself such an outfit. And to be more precise - knit yourself, say, a tunic. You can do this using the diagrams that you will find in this master class. Thus, you can acquire an elegant and exclusive item made by hand. Therefore, be patient, crochet, yarn and go! And the guide will be our master class for beginners. Soon you will be able to learn how to crochet an interesting tunic in the Greek style. But the diagram and description of such a model are presented in the photo below.
Just look how beautiful tunics are! Attention to the video:
Greek version of crochet tunic with patterns and descriptions
The ability to crochet gives you the opportunity to acquire a wonderful and elegant Greek tunic. The pattern of this type of tunic is very interesting and will greatly decorate your image.
And this is how the same tunic will look like, but in a different color:
Her knitting patterns:Beach wear for every day
With sufficient mastery of crochet skills, you can also make a wonderful crocheted beach tunic. This snow-white attire looks elegant and refined and can decorate you soon if you get down to business right now. After reviewing the diagrams and a number of photos below, you will learn how to knit such a little thing with your own hands. It is not at all difficult for those who are already familiar with the knitting technique. This tunic for the beach is also very easy to sew - you only need to sew the sleeves to the edge of the tunic. To complete the image, which we kindly provide to our readers for knitting instructions - just follow the link!
So say "no" to doubts and get to work, because all you have to do is move on! Agree, creating original things for yourself is so nice! Photos of a knitted beach tunic are presented below.


We knit a stylish new thing for a girl
You can also please your little fashionista-daughter with a wonderful new thing. For a girl, this is the perfect solution for clothes for the spring-summer warm period. There is a huge variety of options for various children's tunics. different color And different models for girls. The photo below shows a charming pink crocheted tunic for a girl.


Openwork technique for creating an interesting little thing for beginners
We have great news for you - you can become the owner of wonderful openwork tunics. Such dazzling white tunics, which you see in the photo below, can be easily knitted on your own. For the first tunic, you need to weave 195 round elements, as shown in diagram number one, and connect them together in the last row. The neckline must be tied in one row with single crochets. For the second tunic, you need 200 elements according to scheme number two. The completion of knitting occurs in the same manner as the first model. Just look how beautiful!

More on video:
By the way, it is worth noting that it will not only decorate a young fashionista, but also save delicate skin from sunburn!
Scheme:
Summer clothes for every day with a job description for beginners

Bright lilac summer tunic, very light and breathable - ideal for hot August. So let's try to connect it! Her scheme is located in the photo below.

After knitting is completed, all elements are sewn together, and the armholes and neck are knitted with one row of single crochets and another row of “crustacean step”. After completing the whole procedure, you will get a wonderful summer outfit that you made with your own hands!
Autumn version of a beautiful handmade tunic

You can show off in a beautiful handmade tunic not only in summer, but also in autumn, just choosing threads and a warmer model. And voila! You can get a wonderful autumn thing that will decorate you and warm you on cool autumn evenings - if you wear a light knitted sweater under it to match. The scheme and description of the progress of work are presented in the photo below.


Exquisite model for a real fashionista from motifs
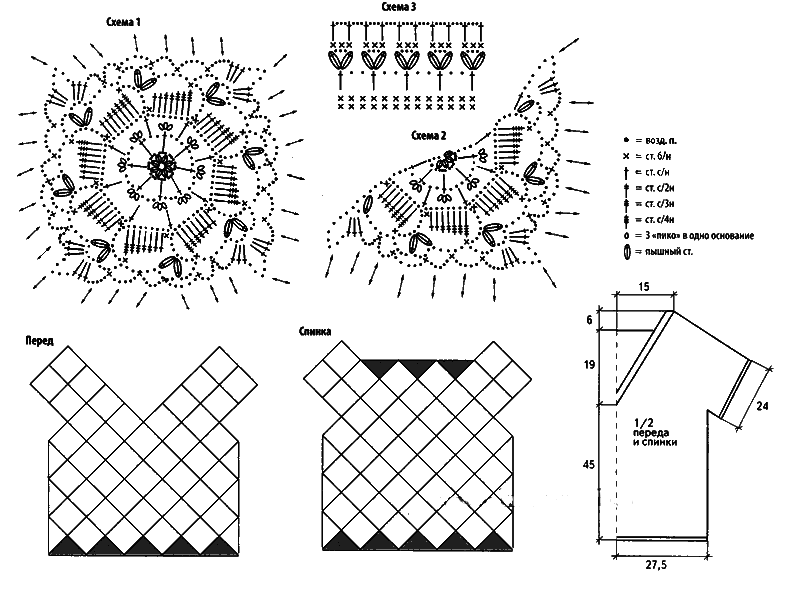
A motif tunic is a great choice of clothes for a sophisticated fashionista! And to make it truly exclusive - it can be crocheted. To do this, you need to connect 12 motifs according to the scheme, and then sew them together. On the tunic pattern from motifs, please note that such places as the neck, armholes and cuts on the sides of the tunic are not subject to stitching.


Size: XL
You will need: yarn "Cable" (100% cotton, 400 m / 100 g) - 700 g green, hook number 2.
The product is knitted from top to bottom.
Description
Dial the initial chain of 220 air. p., lock into a ring and knit a yoke along scheme 1 . Next, knit motives for scheme 2 : 6 motifs on the front and back and 1 motif - above each sleeve. Connect motifs to the beginning of the yoke, as shown in diagram 2. Then leave 35 stitches (about 2.5 motifs) on each sleeve and continue to knit the back and front of the tunic in a circle according to diagram 3, repeating rows 5-7 to the desired length of the product .
Knit sleeves according to scheme 3 . In the last five rows, decrease 2 tbsp. s / n in each rapport.
Tie the lower edge of the tunic with art. 6 / n, sleeves and neckline - "crustaceous step".


Tunic crochet patterns and description for full

Size: XL
You will need: yarn (100% mercerized cotton, 400 m / 100 g) - 500 g white color, remnants of turquoise color, hook No. 2.5.
The product is knitted from top to bottom.
Description
Tie the initial chain of 220 air. p. and knit a yoke scheme 1 . Repeat vertical repeat 5 times, making additions for expansion according to the scheme. Then divide the knitting as follows: leave 10 repeats of the pattern for the sleeves, 15 repeats for the front and 13 repeats for the back. Connect the front and back with chains of 35 air. p. (armhole) and then knit in front and back in a circle with a pattern along scheme 2 to the desired product length.
Sleeves continue to knit with a pattern on scheme 3 , repeating the vertical rapport 4 times.
Tie the neckline with a turquoise thread * 3 tbsp. b / n with "pico" of 3 air. p., 3 tbsp. b / n *, repeat * - * to the end of the row. Tie the edge of the tunic and sleeves with a turquoise thread 1 next to st. b/n.


Knitted summer tunic crochet for full

Size: XXXL
You will need: yarn "Anna 16" (100% mercerized cotton, 530 m / 100 g) - 500 g blue color, hook No. 0.85.
Description
Back:
knit the pattern first scheme 1 . To do this, dial the initial chain of 204 air. p. + 3 air. lifting point \u003d 68 loin cells. Having tied the pattern, on both sides of it, tie 6 cm of the pattern along scheme 2 . Next, knit up 13 rows of the pattern in scheme 3 . Then shape the neckline according to scheme 4 . Cut the thread.

Before:
knit similarly to the back, but with a deeper neckline (see diagram 5). Begin to form the neckline by knitting 4 rows with a pattern according to scheme 3.
Sew shoulder seams. Then measure from the shoulder seam 23-24 cm for the armhole, sew the side seams to the level of the waist. Attach the thread to the bottom edge of the front piece and start knitting the side corner according to scheme 2. Knit until there are 2 cells of the pattern left to the waist, then knit 2 stitches together. s / n before, 1 tbsp. s / n center of the waist and 2 tbsp. s / n back, continue to knit to the end of the back. In this way, knit in turning rows, forming the corner of the tunic. Tie the second corner in the same way.
Sleeves:
attach the thread to the bottom of the armhole, knit in circular rows according to scheme 2 to the desired length.
Tie the neckline according to scheme 6, the sleeves - according to scheme 6 (only rows 3-5, without "picot").


Crochet tunic for full
The flight of fantasy knows no bounds. The "wingspan" of this tunic reaches 6 meters! Do you want the same for yourself? Get to work right away!

Design: Rita Kozhan
Size: XXXXL (Russian 58-60)
You will need: yarn (100% cotton, 1600 m / 100 g) - 630 g white, hook number 3, markers.
The product is made with a thread in 3 additions.
Completing of the work
The tunic is knitted in the round from top to bottom.
Dial the initial chain of 150 air. p., close in a ring. Mark the connection point with a marker - this is the middle of the back. Knit 3 rows of st. 6/n. Knit next according to the scheme.
The tunic consists of 4 tiers-stripes. In the 1st, 2nd and 3rd tiers, 8 rows of "shells" each, in the 4th tier - 19 rows of "shells". The expansion of the tunic takes place in three rows, which are knitted between tiers.
In the first strip-tier - 26 vertical hemstitches. In the second stripe-tier, the number of vertical hemstitches doubles - 52. In the third stripe-tier - 68 vertical hemstitches. In the fourth strip-tier - 136 vertical hemstitches. Tie the bottom of the tunic with 2 rows of borders.
After the second strip-tier, make an armhole: set aside 10 vertical hemstitches for each sleeve, 16 vertical hemstitches remain on the front (back).
Sleeves:
after the armhole, knit another 9 rows of “shells” + 2 rows of border. Sleeve width after armhole - 22 vertical hemstitches.

Crochet tunic for obese women video
Crochet tunic for obese women: patterns


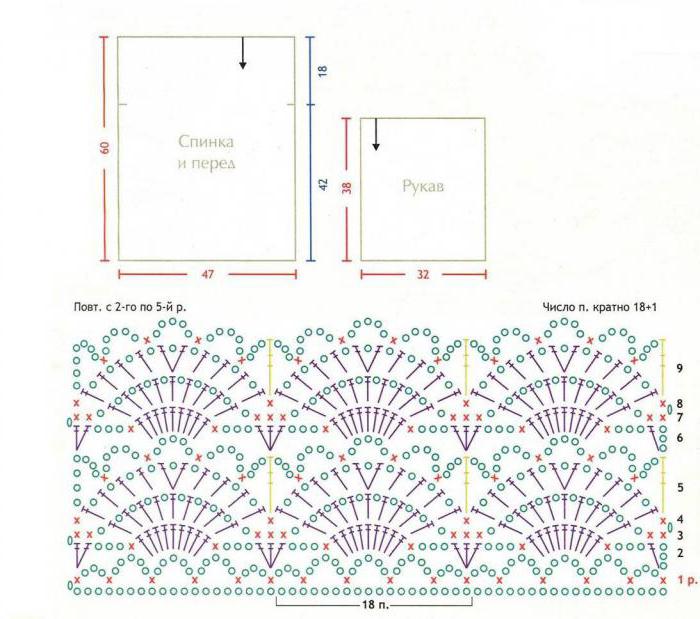
Knitted white tunic crochet pattern and description

Size: L-XL
You will need: yarn (100% cotton, 400 m / 100 g) - 400 g white, hook No. 3, knitting needles No. 3.
Facial surface:
Garter stitch: persons. and out. rows - persons. P.
Description
Back:
start knitting from the center. First, crochet a square according to scheme 1. Then knit 1 transitional row from "pineapple" to "grandmother's" square: 1 tbsp. s / n, 2 air. etc. On one side of the "pineapple" you should get 15 cells (an odd number), the central, 8th cell - above the corner of the "pineapple". After this row, knit a "grandmother's" square according to scheme 2. Knit 23 rows in circular rows. Then on the top side of the square, knit another 10 rows with straight and reverse rows. These rows are for added height.
Before:
knit similarly to the back, but with a neckline. To do this, leave the central 24 cm, knit the remaining loops of each shoulder for another 10 rows in a straight line.
Sleeves:
Cast on 60 sts on the needles. Knit 4 rows in garter stitch - the edge of the sleeve. Next, work *5 rows in stockinette stitch, rows 6-8 in garter stitch*, repeat *-* 10 more times. For expansion, add 3 times x 1 p. on each side = 66 p. At a sleeve height of 17 cm, close all loops.
Assembly:
complete the shoulder seams. Sew on top of sleeve. Sew side seams and sleeve seams. Steam the tunic.
Tie the neckline with a thread in two additions (for relief) with a “crustacean step”.


Crochet white tunic - video compilation
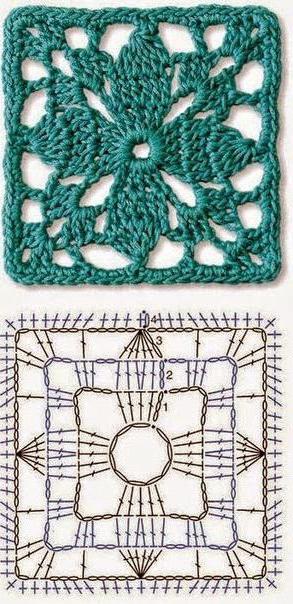
Crocheted tunic from squares

Size: L-XL
You will need: yarn (100% silk, 300 m / 100 g) - 350 g section-dyed, 50 g each mint and mustard, hook No. 4, knitting needles No. 4.
Facial surface: persons. rows - persons. p., out. rows - out. P.
Description
Back:
knit 12 motifs scheme 1
. Connect the motifs to each other in 3 rows - 4 motifs in each (the top and bottom rows are the color of mint, the row in the middle is the color of mustard).
Tie the resulting square, alternating 1 tbsp. s / n, 1 air. n. After this preparatory row, start knitting a “grandmother's” square in scheme 2
. Alternate yarn colors as you wish.
Knit 29 rows in the round, then another 6 cm on the top edge in straight and reverse rows. Cut the thread.
Before:
knit similarly to the back, but with a neckline. At a height of 13 cm from the beginning of the armhole, leave a central 30 cm for the neckline. The remaining stitches of each shoulder are knitted separately in straight and reverse rows for another 5 cm.
Sleeves:
with mint-colored yarn, type 50 sts on the knitting needles. Knit 11 cm without additions, then add 5 times x 1 st = 60 sts on both sides. Close the loops.
Assembly:
complete the shoulder seams. Sew on top of sleeve. Sew side seams and sleeve seams. Iron the tunic very carefully (silk may stretch a little). Tie the neckline, the lower edge of the tunic and the sleeves with 2 rows of the “crustacean step”: one row is the color of mint, the second row is the color of mustard.
Scheme

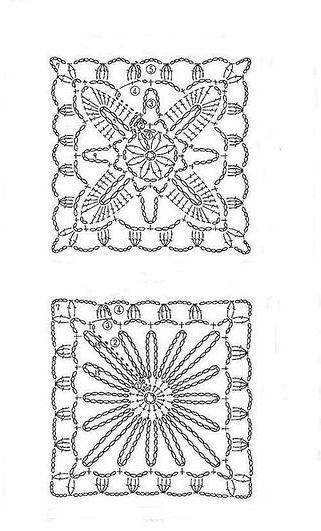
Knitted tunic from crochet squares

Size: L-XL
You will need: yarn (100% cotton, 230 m / 100 g) - 500 g section-dyed, 100 g pink, hook No. 4, knitting needles No. 4.
Facial surface: persons. rows - persons. p., out. rows - out. P .
Description
Back:
start knitting from the center. Crochet a square first scheme 1 . On the last row of the square, knit 3 rows of sirloin mesh: 1 tbsp. s / n, 1 air. P . etc. Next, knit "grandmother's square" on scheme 2 to the model above until the side measures 72 cm. Then work another 5 cm from the top in straight and reverse rows and cut the thread.
Before:
knit similarly to the back, but with a neckline. To do this, leave the central 30 cm, knit the remaining loops of each shoulder for 3 more rows in a straight line.
Sleeves:
Cast on 60 sts. Work *5 rows in stockinette stitch, 6th-7th rows in garter stitch*, repeat *-* 13 more times. Tie 8-9 cm without additions, then on both sides add 7 times x 1 p. = 74 p. Close the loops.
Assembly:
complete the shoulder seams. Sew on top of sleeve. Sew side seams and sleeve seams. Tie all edges 1 next to Art. b/n.
Scheme

Tunic granny's square crochet video
Crochet tunic from openwork squares. MK.
Knitted tunic from crochet motifs scheme and description

Size: 46.
Required:
- 300 g of beige yarn, 100 g of yarn Brown(100% cotton, 169 m/50 g)
- hook number 3.
Motive: scheme 4-1. Knit in the round from the center. With brown yarn, knit from the 1st to the 4th row, with beige yarn from the 5th to the 8th row. The size of the element in diameter is 12.5 cm.
Completing of the work
The dimensions and arrangement of the elements are indicated on the pattern (Fig. 4-1). Knit the required number of elements. In this embodiment, 62 elements will be needed. In the process of knitting the last row, you connect the elements together by folding them according to the pattern (Fig. 4-1). The connection points in the diagram are indicated by arrows. Do not forget to connect the product at the side and shoulder seams. Along the edge of the neckline and the lower edges of the sleeves with brown yarn, knit 2 rows of st. 6/n. On the bottom edge of the product with beige yarn, knit 2 rows of st. b/n. To tie, knit a chain of 220 in. p. and stretch the tie along the waist line, the holes in the pattern will serve as holes.

Crochet tunic loin knitting patterns and description
Bouquets of extraordinary beauty adorn the summer tunic, knitted in loin technique. Airy, slightly flared, snow-white - just perfect for hot days!

Size: XXL-XXXL
You will need: silk yarn (550 m / 100 g) - 700 g white, hook No. 1.25-1.5.
Description
Dial a chain of 780 air. loops (approximately 186 cm long), knit 1 row of sirloin cells = 260 cells. Then divide the work into 4 parts. To do this, use markers to mark the middle 78 cells in front and on the back, knit a pattern on them according to scheme 1. On the remaining 52 cells on the sides, knit a pattern along scheme 2. For expressiveness of the pattern, the extreme cells of the petals and stamens of lilies can be knitted with cells with crossed columns. To do this, knit st. s / n, inserting the hook into the lower left corner of the cell, knit 2 loops on the hook, dial 2 air. p. and knit st. s / n, introducing the hook into the lower right corner of the cell. Then tie another st. s / n in the same corner (lower right), 3 loops turned out on the hook. Without knitting these loops, tie st. s / n in the lower left corner of the cell. Then knit all 4 loops on the hook together. Knit 4 rows in this way. Starting from the 5th row, evenly decrease 2 cells in each part = 8 cells decrease in 1 row. Decrease only in empty cells along the edges of the petals or leaves. Perform such decreases alternately in every 3rd and 4th row until 165 cells remain in the work. 40 rows should be knitted. Knit another 15 rows without decreasing = 65 rows. The height of the work should be approximately 41 cm.
Then divide the canvas in half on the back and front, make marks on the sides. Next, start knitting tucks on 21 cells along the edges of the front using partial knitting: knit according to the pattern, without knitting 2 cells to the side mark, turn the work, knit according to the pattern, not knitting 2 cells to the side mark on the other side, turn the work. Continue knitting in this way, without knitting 2 cells at the end of each row, until there are 22 cells in total on both sides. Further, in each row, knit 4 cells more than in the previous one, until all the cells are knitted again. Please note that the number of loin cells before the start of knitting the tucks and after completion is the same = 78 cells.

Continue knitting in front in the forward and reverse direction for 15 rows without decreasing. Then start knitting the neckline. To do this, leave the middle 10 cells unknitted and then knit each side of the neckline separately. To round the neckline, decrease from the inside in each row 6 times x 1 cell = 28 cells. Continue knitting without decreasing until a total of 22 rows have been knitted from the beginning of the neckline. Finish the job. Knit the other side of the neck symmetrically.
Go back to the reserved cells of the back and knit 33 rows straight. Then, to cut the neckline, leave the middle 14 cells unknitted and then knit 4 more rows separately on each side, decreasing 1 cell in each row on the inside. Knit the other side of the neck symmetrically.
Sew shoulder seams. For the sleeve, along the edge of the armhole on both sides, dial 70 cells and knit in a round loin mesh. If desired, knit the elements of the pattern according to the patterns, placing the motifs in random order. To form side bevels, subtract 3 cells on both sides evenly along the entire length of the sleeve. Knit a total of 44 rows = 53 cm and finish. Knit the second sleeve in the same way. Tie the lower edge of the tunic and sleeves with “shells”, knitting 5-6 tbsp. s / n in one loop. Tie the neckline with b / n columns.


A tunic is a versatile and modern piece of clothing that has become a favorite for many girls and women. In the broad sense of the word, tunics are called clothes for the upper body, reaching the hip line. The length of the model, decoration and execution technique can be completely different.
Exists a large number of options for sewing and knitting tunics, which include sleeves or their absence, dense or openwork fabric, the presence of everyday or festive decor.
In this article, we will talk about what summer is and how it fits in and a description of various models is offered with illustrations.
What yarn is suitable for knitting openwork products?
When choosing a material for making clothes, you should first of all pay attention to yarn with a high content of natural fibers. Suitable for summer things:
- Cotton.
- Bamboo.
- Viscose.
- Silk.
Many models are developed on the basis of optimal and average parameters, and natural materials fit most people. They absorb moisture well, allow air to pass through, in such clothes it is not hot.
Non-natural threads
In some cases, you can use mixed yarn, in which artificial components are added to natural raw materials:
- Acrylic.
- Microfiber.
- Polyamide.
- Nylon.
Due to the negative effect on the skin and the inability to “breathe”, you should not use 100% artificial thread to make a crochet tunic. Schemes and descriptions for women, photos, instructions and recommendations below are given for cotton threads of various thicknesses.
Knitting a simple everyday tunic
The photo below shows a tunic with a straight silhouette.
The degree of complexity of such work is initial. This means that any novice craftswoman can easily get such openwork tunic crochet (schemes and a description of the execution sequence are proposed below).
As you can see in the diagram, the details of the front, back and sleeves are rectangles. To determine how many repeats will be the width of each fabric, you need to knit a control sample from the selected yarn. Its dimensions must be at least 12 centimeters on each side. In this case, the calculations will be more accurate, and the crocheted openwork tunic (diagrams and descriptions are offered for sizes 44-46) will fit.
When the sample is ready, you should measure it and determine how many rapports and rows are 10 cm high and 10 cm wide. Using a simple proportion, you can easily calculate the width of the parts. To knit the tunic in the photo, six rapports were used for the details of the front and back and four for each sleeve.
Getting started: knitting fabrics
Based on the calculations, you need to dial the required number of air loops (VP). For this pattern this number must be a multiple of 18, plus one st per edge.
The specific direction of knitting (from top to bottom) is a feature of this illustration. In the pattern drawing, the direction is indicated by arrows. This aspect should be taken into account when stitching parts.
Having knitted the fabric of the desired length, the work is postponed and the production of the following parts is started.
Assembling the tunic
Finished parts are sewn along the shoulder seams 13 cm on each side. Then side seams are made, leaving 18 cm slots for armholes. Next, the sleeve is sewn along the side and sewn into the armhole.
The connection of parts is best done with a needle with the same thread that was used to crochet the tunic. The diagrams and description for women do not include tying, but it can still be done along the edge of the sleeves and bottom.
An interesting product will turn out if you make a deep neck and a narrowed sleeve. Such models form a more elegant silhouette. A good example is the following figure, which greatly facilitates crocheting tunics (diagrams and a description of the parameters in centimeters are offered below).

There is also a variant of the pattern and a simple binding of the edge of the product. It should be performed after several rows of single crochets.
Crochet summer tunic - diagrams and description
Openwork, almost transparent products have been consistently popular for many years.
It's nice that simple models are still considered classics and continue to find their fans. Among the simplest summer tunics, one can name a product knitted with a solid pattern. However, in the previous paragraphs, the principle of making such a crochet tunic with diagrams and descriptions has already been given. Therefore, here we will consider a product, the details of which are assembled from individual motifs.
How to place square motifs?
Of course, you can apply fragments of different shapes: triangular, round, hexagons and others. But squares are the easiest to model, especially for beginners.
The openwork fragment becomes the main decoration of the crochet tunic. Schemes and descriptions for women, as a rule, suggest either making all the canvases from squares, or connecting them into stripes and combining them with another pattern.

This model includes a simple mesh and large openwork motifs. Along the bottom line, the fragments are arranged in three rows (typesetting), and on the sleeves they are a strip.
Products consisting of one large square deserve special mention.

Most often, this technique is used to crochet spacious tunics, patterns and descriptions for full women consist in repeating the last rows of the motif the required number of times.
The process of making a summer tunic from motifs
The photo below shows an openwork tunic, which consists of squares.

For its manufacture, any pattern you like is suitable for the craftswoman. A good example is such a square.
The fragments connected according to these schemes also look interesting. It is not difficult to repeat them, even a novice craftswoman will cope with this.
The details of the front and back of the tunic are assembled from motifs connected to each other in the process of knitting the last row. In fact, this results in a circular canvas, which, when folded in half, has the shape of a rectangle.
Its width should be equal to half the girth of the chest, and the height should be equal to the length of the tunic to the armholes.
The straps are knitted starting from the front piece and sewn on the back. Their width can be any: from one to ten centimeters. The final stage is the binding of the product. It is important not to overdo it with the complexity of the pattern. If the squares have a rich ornament, the strapping should be simple.
What is the beauty of improvisation
In such an exclusively applied form of creativity as crocheting, there are very few rigid and unshakable rules. For the most part, they relate to the general appearance of the product, the correctness of its cut and proportions.
Everything else (color, texture, pattern, arrangement of ornamental elements and their number) depends only on the knitter's imagination and her skill. The tunic shown in the photo below is a great example of a non-standard creative approach to creating a model.

There are round motifs (flowers), one-piece openwork pattern and solid knit, which is used to fix the bottom line and armholes.
The alternation of strips with different elements opens up the possibility of adjusting the width of the web. This is true if the craftswoman plans to knit a fitted model.
Separate admiration deserves the solution that is used to form the neck. Here the principle of education is combined with thin straps characteristic of summer products.
How to handle a knitted tunic
Crocheted fabrics are much denser than those knitted with knitting needles. They are less prone to deformation, but although stretching does not threaten them, shrinkage is quite possible. Almost all natural materials can shrink a little over time, especially after washing in hot water.
Therefore, the basic rules for caring for tunics, crocheted, refer to the washing and drying mode. The water temperature should not exceed 30 degrees, machine washing is strictly contraindicated, and it is better to dry such products in the unfolded form.
If necessary, iron a knitted tunic, this is best done through a layer of thin, damp fabric.
Conclusion
Guided by the above tips and recommendations, you can crochet summer tunics quite quickly (the diagrams and description for women are quite detailed). At the same time, the pattern can be easily replaced, and the models can be decorated with additional decor: beads or embroidery.


