Steam locomotive made of cardboard. DIY steam locomotive: we create crafts for children from unusual materials
"Making a train out of colored paper with your own hands." Master class with step by step photo
Degtiartseva Natalya Vasilievna, teacher of MAU DO DDTT
Vladikavkaz, Republic of North Ossetia - Alania
The work is intended for children from 7 years and older, teachers and parents.
Purpose: a toy, an interior decoration, a gift for relatives and friends, an exhibit for an exhibition of technical creativity.
Target: make a train out of colored paper with your own hands.
Tasks: educational - to master the technique of manufacturing a steam locomotive and trailer; developing - to develop the practical skills of learning children when working with scissors, to develop fine motor skills, imagination and fantasy of the child; educational - to cultivate aesthetic taste.
Materials and tools: colored paper, scissors, glue, ruler, simple pencil, eraser, compasses.

Riddles for children.
The brothers were equipped to visit,
clung to each other
And rushed off on a long journey,
They just left smoke.
(Train)
far, far away
Along the railroad
Maybe this guy
Take the whole village.
(Train)
Behind the smoke
Behind the whistle
The brothers run in single file.
(Wagons)
V. Struchkov
Iron Already crawling
Passengers are carried far away.
(Train)
Iron Snake
Wriggles in the steppes.
Lost in the steppes.
loud voice,
Runs after the snow.
Ran a thousand miles.
Unhooked a long tail.
Fifteen Brothers
They love to ride.
First with pipe
Leads everyone along.
(Train)
One hundred barrels
Gudochek is leading.
(Train)
Steel Mare
Rushing across the azure steppes.
Ran a hundred miles
She pulled off her long tail. (Train)
On steel tracks
Centipede rushes.
Knock-knock-knock.
Round click heel.
With a cheerful song
Along the iron ladder.
(Train.)
V. Tunnikov
Every day back and forth
Carries loads carefully.
In rain, blizzard, heat, frost
The hard worker rushes - ... (locomotive)
Step by step process of making a train.
Steam locomotive manufacturing.Stepping back from the narrow edge of the A4 sheet by 1 cm, we bend the sheet on both sides of the ruler. Putting the ruler with the left edge on the second bend, bend it again. Let's make four bends in this way.

Having received four wide strips, we cut off the excess part of the sheet along the last bend. Bend the edge of the sheet, stepping back from the left edge by 1 cm, and then bend the sheet on the other side of the ruler.

We cut off the excess part of the paper, leaving 1 cm fields for gluing in the middle square. We cut the edges of the square to the line, as shown in the photo.

Glue the sides of the square. We will shorten the main part of the locomotive cabin by cutting it to the width of the ruler on the right side of the part.

We glue the edges of the long strips, getting a column. Glue the roof to the post. The cabin of the locomotive is ready.

To make a window, we will prepare a square with a side of 2.5 cm from colored paper, and a square with a side of 1.5 cm from white paper. For the door, cut out a 7x2.5cm rectangle and a 1cm strip for the handle. For the front of the locomotive, we bend, departing from the edge by 1 cm above and below a square with a side of 4 or 5 cm. We cut the folded parts of the sheet for gluing.

Glue the prepared square into a tube. Glue a window and a door on the cabin of the locomotive.

On a 6x5cm rectangle, glue a colored strip, 1.5cm wide. On the wide pipe prepared earlier, we glue along the edges of the strip, 0.5 cm wide.

Glue a small pipe in the center of a large pipe. Glue the large pipe, bending the edges, to the cabin of the locomotive. On the free edge of a large pipe, glue a piece of paper in the shape of a square.

Let's make a strip 3x7cm. Twist the edges of the strip with scissors in different directions, getting a figure eight.

Let's make circles for wheels with a radius of 1.5cm and 0.7cm.

We cut off the extra edges of the square on the large pipe of the locomotive, glue the wheels and the figure eight, as shown in the photo. The locomotive is ready.

Wagon manufacturing.
Stepping back from the top edge by 1 cm, bend the sheet on both sides of the ruler. Then the sheet on both sides, putting the ruler to the right and left of the edge of the sheet. Cut the bottom of the sheet to the width of the ruler. To do this, draw a line at the bottom of the sheet. We will make cuts, as shown in the photo.

From the second of the same sheet, we will leave only the middle part, cutting off the extra bends, as shown in the photo.

Cut off small rectangles from the sides of the first part.

Glue the side parts on the first part, as shown in the photo.

Glue the second piece to the top of the first piece.

Glue the side parts of the car to each other.

Let's make a rectangle 11x5 cm for the door and two rectangles 7x5cm for the windows. From white paper we will make a rectangle for the door window 3x6cm and for the car windows - two rectangles
3.5x5.5cm. We will make a strip for the inscription of the direction of the train 1.5x9 cm.

Glue the details of the door and windows to the car.

We will make six wheels according to the previously proposed sample. The diameter of the large circle is 5 cm, the small circle is 3 cm. Glue the wheels along the edge of the car and in the middle. The car is ready.

Glue the wagon to the fixing eight on the locomotive.

Our train is ready.

Adviсe.
1. The main parts of the train are best made from thick paper.
2. For the manufacture of windows, it is better to use paper of ordinary density.
Thank you for your attention! I look forward to your feedback.
Every child dreams of a railroad, but not every parent can afford it. Such a colorful toy do-it-yourself box locomotive you can do with your kid. Your child will roll his toy friends in it. In addition, such a locomotive can perfectly serve as a container for storing toys - children will be happy to put their dolls and teddy bears into the cars.
To make such a locomotive you will need:
- green and red self-adhesive wallpaper
- flower pot trays
- double-sided and regular tape
- plastic lids
- carton boxes
- lining fabric
- spray enamel
- eye bolts
To create wagons, banana boxes are best suited. If the boxes are without a bottom, then it will be more convenient to seal it with adhesive tape by inserting cardboard cut to size. For the wheels of the wagon, take plastic covers, cutting off all the bumps with a knife. And the necks from plastic bottles are useful for attaching the wheels to the box. Cut a hole in the center of the cap to fit the neck of the bottle with a knife.

1. Determine the location of the wheels on the box, attach the lid and circle the hole. Then cut out the marked holes. Insert the neck of the bottle into the hole from the inside of the box. Put a lid on it, then secure it with a cap - this has been a fitting so far.


2. Now glue the box with self-adhesive Green colour. Eye bolts are useful for coupling wagons to each other. Using a screwdriver, make a hole in the box and, inserting the eyebolt, tighten the nut.


3. Cut holes for the wheels and insert the necks of plastic bottles into them.


4. From the inside, glue double-sided tape along the top edge of the box.
5. For the inner part of the wagon made of lining fabric, sew an insert by gluing it with double-sided tape.
6. Paint the caps with golden spray enamel and, after drying, attach them to the necks of plastic bottles, thanks to which they will spin.

7. The trailer is ready! Now the hardest part - the locomotive!

8. Cut along the sides of the end side of the box. Deepen the wall a little. Cut off the corners with a knife. This will be the front of the locomotive.

9. Cut out a piece of cardboard that is similar in size to the perimeter of the top. In addition to the bottom, paste over everything with adhesive tape and self-adhesive.
A juice box is suitable for the cockpit, and a plastic can for the bow.
10. Cut a hole on the box along the neck of the jar so that it fits snugly there.
11. From the bottom of the box, make a cardboard bottom.
12. Seal the box intended for the cab in addition to the top with self-adhesive tape.
Make holes for fastening.

13. Connect the cabin to the bottom of the locomotive - the necks of the bottles should enter the holes on the bottom of the cabin - and screw them from the inside with bottle caps. Do the same with the bow of the locomotive.

14. Make a hole the size of the neck of a bottle in a plastic jar. And on the back of the can, perpendicular to it, make the same hole in the center of the can. Pipe - from the top plastic bottle. Paint it with golden spray enamel.


15. Seal the side of the cab.

The little train is a frequent character in children's fairy tales and cartoons, a favorite hero of many kids. That is why mothers who are engaged in needlework often make crafts in the form of a colorful train. This product can be made from various materials, almost from all that surround us. For example, from felt, from photographs, and even from boxes that were lying around on your balcony. Such crafts can be done with children, it will have a wonderful effect on their mood and hand motility. Thanks to this master class, you will learn how to make a locomotive with your own hands.
The diaper option
Young mothers will definitely appreciate such a gift, because diapers will always come in handy when there is a one-year-old child in the house.
Necessary materials:
- diapers (20 pieces);
- elastic cord;
- rubber bands for money (22 pcs.);
- corrugated paper;
- skewer;
- satin ribbons;
- stapler;
- glue;
- pins.
First, roll the diapers into a tube.
To prevent them from untwisting, fix in the middle with an elastic band for money.

Make sixteen tubes.


Tie two tubes together, then attach the following to them, wrap each in a circle.
On a note! If you just tie them with an elastic band, they will curl up and will not lie evenly and neatly.

Then press the diapers on top with a cardboard so that the last diaper does not rise up.
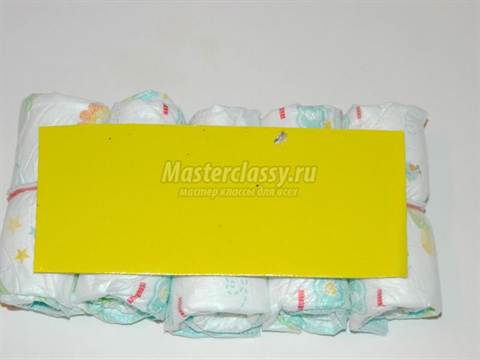
We tie with a ribbon. You can use any tape, as it will not be visible.

We proceed to the frame of the steam locomotive. Tie two pairs of tubes together with rubber bands and lay on crepe paper.

Pack the diapers in paper, glue the joints or staple them together. Then cut the cardboard so that it does not stick out from under the frame. Secure it with ribbons, before trying on the wheels.


Make a pipe for our train. Wrap one diaper with crepe paper, glue on top and at the joints. Insert a tube from a sheet of office paper inside the diaper. It can be replaced with a skewer.
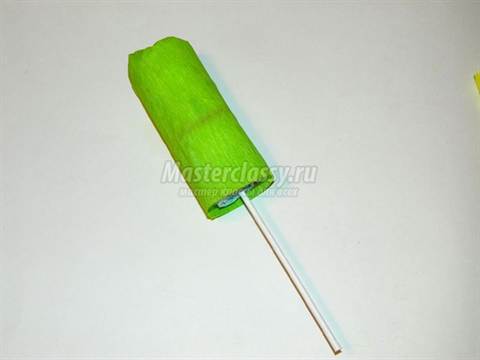
Using a narrow knife, make a hole in the paper between the two diapers and insert the tube.

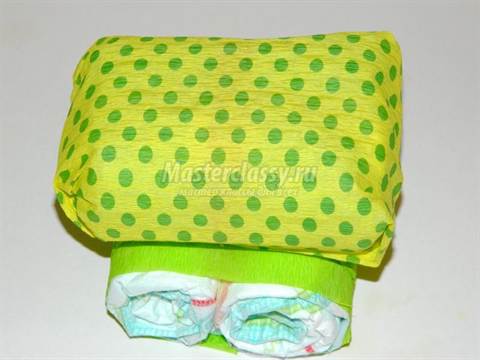
To make a train cabin, fold four diapers in half and stack them on top of each other.

Wrap in paper.

Put the cabin on the locomotive, secure with pins or glue.

For the wagon, make two pairs of knitted diapers. If desired, you can make trailers from cardboard.

Wrap with paper.
Make another trailer, but smaller. Fix all the details satin ribbon. The diaper train is ready!

Thomas the Tank Engine
"Thomas the Tank Engine" is a popular modern cartoon that many children adore. Thomas is made from many materials: from mastic, from sweets, and also from paper. We will consider the latter option.
And traffic jams! Not a single child can remain indifferent to the game with trains: the process of coupling different parts together and forming a single whole from them draws in both the little representatives of the stronger sex and future beauties.
Traditionally, locomotives are built from cubes or special blocks. But you can make them from the means that are available in this moment at hand. And since it is quite possible for a kid of any age to make a train out of it, you can involve very young children and preschoolers in this activity.
For example, an unusual train is obtained from cardboard rolls from paper towels or toilet paper.
To create it, prepare in advance:
- several cardboard rolls (the more, the longer the train will be);
- manual hole punch in the form of pliers (on a narrow handle);
- chenille (fluffy) multi-colored wire (or ordinary wire);
- scissors;
- decorative paper tape;
- tin bottle caps;
- polymer glue.

If there are no ready-made rolls, you can glue them from cardboard or thick.
So, how to make a paper train with your own hands, the photo of which is given below.
We manufacture two types of wagons from rolls – cargo wagons with an open platform and closed wagons. In the first case, we cut the roll lengthwise into two halves; in the second - leave whole. If we make a train from straight paper sheets, then for open cars we simply cut out narrow rectangles, and for closed cars we glue them in the form of a cylinder.

We decorate each trailer decorative tape sticking it in different direction, forming unusual patterns.


Then we proceed to the coupling of our composition: in each trailer, we make a hole along the edges on both sides, thread a piece into it and form a hook out of it. We fasten two adjacent cars to each other by wire hooks.


It remains to put our train on wheels. To do this, we glue caps on the sides of each trailer - like wheels. The train is ready!

Greetings, dear friends, readers of the Family and Mom blog! Today we have a craft on our website again and this time we will tell / show with the children how to make a cardboard train with our own hands for children with step by step photo instructions(or rather, from junk / improvised material that every mother has at home - juice / milk / kefir boxes).
If your child, like my children, loves everything related to trains / locomotives (the train from Romashkovo, Chuggintons and other cartoons with trains are among my children's favorites), then please him with such a cardboard train made by yourself, Moreover, it takes a minimum of time to produce it.
In such a homemade train, you can carry small toys - Lego men, toys from kinder surprises and others. The train made of cardboard has windows, a door, almost like in a real train. It can be decorated - pasted over with colored paper, painted with paints, felt-tip pens, but we did not decorate, because the children urgently needed to carry passengers and they could not wait any longer))
How to make a cardboard train with your own hands for children (photo instruction)
My kids have been sitting at home since the beginning of February (first because of the flu epidemic, and now due to the fact that in the Lenin group several children got into an infectious disease with an intestinal infection, so while they are sorting it out, my husband and I decided that the children are still stay at home).
While the children are at home, we come up with new games and activities every day, constantly looking for something interesting to have fun with. And just the other day, the kids played with Lego men, small toys (from Kinder surprises and other similar miniature ones), which “traveled” around the apartment)) The little men were tired of moving by car, so the children asked for help to build some new transport) ) We thought we thought and came up with the idea of quickly building a train out of cardboard with our own hands (juice / milk boxes), which will be discussed below.
To make a cardboard train, we need:
- long high cardboard box from juice / milk / kefir (we have a box of liter milk) - 2 pcs. (Depends on how long the engine you want to make - the more boxes, the longer the engine.
- Rope for connecting trains
- Scissors/knife
- Colored paper / felt-tip pens / paints for decorating the train (we left it like that, the kids had no time to wait - they had to carry passengers))
- Human passengers who will test the strength of transport))
How to make a cardboard train with your own hands for children:

That's all, do-it-yourself cardboard train for children is ready, now you can invite passengers to take their seats and go))
The article turned out to be useful How to make a do-it-yourself cardboard train for children (photo-instruction)? Please click the social networks button at the bottom of the page so that I know about it) In order not to lose the article, add the page to your bookmarks so that you can later do such a craft with your child. In order not to miss new interesting, useful articles, subscribe to blog updates at the bottom of this page!
Best regards, Olga


