Simple and beautiful DIY Christmas decorations. DIY Christmas decorations: original ideas
Good afternoon I hasten to please new year ideas toys, and those who have not yet made gifts for New Year, I recommend not to delay this for a long time and choose them in this
Tell me, what do you prefer to give for the New Year? What about receiving? Probably everyone really likes to receive toys for the Christmas tree, and just all sorts of things. Agree, I remember when I published a post about crafts for the upcoming holidays, so a lot of people sent me wishes and congratulations, so I also want to congratulate everyone on the upcoming!
Having written the last note about New Year's crafts, letters came to my mail with a request that I publish more options for what can be made from plasticine, I share with you my best practices.
Here she is a beauty!

Do you like to sculpt Christmas trees and snowmen? Then use this step by step instructions with photo:


Where without Santa Claus, the kids just love to see him at the holiday, and even more so to sculpt crafts.

These are the compositions you can get.

If you want, you can even sculpt Peppa Pig and her brother George from a cartoon.

Or for example a mouse or a rat.

You can make a dog lying near the Christmas tree, let it bring warmth to your home and become a talisman.
Such an affectionate and sad puppy girl.

Or playful Tuzik, what do you choose?

I remember once upon a time I had to work in a kindergarten, you yourself understand that kindergartens are almost not funded, so at that time we made and decorated our group from what we could, in general from all sorts of things. It was ordinary foam or they took cheap ceiling tiles and this is what happened:

Agree, there seems to be nothing difficult, but it also looks original, with a twist.

A little more difficult, and time-consuming, are toys made from salt dough.


Beautiful felt toys for the Christmas tree
Now, as for felt, well, a lot of ideas can be created and found on the Internet.


Their patterns and patterns are quite simple, you can easily draw yourself.
Funny deer.

The Christmas tree is a forest beauty.

If you are interested in this Christmas tree, or such a bookmark for books in the form of a dog, then write to me below, I will send you templates and a diagram.


Snow Maiden from felt.

And how do you like such wonderful creatures, if you decorate a Christmas tree with them, there are diagrams in an enlarged form, they will soon appear in another note, or write to send.

By the way, I was so hooked on the topic of felt that I will soon write a separate article on this topic, so expect fans, add my blog to bookmarks and rejoice with me))). By the way, if you need crochet toys, then feel free to go here, there is a whole
Master class of paper crafts in the form of balls and lanterns
Who doesn't love Christmas tree balls? Probably everyone just loves them, let's make a simple option.
You will need colored or multi-colored paper, scissors and glue. You will need to cut out 20 circles of the same size from it. And then act according to this scheme, roll up as shown in these pictures.

Then, as shown, glue with good glue, it is better to take an erikrauzer or PVA.

There is another version of such a paper Christmas tree ball.

And I also give you the most popular type of balloon decorations, in this video everything is shown in great detail and clearly, you just have to repeat the necessary steps after the presenter:
And here is another super idea that you definitely haven’t seen before:
for school and kindergarten I can offer such interesting flashlights that everyone probably knows and remembers.


And another masterpiece in the form of a garland, it's not that unimaginably beautiful. Watch this video from YouTube channel:
Paper toys for the New Year
The first place can rightfully be given to snowflakes of various types and in the origami style and volumetric options, who need all sorts of ideas and patterns, see snowflake patterns here


It is also easy to fold various figures from paper stripes.


We make Christmas decorations for the Christmas tree with our own hands from plastic bottles and light bulbs
A fairly common craft, a souvenir, and someone will even give such a treasure as a gift, I recommend doing it yourself at home. Just be careful if you are making crafts from a light bulb, after all, this is not for children's hands.


From plastic bottles will be safer and more durable.

We will send the material to you by e-mail
It's time to actively prepare for the New Year: while there is still a lot of time left before it, you should use such a valuable resource and make New Year's toys with your own hands from paper and more. The editors of the site undertake to help you with this, which also prepares their houses and apartments for the New Year.
Let's start making New Year's paper toys with our own hands: options for holiday decorations
It is amazing that a great many different decorations can be made from paper, in addition to the well-known lanterns, garlands and snowflakes. We deal with paper beauty and try to make a New Year's toy with our own hands using photos from master classes.

Paper makes beautiful figurines of Santa Claus, Snow Maiden, even pigs as a symbol of the coming year look great like a Christmas tree. We study tips for making various decorations for the Christmas tree and try to put them into practice!
Cute Santa Claus
One of the children's favorite New Year's toys handmade, there will be a wonderful Santa Claus. This revived fairy-tale character from a childhood dream will find the most prominent place on the Christmas tree.


Related article:
Do-it-yourself origami for the New Year: postcards, classic and modular origami, Santa Claus and Snow Maiden, origami Christmas tree, snowflake, origami star, origami animals - in our publication..
Snowman without snow
The snowman is also a traditional winter symbol that children will be interested in making with their own hands. There are several ways to make a small beautiful snowman.


Angels in different ways
The cutest do-it-yourself Christmas tree toy is an angel. Such a Christmas tree decoration always cheers up and will serve as a decor for the coming Christmas.


Garlands - a large-scale decoration of the apartment
Great DIY Christmas toys can be made together with children. Such a suitable option would be the process of creating a garland.


Related article:
DIY garlands for the New Year: photo. Christmas tree, paper circles, accordion, corrugated garland and origami, garland made of fabric or felt, cones and other material, LED garland decor - in our article.
Flower wreaths and more
Christmas wreaths immediately give a festive and solemn mood to anyone who casts a glance at them. They also make chic wreaths out of paper!


Related article:
: the history and tradition of occurrence, a master class on creating what to make the basis for the product from (newspaper, cardboard, pipe insulation), decorating the New Year's wreath with various materials - read the publication.
Stars and snowflakes fall in the apartment directly from the ceiling and walls
The familiar look of snowflakes is still popular, but there are other options for making these traditional elements. We also suggest trying to make beautiful paper stars with your own hands. From them you can build a garland, hang them from beams on the ceiling, a chandelier, stick them on walls and doors, on windows or on a Christmas tree.


Related article:
: the art of quilling and the beauty of paper strips. Stencils for Christmas snowflakes, modular origami, geometric shape, a fluffy snowflake, an asterisk on a Christmas tree made of paper - in our publication.
We make Christmas balls in different ways
How without the usual for us Christmas balls? Paper also makes its own adjustments to the production of New Year's decor. Let's try to create beautiful balls?


Related article:
corrugated paper, kusudama, origami, paper flowers; christmas ball from felt and fabric, decorating a Christmas ball on a Christmas tree by various means - read in the publication.
Christmas tree lanterns and more
The flashlight is a versatile toy, suitable even as a decoration on city tree handcrafted. In the apartment, too, there is always a place where there is clearly not enough New Year's lantern.


How to make a New Year's toy from yarn, ribbons, beads, felt and cones with your own hands
In addition to paper for making New Year's decor, it is worth trying to use various materials. Interesting and beautiful work are obtained from natural material, easy-to-handle felt, beautiful yarn. Acrylic paints, hot glue and PVA glue, sequins and any decorative elements help in the work.
DIY Christmas tree toys: a new life for grandmother's yarn
Any dense thread can be turned into voluminous or flat original jewelry for the holiday, which are so good that they keep their shape for many years.


Video: an example of a toy made of threads for the New Year
We make a New Year's toy from ribbons, beads, sequins
A bag of sequins or beads is inexpensive. They decorate any surface or use them as decorative elements for finished products. Glue the decoration on hot glue or super-moment.


From fabric, ribbons, beads, it is easy to make even a large toy for the Christmas tree with your own hands. Large-sized ready-made foam blanks are for sale, which can only be decorated.
Felt toys for the New Year
Do-it-yourself small and large New Year's toys are easy to make from a material such as felt. This is a fascinating process that always has a positive result for both experienced craftsmen and beginners.
You don’t need to spend a lot of time learning the basics of working with felt either: the material is easy to cut, it’s easy to sew it by hand or sew it on a typewriter. The edges are decorated with any kind of seams.
More often felt serves as a base on which the decor is located. Decorative elements are also cut out of felt of a different color, or embroidered on it, various beautiful decorations are pasted on.

Article
Everyone wants to present a surprise to their loved ones on Christmas and New Year. And you can bring the onset of the celebration closer with your creative forces. Take note of the original ideas that we have collected in the selection below, and then the upcoming winter holidays play with completely new colors. Do not be afraid to create, involve all the household in the process - this will bring the family closer, and maybe even become the beginning of a new tradition.
winter flowers
It is not difficult to make the New Year's beautiful Christmas tree bloom. In order to make such Christmas and New Year toys with your own hands on the eve of 2018, you don’t even need to use a special colored paper making a choice in favor of old books or newspapers. Such buds will look original, and you will pay tribute to the now fashionable eco-direction. So let's get started:
- cut out a perfect square from paper;
- fold it as shown in the photo;
- repeat this with the remaining 4 sheets of paper;
- glue the resulting blanks, forming a flower;
- we decorate the middle with tinsel, a bead, in a word, everything that seems suitable to you.
ice shards
Who would have thought that old CDs could be used to create such creative balloons? Yes, in most cases, making Christmas tree decorations will not require either serious material expenses or the skills of a professional designer. Which proves the next master class.
For work, you will need transparent (in principle, you can use colored ones) plastic or glass balls, waste CD, scissors, glue gun.
- cut the CD into pieces of arbitrary shape and size with scissors;
- we apply droplets of glue on the surface of the ball and fix the “mirror” fragments in the desired order, evenly covering the ball from all sides and leaving no empty spaces.
The result is a wonderful toy that is no different from expensive designer works. Their soft sheen will perfectly complement the overall impression of a magnificent Christmas tree.
cute snowflakes
A simple, but remarkable in its laconism, decoration is snowflakes. Backing material … bushings left after use toilet paper or kitchen towels. Also stock up on scissors, glue, decorative elements in the form of large rhinestones and thin fishing line. Step by step the whole process looks like this:
- crush the sleeve, pressing it well from the edges;
- We cut the sleeve into strips of the same width. Elements are obtained that visually resemble flower petals;
- we glue the resulting blanks in the center, so that we get a flower;
- decorate the middle with rhinestones;
- through one of the petals we pass the fishing line. Everything, the snowflake is ready to soar near the branches of your Christmas tree.
felt fantasy
Here are some more fun DIY crafts. The toy can become both an independent element of a festive decor, and act as an integral part of a whole garland.
- cut out a square from the felt of the desired color;
- draw it as shown in the photo;
- cut with a clerical knife along the lines, not reaching the center;
- glue the strips together, folding the corners on top of each other;
- we alternate actions alternately on one side, then on the other;
- we hang the finished toy on a fishing line, decorating with beads.
If desired, you can create a whole vertical garland of several similar parts, alternating them with beads. The toy can be hung on a Christmas tree or placed in the interior.
Snowball game
It is very easy to make fluffy lumps of snow that will not melt, no matter how warm it would be in your house. We use foam blanks in the form of balls, mother-of-pearl beads, sewing pins, glue, scissors, braid. The process of making such a toy comes down to the following steps:
- string beads on pins;
- smearing the end of the pin with glue for better fixation, stick them into the ball;
- continue like this until we cover the entire surface of the toy with beads;
- we attach a braid or ribbon to the ball, for which we will hang the decoration on the Christmas tree.
funny ninja
Small ninja toys with cute movable eyes will save your homely beautiful Christmas tree from excessive formality. After all, looking at such new Year decoration involuntarily want to smile.
To work, you will need very few materials: dark opaque balls (they can even be made of plastic), narrow ribbons different colors, toy eyes (a pair for each ninja).
- we wrap each ball with two turns of the ribbon, fastening the bandage of the impromptu fighter to the knot at the back. For greater reliability, the tape can be put on glue.
- glue the eyes on the tape in front, that's all - decorations for the new year can be hung on the Christmas tree.
Beauty cone
Fits perfectly into christmas decor... an ordinary pine cone. It would seem how unpretentious the accessory is, and what wonderful toys can be made from it and how many ideas can be realized. The bump can simply be hung by a rough twine, and the top can be decorated with a beautifully tied satin ribbon bow to match the overall color scheme. Or make from cones christmas trees, crowning them with numerous multi-colored plasticine balls. It seems to be simple, but it looks really unusual and creative.
Snowflakes from ... pasta
For a prudent and creatively thinking hostess, even pasta can become the basis for creating amazingly beautiful decorations in the new 2018. Fantasies can be given free rein here - after all, each new snowflake may be completely different from the previous one. All you need is to stock up as much as possible big amount different types pasta in the nearest supermarket (flowers, Christmas trees, spirals, shells, etc.). Also, you can not do without glue, white paint and braid (ribbons, fishing line, thread) for hanging.
We form a pattern, starting from the center, observing symmetry. How the toys turn out depends only on your imagination. We glue the parts of the decoration together with glue. At the end of the work, paint the snowflake in White color, additionally decorating the decor with sparkles to your liking.
New Year's toys with sequins - festive glamor
Surprise your loved ones on Christmas and in new year's eve you can make unusual, shiny decorations for the Christmas tree with your own hands. A special charm in creating such balls is the process itself, which is addictive and very simple. So, stock up on a small foam ball that fits easily in your hand, sequins of any color, sewing pins.
We fix the sequins to the ball with pins, as shown in the photo, we act sequentially, placing the shiny elements close to each other, avoiding gaps. When the ball is ready, it remains only to place an element in its upper part to fix the decoration on the Christmas tree.
Who wants ice cream?
Love ice cream? Why not decorate the Christmas tree with your favorite treat for the New Year, especially since this does not require a lot of materials. It is enough to find thick paper to imitate waffle cones and colored napkins or small pieces compressed paper, needle, thin fishing line. Having formed a cone from thick paper, we make ice cream balls from colored paper, the number of which depends on your desire. Then we form a loop from the fishing line, for which our sweets will be hung on the Christmas tree and thread it through our balls, as is done in the photo.
Rooster on the Christmas tree
It will look good from paper or other materials. You can make a lot of these cockerels and collect pendants into a garland to decorate your home. If you are going to make a paper cockerel, take cardboard as a base, which you will glue on both sides.
- You will need multi-colored sheets of colored paper (you can use colored cardboard) and a sheet of cardboard. Draw the silhouette of a rooster on cardboard and cut it out.
- Using a cardboard blank as a template where necessary, draw the details on colored paper (cardboard): head, torso, wings and tail - pre-fold the sheets in half so as not to waste time preparing blanks for the second side.
- The next step: cut out our blanks.
- Now we glue the parts from colored paper (cardboard) onto the cardboard blank. After the cockerel has gathered into a whole picture, you can decorate it with sparkles, beads - whatever comes to mind.
- Make a hole in the workpiece, thread the ribbon and hang it on the Christmas tree.
You can make a similar toy out of felt and also use it to decorate the Christmas tree.
Draw a pattern by hand or use any ready-made one, for example, this one:
Homemade cockerels made using the origami technique will look original.
pillow toy
A difficult, but very exciting activity in making toys is the creation of a pillow in the form of a symbol of the year, which will delight you not only in the year of the Rooster, but much longer. You will need a pattern, fabric, filler, felt (depending on the model chosen), threads and needles. Here the matter is small, we circle the pattern, sew the details, leaving a hole to fill the pillow with filler. We turn it inside out, put the filler inside the toy, sew it up to the end.
There is also a more complex plan with fabric painting - this is batik, thanks to which the pillow will acquire a bright color. After you have circled the cockerel on the fabric, paint it with special paints, they can be replaced with gouache if you mix it with PVA glue. We leave for a day for the paint to dry, and continue to finish the pillow in the form of a rooster.
From salt dough
At a competition, children are often asked to bring something to school. New Year's crafts. Make it from salt dough. A bioceramic craft can become great gift from children to grandparents. Moreover, this occupation is so exciting that it fully claims the status of a hobby.
Before you make a toy out of salt dough, you need to prepare the dough itself. To prepare the dough, use fine table salt, ordinary wheat flour and water in a ratio of 2:4:2, respectively. First, flour and salt are mixed, and then warm water is added, thoroughly kneading the dough for at least 10 minutes.
There is another recipe for making dough. In this case, flour and salt are taken in the same proportions, only the flour is sifted beforehand. You need to take a little less than 1 1/3 cups of water. The cooking method will be different. According to this recipe, water must be brought to a boil and salt should be dissolved in it. Only then flour is added.
When the dough is ready, start making crafts. If you are doing crafts with your child, simplify the task by taking cookie cutters, for example, in the form of Christmas trees or bunnies - you will get wonderful Christmas decorations. Make a toy (you can use beads or beads for decoration), do not forget to make a hole at the top. To harden the toy, it is left for 24 hours or baked in the oven. After the toy has hardened, it is painted acrylic paints, gouache, watercolor, allow to dry well and cover with either colorless nail polish or nitro-lacquer on wood. A thread or ribbon is threaded through the hole. Here's the New Year's gift.
Photo ideas of crafts from salt dough
Soap figurines
Soap is always useful. A little unexpected, but soap can also be used to decorate the Christmas tree. Soap toys for the Christmas tree are made by hand. The process is simple. First, we rub the baby soap on a coarse grater, melt it in a hot bath (make sure that bubbles do not form), pour the liquid into a mold and leave it to harden.
- If you want to make a colored soap with a pleasant aroma, then add dyes to the base - it can be either food coloring or the juice of berries or vegetables, such as cherries, beets, carrots. The smell can be given with the help of perfumes or fragrances.
- If instead baby soap use ready-made transparent soap base, then you can make soap with "filler". After you half fill the form with melted soap, let it brew for 20-30 minutes, put a slice of lemon or orange on top, coffee beans and fill the form to the end with soapy liquid.
- So that soap also has useful cosmetic effect, ground coffee is added to the base, which will work as a scrub, various oils, lemon zest, ground oatmeal. Such a toy, which in combination will also be an excellent gift, will obviously not be left without attention.
big toys
Using threads, you can also create wonderful jewelry of a rather large size - giants. It is enough to inflate the balloon, wrap it with a thread dipped in PVA glue and leave it for 24 hours. After drying, the ball is burst, leaving an airy New Year's toy made of threads, which for decoration can be covered with silver or gold paint, decorated with beads, beads, sequins, ribbons. Pass the tape, and the accessory is ready. If you prepare two or three balls of different sizes, you can make a snowman.
Christmas trees are made from threads according to the same principle. As a base on which you will wind the thread, use a Whatman cone. You can make such a toy in miniature if you take a simple sheet of cardboard instead of whatman paper. Light beads, ribbon bows are useful for decoration.
New Year is a time of fairy tales and miracles. On the eve of the holiday, even desperate skeptics are inspired and strive to work miracles themselves. Where, in what direction to direct the flow of your unrealized energy? On the eve of the holiday, you can think about decorating the Christmas tree and make your own Christmas decorations for the Christmas tree. In addition to the decor functions, toys made for the New Year can be presented to loved ones, relatives, colleagues, friends. This small sign of attention will be very pleasant to them!
The manufacturing process is not only interesting and fun, but also extremely economical for the family budget. Such gizmos are significantly different from store ones, because a piece of soul and love is invested in them.
Ready-made Christmas decorations fill the shelves of all shops and souvenir shops. These are traditional stamped plastic beads and balls that are not able to arouse admiration and delight. As for unique, divine beautiful toys self made they are quite expensive. But such products radiate real warmth! Thanks to the step-by-step MK that I have collected in this article, you can quickly and easily make toys on Christmas tree.
DIY Christmas toys for the Christmas tree 2019
The Earth Yellow Pig will be the symbol of the New Year 2019. Oddly enough, but colors should be given preference yellow. The following shades are also perfect:
- grey;
- beige;
- brown;
- terracotta.
It is interesting that the circular annual cycle ends on the Pig, if you follow the Eastern calendar. In this case, all celebrations must be held at the highest level, and decorations and toys are no less important.
If the proposed colors seem boring, gloomy, you can apply the following shades for toys:
- green;
- red;
- silver;
- blue and cyan;
- white;
- golden.
Advice! It is advisable to avoid black and dark blue.
main attribute new year holidays is a Christmas tree - a lush, bright beauty. Toys of their own manufacture will look especially beautiful on its fluffy branches. You can make toys from any materials at hand: foil and paper, pompons, puff pastry and pasta, ribbons and cotton wool, felt, coffee beans and acorn caps.
Master class on making pasta decorations:
 From pasta you can make such a cute angel for the Christmas tree
 Not many people are able to master art modeling. That is why, in order to decorate the Christmas tree in a non-standard way, you can build a toy using pasta. Absolutely everything will do - stars, shells, horns, bows.

- glue or glue gun;
- pasta;
- newspaper;
- acrylic paints;
- dense thread and decor.
Cover the work surface with paper so as not to stain or spoil. According to the scheme you came up with, glue the pasta together. From them you can make various figures, angels, snowflakes. When the parts dry, you need to apply paint. great idea will use bright colors with a pearly sheen.

Leave the products for 2 - 3 hours, then you can decorate with beads, beads, and also sprinkle with sparkles. In order for the design to be fixed on the Christmas tree, you will have to make a loop of thread and attach it to the top.
How to make a New Year's toy a pig from cotton wool
New Year is wonderful magical holiday. To attract good luck next year and please its owner, you can make New Year's toys in the form of a pig with your own hands using hand-made materials.

It would be a great idea to make soft toys from cotton. It will take a little effort and patience, but the result is worth it. Such a toy will be a chic gift for friends, family and colleagues.
For crafts you will need:
- a piece of fabric;
- pattern;
- cotton wool or synthetic winterizer;
- needle, buttons;
- marker (chalk or pencil);
- scissors and thread.

If it is not possible to use sewing machine, all sewing work is done by hand, which is not at all difficult and interesting.
You will need to print the pattern. Cut out all the details with scissors, according to the proposed blanks. Make a translation of the material. As for the stitches, while sewing, they must be done only from the inside out. Sew all the details together with the right side. The finished product must be turned out and stuffed with cotton.

In the process of work, it is important to remember about the free holes, through which the model is stuffed with cotton wool or padding polyester. The holes are then sewn up with a blind stitch. The threads must match the color of the material.
These pigs will look very cute!
We make a New Year's toy with the children on the Christmas tree 2019
It is not necessary to use new things to make toys. You can use textile waste. They are in every home. Great option - terry socks
List of required components:
- socks - 2 pcs.;
- small buttons for the eyes - 2 pcs.;
- needle, thread;
- for stuffing - cotton wool, synthetic winterizer;
- medium buttons - 2 pcs.;
- chalk and scissors.
You can make home toys with the whole family with children, it will be very fun and interesting for them.
These cute piglets can be made literally in one evening.

Work on the toy begins with stuffing with filler. It is advisable to take a synthetic winterizer. It is much easier and faster to work with.


Fill tightly enough so that the product is stable and holds the desired shape. When you reach the heel area, stop the stuffing process. Give the body an oval shape.
As for the unfilled sock, it is cut off with scissors.


The resulting hole is pulled together with a thread. The needle and thread are threaded from the inside, it should come out. Walk along the perimeter of the tucked edge of the hole with a running stitch, then pull it off.
Put the cut off part of the product on the body. It is important that the elastic frame the edge that is not darned. This will be the head.
If the toe is too long, the excess is cut off, and the hole is tightened according to the previous scheme. Given the fact that the elastic can move when tightened, the child will need the help of an adult.


The future piglet cannot do without cute ears. They can be made from the second sock, namely from its gum.
Cut it off carefully with scissors. Then cut in half crosswise. Turn inside out to mark the places for the firmware with chalk by drawing an eyelet. Sew along the marked line, but do not touch the bottom of the gum. Turn the ears through the hole. It is important that the line stays inside.


If the elastic is too thin, the part will not hold the desired shape. Solving such a problem is very simple. To do this, a layer of thick paper or filler is placed inside the ear.
Then the details are sewn to the body. In this case, it is advisable to use a hidden seam. Attach the front first, then the back.

The family toy is almost ready for the upcoming New Year. The only thing left to do is sew on buttons for the heel and eyes. To make everything clear and correct, mark the desired areas with chalk.
Toys for the New Year made of paper - a simple master class
The most popular Christmas decoration is a ball - glass, paper, plastic. Even though you can buy it in any store, it is much more interesting to make it. with my own hands in the family.
In order for the product to be durable and keep its shape, it is advisable to use thick paper. Unnecessary postcards, colored cardboard, magazine covers will do. Unique, exclusive balls will give the room an atmosphere of celebration, happiness, a winter fairy tale and a miracle.

List of necessary tools for crafts:
- PVA glue;
- cardboard, magazine cover, old and unnecessary postcards;
- thick paper;
- scissors;
- compass.
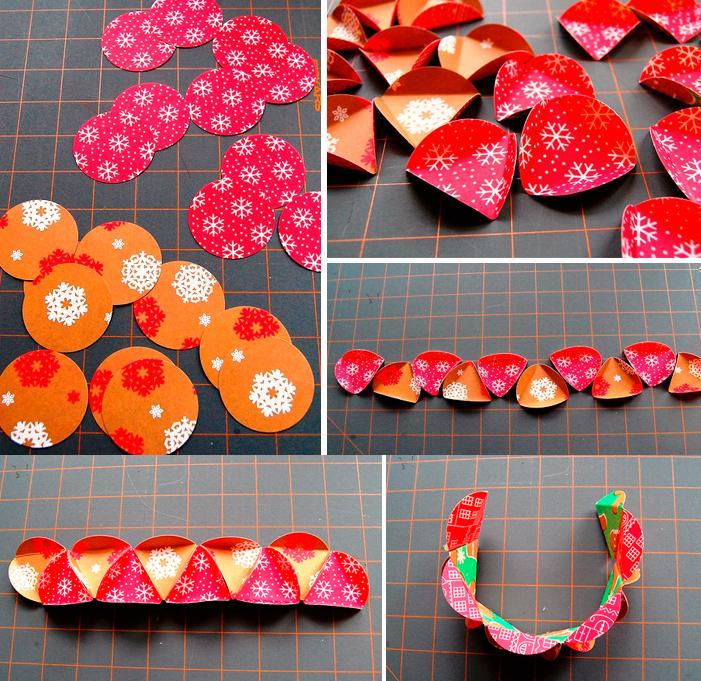
Lay the cardboard on a flat surface, use a compass to make 21 circles of the same size, then cut out. How to process circles: bend twice in half on both sides, then unbend. This is necessary in order to outline the center.
After that, you need to bend one side. Make sure the edge of the circle is right in the center. Bend the two sides twice, you get a triangle.
Cut out one such triangle. It will become a stencil for the rest of the copies. The next thing to do is to lay it on the circles, trace and bend.
Take 10 prepared circles. They must be glued in a strip, namely five down and five up. The strip is glued into a ring. This will be the basis future toy.
The remaining circles are divided into five and glued. Get two covers. They are glued to the base. Attach a loop to the toy, for which it can be hung from the Christmas tree.

Stylish toys for the New Year made of felt with your own hands (with patterns)
Christmas decorations, made on the basis of felt, will always be in fashion. They are really homey and warm. This is a great gift for the holidays.
To make toys, you will need the following materials at hand: scissors, multi-colored felt, glue, bright floss, various decorations(beads, rhinestones and sequins, buttons, beads), pins, cardboard, synthetic winterizer.

Step by step master class:
- Print pattern 0 snowflake pattern. Then prepare paper blanks. Given the fact that paper quickly becomes unusable, it is better to use thick cardboard.
- Transfer the snowflake pattern to pieces of felt. Cut with scissors. Crafts will be more beautiful if you make strokes with a pencil to imitate frost patterns. Embroider the resulting outlines with contrasting threads. As for the decoration, you can use small beads, rhinestones and sequins, glued to the felt. Leave for a while to dry everything.
- Sew two pieces of snowflakes. The toy will turn out to be voluminous if filled with cotton wool or padding polyester.
- Make loops from floss, yarn will do. Place a tail from the thread in the corner of the snowflake and make a loop, sew it up.
Ready-made toys will decorate not only the Christmas tree, but also the cornice. You get a whole garland for decorating a room if you place snowflakes on a string.

New Year's toys from cotton wool
The process of making Christmas toys will especially appeal to children. It is also interesting that this does not require large expenditures. It is enough to prepare some cotton wool and some improvised elements to make New Year's sheep. This:
- starch;
- empty chicken egg;
- cotton wool roll, disks;
- water;
- cardboard or paint;
- toothpicks, PVA glue;
- syringe;
- plastic or wooden board.
Action algorithm:
You need to cook the paste in advance. To do this, dissolve 1 tablespoon of starch in a small volume. cold water. Bring 250 ml of water to a boil. Reduce heat and pour in starch mixture. Do this slowly, stirring constantly so that no lumps appear. Bring to a boil and remove from stove.

Cool the resulting mixture and proceed to work:
- Prepare chicken egg. This will be the body of the future toy. Use a syringe needle to make a small hole in the bottom of the shell and draw out all the liquid. In the same way, pour water into it and rinse, do the manipulation several times. It will turn out a hollow, perfectly clean shell without foreign smell.
- Vata is divided into several parts: for the head, torso and legs. The dimensions must match the egg. As for wool. It must be made from cotton wool, rolled up in the form of small balls. The diameter of each is no more than one and a half centimeters.
- The balls are wetted in the prepared paste. In order not to get dirty, they are put on toothpicks, and then put on a board to dry.
- In the side of the egg, make two holes at a distance of 2 cm from each other. Thread them with a needle. Spread half of the egg with paste, stick cotton wool to it. Do the same with the second part. You will get a cotton ball with two threads sticking out of it.

Stages of work:
- Literally after 30 minutes, the cotton wool will dry out and take the necessary shape. Roll the legs out of several ready-made balls. They should take the shape of a cone.
- Cut out two centimeter ovals from a cotton pad - these are blanks for the ears. Using PVA glue, glue the sheep to the head.
- Then paint the legs, head, using black paint. It is advisable to take thick gouache or acrylic. If you don’t want to mess around with paint, you can cut out the details from black cardboard. You can make eyes out of it.
- After drying the head, you can begin to collect the toy. This is the most crucial step. Use PVA glue to glue the head and legs. Then wool, starting from the back.

The result is such a cute and funny sheep. From the threads sticking out on the back, make a loop by tying them together. Unique cotton toy can decorate any Christmas tree.
DIY paper Christmas tree decorations
Paper and tissue paper toys are incredibly popular. These are various garlands, snowflakes, snowmen, Christmas trees and more.
The Christmas tree will appear in a new look if you decorate it with toys of your own making. Worthy of special attention are gems and crystals" from paper. It is enough to print ready-made templates, then carefully cut and glue all the details.


Before the toy is glued completely, a loop is attached from below. It will be possible to hang a toy for it. Paper jewels are covered with glitter to give them a magical glow.

From ordinary colored paper, you can make such a Christmas tree decoration as diamonds. Having a ready-made template at hand makes it much easier to work.

Action algorithm:
- print the finished template;
- cut with scissors;
- make a loop from the thread, glue it to the top, which will allow you to hang the decoration on the Christmas tree;
- then it is necessary to precisely bend along the indicated lines, glue;
- if desired, cover the surface with sparkles.

Homemade Christmas decorations are incredibly easy and fast to make. The process helps to unite all family members for one exciting activity.
New Year's toys from wrapping paper
A wrapped gift will become a rather unusual, bright and even unique decoration for the Christmas tree.

For this you will need:
- glue;
- thick cardboard;
- fishing line;
- decorative tape;
- scissors and ruler;
- wrapping paper, packaging.
Draw a box template on a cardboard sheet. Then it must be cut out, bent along the dotted lines. Gently form gift box and glue.


Pack the finished box according to the scheme, not forgetting that you need to fix the fishing line and tie a festive ribbon.


DIY Christmas tree decorations from ribbons
For making original christmas decoration from satin ribbons, you can bend to a special patchwork technique called the Artichoke. The essence of the technique is sewing, gluing individual elements. To make christmas balls, you will need foam and tape.

The first thing to do is to prepare the basis for the future ball. The best option is a foam blank. It can be purchased at a craft store.

The satin ribbon is cut into strips 2.5 centimeters wide and 7 cm long. Additionally, you will need small sewing pins with heads.
You need to cut out a square and pin it to the ball with thin pins.

Then the prepared strip is taken. It must be folded into a triangle. finished part also attach to the square. It is important that the needles are located in the folds of the ribbon, namely its lower corners. Triangles are attached to the four sides of the square.

Having done the described actions with the first row, you can safely switch to the second. It is worth considering that the blanks will be mounted in a checkerboard pattern.

To make the craft look colorful and attractive, you can combine different colors according to your own taste. Attach parts to foam ball until the entire area is closed down to the bottom.


