Knitted tree. Volumetric Christmas tree crocheted
are rapidly approaching new year holidays, and all of us are thinking about how to decorate our home. In addition to the main "New Year's beauty", people often decorate the interior with small original Christmas trees. There are many ideas on how to Christmas tree do it yourself. A Christmas tree can be made of tinsel, cardboard, beads, knitted with your own hands and there are a lot of other techniques for its execution.
The photo master class will help you learn how easy and simple crochet the original Christmas tree with legs for New Year's decor apartments. Moreover, it is not at all necessary to have extensive knitting experience, elementary knowledge is enough.
To tie crochet herringbone You will need:
- yarn "Grass" of green color,
- white and red yarn
- hook,
- scissors,
- a piece of foam
- some wire with a diameter of 3 mm,
- a sheet of cardboard A4,
- 6 barbecue skewers
- scotch,
- stationery knife,
- hot glue gun,
- decor: ready-made or homemade eyes and nose.
We make a cone from a sheet of cardboard. If you do not have a whole sheet of A4 format, like mine, then you can glue it with tape. The connection point is also more convenient to fix with tape.

From a piece of foam, you need to cut a small cone that would fit snugly in our large base cone.
You can use a ready-made foam cone instead of a cardboard base.


We connect 3 skewers together with hot glue. I shortened the skewers by about 5 cm.
We fix them in a cone.


Let's make a hat with a curved crown near the Christmas tree, for this, we additionally attach a wire to the center with hot glue.

I tentatively, for myself, divided the Christmas tree into 4 parts.
We will knit a Christmas tree from the bottom up.


First you need to dial a chain of air loops(Fig. 1), its length depends on the diameter of the cone. I did not close the chain in the ring, it was more convenient for me.
We begin to knit with single crochets (Fig. 2), so the knitting turns out to be denser and fluffier. You can also knit with a double crochet, it all depends on your desire.
Periodically applied to the cone, gradually reducing the number of loops.
You can stick to some kind of system, I personally reduced the loops by eye. The most important thing is that it happens evenly.

Having connected, approximately, 2/4 of the entire Christmas tree, I fixed the knitting a little with hot glue on the cone and connected the side edges by crocheting.


I left the last part on the cap, knitted several rows of white yarn, then red, to the end of the cone.


We fasten the loop so that it does not bloom.


We cut out the boots from the foam plastic with a clerical knife and tie them with yarn. We collect approximately 4-5 air loops and tie them “in a circle”, so we knit the oval sole of the boot and go up, reducing the loops if necessary.
I hope that needlewomen and knitting craftswomen will not scold me much, but in crocheting I have remained only at the initial level. 🙂
Therefore, I tied it purely intuitively, according to a foam blank.
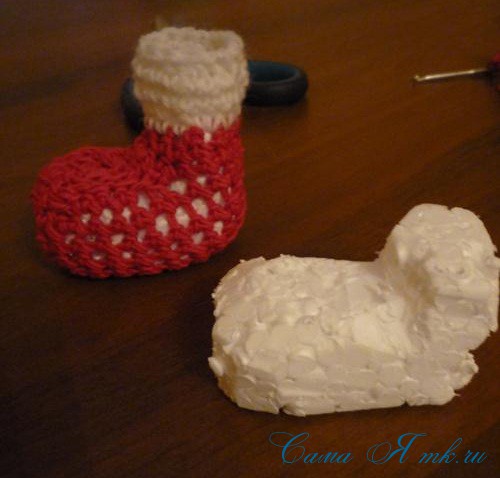

It remains to put the Christmas tree in boots. Do not place them evenly, spread them a little, then your Christmas tree will be more stable.
I forgot to say that the legs, for greater decorativeness, can be wrapped with yarn. In my case, this was not necessary, since they are almost invisible.
Glue the eyes, nose and mouth with hot glue.
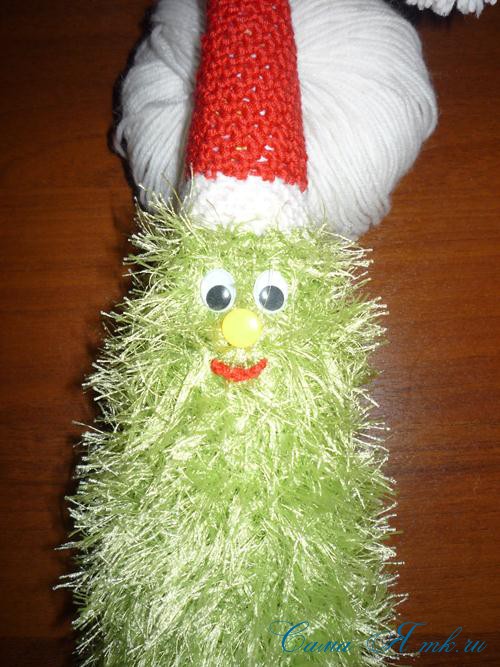
Like this tree with legs turned out!


Such cheerful Christmas tree can be placed on your New Year's table. In addition, it is completely safe, so it can be placed in the children's room. And when the holiday is over, such a Christmas tree will need very little space in a box on the mezzanine. And she will delight you again next year. This little one New Year's souvenir handmade, can be amazing New Year's gift which will surely bring joy to your family and friends.
I was glad to help!
Preparing for the New Year has not just reached the finish line - it can be said, stomping with a hoof and releasing puffs of steam from heated nostrils, directly and clearly says that it is time to turn off the pre-holiday activities and limit ourselves to watching "The Irony of Fate" and slicing salads. The time to start new projects is left in the previous sheets of the calendar, the stones are scattered, it's time to collect them. However ... well, how to deny yourself the pleasure of starting and implementing at least one more tiny new year project? The very smallest! Well, here, for example, a crochet Christmas tree - you can pick up a model that will take a little time to suck. A couple of hours before going to bed - and you have a pretty little one ready new year symbol, knitted flat herringbone that pleases the eye and warms the soul. Is it possible to pass by such an idea? So, we knit small Christmas trees, increase the coefficient of festive mood!
We knit a flat Christmas tree - 5 "quick" projects:
1. Simple openwork Christmas tree
New Year is perhaps the most favorite holiday among both children and adults: no other day brings so much excitement, faith in miracles and love. It is a special pleasure to prepare for this day. So, do not neglect the opportunity to give yourself such joy - be sure to tie a couple of light openwork Christmas trees, it will be even more fun and joyful with them!
2. Triangle lace Christmas tree
By the way, have you got all the presents already wrapped? No? So it's healthy! Consider you have a respectful reason put all your affairs aside and sit down with knitting in your favorite chair: you also need decor for festive packaging? Wow, that means we need to get to it right now. Tie a couple of flat Christmas trees - pack a gift for loved ones.
3. Tight knit tree
Or maybe you need to decorate the house too? Isn't everything and everywhere full of New Year's symbols? So, you can crochet a flat Christmas tree and sew it, for example, on sofa cushion- here it is, New Year's beauty, all in its naive simplicity and some kind of childish sincerity! Is it possible to neglect the opportunity to create this miracle?
4. "Graphic" Christmas tree in a square
Well, okay, okay, this is not the "fastest" project, but, you see, one of the most stylish! A Christmas tree in a square is a great idea for decorating, for example, New Year's card. Well, or a contribution to the future plaid - don't you think that by the next New Year a new plaid with Christmas trees is vital for you?
5. Multi-colored knitted Christmas tree
Collect leftover threads from previous projects - it's time to knit beauty! Small, charming, colorful, cheerful, beautiful, joyful Christmas trees will decorate the space and cheer up even the most hardened cynics who do not believe in New Year's miracles. Well, you must admit, for the sake of such Christmas trees it is worth putting aside
You will need
Yarn (green and brown were used for the master class); a suitable hook (for the master class, hook No. 2.5 was used); filler for soft toys; tapestry needle; colored beads with a wide hole.Step 1
Fold the thread ring, tie 6 single crochets into it (st. b / n).
Step 2
In every st. b / n tie 2 tbsp. b / n \u003d 12 tbsp. b/n.
Step 3
Knit in each loop of the previous row 1 tbsp. b / n, but knit only for the front wall of the loops! In a row of 12 st. b/n.
Step 4
Knit this row behind the back wall of the loops of the 2nd (not 3rd!) Row as follows: *st. b / n, 2 tbsp. b / n next. loop *, repeat from * to * to the end of the row = 18 tbsp. b/n.
Step 5
Knit in each loop of the previous row 1 tbsp. b / n \u003d 18 tbsp. b/n.
Step 6
Knit in each loop of the previous row 1 tbsp. b / n, but knit only for the front wall of the loops! In a row of 18 st. b/n.
Step 7
Row knit behind the back wall of the loops of the 5th (not 6th!) Row as follows: * 2 tbsp. b / n, 2 tbsp. b / n next. loop *, repeat from * to * to the end of the row = 24 tbsp. b/n.
Step 8
Knit in each loop of the previous row 1 tbsp. b / n \u003d 24 st. b/n.
Step 9
Knit in each loop of the previous row 1 tbsp. b / n, but knit only for the front wall of the loops! In a row of 24 st. b/n.
Step 10
Row knit behind the back wall of the loops of the 8th (not 9th!) Row as follows: * 3 tbsp. b / n, 2 tbsp. b / n next. loop *, repeat from * to * to the end of the row = 30 tbsp. b/n.
Step 11
Knit in each loop of the previous row 1 tbsp. b / n \u003d 30 st. b/n.
Step 12
Knit in each loop of the previous row 1 tbsp. b / n, but knit only for the front wall of the loops! In a row of 30 st. b/n.
Step 13
Row knit behind the back wall of the loops of the 11th (not 12th!) Row as follows: * 4 tbsp. b / n, 2 tbsp. b / n next. loop *, repeat from * to * to the end of the row = 36 tbsp. b/n.
Step 14
Knit in sequence. Each time, knitting a row with Art. b/n. behind the back wall, shift the double columns by one. Thus, knit to the 28th row, knitting it behind the back wall of the 26th row as follows: * 10 st. b / n, 2 tbsp. b / n next. loop *, repeat from * to * to the end of the row = 66 tbsp. b/n. Break the thread.
Step 15
Tie the bottom of the toy. To do this, make a thread loop with a brown thread and tie 6 tbsp. b/n. In the 2nd circle. R. in every st. b / n tie 2 tbsp. b / n \u003d 12 tbsp. b/n.
Step 16
Knit 3rd round. R. as follows: *2 tbsp. b / n in one loop of the previous row, then a single st. b / n *, repeat from * to * to the end of the row = 18 tbsp. b/n.
Step 17
4th circle. R.: * 2 tbsp. b / n in one loop of the previous row, then 2 single st. b / n *, repeat from * to * to the end of the row = 24 tbsp. b/n.
Step 18
5th round. R. : *2 tbsp. b / n in one loop of the previous row, then 3 single st. b / n *, repeat from * to * to the end of the row = 30 st. b/n.The size of the base can be made arbitrary: you can achieve the exact lower diameter of the main part with a base circle, you can make the base a little larger or a little smaller.

Step 19
Tie the leg of the tree. To do this, make a thread loop with a brown thread and tie 6 tbsp. b/n. Then knit the 2nd round. row, performing * single st. b / n, then 2 tbsp. b / n in one loop of the previous row * = 9 tbsp. b/n.
Step 20
Then perform an arbitrary number of circular rows, knitting according to Art. b / n in each loop of the previous row = in each row there will be 9 tbsp. b/n. Stop when the length of the leg seems sufficient. Break the thread and fasten off.
Step 21
Sew colored beads onto the main part of the Christmas tree using a tapestry needle. The location of the beads can be arbitrary.
Step 22
Sew the round base to the bottom of the toy, picking up the loops of each piece. When the base is more than half sewn on, fill the Christmas tree with filler.
You can adjust the volume of your toy by stuffing it more or less.

Reaching desired result, finish sewing on the base.

Step 22
Stuff the leg of the tree and sew it in the center of the base.
Step 23
At the top of the Christmas tree, fasten the green thread with a connecting post and tie a chain of 20 ch. Fasten it to the loop of the base, break the thread and hide the tip.
Christmas tree, crocheted, can be decoration christmas tree, decor for holiday table or a nice souvenir for a friend. The options suggested in this article knitted Christmas trees very easy to implement. These recipes will be useful for beginner craftswomen, as well as for those who are raising young children. After all, many children really like joint creativity.
How to crochet a Christmas tree: the easiest way
This method of knitting a Christmas tree can be applied even in cases where the craftswoman does not know how to crochet at all or has just started learning.
In the first case, she can use any braid or ribbon she wants. In the second, you need to tie a long chain of air loops (VP). Before crocheting, you should think about yarn and hook. It is better to choose a thread thin and dense, even stiff. For example, cotton or linen. And the hook should be small (optimally 0.9-1.2).
The recipe for how to crochet a Christmas tree for beginners includes assembling the product. The tape should be laid out on a flat surface, forming all the bends, and strung each layer on a thread. Plain or tied beads or other appropriate decor can be placed between the layers.
Knitting a flat Christmas tree
The next most difficult way to crochet a Christmas tree is to make a flat triangular Christmas tree.

Almost any triangular motif scheme is suitable for this. It is better that it be moderately openwork, otherwise it is ready knitted product the silhouette of the Christmas tree will be difficult to guess. The photo below suggests several schemes that can be used to work.

Finished products for stiffening must be impregnated with a solution of gelatin, sugar, starch or PVA glue.
Crocheted cone-shaped Christmas tree: master class
The Christmas tree, the basis for which is a cone, is the most versatile. It can be performed in almost any color, decorate at your discretion and used literally everywhere.
Before you crochet a Christmas tree, you should consider its content. It can be a synthetic winterizer, cotton wool or a cardboard cone. If it was decided to stop at the last option, then it must be prepared in advance. The size of the finished cone should be guided in the process of work. So when there's everything necessary materials(yarn, hook, scissors, cone or stuffing, decor), you can start knitting a Christmas tree:
- You should start by knitting the bottom. To do this, they collect 4 VPs, close them in a ring and knit 6SBN into it.
- In each next row, you need to increase the number of RLS by 6. It is better to do the additions not on top of each other, but a little obliquely, otherwise you will get not a circle, but a hexagon. When the width of the circle is equal to the size of the bottom of the Christmas tree (often about 7 rows are enough), it's time to move on to knitting a cone-shaped base.
- As a border between the two parts, you need to knit a row of RLS without additions, while knitting all the RLS behind the back wall of the loops of the previous row.
- Next, you should perform a uniform reduction of the fabric by 6 RLS in every fifth row.
- Having knitted about half of the Christmas tree, you need to insert a cardboard cone inside. If a synthetic winterizer or cotton wool is chosen as the filling, then they should be placed in the Christmas tree when it is 2/3 tied.
- The last third of the Christmas tree canvas should be cut by 6SBN in each row.
Here is the base for decorating. It is very important to get the pointed top of the Christmas tree. This is possible if, after all RLS are reduced, perform several VPs and only then hide the thread.
Ways to decorate a cone-shaped Christmas tree: colored stripes
The described algorithm of how to crochet a Christmas tree, for beginners, can be used to make an independent product or a basis for placing a decor. The photo below shows a method in which the Christmas tree-cone is knitted with multi-colored threads and decorated with a minimum number of beads.

Knitting a Christmas tree with twigs
The next way to crochet a Christmas tree is to impose stylized twigs on a cone-shaped base. To do this, you need to sequentially knit a picot from several VPs along each row. This is not difficult, because all the circular rows from which the Christmas tree is formed are spiral. They have a common beginning and end. It is better to start knitting pico from the bottom, so it will be clearly visible what is happening and whether it is necessary to shorten the “branches” closer to the top.
The size of the pico branches will need to be chosen independently, since the characteristics of the yarn greatly affect their length and volume. The photo shows how you can transform the base Christmas tree by imposing a picot.

An interesting feature of this particular development is the manufacture of a trunk and a flat, stable base for the Christmas tree. Inside the barrel, it is better to place cardboard or thick paper folded into a tube, and for a flat base, any disc of a suitable size will do.
Another way to crochet a magnificent Christmas tree is the imposition of semicircular elements on a conical base.

Each of them consists of several CCHs with a common base. Knitting is done in a spiral, as in the pico method.


