Preparatory group Shrovetide applique. Crafts in kindergarten on the theme of Maslenitsa
Not everyone knows where the holiday comes from - Maslenitsa has its roots. It turns out that this unusual holiday has a deep meaning. Even our ancestors celebrated this holiday on the day of the spring equinox. On this day we met spring and saw off winter. Holiday - Maslenitsa is fun for the people. As a rule, a whole week is allotted for the celebration of Shrovetide. At this time, adults bake pancakes, and the kids make crafts for Shrovetide. In this publication, we will tell you about what crafts to make for Shrovetide in kindergarten. Here we will offer you the most beautiful ideas that you will definitely like.
Easy crafts with children for Maslenitsa
Before we start talking about simple crafts, it is important to say that do-it-yourself crafts for Shrovetide are easy for kids to make in kindergarten. Remember that such creativity lessons can bring positive emotions to all children, without exception.
The first craft will help the kids train their tactile abilities. Moreover, when creating such, they use unusual materials. And children love to work with something unusual. To create this craft, a circle is drawn on a piece of paper. On this circle it is worth designating the mouth and eyes of the future sun. The rest of the space should be covered with glue. After that, the space with glue should be sprinkled with grits. Now it is worth waiting for a while for the cereal to dry. Then you need to shake off unnecessary grains. 
Maslenitsa is associated with the sun. Therefore, crafts must be sunny. The next craft is simple in its execution. From plasticine yellow color make a circle. Roll it out. In other colors on the mug, designate a smile and eyes. Use toothpicks to make rays.

Craft workshops
Doll.
Crafts for carnival for children are a pleasant pastime. In addition, you can make something interesting with your own hands. What carnival can be imagined without a doll that is burned. But our doll does not need to be burned. She will please the eye of everyone. To create such a craft, you should prepare:
- Colored paper in two colors, white circle;
- red triangle;
- Glue and scissors.

Progress:
- On a mug white color it is worth drawing the facial features of the doll.
- A handkerchief for the doll is cut out of red paper. The circle with the head is glued together.
- Fold sheets of colored paper in the shape of an accordion.
- Place a sundress in the center, and hands for the doll on the sides.
- The parts need to be glued all together and your doll will be ready.
Paper sun.
If you like making solar crafts, then the next craft is a great opportunity to get positive emotions while creating it. In order to create the sun you should take:
- colored paper,
- hole puncher,
- scissors.

Progress:
- First of all, draw a circle on colored paper. In order to get an even circle, you need to use a plate of a suitable diameter.
- From colored paper of other colors, it is worth cutting a lot of strips.
- Further, using a hole punch, it is worth making a lot of holes in a circle. In this case, you need to observe the distance between the holes.
- Now long strips should be threaded with a sharp end into the holes. Fold them up and glue them on.

Lollipops.
Shrovetide is impossible to imagine without pastries and sweets. However, caramels and other sweets may not be edible. They can be made by hand. Such lollipops will simply please the eye and cheer up everyone around. Original lollipops are easy enough to make from chenille wire. You can always find and purchase chenille wire in specialized stores that sell materials for creativity. 
To make one lollipop, you will need a couple of pieces of chenille wire, which will differ in color. Also prepare: Chinese stick and PVA glue.
On a note! The Chinese stick can be replaced with any other long and thin stick.
Progress:
- First, a couple of pieces of wire should be evenly twisted together. Be sure to trim the ends of the product.
- After that, the wire must be twisted tightly into a spiral. In the 2nd or 3rd turn, the lollipop should be glued. This is done at the junction.
- Once the circle is formed, you will be left with a ponytail. From this "tail" you form a loop.
- Insert the stick into the loop. Pass the stick through one of the top spirals as well to keep the top in place.
That's all. It remains only to insert the lollipops into a suitable vase or dish.
Finally
This, of course, is not all children's crafts for Shrovetide. There are other crafts as well. However, they are more complex in their implementation. But in this article we have given only the easiest crafts that will be very easy to make on your own for children of absolutely any age.
The Maslenitsa holiday is associated with the farewell to winter and prepares people for a meeting with spring. Previously, crafts for Shrovetide to school were not as common as for other holidays. If your child was asked to bring crafts to school for the holiday, but there are no ideas, look for them in our article.
Sun from palms
Materials:
- Paper
- Scissors
- Paints
- tassel
Circle your hand on the paper. Make several copies and cut along the outline. Color the handprints with paints. Cut out a circle from paper and color it with yellow paint. Glue the palms in a circle in the form of sun rays.
Paper postcard
We will need:
- colored paper
- Scissors
- felt-tip pens
- Make a sun out of colored paper. To do this, cut out yellow paper circle and stick the rays.
- Make two accordions from colored paper of any color. Glue the top of one to make a doll's skirt.
- Bend the second harmonica in half and glue it to the top of the first one, these are the hands.
- Cut out a circle for the head from paper, draw a face with a felt-tip pen.
- Decorate the doll with a scarf from a piece of fabric. Glue the resulting doll to the sun.
- A postcard with several dolls will look more effective.


The sun from spikelets
Materials:
- Cardboard
- Ears of wheat
- Scissors
- hot glue
Cut out the base from the cardboard. Glue ears of wheat on it, imitating the rays of the sun. Decorate with natural material.


corn scarecrow
You will need:
- corn on the cob
- corrugated paper
- Dried or artificial flowers
- hot glue
- Threads
Attach a corrugated paper skirt to the corn cob with threads. We decorate with flowers. We complete the image of a scarecrow by attaching eyes and a mouth.


There is nothing complicated in making crafts. The main thing is the availability of the necessary improvised materials, skillful hands and a little imagination. And if there are problems with fantasy, our article is at your service.
The bright Maslenitsa that came to us from antiquity brings not only the “birth” of the sun, Yarila, but also warmth, spring, fun and laughter, the readiness to start field work again to the delight of ourselves and our whole family!
Children are always very sensitive to everything that brings light, joy, sincerity, and from the Maslenitsa holiday they expect not only rosy-cheeked pancakes and a fire show, but also some pleasant surprises!
So let's make fun crafts for Shrovetide for our own children together!
The first craft will be the sun, named in Old Slavonic Yaril!

And this craft-amulet is made from ordinary threads for knitting and bright ribbons!
You can make "Yarilo" with your children - it will be more fun and interesting!
So let's get started!
Prepare the following materials for crafts - the sun:
- Pieces of bright satin ribbons different colors, 0.5 cm wide;
- Bright yellow woolen threads for the sun;
- A circle of cardboard of approximately the same diameter as you intend to make the craft;
- PVA glue;
- Shilo, or gypsy needle;
- Pieces of blue and red, blue and pink colored paper, for the eye, mouth and nose, respectively.
Let's start creating:
1. We take an awl in our hands and use it to make a small hole in the very center of the cardboard circle;
2. And now we take and cut the yellow yarn into threads of the same length. To determine how long the threads should be, measure the diameter of the circle and add the length of the ray to it!
3. Lubricate the entire cardboard blank with PVA glue and until the glue has dried, proceed to the next step - we form the sun from the threads;
4. To do this, we thread a piece of yellow2 yarn into a gypsy needle and put it through the hole. Then we leave one half of the thread on one side of the cardboard, and the other on the other. We beautifully put the threads on the cardboard and press down so that the rays “grab” on the glue. We repeat this procedure until our Yarilo is completely covered with bright rays. Let the glue dry completely, and the threads will stick firmly!

5. Ours is ready for the next step - the formation of volumetric rays from many threads. We need to distribute all the threads into uniform rays and tie them, just behind the cardboard base, with bright satin ribbons! The more colors prevail in the ribbons, the more fun the sun will turn out!
6. And now we cut out Yaril's eyes, mouth and nose. Look how cute the sun turned out! To match Maslenitsa:
See what else you can do for the child and together with the child in a long and fun oil week:


As you noticed, the materials for making such toys can be very different: threads, pieces of cloth, straw or hay ...
To please your baby with crafts of hay, straw or thread dolls, I propose to consider this detailed diagram assemblies:


Let's make a Shrovetide doll with you - for the fun of a child, for a generous harvest in the household and peace and well-being in your home:
As you have noticed, having examined the photo of our Shrovetide, the pose itself can tell a lot about something! For example, a special twist of a skirt symbolizes a gyroscope - one of the most ancient symbols of the Sun and life ... hands raised to the top are a symbol of sun worship, an appeal to Yaril! Such an amulet, made on Shrove Week, has tremendous protective properties ...
You can draw a big sun on a board and lay out the sun with seeds, which you can then take and paint with yellow paint. From above, lay out the eyes, eyebrows, nose, mouth, cheeks with seeds and color them so that the sun looks like a picture but with an interesting structure. From round, or maybe oval? rays of the sun come out, which can also be laid out with seeds or take threads and make rays out of them. Then the rays of the threads can be decorated with bows. Lacquer and decorate into a single whole, make an ornament. Volumetric products always look original and unique. And it would be interesting to lay out a side image of a stack of pancakes on the side. But it will be more difficult if there is no ability to sculpt sculptures.
Maslenitsa in kindergartens is celebrated with cheerful matinees, and children make all kinds of crafts with their parents for a competition in elementary grades at school and, of course, in kindergartens. Maslenitsa is always associated with pancakes and a scarecrow, which is then burned.
Crafts can be made from absolutely everything that comes to hand, even from an ordinary juice box you can make a stuffed animal, the box is painted, or pasted over with paper, for example, this option:
You can make crafts from plasticine:

And this is an unusual craft with the help of cereals, very original:

Of course, if you have more time for crafts, then you can make this one from fabric and thread:

I really liked this toy made of a cotton yellow pom-pom and fabric, it’s very easy to make, but it looks very nice:

Very good and fun party, Maslenitsa. For crafts in kindergarten, there are a lot good ideas, it all depends on the age of your child and what exactly he likes to do most of all. Such a sun can be made with your help from a disposable paper plate, for this, we have the rays of your child’s palms, which can be cut out of colored paper, or if there is only white, you can then paint with colored pencils or paints.

From threads, you can make such dolls, which are the symbol of the holiday.


There are also such ideas, from paper, you can make a model for yourself in a kindergarten, such wonderful crafts.


And even better, add something of your own, what you have at home, what you can use, and your work will be the most exclusive and wonderful.
Or you can make a sun out of an old CD and leftover yellow yarn.

Sequence of work

We tie the disk with a crochet with single crochets. Then, along the contour, we make rays-pigtails with bows and fasten the eyes, nose and mouth with superglue.
Or here is such a cheerful sun that the baby can easily make MYSELF from colored paper.

Well, where without the main symbol - Maslenitsa itself

Maslenitsa is a cheerful celebration of farewell to winter. Traditionally, on this holiday, a stuffed doll was always burned at the stake. It was this doll that symbolized winter. I propose to make this doll out of very simple material- an ordinary brush for whitewashing trees, it is sold at any hardware store. To begin with, you need to braid it correctly.


And I propose to make a beautiful picture, main character which, of course, is the sun.
Take: a sheet of white cardboard
corn grits,
glue (regular glue stick works well),
yellow colored paper for rays (you can use yellow woolen threads),
markers.
Draw a circle on cardboard with a compass. Next, draw the eyes and mouth with felt-tip pens. If you wish, you can make eyes with your own hands from the packaging of tablets.
We apply glue to our sun, avoiding the area of \u200b\u200bthe eyes and mouth, and pour grits on the glue and press it lightly.
We make rays from colored paper or threads and also glue them.
Here you have the sun, and because of the created texture it looks very interesting.
If you cover the picture with automotive varnish (sometimes this is in a spray can), then the life of the craft will increase.
Creative success!
Most often, from crafts for the Shrovetide holiday, they make the Sun, which symbolizes this holiday, and they also make Shrovetide itself, which most often appears in the form of a ruddy beauty with light brown braids.
The sun can be made from paper, cardboard, fabric, as well as from any natural material.
Yes, and little child of kindergarten age, it will be quite possible to make the sun if for this he uses such a simple material as colored paper, because in kindergarten they make applications from colored paper most often.
And if you connect one of the adults to help - mom, grandmother, older sister, etc., then you can make the craft more complicated.
Here is what beauty can be done for this wonderful holiday:


Uncomplicated and beautiful crafts can be done using the applique technique. For application, you can use colored paper from which individual elements are cut out, which are then glued to cardboard or other thick paper, thus making up a picture. In this way, you can depict any Shrovetide motifs, for example, a scarecrow, a plate of pancakes, a round dance, or, using as a basis plastic plate, you can depict the sun:
Or glue a pancake doll-Shrovetide:
Maslenitsa is associated with pancakes, since Pancake week is not complete without pancakes. Pancakes are very similar to the Sun, so it is also an attribute of the holiday. The sun is the easiest way to make together with a child for kindergarten. To make a beautiful three-dimensional picture, you can take blue cardboard, which will symbolize the sky. Next, take yellow cardboard and cut a circle out of it. This will be the Sun. We glue the sun on blue cardboard, approximately in the middle. Next, take super glue and apply it to the yellow circle. Then, we take pre-prepared millet groats, which just has a yellow color and sprinkle the sun with it. The grits should adhere well. At the request of the Sun, you can make eyes, nose and mouth. To do this, you can use buttons, beads, beans. It remains to make the sun's rays. To do this, you can take peas and stick it on super glue so that you get rays. Thus, you get a voluminous, bright and interesting craft, which can be taken to kindergarten.
Traditionally, on Maslenitsa for kindergarten, they make the sun and a stuffed Maslenitsa.
It is very simple to make the sun for Shrovetide with your own hands, here is a step-by-step master class:

Or you can make a whole composition

And for a particularly skilled mother, it will not be difficult to knit such delicious pancakes.

Crafts for Shrovetide
In this article, we want to tell you about crafts that you can do with your child on Maslenitsa. Previously, Maslenitsa in Rus' was celebrated on the first day of Spring, March 1. She marked the arrival of Spring, the awakening of nature and the farewell to winter. With the introduction of Christianity, Maslenitsa began to be celebrated on the last week before Lent, so now Maslenitsa falls on different days in every year. But in our time, Shrovetide is a mischievous and cheerful farewell to winter and a meeting of spring, which brings revival in nature and solar warmth. From time immemorial, people have perceived spring as the beginning of a new life and revered the Sun, which gives life and strength to all living things. On Shrovetide week It is customary to bake pancakes, which are a symbol of the sun. The theme of the sun is also reflected in the carnival crafts for children.
1. Crafts for Shrovetide. DIY crafts for Shrovetide
To make such a spring, sunny craft for Shrovetide, you will need: colored paper, scissors and a hole punch. Draw a circle on double-sided yellow paper. To do this, you can simply put a plate of a suitable size on paper and circle it. Even for this do-it-yourself carnival craft, you will need to cut out many multi-colored strips of paper, or rather, long triangles. For young children, you can independently prepare all the details of the future carnival crafts necessary for work. Older kids can do this on their own. After that, using a hole punch, make many holes around the perimeter of the circle at the same distance from each other (see photo of crafts for Shrovetide below).

It remains for you to thread the multi-colored triangle strips into the holes with the sharp end, bend them and glue them. Here's what wonderful craft turned out to be a carnival!

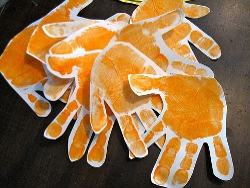
2. Crafts for carnival for children. Crafts for carnival in kindergarten
For kindergarten, you can make the following crafts for Shrovetide. This is a sun made of paper, the rays of which are prints of children's hands. The rays can be cut out of colored paper by circling the child's palm on it the required number of times. Or you can make prints of pens on paper using paints. In both cases, beautiful and unusual crafts for buttermilk for children. Here is an example of one of the crafts for carnival in kindergarten.


And this is another option for carnival crafts for children. Watch and choose which one you like best. Please note that the sun in the photo below is decorated with an applique of buttons arranged in a spiral. Such an ornament makes this craft for carnival in kindergarten especially interesting.
 |
 |
 |

3. Crafts for Shrovetide photo. Paper carnival crafts
We continue to consider with you various options paper carnival crafts. In the photo below, the base for the sun is made from a disposable cardboard plate. Agree, an unusual solution! Such a sun would be good to do with a group of kids. Each child will be able to take part in the manufacture of crafts for Shrovetide. To do this, he will need to circle around the contour and cut out his palm. The leader of the group will only have to help the kids glue the rays to the base.


4. One of the indispensable attributes of Maslenitsa is the Homemade Doll Maslenitsa.
Just please don't confuse it with the Scarecrow of Shrovetide, which is burned at the stake on the last day of Shrovetide week. The Shrovetide doll is a home amulet, which is made by hand from scraps of fabric, straw, birch bark. Made in a good mood and with good intentions, the Shrovetide doll will bring family well-being, prosperity and health to your home. There are many ways to make a Maslenitsa doll with your own hands. Here we will give examples of the simplest and most accessible, including for children, master classes on creating a Maslenitsa doll with your own hands. It will be especially interesting to make Shrovetide with your own hands for girls, because. then such a doll can be used in games. Please note that the Maslenitsa doll does not have a face. Such dolls are especially valuable for children's games, because. the child can endow the toy with any emotions according to the game plan.

In order to make a Shrovetide doll you will need:
White fabric - 1 square 20x20 cm for the body, 2 squares 10x10 cm for the handles;
- bright, colored fabric - 2 squares 20x20 cm for a skirt;
- red fabric - a versatile triangle, whose largest side is 12 cm for a scarf;
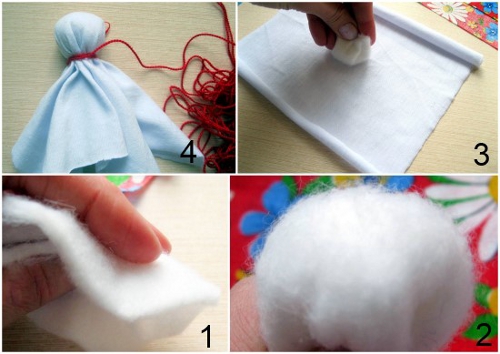
- a piece of synthetic winterizer or cotton wool to form the head;
- red threads.

We draw your attention to the fact that for the manufacture of Shrovetide dolls it is recommended to use red threads or yarn.
1, To make the head and torso of Shrovetide, we form a ball from cotton wool or synthetic winterizer (paralon) and put it inside a square (20 * 20 cm) of white fabric. Rewind with red thread.
2. We continue to make the Maslenitsa doll with our own hands. Now we need to attach the handles. From two squares of white fabric 10 * 10 cm, we make such twists (see the Shrovetide photo below).
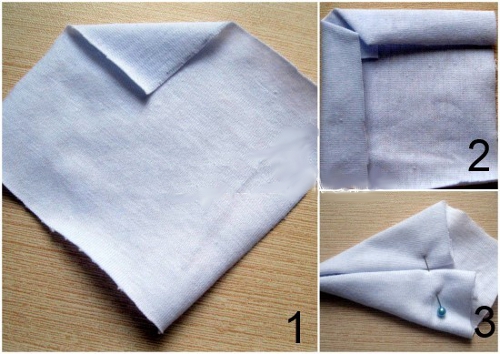
3. We put our hands between the folds on the skirt of the Maslenitsa doll and rewind it with a thread. At the ends, also wrap the handles with red thread.

4. Now we will make a skirt for our Shrovetide doll. To do this, fold two squares of colored fabric diagonally, you will get two triangles. Lay them on top of each other at a right angle as shown in the photo of the Shrovetide doll. Now you need to twist the skirt and rewind it with a thread.
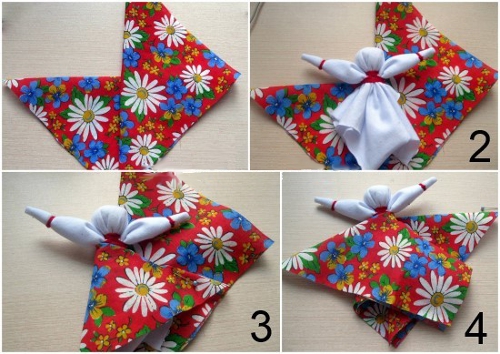
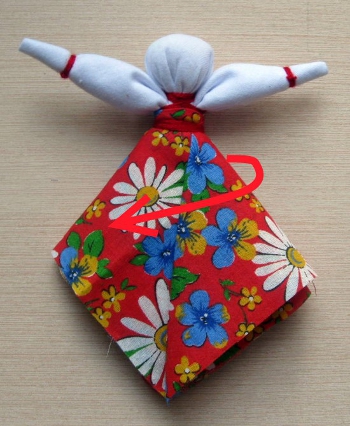
5. It remains only to tie a red handkerchief on our head with our own hands. Look what a glorious Shrovetide doll we got as a result!


