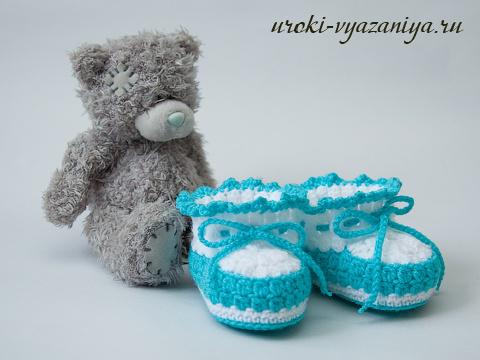
Crochet booties for a newborn girl. We knit simple crochet booties with half-columns
When a little happiness appears in the family, you want him to have all the best, the most fashionable and beautiful. And, importantly, children's little things should also be functional. Baby's first shoes are booties. If you haven't tried knitting booties yet, this article is sure to inspire you to create at least one pair of adorable baby shoes.
Crochet baby booties are a great opportunity to show all your love and skill for experienced knitters or hone your skills if you are a beginner needlewoman.

Yarn
Choosing yarn for booties for a newborn is a pleasant and responsible task. In the variety presented in stores, you can choose the color, texture and composition for any, even the most demanding taste and wallet. But it is important to remember that yarn for children's knitwear should not only be bright and beautiful, but also have good hygienic properties.

Woolen threads are considered the most suitable for this purpose. They are pleasant to work with, look good in the finished product, do not interfere with the legs to breathe and retain heat.

Cotton and linen are well suited for knitted summer shoes. And synthetic acrylic yarn has high strength, does not fade, is close to natural wool in its properties and has a low price.


booties size
After the yarn is selected, you need to decide on the size. Measure your baby's foot from the highest point of the heel to the tip. thumb. If it is not possible to measure the leg, then the average length of the feet is given below:
- Up to 3 months - 9-10 cm;
- From 3 months to six months - 10-11 cm;
- From six months to a year - 11-12 cm;
- From a year to 1.5 years - 13-14 cm.

Sole for booties

On a chain with a length of 12 air loops, knit 8 rows in a circle with half-columns. If you need booties bigger size- increase the length of the chain of the initial row and the number of rows of half-columns.

Now knit 4 rows, alternating one row of double crochets and a row of semi-columns - this will be the rim. We knit the headband without increments. Divide the number of loops in the work into 6 equal parts and mark them with markers.


toe
On the loops of one part, we knit the toe detail with half-columns. The number of rows of the toe corresponds to the number of loops in the work. In each row, knit the last loop of the toe together with the next loop (either to the right or to the left of the toe) with the loop of the base of the rim.

booties top
The top of the booties (shaft) is knitted with single crochets on the loops of the remaining four parts: 1 part - toe loops, 3 parts - loops of the base of the rim. Having tied the shaft to the desired height, finish the job. Similarly, tie the second bootie.

booties decoration
The top and rim of the booties can be tied with a finishing thread, a cord or satin ribbon can be threaded around the top, embroidery or appliqué will look good on the toe. Here the flight of your imagination is not limited.

Using this step by step guide and having minimal crochet skills, you can easily knit comfortable and warm shoes for your baby or as a gift. When determining the size, the thickness of the selected yarn and the size of the hook should be taken into account.

Master class in one photo
If you are wondering how to crochet booties, the foot pattern suggested above will be the key to creating any model. Then you can tie it as you like, creating a wide variety of models.

In this photo - booties that will suit both girls and boys. They are created in a few simple steps:
- We tie the base with two rows of single crochets with threads of a different color, inserting the hook behind the back wall;
- We knit the next row with a thread of the main color in this way: a bump of two ch. and two unfinished double crochets, ch 1, * skip 1 base loop and knit a bump from 3 unfinished sts. s / n, ch 1 * Repeat to the end of the row from * to *;
- We knit another row with bumps from 3 st s / n, introducing a hook into the top of the bump of the previous row;
- We begin to knit the toe with a thread of a contrasting color, marking the middle of the booties. In the second row, the number of "bumps is halved";
- We knit the top of the booties in three rows, capturing the loops of the toe and the rest of the booties;
- We tie the edge with arcs of air loops with a thread of the main color.

This master class will be useful for both beginner needlewomen and experienced craftswomen, because it will take only a few hours to create one pair of lovely shoes.

Photo of crochet booties


Every mother wants to dress her child beautifully. We invite you to learn how to crochet very simple booties for your little princess. Even if you are a beginner, do not worry, with our master class you will succeed!
What are booties? These are the baby's first shoes, knitted or sewn shoes.
What you need:
- white yarn 50 grams,
- peach yarn 50 grams,
- hook.
It is better to use natural threads for knitting booties - cotton or wool. The hook number is selected depending on the thickness of the threads.
Do you want to sew warm booties from sheepskin fur for your baby with your own hands? Detailed description pattern building and sewing process, .
Master class for beginners: how to crochet simple booties
In front of you you see a diagram of the sole of the booties. Circles and columns are drawn on the diagram. The circles are air loops (VP), and the bars are a single crochet.
We collect the required number of VP. Please note that if you are knitting for a newborn child, then you need to dial 13 VP. If you need a larger size, please measure your foot.
Knit the sole according to the specified scheme.

Here's what you should get.

Now you need to make a small border to separate the sole of the booties from the main part. To do this, you need to knit RLS (single crochet) for the back loops of the previous row.

We knit several rows of sc in each loop.

Change the color of the yarn to peach. Knit a row of sc again in each loop of the previous row. This zone serves as a small separating feature.

Now you need to knit a row of RLS again with white yarn.

Here's what you should get. As you can see, a small boat is formed.

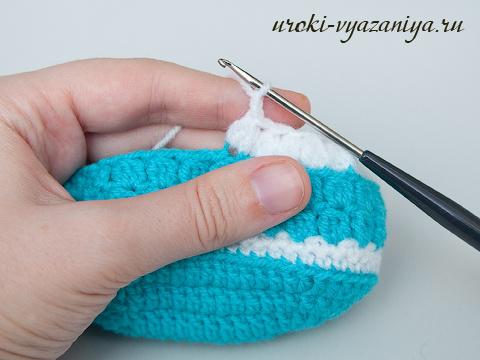
How to tie a bootie toe
To knit the toe, it is necessary to evenly divide the knitting of the booties. If you dialed 13 VP at the beginning of knitting the sole, then the dividing line will be 20 loops.
Knit the first row with peach yarn С1Н. The second row we make a decrease. It is necessary to knit one C1H in one loop, a similar column into the second loop of the previous row, and connect the two resulting columns with one vertex. In the second row you should have 10 C1H left on the toe.

From the toe, dropping two rows lower, knit the rest of the booties C1H.

It remains to make the last decrease on the toe.
In the toe area, you should have 5 C1H left, knit them together. Continue knitting all over the booties. Side parts and back side, without reduction.

Here's what happened.

Final stage
Knit with white yarn RLS throughout the booties. Then dial a chain of 60 VP for laces. That's it, booties crocheted ready for the princess.
What are booties for? Rompers and tights keep trying to slide off the baby's legs, but booties will help to avoid this. Beautiful and neat booties sit on their legs and keep the fugitives in their place.
Do not forget about the popular photo shoots that mothers began to practice so often almost immediately after the birth of the baby. In addition to booties, there are also others knitted accessories used in these photo shoots.
Booties can become great gift in a family where a baby has recently appeared. Knitted booties help mom tune in to the notes of maternity melody and quickly establish contact with the baby. It is not without reason that there is advice for mothers suffering from a lack of milk to hold and look at baby things more often.
For a change, you can familiarize yourself with, tiny, lace. Or maybe you will also master the knitting needles and knit such tender ones.
IN this master class you will learn how to crochet booties. Do not be afraid to knit them, this is a fairly easy and simple way suitable for beginners. Everything is painted step by step, with a photo and a description of the process. A diagram is also attached.
themselves knitted booties are made up of several parts.
The first detail to be encountered is the sole. It must be knitted according to a special pattern. One of the most convenient schemes is presented below.
For the knitting itself, you have to choose the right yarn and hook. For the cold season, it is better to choose yarn containing wool, and for summer period It is better to choose cotton yarn.
- In this master class, yarn with 40% wool Alize Baby Wool is used. In addition to wool, the composition also includes bamboo and acrylic, which makes the booties soft and gentle to the touch, which is also important for children's delicate, sensitive skin.
- A 2.5 hook is matched to the yarn. It is suitable in accordance with the recommendations indicated by the manufacturer on the label of the selected yarn.
- You will also need to prepare 2 buttons.

According to the scheme, the beginning of work consists of a set of a certain number of air loops (vp). You can choose the initial number of VP yourself to get a certain size of future booties.
If knitted strictly according to the pattern using the selected yarn and hook, the size of the booties is 9 cm. This corresponds to the age from 0 to 3-4 months.
Accordingly, to obtain a smaller size, for example, on a leg, it is necessary to first knit a smaller number of VP.
The number of VP for a specific size can be calculated as follows:
- It is necessary to measure the length of the baby's foot and its width.
- Subtract the width from the length and get the value in centimeters, which corresponds to the length of the chain from ch.
How to crochet booties for beginners - a step-by-step master class:
Our first step in the form of a set of chains from vp looks like this. 
In the first row of strapping, we make columns with 1 crochet (s1n) with an increase in the number of columns along the edges. At the end of this and all the next ones, we knit 1 connecting column (ss) to complete the row. 
The next row of strapping already contains double columns, consisting of 2 s1n, knitted into one loop of the base. 
In the third row, there is also an increase due to double columns along the edges. 
So the first detail of booties turned out. The sole length is the promised 9 cm. 
Now you need to move on to the second part, which makes up the main part of the booties.
To do this, we knit 1 row of single crochets (sc) behind the back wall of the loops of the extreme row of the sole. 

This is how the knitting is oriented not to the side, but upwards, which is what is needed for further knitting of booties. The next step is knitting 1 row of sc with white yarn. 
Next, we move on to knitting 1 row c1n using the base color, in this case beige. 
Now we knit 1 row c1n, but in the toe area we knit decreases to start forming the shape of the boot. The decrease occurs due to knitting 2 s1n with one vertex. 
The decrease occurs due to the knitting of such decreases in the amount of 6, i.e. you need to make 6 double inverted checkmarks (3 checkmarks to the right of the middle and 3 checkmarks to the left of the middle). 
In the next row, the decrease occurs by knitting 3 s1n with one vertex to the tops of the inverted checkmarks of the previous row. In total, you should get 2 elements from built-in columns. 

In the next row, the decreasing element consists of 4 c1n with one vertex, 2 of them come from the tops of the triple elements of the previous row, and the remaining 2 come from the tops of the c1n along the edges of these triple elements. 


Along the edge we knit with the help of white yarn the th row to the tops of the columns. 
Now we move on to knitting the fastener. We make a chain of 21 ch. 
In the opposite direction, we knit lifting 3 ch and then 2 s1n, make a pass in the form of a set of 1 ch and skip 1 loop from below. Next, we knit a row with 1n. 
We fix the connected strip on the row of the main part and then we knit the row c1n. 
We prepare 2 buttons to match the color of the booties. 
Sew them on the side. 
Booties for Beginners - Decoration
On the side, you have to knit a flower in such a way that the base (middle) consists of the columns of the booties themselves. 

In the gap between the rows of columns, we thread the hook and knit a chain of 2 ch. 
In the same top we knit 2 s1n, 2 ch and 1 sl-st in the same interval. We get the first petal. 
In the column on the left we also knit 2 ch, 2 s1n, 2 ch and 1 sl-st, then also 2 ch and 1 s1n, i.e. I got 2 petals and half of the 3rd. 
We knit the second half of the petal in the lower gap between the rows, we knit another half of the petal there. We knit the second half of the 4th petal in a column on the right and knit another 1, 5th petal in the same petal on the right. 
Ready. Now you know how to crochet booties for beginners. 

Crochet booties master class, for beginners prepared by: Lilia Pervushina
Knitting and weaving
Crochet booties for beginners
Present to your attention crochet booties master class for beginners. Let the first shoes of the child be not only warm, but beautiful and very soft!And even if you don’t know how to crochet booties at all, you shouldn’t run after them to the store - in this master class you will see everything step by step, with photos and a description of knitting! And you just have to choose desired color thread - and tender booties, knitted by the caring hand of the mother, will warm your baby in his first months of life.
1:1426 1:1433
2:4
These crochet booties knit pretty quickly! Let's start knitting!
2:146 2:149For work, I used Pekhorka yarn "Children's novelty"(100% acrylic, 50g / 200m) in two colors of blue and white and hook No. 2.5.
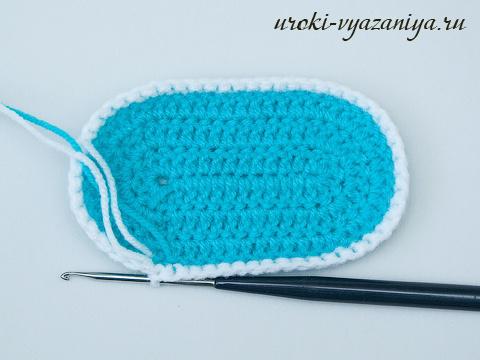
2:374We dial 12 ch + 3 ch (total 15 ch), insert the hook into the 4th loop from the hook of the chain and knit 3 rows according to this pattern.
2:578
Crochet booties pattern
3:1154
4:4
We finish the 3rd row with the help of a connecting post, thread white color.
4:146 4:151
4 row: with a white thread in each loop we knit st. b / n, introducing the hook behind the back wall of the loop.
5:830 5:835
we finish a series of connections. Art.
6:1396 6:1401
7:4
5 row: in each loop we knit st. b/n,
8:581 8:586
we close a series of connections. Art. blue thread.
9:1183 9:1188
6th row: we knit a "knob" from 2 cp
10:65 10:70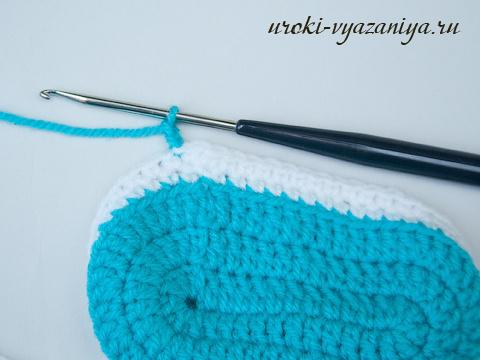
and 2 unfinished Art. s / n,
11:633 11:638,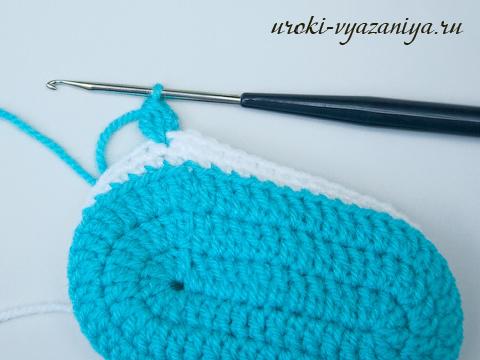

13:4
13:117 13:122
skip 1 vp and we knit a "knob" from 3 unfinished st. s/n
14:746 14:751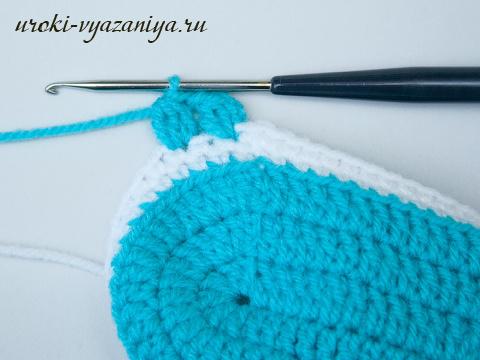
(a lesson on knitting "crocheted bumps" can be viewed)
15:1379 15:1384

Repeat from * to the end of the row. We close a series of connections. Art., inserting the hook into the top of the "knob"
17:714 17:719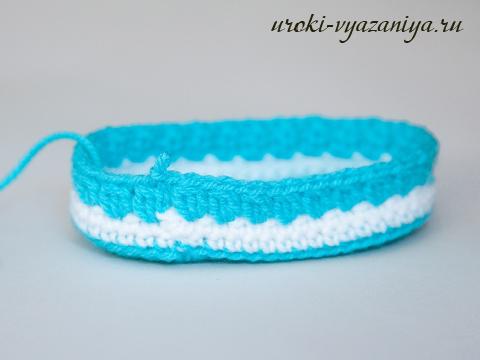
7th row: knit as well as the 6th row
18:1289 18:1294
19:4
"knob from 3 tbsp. s / n "we knit at the top of the" bumps "before. row
19:113 19:118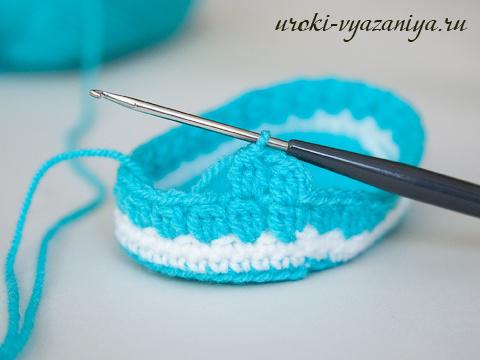
We close a series of connections. Art. and break the thread.
20:703 20:708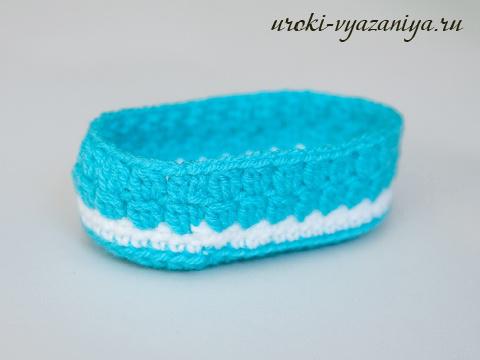
We make the initial loop with a white thread.
21:1304 21:1309
I knitted my booties for a 10 cm leg, noting the middle, I started knitting a toe
22:162 22:167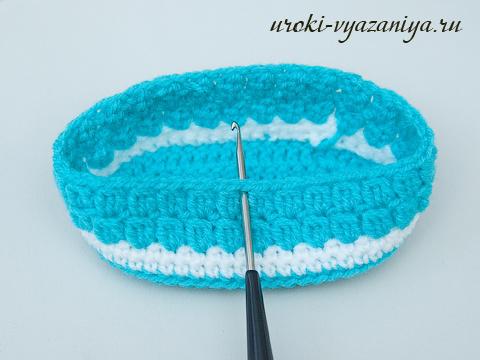
we insert the hook behind the back wall of the top of the “knob” and pull out the initial loop,
23:830 23:835

25:4
to the next top of the "knob" before. row we knit a "bump" of 3 unfinished st. s/n
25:159 25:164
We knit to the middle of the booties, I got 14 “bumps”
26:785 26:790
turn the knitting over and knit a "knob" from 2 unfinished st. s / n and 2 v.p.p.
28:148 28:153
* skip 1 loop and knit a "bump" of 3 unfinished st. s/n*
29:785 29:790
repeat from * to the end of the row (in this row we have 7 "bumps")
30:1412 30:1417
31:4
knit conn. Art., connecting the tops of the "bumps", like this
31:102 31:107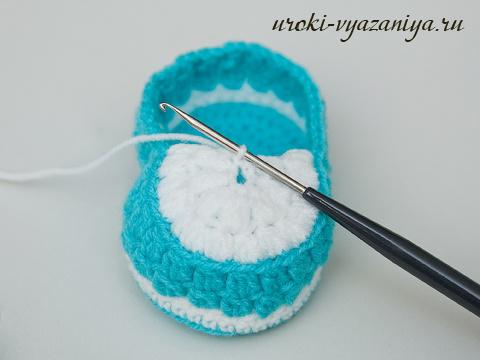

we knit 1 ch and a “bump” of 3 unfinished art. s / n (we insert the hook into the leg of the extreme column of the “knob”)
33:1427 33:1432
again we knit 1 ch. and “knob” (we insert the hook into the leg of the last st. of the next “knob”)
34:164 34:169
we knit 1 ch, and the “bump” to the top of the “bump” of the 7th row
35:775 35:780

37:4
Similarly to the 7th row, we knit 2 more rows
37:74 37:79
We close a series of connections. Art. blue thread
38:669 38:674We knit st. b / n in each loop and 3 ch. between them
38:760 38:765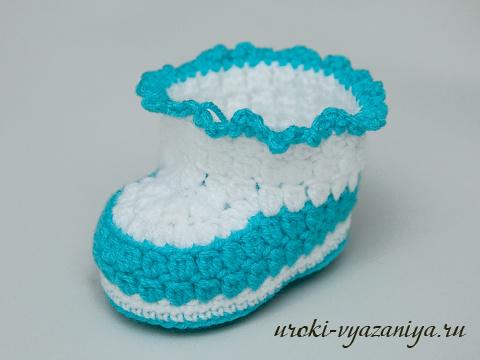
We close a series of connections. st, carefully hide the ends of the threads. And our booty is almost ready. It remains to tie the lace from the v.p. (I got ch 120)
39:1530Pregnancy is, of course, the most beautiful time in a woman's life, because at this time she is waiting for a meeting with the most dear and beloved person in the world - her baby. Being on maternity leave, most expectant mothers discover the appearance of a large amount of free time, because many classes are contraindicated "in interesting position”, and the rest, like watching movies about childbirth, quickly get bored. What to do with yourself while waiting for the birth of your child? We will be happy to suggest an option for enticing needlework - knitting! And in order for it to be useful, we offer the instruction “booties: diagrams and description”.
Knitted booties for beginners

If you have not yet switched to “you” with knitting needles or do not own them at all, start your acquaintance with knitting baby booties. On the Internet there are a large number of descriptions and patterns of their knitting - from the simplest to the most complex, with ornaments and patterns.
Preparatory work
In order to make with my own hands the first soft comfortable "shoes" for your baby, you will need:
- Yarn for children's knitting (fifty grams). If you take a different yarn, booties can turn out to be rough, prickly, and some threads can cause allergies in a child, so the choice of material must be approached responsibly. It is worth giving preference to the average thickness of the thread, from which the product will turn out to be more accurate, and it is easier for you to work with such yarn.
- Two knitting needles of size 2 (you can also take a triple, in which case the knitting will turn out to be more loose).

The size of the needles is determined in millimeters, where the size "2" is two millimeters, "3" is three, and so on, respectively. But there are non-standard knitting needles, for example, two and a half or three point seventy-five hundredths. They are suitable for working with certain types of yarn.
If you have taken yarn and cannot decide on the size of the knitting needles, you need to attach the knitting needle to the thread. Ideal when the thickness is the same, or the thread is slightly thicker. The density of knitting depends precisely on this ratio, however, non-professionals should not choose thin knitting needles, since the slightest flaws will be visible on the product.

Before proceeding to the manufacture of the product itself, it is necessary to check the density of knitting. With the right material and knitting needles, knitting stockinette stitch ten by ten centimeters will be obtained from thirty-seven rows of twenty-eight in each.
If you plan to wash the finished product, after carrying out the density test, wash the knitted square at a temperature of thirty degrees. With a high quality of the selected yarn, the size and shape of the piece should not change. If the square “creeped”, it is necessary to take into account the resulting error in the direct manufacture of booties.
Product diagram
When you knit the twelfth row, there should be sixty-four loops on the needle. After that, the expansion ends, we knit rows without a crochet.
From the thirteenth to the nineteenth row (inclusive) we knit with the front stitch (both even and odd rows) behind the back wall.
The twentieth row falls on the wrong side. Here we need a hook (preferably thin, so as not to damage the yarn and not to pull out the extra threads). With the help of a hook, we knit the twentieth and thirteenth rows together, knit (we stretch the thread simultaneously through two parallel loops - the 20th and 13th rows).
From the twenty-first to the twenty-eighth inclusive, we knit again only with facial loops.
In the twenty-ninth row, we knit the first thirty-six facial loops, then there will be a decrease. We remove the thirty-seventh loop without knitting, knit the next one with the front one, put the removed loop on the knitted one and turn.
In the next row, we remove the first loop, do not knit, the next eight will be purl, the tenth and eleventh we knit together in the wrong way, turn.

Thirty-first row. We remove the first loop, knit the next eight in the front way, remove the tenth, knit the eleventh with the front one, throw the tenth over the knitted one, turn again.
The next fourteen rows repeat the last two, where all even rows are identical to the 30th (32nd, 34th, 36th, 38th, 40th, 42nd, 44th), and the odd rows are identical to the 31st (33rd, 35th, 37th, 39th, 41st, 43rd, 45th).
The forty-sixth row repeats the thirtieth.
In the next row, remove the first, and knit the rest in the front way.
Forty-eighth row: seventeen knit, the next two knit together with knit, the next eight are purl, one is removed, one is knit, we put on the removed one, turn and knit the next seventeen loops with knit.
Forty-four loops should remain on the spoke.
Knit next row
Next row: knit twenty-four, turn, purl four, turn, knit four, turn.

We knit the remaining four loops only with the front stitch until we get six centimeters in height. We close this segment.
There should be twenty stitches left on each needle, on each side.
On the one hand, we collect fifteen loops (weaving along the strap of four loops), turn, close the next twenty-six loops. There are nine left to be removed for an additional knitting needle.
We collect fifteen loops in the same way on the other side (along the strap of four loops), make the next twenty loops facial.
The nine stitches we left on the extra needle is the heel. As long as they stay that way. Bind off the remaining twenty-six stitches.
Make seams on the sole and heel. We knit the next eighteen in the facial way, we get another twenty-two.
The next row is completely facial, at the end we get four loops.

The next one is also facial, when there is a remainder of three loops on the knitting needle, we need to make a hole for the button. We make a crochet, knit the next two loops together with the front ones, the last one is the front one.
Two more rows are fully knit facial.
Close all loops. From a segment of six centimeters, which we knitted earlier, we make a strap and sew it. We stretch the strap through it. According to the hole left for the button, we sew the button.
Both of the pair of booties are knitted identically. The finished product can be decorated with a separately knitted flower, bow or sew on ribbons.
The simplest and most beautiful crochet booties

Crochet is a great alternative to knitting. Many needlewomen note that it is much easier to master a crochet than knitting needles, and the products turn out no worse, even nicer and more openwork.
The proposed knitting pattern for booties is designed for the size of a small leg up to ten centimeters. Ready-made slippers, with a properly selected thread and free knitting, stretch a little. The proposed booties are suitable for replacing warm homemade socks for the baby.
The whole product can be knitted with yarn of the same color, however, in the proposed scheme, two were used to make the booties more cheerful and bright.
Preparatory work
- Yarn. In choosing the material for knitting, it is important not to make a mistake, so that the baby is comfortable in the finished slippers, and you do not experience any inconvenience during the manufacturing process.
- Yarn in a different color. The quantity depends on the selected element that you want to knit to decorate the booties.
- Hook (size is measured in millimeters) - three or four.
- A large gypsy needle with a wide eye or a thin hook (depending on what is at hand, the quality of the product does not depend on this).
- Good scissors (will be used to cut the thread). Since acrylic threads are strong enough, sharp scissors must be taken.

We will start knitting from the sole. In the proposed model of children's home slippers, the sole is oval. It is also necessary to pay attention that the choice of the location of the heel and toe depends on the master.
The first row will be represented by nine air loops plus the tenth, which will serve as the transition to the next row (lift loop).
In fact, the first row is a row of a set of loops. As a rule, it is considered to be zero. Therefore, it is correct to start counting from a row that is directly viscous.
First knitting row. From the first loop (starting from the row of the set, this will be the ninth loop) we knit three half-columns with a crochet (we make a crochet on the hook, insert it into the ninth loop, stretch the working thread, we get three loops on the hook; we stretch the working thread through all three loops at the same time, repeat three times).
We also knit the next seven loops with half-columns with a crochet, from each loop, one half-column.
From the extreme loop of the zero row, you need to knit six crochet half-columns.
The row is closed by connecting the outer half-column and the first air loop. The first row should total twenty-six loops.
In order to knit the second row and the sole of the product, you need to dial two connecting (air) loops.
From the first six loops of the row we knit two cap half-columns. Next, from each lower half-column with a crochet (there are seven in total), we knit another one. At the end of the row, we get thirty-eight loops.

We continue to work
The third row begins with two air loops that serve as a lift. Second air loop we knit a half-column with a crochet. We knit all subsequent loops to the end of the row with half-columns with a crochet (one from each loop of the row).
We get the sole in the form of an oval. The third row will be the final one for this part of the product. We knit its extreme loop with a connecting column. To do this, we stretch the working thread through the air loop on the hook and the first loop from it - we connect the two into one.
When the connecting column is knitted, we will get forty loops in a row.
The absence of columns in the third row will make the sole stable enough.
The fourth row will be the base of the vertical wall. We start with a set of two air loops. All the following loops of the row must be knitted with half-columns with a crochet (one half-column from one loop).
It is important to capture the working thread through the back wall of the loop. If you work behind the front wall, the product will look inside out.
We finish the row with a connecting loop. Starting from the fourth row, you need to make sure that the knitting is as tight as possible. This is necessary so that the vertical part of the future boot is even.
We start the fifth row with two air loops. Next, from each loop of the bottom row we knit a cap half-column. There should still be forty loops.
We finish the extreme row of the side of the booties with a connecting loop. working thread cut with scissors and bring out with a hook or needle on the inside of the slipper.
We knit the rise
We knit rise. First you need to determine the middle loop of the resulting oval. From it in each direction you need to count nine loops (along the wall of booties).
We fold the working thread in two layers and attach it to the tenth loop from the starting point. We knit three air loops.

Upon completion of the set of eighteen crochet half-columns, we stretch the thread at the same time through all the loops remaining on the hook.
We attach the working thread with a connecting loop, knit three air loops. We fasten the extreme loop with the nineteenth loop of the slipper column.
We cut the working thread with scissors and bring it to the inside of the booties.
Decoration. From the second color of yarn, we crochet a product for decorating booties. It can be a bow, a flower, a heart or a ruffle, according to the taste of the master. Using a needle, we attach the decoration to central part slipper.


