How to insert a zipper into a sun skirt. How to sew a hidden zipper - technology, tips, subtleties
For example, if it is a rare loose boucle, voluminous lace, a fabric with woven fibers, the ends of which stick out above the surface of the fabric. All this will be hooked by a hidden zipper, because it is sewn close to the teeth.
In these cases, we sew in a regular zipper in an open or closed way. I will make a series of master classes about different ways stitching a simple zipper.
Today we will sew a zipper into a skirt under the belt. This method is called "Zipper in the pleat". I still have a silk skirt from the 90s, which was shown on the catwalk at the Burda trading house on Pushechnaya. This is how they used to sew a zipper into all products, because we didn’t have hidden zippers yet. Please note that the zipper in this skirt is longer than usual due to the large difference between the waist and hips. Otherwise, do not wear a skirt.
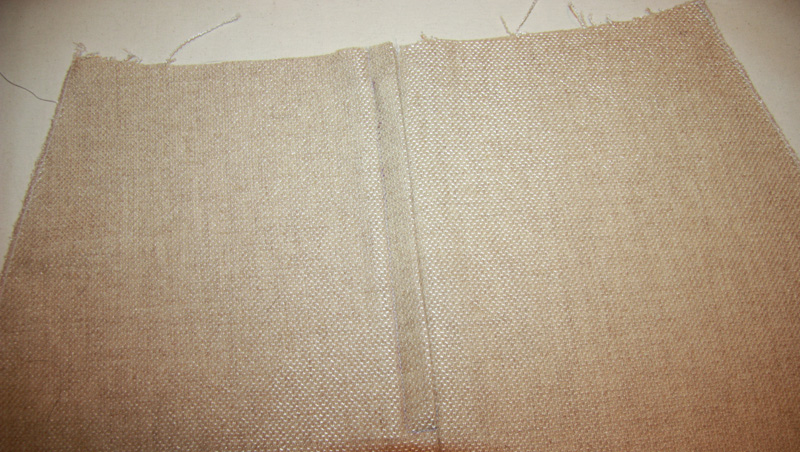
I show sewing in a zipper on a small sample and on a smooth fabric so that the stitches are visible.
You will need:
- textile- zipper 18-22cm long. Remember what more difference between the waist and hips, the longer the zipper.
- tailor's pins
- needle and thread for sewing
- tailor's scissors
- kantenband strip - 0.5 m
Step 1. Choosing the right zipper


It can be either plastic or metal, it will not be visible, but the teeth of the metal zipper in this case should be small and narrow!
Firstly, a regular zipper has teeth on the same side as the lock, unlike a hidden one.
Secondly, there must be a stopper on the zipper, which fixes the lock in one place and prevents the zipper from spontaneously opening in the sock. This is especially true for tight-fitting pencil skirts.
Thirdly, the zipper should not be wide!
Stopper - these are triangles on the bottom of the lock, they rise when the lock is lowered into the zipper links and fix it in place.
Step 2

We iron the zipper on the underside, not on the teeth! Synthetic - dry iron, cotton - with steam. All zippers will shrink slightly when ironed. Do not neglect this operation, otherwise, after ironing the finished sewn-in zipper on fabric, especially shiny and smooth, ripples may appear along the zipper or the zipper will arch.
Step 3

To sew a zipper in the pleat, allowances must be at least 2 cm! It is important.

Loose or stretchable fabrics need to be strengthened. To do this, glue the zipper allowances along the seam markings with strips of kantenband or any thin glue. For dense and non-stretch fabrics, this step can be skipped.
Step 4

Mark the zipper on the seam strictly under the metal limiter, otherwise it may fall under the needle.

Sweep the seam under the zipper.
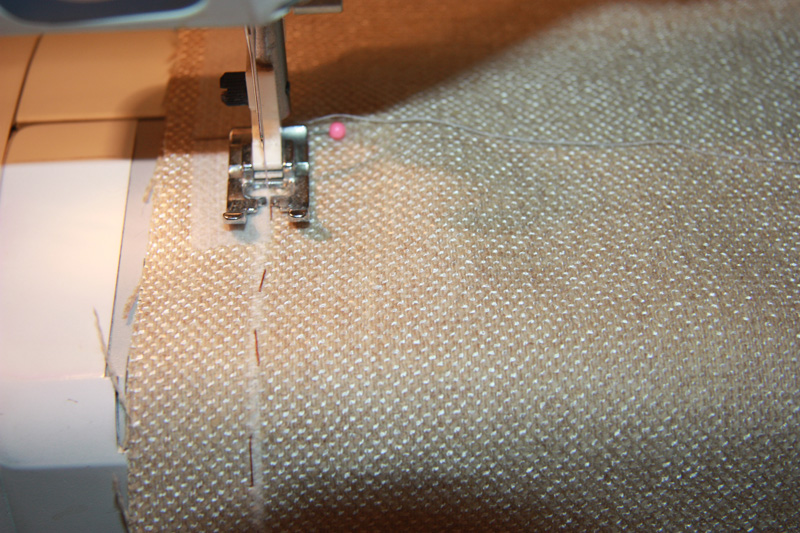
After trying on, sew on a typewriter the seam below the zipper, overcast the allowances separately.
Step 5

Iron the allowances below the zipper smoothly, and under the zipper, iron the left allowance with a slight influx on the right one - up to 1 mm.
It is very important!
This influx will block the stitching of the zipper, it will be invisible in the finished product.Step 6
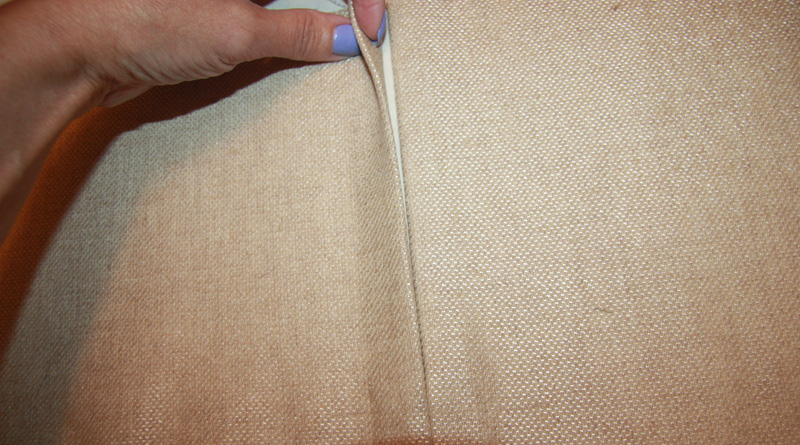
Remove the basting in the seam, the photo shows that on the front side the left edge of the cut slightly overlaps the right one.

Bend the left edge of the slit from the front side of the skirt, put a zipper under the right edge of the slit. The fold of the fabric should come close to the teeth of the zipper. Baste the right edge of the zipper 1 mm from the edge of the cut.
Step 7
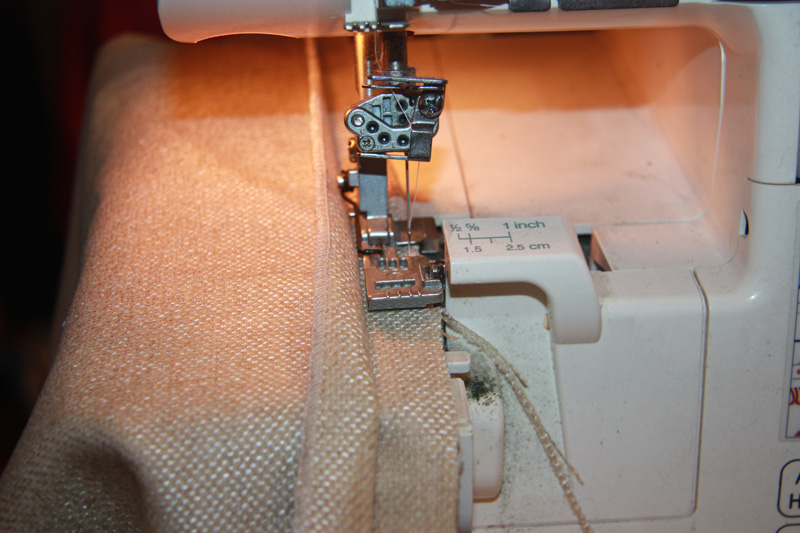
Position the zipper foot so that the needle is in the leftmost position of the foot.
Sew the right edge of the zipper 1 mm from the fold with bartacks at the beginning and at the end of the seam. The zipper can not be opened, the lock does not interfere with us.

Here's what should happen.
Step 8


Cover the zipper with the left edge of the cut so that it overlaps the stitching by 1 mm. Pin the left edge over the stitching.
Step 9

From the inside of the skirt, baste the second half of the zipper close to the lock, below, under the metal limiter, make a transverse stitch so that you do not get on it when stitching from the face.
Step 10

On the front side, mark according to the basting straight line stitching.

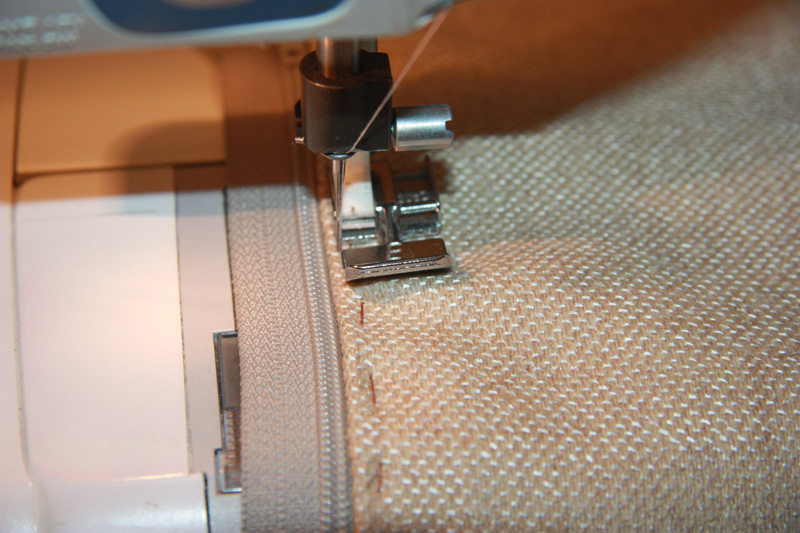
Adjust the zipper foot so that the needle is at the far right of the foot.

Unzip the zipper! Otherwise, the lock will prevent us from making an even line.
Lay the line along the markup approximately to the middle of the zipper.

Dip the machine needle into the fabric, raise the presser foot and carefully close the zipper!

Continue the line already with the zipper closed exactly according to the markup. At the end of the zipper, make a transverse bartack either at a right angle or obliquely, as you like.

Here's what we got. The zipper is hidden in the fold, the lock is not visible.


View of the unzipped zipper and from the inside. From the inside, the transverse line is below the metal limiter of the zipper.
With this zipper treatment, the top of the skirt is treated with a belt.
Other ways to sew a zipper into a product are at the links:
with turning

Svetlana Khatskevich
Svetlana graduated from the university with a degree in Sewing Production Technologist. She has been teaching sewing technology for over 20 years. He is a Senior Lecturer at the AcademyBurda. We know Svetlana from her work on the site since its inception. She generously shares her knowledge and infects with her love for sewing.Sewing is creativity, fascinating and informative. Welcome to this bright and interesting world!
And a skirt. It can serve not only for its intended purpose, but simply as. Zippers are sewn along the midline of the back, or shelves, into the side seam, pockets, codpiece, and so on. Vertically, horizontally, obliquely, in an open and hidden (secret) way. Colors can be selected as appropriate fabrics, as well as contrasting ones. Hidden zippers, as a rule, are accurately matched in color and shade.
In contact with
Threads for stitching, if there is no task to emphasize the presence of a fastener, are also chosen exactly to match the fabric. The number of threads is the same as required for sewing this fabric, in the case of finishing stitches, the thread is taken thicker.
Materials and tools
To work, you will need the following fixtures and fittings:
- threads;
- sewing needle;
- safety pins for pinning and sweeping;
- sewing machine;
- special foot;
- gasket to strengthen the edge (non-woven or).
The shops now have a large selection of materials. If the lock is sewn into products made of dense fabric, then there will be no problems, but when installing a secret lock on a stretchy knit material or very thin fabric, you will need a doubler. This is a strip of lining material that has a very thin thickness, a thin adhesive layer is applied to it.
Before installing the zipper along the line, where a line is supposed, a doubler is swept. Such a lining is applied with the adhesive side to the material, then fastened with a preheated iron. This procedure prevents the edges of the fabric from stretching. With good gluing, the zipper will be sewn well and look neat.
How to sew a hidden zipper to a skirt
To begin with, if you have never done this operation before, then it is better to try to sew a lock on some unnecessary product or a separate fragment in order to gain some experience. After you are convinced that you can do this, you can start working with the main product.
Advice for inexperienced dressmakers: it is easiest to sew the lock into the back seam of the product, since if the fastener is sewn on the side incorrectly, the fabric can get skewed, and symmetry will be lost. . On the back seam, it will not be very noticeable., since it is more symmetrical, sewing the necessary lock there is much easier than in the side.
Procedure:

It is necessary to hide the presence of the fastener as much as possible, so stitching it discreetly and carefully is a very important procedure. At the same time, the lightning should move freely, do not get stuck or break from too close stitching. Its length varies depending on the size and design.
An incorrectly sewn zipper can deform the product. In addition, if the fabric is too thin (also very elastic and thin jersey), then the end of the fastener may stick out angularly, in this case it is preferable to sew a lock along the center line of the back. Therefore, learn to sew locks correctly.
Various options
The procedure for sewing fasteners to a skirt with a belt
In the event that the skirt has hooks or buttons, then the beginning of the zipper should be located under the belt. If the belt does not have any, then the zipper is sewn from the topmost line. In this case, the fastener is sewn from top to bottom. With this approach, it will not deform the fabric, and it will be much more convenient to install it.
After the lock has been attached, the upper edge must be masked under the belt. To do this, you can tuck the edges of the lock and flash it. Sometimes pieces of fabric are superimposed over the clasp. This is done so that the lightning does not create unpleasant moments in the form of scratching the back.
When placing a side hidden fastener, there are some nuances. There is symmetry in the back seam, so it stretches evenly to both edges. If the lock is in the side seam and sewn carelessly, then the skirt will be skewed, and the fabric will gather in waves. These shortcomings will spoil the picture. Therefore, the zipper is the final element of the skirt.. When installing it, you need to be careful. It must be maximum.
How to sew a lock into a skirt without a belt
If the product does not have a belt, then the choice of fastener must be made in such a way that there are no incidents in the form of unfastening, that is, the zipper must be tight. The stitching process will be carried out as follows:
- First you need to sew a zipper.
- Then fold over the top edge of the skirt.
- Hem the canvas on a typewriter, masking under the fabric.
- The teeth should be at the same level with the edge of your skirt.
Stitching a fastener into a seamless skirt is very easy. In this case, the condition must be observed: on the lower part of the zipper, in the place where it ends, the seam must be carefully applied.
There are ways to install locks without application sewing machine i.e. manually.
How to sew into a pleated skirt
When sewing a skirt with pleats, more experience and skills are required. Sewing a fastener into the pleat of a skirt is a painstaking process, so you should be patient. Only well enough familiar with sewing business the dressmaker can do it neatly without a hitch.
When cutting out products, it is necessary to leave a cut for the fastener in the seam, the length of which should be equal to the length of the lock with an allowance of two centimeters.
- First of all, you need to smooth out the seam allowances.
- Then you need to make a fold by one centimeter.
- At the next stage, remove this fold and bend again, but only to a different distance, equal to 1.3 centimeters.
- Then you need to pin the zipper to the skirt behind the folded fabric: where the fabric lies in 1 layer. The teeth should be located close to the fabric, and the teeth should recede 2 centimeters from the top of the product.
- Next, you need to make a basting of the seam along the zipper and stitch it between this seam and the teeth. The second side should be pinned 1 centimeter from the fold of the fabric.
- And, finally, sweep the fastener, then stitch it so that the seam is close to the teeth (at a distance of two or three millimeters).
- Remove excess threads and make a line across the seam to secure the hidden fastener from below.
Try to sew such a zipper on an old product, if you can’t do it the first time, practice and you will succeed.
How to sew a metal zipper into a skirt
 Zippers made of metal, are used not only to perform the function of a fastener, but also to give additional decor to products. In the latter case, zippers are sometimes sewn into the skirt, and sometimes superimposed on top. In this case, the color of the fastener can be in contrast to the main color of the fabric or be selected to match it. Beginning dressmakers are advised to choose a color of the zipper in the same shade as the skirt and sew it in from the inside out.
Before installation, you must first baste the clasp on the product, as when working with a conventional plastic zipper. The main condition: the teeth must be visible from the face, so you need to step back about five millimeters from the edge of the fabric.
Nuances when working with knitwear
When working with knitwear the technology for installing the fastener is the same, but requires a little preparatory work:
- purchase of a special needle for sewing knitwear with a rounded end;
- selection on a small piece of fabric step length;
- line check;
- gluing with non-woven or doubler lining.
Hello, my dear readers of the Shake with me blog. If you are thinking of sewing a skirt or dress, you will probably have a question, how sew a hidden zipper. If you've never done this before - don't worry, it's easy!! The main thing is to be attentive and pay attention to those details, which will be discussed below.
 Now we will learn how correctly sew a hidden zipper into a skirt.
As a rule, hidden zippers come in two sizes: length 19 and 50 cm.
The zipper should be 2 cm longer than the cut under it on the skirt or trousers. The excess is cut off.

Before sewing the zipper to the other side of the cut, we close it and cleave it with a pin so that the points of the belt on the product (or peplum, for example) coincide.
Then carefully sew the other side of the zipper with large oblique stitches.
You can't just sew with a straight stitch by hand. Such a seam will not protect the zipper from tearing when we sew it on a typewriter.
So just an oblique seam.
We check whether everything matches exactly on the front side and there is no skew on the belt or peplum. 
You will need special hidden zipper foot. (see photo below)
You can help yourself and move the needle a little bit using the zigzag function on the typewriter.
This way you get a really invisible hidden lightning.
We cut it after the cut mark on the skirt, leaving another 2 cm. We do the backtack manually.
We hem the seam at the bottom of the zipper close to the zipper so that there is no hole. If it is not convenient on a typewriter, we hem it manually. 
We cut off the excess length of the zipper and do the bartack by hand.

We iron the area with a zipper. 
All! Lightning is ready! 

See also a video on how to sew a hidden zipper:
I hope this article helped you and you are one step closer to your dream. I would be very grateful if you use the buttons of social networks! And see you soon on the pages of the Shaysomnoy.rf blog
Good afternoon, dear readers. You probably know that every woman should strive for continuous development, study, try something new and useful. That is why today we will talk about how to sew a zipper into a skirt correctly step by step.
Stages of flashing a hidden zipper
Now we will talk about a method that will help you quietly sew a hidden zipper to a skirt. The main convenience is that it does not matter at all where exactly the lightning will be located - in front, behind or on the side.
Product preparation
The chosen technology assumes the following steps:
- In the place where the sharpening will be machined, the fabric is folded in two layers. In this case, an allowance of 1.5 cm from the edge is made and a seam line is drawn. The product must be swept away, focusing precisely on this mark.
- Then, you need to overcast each edge separately. After that, iron the seam, straighten it and iron it carefully.
- The lock is applied with teeth down from the wrong side of the skirt. It is necessary to make sure that the teeth are aligned with the middle of the seam. And the slider should coincide with the hem line of the upper cut of the product.

After that, it's time to start step-by-step sewing on a metal or iron hidden zipper:
- The slider is pulled to the front side, after which the lock is fixed with pins across, right under the teeth. This should be done carefully so that the fabric does not move.
- The next step is to make a seam in the middle. To do this, it is enough to baste the zipper to one layer of the hem.
- After that, the pins are carefully removed, and the clasp opens to the very end.
- Using a special foot for a hidden lock, which bends the edge with teeth, you need to grind one side. The same operation is done on the other side. And if the fabric is sliding, then the lock is stitched from above.
- On the wrong side (about 1 cm down from the lock), a fixing seam is made. After that, the back seam is sewn to the very end, but very carefully.
- It remains only to turn the upper part of the skirt, and at the end - to process and hem the hem.
We also invite you to watch the video below. Thanks to him, you can learn how to quickly sew a hidden zipper into the side seam:
Skirt with a belt: how to sew a zipper into a skirt yourself
Have you ever sewn a skirt with a belt? If not, then be sure to try and do not worry about how to sweep the zipper correctly. It's not hard at all if you stick to it. simple rules. Namely:
- At the very beginning, the blank belt is folded in half along the length. After that, it must be carefully ironed with an iron (it is possible through gauze), and then - stitch one side of the skirt to the upper cut.
- With the help of pins, the upper edge is necessarily fixed where the belt is bent. Everything is neatly tucked in, but at the same time, the seam where the hidden zipper will be attached is not stitched now.
- At the next stage, the clasp is sewn in. Do not forget to sew the back seam so that the resulting "design" holds well.
- Now it's time to bend the belt over the ironed place and sew it on completely.
Important. The side seam, which should close the fastener, is sewn on by hand in this case.

If you sew a hidden zipper into a skirt with a belt in this way, then it will not be visible at all. In addition, it will take quite a bit of time even for a beginner needlewoman. You just need to be careful and show a little patience.
Tip from the pros: how to sew a regular zipper
Very simple instruction, allowing you to sew a zipper into a skirt without any hassle:
- With the usual construction, two parts of the skirt are sewn together in the place where the zipper will be. Then the seam is unfolded, and the fabric is gently ironed with a low temperature iron.
- A zipper is applied to the seam (from the unfolded fabric). It must be fixed in a level position with ordinary tape or double-sided adhesive tape.
- With a sewing needle, the zipper is fixed on the outside of the skirt. After that, the zipper is stitched, and the adhesive tape is carefully removed from the fabric.
- With the help of a ripper, the very first seam is carefully removed. After that, the lightning is completely ready for use.
We also suggest that you familiarize yourself with an additional video, which will discuss how to properly stitch an open zipper into a sun skirt:
Sew in a lined zipper without sewing the seam
This procedure is a little more difficult to perform than all the previous ones, but still possible. To do this, follow the following instructions:
- The sides of the fastener are aligned, and then the marking of its length is made. It is necessary to leave 2 cm of excess lightning.
- Then the first part of the braid is sewn to the markings on the skirt. After that, the second part of the zipper braid is sewn on.
- Before stitching the seam near the braid, the zipper must be closed.
- At the next stage, the skirt is connected to the prepared lining. In this case, the length of the cut for the fastener in the lining and in the skirt must match.
- Next, the seam is carefully bored. After the done procedure, the sides of the fastener on the skirt itself and the lining should be the same length.
- It remains only to grind the lining to the allowance for attaching the lock and at the same time form the top of the product in the fastener area.
At the end of the article, I would like to please you with another master class in which an experienced craftsman will show you how to sew a zipper into a skirt (tulle):
Until we meet again, dear readers. May everything be easy for you!
To sew a half-sun skirt with a zipper, it is not at all necessary to be a professional seamstress with rich work experience. Patience and a couple of hours of free time will help you sew a pretty skirt for every day or for a holiday. The master class will be available to beginner seamstresses and craftswomen.
What do we need to sew a semi-sun skirt?
- any dense fabric for sewing formal suits or trousers (1 m by 1.5 m),
- zipper (12-15 cm),
- interlining for belt processing,
- tape measure,
- chalk or soap
- thread,
- needles,
- scissors and other sewing accessories.
How to sew a semi-sun skirt with a belt simply and quickly for beginners
Let's build on fabric. Fold the fabric in half (face to face).
We measure the waist circumference (in our case it is 66 cm). We divide the waist circumference by 3, we get 22 cm. From the right corner of the fabric from the side of the fold, we measure 22 cm in both directions and draw a circle. In order for the skirt to have beautiful waves, we will need to slightly gather the fabric at the waist. To do this, we measure 5-6 cm from the existing circle to the other side of the corner and draw a second circle.

The second (lower) circle will be the waist of our skirt. Next, decide on the length of the skirt. In our case, the length of the skirt will be 40 cm. We measure 40 cm from the waist line in two directions. We draw a circle that will become the bottom of our skirt. Cut out the "skirt", leaving 1.5-2 cm on the lower and upper sides for allowances.


Next, let's take a look at the belt. On the fabric folded in half, draw a slightly curved rectangle (66 cm by 5 cm). Cut out a rectangle of the same size from the non-woven fabric. Do not forget to leave 1.5-2 cm in the belt for allowances on all sides.


Using an iron, we “glue” the interlining to the wrong side of the belt.

Sew together the 2 upper parts of the belt.

We turn it out so that the junction of the fabrics “moves out” a little to the inside of the belt.

In order to sew in a zipper, we will need to stitch the edges of the skirt, which will be the back seam. Do not forget to leave 7-10 cm from the waist for the zipper. Why so few? Because part of the zipper will be on the belt.

Now we will slightly gather the fabric at the waist in four places so that the waist circumference coincides with the length of the belt. Do not forget to leave a few centimeters for the zipper on the edges of the skirt and on the belts.

We connect the skirt with a belt with a machine line. First we sew the front side of the belt, then the wrong side. Try to make sure that the wrong side of the belt covers the edges of the skirt at the waist. Do not forget to process the visible edges of the fabric with a zig-zag stitch or overlock.

We sew a zipper into the remaining cut on the skirt (preferably a hidden one).

We tuck the bottom of the skirt by 0.5-1 cm and hem it. Do not forget to iron the skirt well so that the waves on it do not stick out in different directions.


