Step-by-step weaving of a frog from beads. Frogs and toads (5 patterns) Volumetric beading frog
We have prepared for you step by step master class with photos and patterns of weaving with your own hands a voluminous beaded frog. Stock up on supplies and get creative.
Tools and materials Time: 2 hours Difficulty: 4/10
- green beads of two shades;
- red beads;
- wire.
Step by step master class
Dedicated to all lovers of original volumetric toys. Our frog is a great option for a gift or a small friendly souvenir for no reason. Such a voluminous beaded frog looks funny and simply charming.

And at the heart of everything is parallel weaving, with which you already had the opportunity to get acquainted thanks to some master classes posted on the site earlier.
Weaving pattern
So, let's start our master class on weaving a voluminous frog. To begin with, pay attention to the weaving pattern, it clearly shows the number of beads, as well as the color nuances of weaving.

Step 1: make the tail
We start with the tail of the frog. To do this, we string 2 beads on a fishing line, send them to the center of the wire segment and cross the tails of the wire in the second bead.

We string 4 green beads on each of the wire tails and take the second piece of wire, on which we string 6 green beads, 9 yellow and 6 more green.
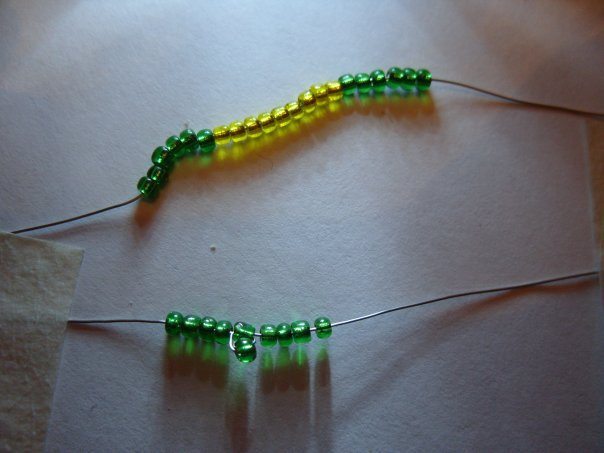
We connect two wires as shown in the photo, crossing the tails in three beads.

Step 2: Shaping the Body
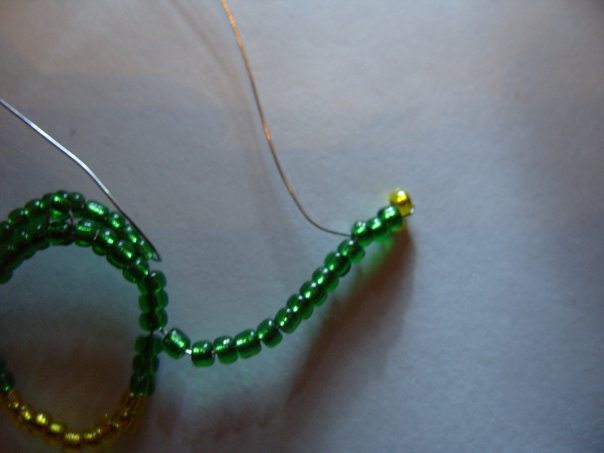
We begin to form the second row. To do this, weave 9 green beads with parallel weaving from the side of the tail.

Step 3: make paws
It was a back row, now we turn the product to face us, the yellow beads just form the frog's tummy. And we begin to make a paw.
We collect 14 green beads and one yellow on the wire and pass the wire through the last 3 green ones, bypassing the yellow one. This is the first finger. We also form the second one, only for it there should be not three green beads, but already 4.
And the third finger is also formed from 3 green beads.


Step 4: weave the second foot
And the final touch - we return the wire, passing through all 11 beads of the foot, and through 3 green beads on the abdomen.


We also make the second foot on the other side.

We continue to form the tummy, forming a row of 9 yellow beads with parallel weaving.

Do not forget that after that we still have side rows of 6 green beads.

Step 5: Forming the Language
Thus, we make 5 rows, and begin to form a tongue, stringing 1 green and 11 more red beads on the wire.

After the loop is formed, we string another red bead and a green one.

We form a row with parallel weaving. As well as the hind legs, we form the front legs of the frog.


Step 6: Making the Eyes
After the next rows are ready, weave up to 8 (reduction of beads occurs according to the scheme), we begin work on the eyes.
We string 1 bead, sequin, black bead on the wire. We fix the sequin by returning the wire to its hole, bypassing the black bead. Next, we string 6 more green beads and send the wire to the first stringed green one, even before the sequins, and to the last of 6.


Now we send the ends of the wire to opposite pairs of beads.

Step 7: Finish Weaving
We fix the wire, cut off the excess and hide it. The master class is over. Volumetric beaded frog is ready.
If you want to make a small original gift dear person, do not rush to run to the souvenir shop. A do-it-yourself voluminous frog made of beads will not save your budget much, but it will bring you real pleasure in the process of creation and, for sure, will be appreciated by those who received such a gift.
Frog under the fly
- For work, we need beads and wire. The whole weaving process is perfectly described by the above diagram.
- The frog does not have a tail, so let's start weaving from the priests. Dial two beads and cross the wire on the second.

- We collect 4 beads from two ends. We take the second piece of wire and string 6 green + 9 yellow + 6 green beads on it.

- Connect two wires by threading the ends of the first through 3 beads of the other on both sides.

- Dial 9 beads from the back to the two ends of the wire and tighten.

- We begin to weave the hind legs. Dial 14 green beads and one yellow. Go back, skipping the yellow one, through the last three, which form the first finger.

- Dial two more times, three green and one yellow, passing the wire back through three green beads. At the end, pass the wire through the entire foot to the torso.

- To weave the second foot, the same pattern is used.

- We continue to weave the body for another 5 rows in a parallel way with four ends of the wire, not forgetting that the frog's tummy is yellow and the back is green.

- We make a tongue by picking up 1 green and then 11 red beads. Make a loop by threading the end of the wire through the 5th bead.

- Dial another green one and thread the second end of the wire through all the beads of the tongue, except for the loop.

- Weave the front paws in the same way as the back ones. Just make them a little shorter: 8 green + 1 yellow.

- Weave further the body, reducing the number of beads to 8.

- Our voluminous frog should have bulging eyes. To make them, type on both sides: 1 green + sequins + 1 black. Return to the patch.

- We make a circle of 6 green beads, return to the very first and the first of six (pair). The circle is closed.
- Thread the wire into opposite pairs of the circle and tighten.
- Fasten the wire. Cut off the excess. Twist a fly from one end of the wire using two beads. The frog under the fly is ready.

frog
This video shows how you can weave our tailless amphibian in a slightly different way. Rather, the body is made in the same volumetric weaving method, but the eyes and paws here have a different shape, and hence the pattern.
This video is also good because in addition to a clear picture, big plans shooting and competent intelligible speech of the master, a weaving report is written on the top of the screen. The master class is shown from the beginning (preparation and weaving of the hind legs) to the very end (eyes and muzzle) with the final firmware of the craft.
wahs
From beads, two medium and one large bead, you can get a funny wah toy.

Keychain

Frog-keychain is made by parallel weaving from small beads of 5 colors. For it, a fishing line is used. The work begins with the paws and is knitted according to the scheme or, as in our case, according to the photograph. Don't forget to leave a small loop for the metal ring.
We take the end of the wire and put it through one black, two green and one black. We do it in such a way that it turns out approximately in the middle of the wire.

Gently tighten the resulting structure. We make sure that it is exactly in the middle of the wire.

We collect five beads on the wire.

We take the wire where there are no beads, and stretch it through five beads and tighten again, so that they are under the black eyes.

Now we collect six beads and do exactly the same as in the previous step, we form the back of the frog.

It turns out here is such a "semi-finished product".

Now let's start making paws. To do this, we collect three green and three yellow beads. As long as we don't delay!

We take the end of the wire, on which the beads are strung, and we put it through three green ones, and now we tighten it to make a loop of wire.

It turns out a paw.

We do the same with the second side. If the foot turned out far, then we relax the wire, adjust it to the body and tighten it.

Now we collect two rows of six beads and tighten. And exactly according to the same principle that was described earlier, we make two lower paws.

We collect another row of six beads, tighten it tightly, tightly.

It should turn out like this.

We hold our "almost-frog" in this way and begin to weave from the bottom up.

We take the free end of the wire and push it between 2 and 3 next to the bottom, tighten it.

We collect on this end of the wire again a row of six beads, tighten.

Again they scored a row of six, tightened,

This is what the frog should look like after you have completed all the rows.

The frog turns out with a secret, with a hole inside the body, you can put it on the tip of the pen.

And in this hole, according to Chinese mythology,

you can put a coin and put a frog in the southeast part of the house. If you do everything in this way, then there will be an attraction of money to the house.

The Eurocent did not enter our frog made of small transparent beads, but the Russian penny did.

If you take more beads, then you can weave a secret for a eurocent.

All money goes to us.

I wish you good luck and wealth!
Bead weaving today is an actual occupation, because in a fairly short time and minimal financial waste, you can create interesting jewelry, figures that will differ in their originality.
Products from beads
Today, beaded jewelry is very popular, because they look stylish and interesting. In addition, this occupation does not require special knowledge or possession. huge amount weaving technique. The process of making jewelry is very interesting and exciting, and the result is worth the resources spent.
To master the technique of weaving from beads, it is enough to have materials and a pattern. The scheme can be found in print publications on needlework, or you can use the worldwide network, which contains not only weaving patterns, but also a video that shows in detail what and how to do.
Weaving a frog from beads
Weaving a frog with beads is enough interesting hobby, because from such materials as wire and beads a real work of art is obtained. So, before you start weaving, you need to prepare materials.
Materials that are needed for weaving a beaded frog
- Beads. In order for the frog to turn out attractive, the beads must be selected in the same size. In our case, four colors are required: green, red, yellow and black.
- Wire, mostly copper, which will allow you to bring the product to the desired shape.
Step-by-step production of a frog from beads
First row
We take copper wire at least one meter in size and put green beads on it in the amount of 7 pieces. We place the beads in the middle of our segment, with one end of which we pierce four green beads, which are located at the opposite end. The wire is being pulled.
After tightening the wire, we got two - the top one consists of three beads, the bottom one - of four beads.
Second row
We begin to weave the upper tier. Let's start by placing 5 green beads on one of the ends of the wire, then thread them through the other end. With the help of a tightened wire, we get the upper tier of our product.
In the same way we make the lower tier. The sequence of beads should be as follows: 1 green, 3 yellow, 1 green.
Third row
We continue to form the top with such a sequence of beads: 1 black, 1 green, 2 yellow, 1 green, 1 black.
Bead sequence for the lower tier: 1 green, 2 yellow, 1 green.
In the fourth row
Top: 2 green beads, 1 yellow, 2 green.
Bottom: 1 green bead, 3 yellow, 1 green.
In the fifth row
Top: 2 green beads, 2 yellow, 2 green.
Bottom: 1 bead green, 4 yellow, 1 green.
In the sixth row
Top: 2 green beads, 3 yellow, 2 green.
We start weaving the paws, for this you need to put green beads in the amount of 10 pieces and 1 red bead on one of the ends of the wire. Holding the red beads, the wire in the opposite direction must be passed through 2 green beads, which are closest to the red bead.

On the same end of the wire, 2 green beads and 1 red are placed. We fix the red bead, and thread the end of the wire in the opposite direction through 2 green beads. We repeat this step twice. At the end of this stage, the end of the wire must be passed through 8 free green beads. By tightening the wire, we get a frog leg.
Thus, the weaving of the second front leg of the frog also occurs.
After the second foot is woven, we move on to the lower tier of the sixth row and thread the beads in the following sequence: 1 green bead, 5 yellow, 1 green.
In the seventh row
Bottom: 1 green bead, 6 yellow, 1 green.
In the eighth row
Top: 2 green beads, 5 yellow and 2 green.
Bottom: 1 green bead, 4 yellow, 1 green.
In the ninth row
Top: 2 green beads, 4 yellow, 2 green.
Bottom: 1 green bead, 4 yellow, 1 green.
Top: 2 green beads, 2 yellow, 2 green.
Weaving of the hind legs. 11 green and 1 red beads are strung on the end of the wire. Holding the red bead with your hand in order to avoid it slipping, we thread the wire through the next 2 green beads in the opposite direction. We put 2 green beads and 1 red on the wire, then thread it in the opposite direction through 2 green beads - the step should be repeated two more times. The final step in the manufacture of the foot is to pass the wire in the opposite direction through 9 green beads. At the end, the wire should be well tightened. Weaving the second foot will not be difficult, because the principle of operation is the same.
- The eleventh row provides for weaving only the upper tier, which consists of 2 green beads, 2 yellow and 2 green.
- Upon completion of the work, we pass the free end of the wire through the eleventh row of weaving. The weave is tight. The work is completed - the beaded frog is ready.


In order to make a beaded frog, we need the following materials:
- beads of green, red, black and yellow flowers;
- copper wire;
- fishing line.
Weaving will be carried out in volumetric technique. The back of our figurine will consist of the upper tiers of beads, the belly - of the lower tiers. Photo examples will help you view the entire weaving process in detail.
Let's start making the first row. To do this, on a wire one meter long and string seven green beads on it. We advance them to the center of the wire. We pass any of its tips through four beads of the second tip of the wire. After tightening, we get the first row, consisting of two tiers, consisting of three and four beads, respectively.


To form the second row, we string five green beads onto the wire and thread the opposite end of the wire through them, tighten it and arrange the resulting row of beads so that we get the upper tier. For the lower tier, you need to dial the beads in this way: one green bead, three yellow and one more green.
To create the third row, we string the beads in the following order: one black bead, one green, two yellow, one green and one black. To form the lower tier, we use the following sequence: one green bead, two yellow and one green.
Weaving the top row of the fourth tier is carried out with the following set of beads: two green beads, one yellow and two green. For the lower tier, the order is: one green bead, three yellow and one green.
The sixth row suggests the following set of beads for the upper tier: two green beads, three yellow and two green.


We turn to weaving the front legs of the frog. We string ten green beads and one red on one of the ends of the wire. Holding the red bead, you need to pass the tip of the wire through the two nearest green beads in the opposite direction.
We string two green and one red beads on the same end of the wire and, again, holding the red bead, thread the tip of the wire through two green beads in the opposite direction.
In the same way, you will need to weave another foot.


We return to the weaving of the lower tier, for which we string the beads in this order: one green bead, five yellow and one green.
For the top row of the seventh tier, we string: two green beads, four yellow and two green. For the bottom: one green, six yellow and one green.
For the top row of the eighth tier, we string: two green beads, five yellow and two green. For the bottom: one green bead, five yellow and one green.
For the top row of the ninth tier we string: two green beads, four yellow and two green. For the bottom: one green, four yellow and one green.
We start the tenth row by weaving the upper tier by stringing beads in the following order: two green beads, three yellow and two green.


We turn to weaving the hind legs of the frog. To do this, we string 11 green and 1 red beads on the tip of the wire. Next, holding the red bead, we pass the tip of the wire through the nearest green beads in the opposite direction. Now we string two green and one red beads on the same tip and, again holding the red bead, we thread the tip of the wire through two green beads in the opposite direction. We do this two more times and thread the tip of the wire through 9 green beads in the opposite direction. Then you need to tighten the wire. As a result, we got the hind leg of the frog. On the second tip of the wire we create another of the same paw.


After that, for the lower tier, we string the following chain of beads: one green bead, three yellow and one green.
11 row will consist only of the upper tier, consisting of two green beads, two yellow and two green.
Now you need to stretch one of the ends of the wire through the previous row of beads and fix the wire.
This completes the process of weaving our frog.


To give our product a shape, it must be stitched with a fishing line.
At the tip of the fishing line threaded into the needle, you need to tie two knots and thread the needle under the final row of beads. Next, you need to pass the needle through the knot to secure the fishing line.
We sew the beaded rows by threading the needle under them. We tighten the fishing line so that it passes through the center of the rows. We first connect each of the lower rows, then move on to the upper ones. At the end, you need to tighten the fishing line and hide the knot inside our frog.


That's all, we made our first frog with you.
Cheerful frog with a fly according to the scheme
For weaving, you will need green, red, black and yellow beads, as well as wire. We will use the technique of parallel weaving.
Before weaving, study the diagram on which the number of beads is distributed by color.
Let's start making a frog from its tail. We collect two beads on the fishing line and move them to its middle. Next, you need to cross the ends of the wire in the second bead.
Now we collect four beads on both of the ends of the wire. On the second wire we collect 6 more green beads, 9 yellow and 6 green. Then, we need to connect two wires, crossing the ends in three beads. In the photo you can clearly see this process.


We start creating the second row, using parallel weaving from the side of the tip with nine green beads.
We string 14 green beads and one yellow on the wire and thread it through three green beads without yellow. We get one finger. In the same way we make the second one, but using 4 green beads. The next finger is made of 3 green beads.


