Craft product. Crafts from natural materials with your own hands: an interesting, fun and useful hobby for children and adults! DIY cardboard crafts for children
Nature every year gives us a lot of free natural materials suitable for creativity. The process of creating with your own hands develops the artistic taste, thinking, memory of the child, cultivates perseverance. But most importantly, you can have fun and usefully spend time with friends, delighting yourself and others with crafts.
Preparation of natural materials for their further use
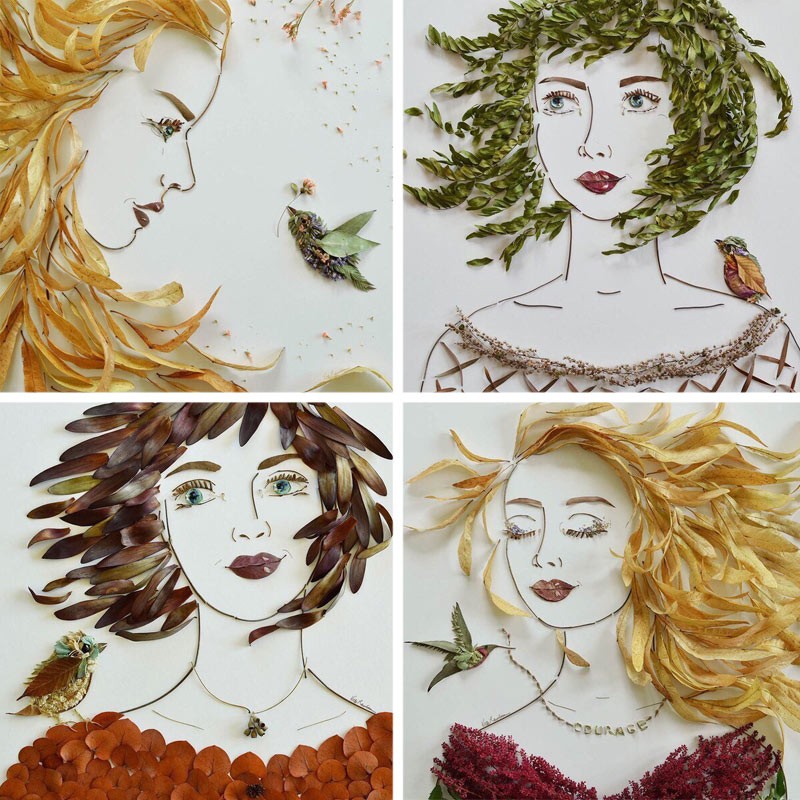
Nature is the best artist, it creates such natural materials that turn into works of art in skillful hands!

plant materials
chestnuts
Chestnut fruits have a bright brown color and a shiny surface, so they make excellent DIY crafts from natural material. The shell of a fresh chestnut is thin, easily pierced with an awl. Chestnuts are a fertile material for working with young children themselves. You can make many different dolls,.


It is better to store in a cool place in boxes.
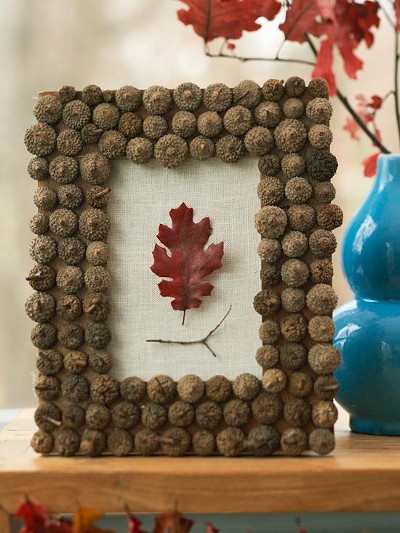
acorns
Oak fruits ripen in autumn, in September-October. collected in various shapes and sizes.


At the same time, their cups (pluses) on which they are held are also collected. Plushs are very often used separately from the acorn, as an independent natural material for various crafts.

Acorn cups and balls knitted from wool
How to knit even balls of wool, see the video Olga Skibina:

Acorn buns and Christmas bells


You can store them for a very long time, after washing and drying thoroughly. But why just keep stones when you can play with them with the whole family?)


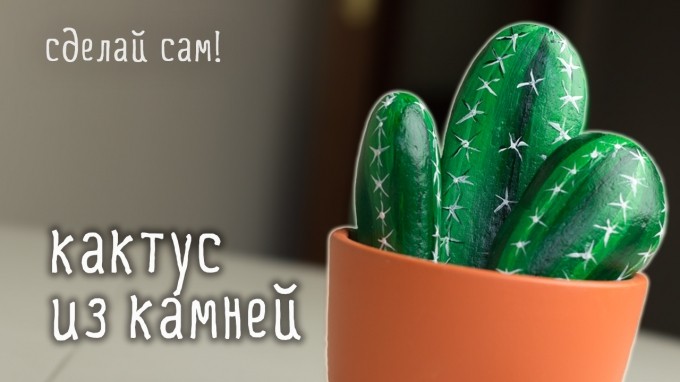
Another way to apply an image to river or sea stones see video from You Can Do It Craft. You will be surprised how easy it is!
shells
You can collect shells on the banks of rivers, seas, lakes while relaxing with your children. Many of them are original appearance, in shape - oval, comb-shaped, elongated, etc.
Boil them for a few minutes to free them from living organisms. Shells are washed with a small brush (you can use a toothbrush), after which they are dried, sorted by type and size. Stored at any temperature.
You can also clean the shells in a solution of whiteness and water at a rate of 1: 1. The top layer will disappear after a while, leaving the shell with a nice shiny top.
Animal figurines are made from large shells.

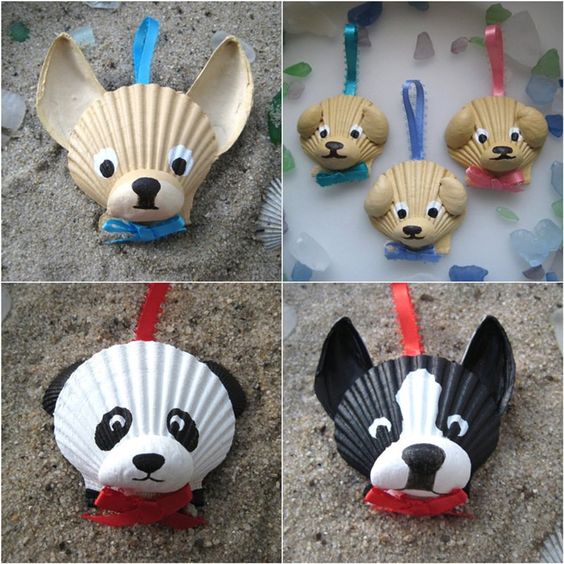

Small shells make wonderful applications, garlands:


Shells can be used not only as the main material, but also as an additional decor (bird wings, dog ears, flower petals, etc.)


Sand
Very affordable material that can be collected in any sandbox. It differs in structure. Rinse and dry thoroughly before use. And then you can use it as a decor in your work:


Rules for the storage of natural materials
Crafts made from natural materials with your own hands will be flawless if, after collecting, drying, pre-treatment, you properly store these natural gifts. To do this, you must adhere to certain rules.
- A dark, cool and well-ventilated area is the best place for storage of natural materials.
- Can buy plastic containers for storage of each type of materials; use carton boxes from under shoes, tea, sweets; take ordinary glass jars with a screw cap. For seeds, as well as for beads, it is better to have a container with many compartments.
- Dried flowers are fragile and break easily, so they are placed in a tight box or container. Petals are stored separately from flowers. Flowers with a stem can be stored in a vase.
- Prepared leaves are also brittle. You can store them in large books. Also, for safety, put them in signed candy boxes, grab a little tape so that they do not accidentally open.
- Seashells are placed in glass jars or plastic containers with a wide neck so that they do not crumble.
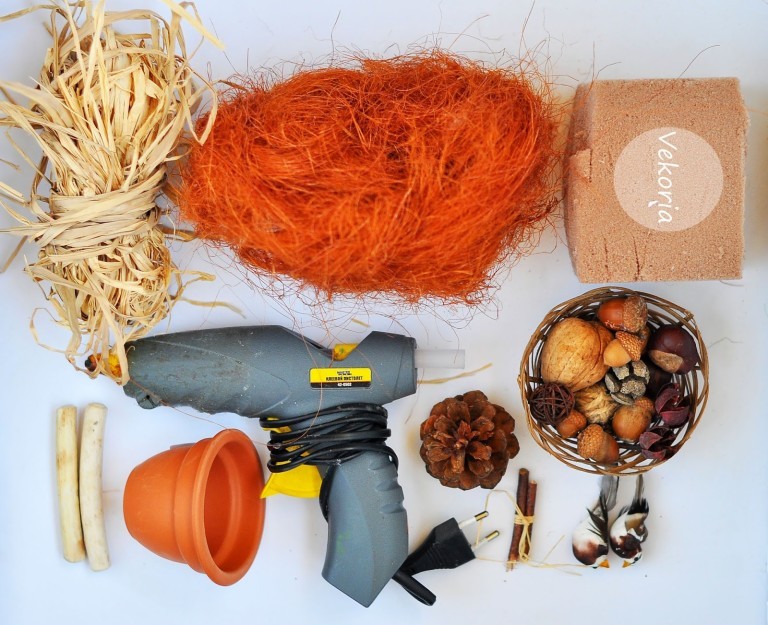
Additional tools for crafts made from natural materials
To create a beautiful craft from natural materials, you will need additional tools and materials.
It can be:
- colored paper;
- cardboard;
- skin scraps;
- scraps of fabric;
- bird feathers;
- Styrofoam;
- plasticine;
- wire;
- PVA glue, "Moment";
- gouache;
- stain;
- varnish etc.
Paper very often used as an addition to natural materials. Children, bending, gluing it, make the work much more interesting.
plasticine fasten separate parts of simple toys at the initial stage of work. It is not very durable, but as a supplement it is often used in kindergarten and in primary school.

From wire most often they make the frame of a toy, the connection of its parts. Copper wire diameter 0.29-0.35 mm - soft, flexible and durable - the most comfortable. And for the frame, a wire of a larger diameter is used - 1-1.5 mm.
Threads it is better to take thick, multi-colored ones (No. 10).
Glue it is better to take white PVA, BF, etc. However, in kindergarten it is better to use PVA glue.
They also use foil, pebbles, pits from cherries, and bristles.
Additional material is best stored in a small box with cells for each type of material.
Usage additional material depends on the idea, the skill of the children, the degree of development of the imagination! Offer your options, but rely more on children's intuition and desire.

It is also additionally necessary to have certain tools for making crafts from natural material:
- artistic scissors;
- awl;
- jigsaw;
- tweezers;
- pliers and wire cutters;
- sewing needles;
- brushes for glue and paints;
- cotton cloth for wiping off adhesive residue.
Scissors for children should be with blunt ends, small, with rings convenient for a child's hand.
Awl you need to take from a durable material with a handle length of about 6 cm, a diameter of about 2 cm, a stabbing part - 3.5 cm
Needle need a large sewing machine. It must be kept in a needle case with a thread threaded into it.
Attention! Only adults use pliers, pliers, drills!
To draw the contour of the part to be cut out, a simple pencil. For example, dresses, hats for a doll, etc. It is better to take a soft pencil (2M).
Tassels(soft for drawing, harder for glue). It is better to buy squirrel brushes (No. 4 and 6). For glue take brushes with hard bristles.
Stack- a tool necessary for surface treatment of clay or plasticine. The length of the stack for children is about 12 cm.
Crafts from natural material for kindergarten
Toddlers are very fond of turning chestnuts and plasticine into toys in their hands that they can play with. Crafts from natural material for kindergarten not very difficult, so with the help of an adult any child can handle it. Sometimes they are made from fruits and vegetables, but most often they are applications from leaves and animals from cones and acorns.
Crafts from leaves and maple "helicopters"
The lightest and available work even for kids - this is an application of leaves. If this is the first time you are making a composition with your child, offer him a picture that will serve as a template. Do not rush to do everything yourself. Invite the child to choose the leaves as desired, so that the work turns out to be similar to the sample. This will develop your child's creativity.
Application material:
- colorful leaves;
- thick sheet A-4;
- brushes for glue;
- PVA glue;
- scissors;
- sample.
To make a simple composition, you need even, dry leaves. Put them under a press or in a book. In two days the material is ready. Cut out suitable parts with scissors and lay them out on a piece of paper.
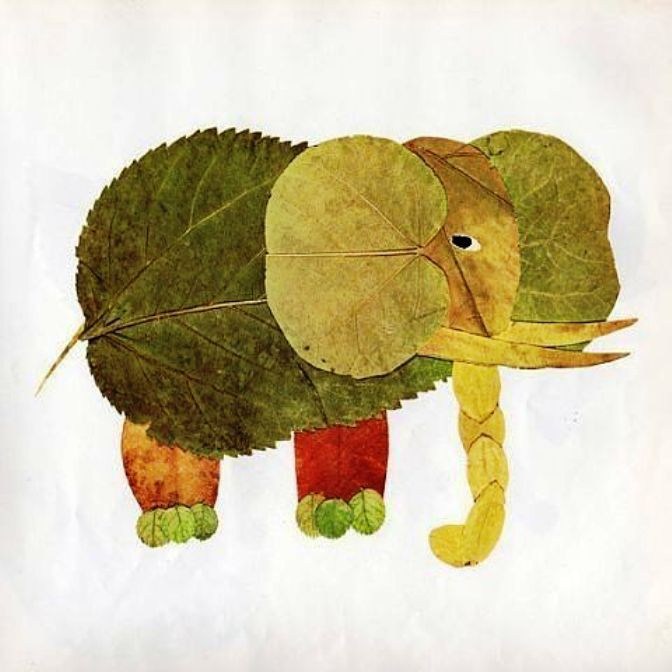
Now you can glue. First the background and bottom layers, and then the finer details. For example, if you want to make an elephant, then first make the body and head out of the leaves, and then glue the trunk, tail, legs. If there are not enough eyes, then they can be drawn with a marker or made from tree seeds.
It is not necessary to do everything according to a template. You can come up with a picture yourself and create an original composition of leaves.


Use as a supplement colored paper, felt-tip pens, paints, so your applications will be even more interesting.
Along with the leaves, “helicopters” from maple are also ideal as a basis for crafts made from natural material for a kindergarten. Just look at this miracle!

Fairy wings from maple seeds

Dragonflies from maple helicopters
Now you are convinced how beautiful and original leaf applications can be. Use these ideas for leisure activities with children.
Simple master classes on creating children's crafts from acorns and cones
At the end of summer, acorns begin to ripen, and they make wonderful crafts made from natural material for a kindergarten or school. They are well preserved, and on long autumn evenings, together with children, you can do a pleasant and useful thing that develops fine motor skills hands of the baby, fantasy and perseverance.
The most common acorn crafts are animals and various little men. From toothpicks, matches, thin twigs, you can easily make legs, handles, horns and other small items. An adult needs to help the children poke holes in the acorns.
For attaching small parts, you can use glue gun, Super Moment glue, but only adults should do this. And it is safest for the guys to fasten the parts with the help of plasticine.

Fly agarics from acorns are even easier to make! To paint acorns, you need to remove the hats from them, and after the paint has dried, glue them in place.


Acorns are very beautiful on their own, and if they are also painted acrylic paints or nail polish, then such crafts will decorate any home.

And from silver-painted hats you can make original decoration on Christmas tree. The process of creating such an eco-toy is quite simple: we stick it tightly on a foam ball (you can take the old christmas ball) caps from acorns. And sparkled new.

We found another video for you, where Niki Junior tells what a wonderful craft will turn out from leaves, cones, twigs and plastic bottle. Look, you will learn a lot.
Categories
So that you have a great mood in any weather, make new things from improvised means. Quick crafts that take less than an hour to make.
The content of the article:
Sometimes you want to pamper your child with a new toy, but there are no financial opportunities and time to make it. Therefore, we decided to select for you the fastest simple crafts for which you will spend no more than an hour. The family budget will not suffer, as they master for the most part from waste material and all sorts of leftovers.
How to make a doll from threads and a dandelion with your own hands?

You will create it while relaxing in a comfortable chair. The main thing is to arrange everything you need nearby so that you do not have to get up again. This:
- threads;
- half a sheet of cardboard;
- scissors;
- a strip of flesh-colored fabric;
- markers.
- Wind the threads around the postcard with an impressive layer.
- Tie the finished winding with thread. Decide where the doll's head will be. Designate it by also rewinding the thread.
- In the same way, arrange the right and left hand. To make doll brushes from thread, rewind your hands at wrist level, cut the yarn around the fingers of the toy.
- Also, separate the torso from the legs with threads, and perform them in the same technique as the arms, just make them longer.
- Measure a strip of flesh-colored fabric over the volume of the head, glue its sides.
- Wind the hair threads around your hand, cut the resulting roll on one side. Glue to the head, trim the bangs if desired.
- markers different colors draw the facial features.
- Sew a sweatshirt for the toy or tie it up with a piece of fabric to make an apron. You can tie a handkerchief to become a cloak. Such clothes are made with pleasure by children, who will surely appreciate the new doll made of threads.
If you are making a girl doll, then you do not need to indicate her legs. Let the threads evenly cut at the bottom become a skirt.
Such simple crafts will surely please the kids. You can also create a fluffy dandelion from the leftover threads.

For this charm you will need:
- yellow and green yarn;
- wire;
- PVA glue;
- knitting fork or metal staple;
- scissors;
- gypsy and thin needle.
- Wind yellow yarn around a knitting fork. Thread the gypsy needle with a thread of the same color. Sew it in the middle.
- Lubricate the resulting line well with glue. Remove the created web of yarn from the fork, twist it with a roller.
- A thread is wound in the middle to give the workpiece the shape of a dumbbell. From above, coat the middle of this part with glue, wait until it dries.
- Such simple crafts are interesting for both adults and children. They are made quickly, but part of the time is spent waiting for the glue to dry. Therefore, it is better to make crafts in the evening, and the next day to continue entertaining needlework. What are we going to do now.
- Cut the resulting dumbbell in the middle. On the first and second flowers, you need to cut the loops with scissors, carefully comb them to get fluffy hats of two dandelions.
- The green yarn from which we will make the sepals must be cut into segments 4 cm long. We thread the same thread into the gypsy needle, sew the segments across, but not in the middle, but stepping back from the edge 2/3.
- Trim the top with scissors, trim it, make another line parallel to the first.
- Lubricate the back of the flower with glue, attach the sepals here. Wrap it with the same thread that was stitched. Glue both ends and leave the workpiece to dry.
- In the meantime, you will wind the green thread around the glued wire. Get a stem.
- Insert a thick needle from below into the sepal, twist to make a hole for the stem. Install it there, after lubricating this part with glue.
- The leaves can be crocheted, but since we make simple crafts, cut them out of green paper or cardboard, glue them on the stem.
How to quickly make crafts from animal tissue?
If you want to spend on making new toy less than 30 minutes, then make these funny mice. They don't even need to be sewn. By making cuts in a certain way, you will make these rodents.

See if you have:
- pieces of felt;
- juice straws;
- beads or small buttons.
- For each mouse, you need to cut two pieces from one fabric. The first will become a body, pointed from the muzzle, rounded on the other side. Cut out the ears in the shape of a figure eight.
- From a fabric of a different color, you need to cut a small circle for the nose and two larger ones for the ears, glue them in place.
- Use scissors or a clerical knife to make 4 cuts on the body of the mouse. Two will be vertical, at the back of the head, and the other two you will make in the area of \u200b\u200bthe rump to put the straw here. Position the ears on top of the head by threading them through the incisions.
- It remains to glue beads or buttons instead of eyes and marvel at how quickly crafts are made from simple materials.

If the child is bored, you can make a fabric appliqué with him. Such funny bunnies sewn on worn knees of children's trousers to update this thing.

Transfer the applique to the fabric, cut it out. They decorate the bunny by sewing a bow to its ears, and a carrot on the body. Attach eyes and other facial features. If this is an applique, then you need to glue the hare on cardboard.
And here are some more simple crafts - in the form of birds. You can cut these out of the remnants of felt, glue the nose, eyes, wings and play a home performance.

Crafts from cones with their own hands for children

They are also made simply and quickly.
To make gnomes, take:
- Pine cones;
- light plasticine;
- pieces of felt or fleece;
- glue;
- brush.
- Let the child roll a ball out of plasticine, with the back of the brush make indentations in it for the eyes, mouth, nose. They will be filled with pieces of plasticine of the corresponding color. So, the eyes can be brown or blue, the mouth is red.
- Attach the head to the top of the cone. Cut out a triangle from felt, glue its sides to make a cone. Put this cap on your character's head.
- Cut out mittens from the remnants of the fabric, attach them to the bump with plasticine.

For such crafts from cones, like an owl, we also need:
- 2 caps from acorns;
- yellow paint with a brush;
- plasticine;
- accessories in the form of feathers, ribbons.
- First, the cone and the acorn cap need to be painted, continue subsequent work when they dry.
- Let the child roll small balls from black plasticine, stick them to the inverted acorn caps - these are the pupils.
- Make a nose out of orange plasticine, attach it in its place.
- Such an owl made of cones craft is decorated with feathers or ribbon.
- pine cone;
- pieces of dense fabric;
- two toothpicks;
- cotton wool;
- 2 ice cream sticks;
- white paint.
- Let the child paint the bump, remove it until it dries completely.
- Mom will cut a scarf out of checkered fabric and tie it around the snowman's neck. He will make headphones from felt, glue them to the character's head.
- The child will make the nose and mouth of a snowman out of plasticine, attach it to his face.
- Make hands from wire wrapped with a strip of cloth or tape. The wire needs to be wrapped around the bump.
- Put toothpicks in the hands of the snowman, with pieces of cotton wool glued to the bottom of these sticks.
- Paint the ice cream sticks, when they dry, install the snowman on these skis.
Quickly and simply done and these are the piglets. Glue the scales from the cones in the form of ears to the spruce cones. Attach the patches, which will become acorn caps. You can use not glue for this, but plasticine.

Paint the piglets pink, you can use spray paint for this. When it dries, only after that you attach small black beads that will become eyes.
For this craft, you need an unopened cone. But over time, the scales open up. To avoid this, dip the cones in wood glue diluted with water for half an hour.
Take them out of the solution, shake them off. After 3 days, the bump will dry completely, fixing the scales, which now will not open. After that, you can cover this natural material with paint and make new items.
The next simple craft is a forest corner. For her, take:
- CD disk;
- plasticine;
- spruce and pine cones;
- an acorn cap;
- glue;
- paints;
- eyes for toys
- Paint the disc green color, draw flowers on its surface.
- Let the child roll up the hats and legs of the mushrooms, connect them.
- The basis for a hedgehog can be molded from plasticine or polymer clay. Then cover it with brown paint.
- When it dries, stick scales from a spruce cone into the back of the hedgehog. Put a hat on his head.
- Glue the eyes, nose, mouth, put a cane stick in your hand. The other will contain a basket with mushrooms, which are molded from plasticine.
- Attach the hedgehog to the stand, then another wonderful craft ready.
Tie floristic wire to the cones, put picturesque flowers in a jar, previously wrapped with twine.

From cones for the garden, you can make another craft, such a wonderful decorative basket.

If you need to quickly make a hedgehog to bring to kindergarten, mold his body and head from beige plasticine, and roll up his eyes and nose from black. Stick seeds that will become thorns.

Simple crafts for a great mood
Now the sun peeps rarely, more and more cloudy weather. In order not to succumb to despondency at this time of the year, make mischievous tricks that will certainly improve your mood.

Settle at home in a vase with these cheerful flowers that are made from almost nothing. For them, you just need to take:
- colored paper;
- cardboard from a white box;
- marker;
- stationery knife;
- tape;
- scissors.

Paint the eyes with a black marker, bend the petals forward.

Cut out a stem from cardboard. At the top on one side, glue already finished part, on the other - a pre-cut flower with petals.

Bend a green sheet of paper in half, draw an oval line on it, cut it out. If available, use zigzag scissors. Make the cuts simple.

Tie paper flowers with ribbon, and if there is taffeta, then use this fabric for decoration. You have got a bouquet that will never wither, will amuse you.

You can attach flowers with a toothpick to washed beets or pineapple. You will get a beautiful tortoise shell. You will make her arms, legs and head with a neck from carrots. Attach these parts to the body with toothpicks too.

If you want the New Year to come soon, decorate the white objects in the apartment by turning them into snowmen.

Attach black magnets to the refrigerator, and now the holiday character has settled in your kitchen. If you draw on a white vase or stick round eyes and an orange nose in the form of a carrot, then another snowman will amuse everyone at the table.
See what other quick and easy crafts you can make.
The idea to make a bouquet of paper flowers is very good. For paper crafts, we need to purchase colored paper, cardboard, felt-tip pens, a stationery knife, ribbon, scissors and PVA glue.
paper bouquet
First you need to make three blanks for each flower, two of which should be the same color, they should have six petals.

Place one blank in front of you, on top of which stick a circle.

On the mug, pre-make holes for the eyes and mouth in the form of a smiley face.

After gluing the mug with the flower, you need to paint the eyes with a black felt-tip pen, and then bend the petals inward.

The next step is to cut out the stem, which we later attach to the flower, and on the other side of the flower, you need to attach the same blank.
Also for a bouquet, you can make leaves that can be made from green paper.

First you need to draw an oval and cut it out, and then make notches using scissors.

In order for the individual pieces of paper craft to become a single whole, tie the flowers with a ribbon or some other fabric to decorate the bouquet.

Such a bouquet will never wither and will be a great decoration for your home.

Simple crafts from plastic bottles
The simplest crafts for children include crafts from bottles.

For example, you can make a piggy bank from a bottle, which requires only a marker, a clerical knife, dice (4 pieces), a small bottle, glue and colored paper.

The first step is to cut a straight line, the width of which can be 5 centimeters, and the length of this line should be enough to girth the bottle.


With a marker we draw eyes, and on the bottle cap we draw nostrils. Using a clerical knife, cut a hole for coins.

As legs for the pig, you need to attach the dice with glue.
Note!


This craft develops the imagination of the child, and is also useful in everyday life.
Ball of thread
The craft can be used as a lampshade for a lamp or simply hung as a decoration.

A ball of thread is made very simply, for its manufacture you will need colored threads, a ball, and transparent glue.

First we need to inflate the balloon and tie its tip so that the air does not escape.

Then the inflated balloon must be wrapped with threads, after which glue should be applied to the surface of the balloon and wait until it dries.

Note!

Now you need to separate the ball from the threads, for this, just pierce it with a needle and the whole craft is ready.

Gnome from plasticine and cones
As a simple DIY craft, you can make a gnome. For crafts, you will need a pine cone directly, light-colored plasticine, pieces of fabric, glue and a brush.
First of all, the child must roll a ball from a piece of plasticine, after which, using a brush, you need to make indentations for the nose, eyes and mouth on the ball.


At the next stage of our craft, it is necessary to attach the resulting head to the top of the cone.

Then the child should cut a triangle out of the fabric and glue it on the sides, the result should be a cone. The cone will play the role of a hat for our character.
Note!


At the end, you need to make fabric mittens, and then attach them to the cone using plasticine and our cone gnome is ready.
paper bookmark
As a simple craft for kindergarten, a paper bookmark is perfect. To make this simple craft, kids will need a pencil, ruler, colored paper, scissors and glue.

To begin, the children must draw a square measuring 20 by 20 centimeters.

Then divide the resulting square into 4 identical parts with a pencil and a ruler, as a result there will be 4 squares measuring 5 by 5 centimeters.

The second step is to divide the upper right and lower left square in such a way as to get triangles, that is, you need to draw a line diagonally from the upper corner to the lower corner.

We do not need triangles with an outer side and can be crossed out.

Then it is necessary to cut out a figure from paper without taking into account the crossed out triangles.

The top triangle needs to be trimmed. If everything is done correctly, then the paper will be in the shape of a diamond, to which two triangles are glued.

The next step is to fold all the triangles in half, and then alternately put them on the tip of the rhombus. You should get a pocket that will fit on the tip of the page of the book.

To make an original bookmark, children can be advised to cut out some application from colored paper.

Photos of simple crafts


Each person in his life was probably engaged in the creation of some cool crafts, not only in childhood, but also in adulthood. After all, as you know, needlework brings everyone great pleasure and a lot of positive, relieves accumulated stress and negativity, makes us rejoice and look at the world with completely different eyes. Its fruits transform our homes, replenish school and kindergarten exhibitions, flaunt in the hands of our relatives and friends as an expensive gift for the New Year, March 8, February 23, Birthday, Easter, May 9, Mother's Day and even Cosmonautics Day, or just like that, for the sake of deep respect. This activity is especially interesting for our children. They, like no one else, love to make something from paper, cardboard, plasticine and other materials at work lessons or at home at their leisure, thereby developing their inner world, making it richer and more beautiful. If you and your family decide at home to start making some original gizmos from accumulated unnecessary items, then we recommend that you look at our article. She will provide you with 74 photo ideas of beautiful do-it-yourself crafts from improvised means created for the beauty of the room interior and benefit. Informative videos with accessible and step by step description creative works, you will come in handy. They will solve all the questions and problems that have suddenly arisen.
The best cardboard crafts
You can do the same cardboard crafts DIY with instructions and diagrams for all family members. This is a fascinating and interesting process, and will not leave anyone idle.
From white decorative stones small size can be done by hand very original stand under the cup, as in the photo. To do this, the stones need to be glued together. This is a very painstaking and lengthy work, but the result will exceed all expectations. Such a stand, made from an affordable improvised tool, can even be used under hot dishes at home.
Jewelry box from a metal can

We have provided you with many interesting photos ideas for creating crafts with your own hands from various improvised means. All of them are equally beautiful and original. However, I would also like to offer you one no less cool idea, which is carried out at home from a simple tin can and colorful fabric. If you are interested in our offer, then let's start our step by step wizard a class with a description of all actions.
To work you need:
- metal can;
- textile;
- hot glue;
- scissors;
- cardboard;
- pencil or compass.
Manufacturing process:
- We take an empty metal can and cloth. We need to arrange a festive container. To do this, we take measurements from the side of the can and transfer them to the material. Then we cut out the decor of the desired size and glue it to the side surface of the container with hot glue.
- The protruding part of the fabric on the top of the jar should also be folded inward and sealed. It turned out something like neat sides.
- From cardboard, measuring the diameter of a metal container, we cut out circles of the appropriate size in the amount of two pieces and an additional third slightly smaller size.
- Our cardboard blanks should also be decorated on both sides with a cloth, using hot glue to secure.
- One round piece will become the bottom of our decorated box, where we insert it, and the second two will become a lid, consisting of two circles that differ in size (the large one is the top of the lid, and the small one is the bottom).
- Upon completion of the creative work, you can transform the box with satin bows, rhinestones, beads, or something else, no less bright. It’s not a sin to give such a craft to your mother, sister, girlfriend or your young girlfriend. This is how at home with your own hands you can create many original things from empty jars of cream, hair balms, tea and more. All these improvised means are quite affordable and diverse.
Video: master class on making a box of matches
9 ideas easy and beautiful crafts hand made from leaves
If you want to make wonderful crafts from leaves with your own hands for home, garden or school with your children, then visit our article. In it, we will provide you with some photo ideas and videos from step by step wizard classes....
To create simple do-it-yourself napkin crafts for the New Year 2018 or other holidays, you should visit our article. In it you will find a lot of wonderful photo ideas and video with step by step instructions....
make out various crafts for children with their own hands together with their child is an exciting activity that significantly contributes not only to the development of the child, but also to the strengthening of your relationship with him. Any child will be very happy if he has the opportunity to do something beautiful with his parents. Therefore, even in the busiest schedule, try to set aside a piece of time to devote it to activities with children. Sections of our article will present useful advice how to make a DIY craft various materials taking into account age features kids.
DIY paper crafts for children
The most commonly used material for applied art is, of course, paper. Moreover, it is worth paying attention not only to the usual color sets, but also to other types of it: corrugated, velvet, designer. You can create do-it-yourself crafts for children from paper, flat (applications), as well as voluminous, using various techniques. For example, having learned how to fold a flower using the origami technique, to form beautiful bouquet tulips.


The easiest DIY crafts for beginners
For those who are just starting to teach their child the arts and crafts, we advise you to start with the simplest solutions, making easy crafts for children with your own hands. You might like examples of caterpillars made of paper rings, applique from colorful fish or funny little mice on a piece of cheese.


DIY cardboard crafts for children
Cardboard is an easily accessible material that is well cut, bent, painted, it is often used in children's creative works. In addition to a set of cardboard purchased at the store, cardboard boxes are used, disposable tableware, packages from cereals, egg "honeycombs", as well as bushings from toilet paper. In our photo catalog you will see what kind of cardboard crafts do-it-yourself craftsmen make for children. For example, a stand for pencils, funny animals, boxes.


Craft "house" do it yourself
Cardboard houses are made at will of any size - it all depends on their purpose. Perhaps it will be a large structure with a child's height, a "dwelling" for dolls or a do-it-yourself "house" craft made as christmas decoration, gift wrap. In any case, the manufacturing technology is the same, the differences will be in size and design. We have prepared some sketches on which you can make blanks. If you are making small structures, PVA glue and adhesive tape are enough to hold the parts together. Building big house, it is better to use a thermal gun for reliability. New Year's craft"house" with their own hands is complemented by a decor that imitates snow on the roof (cotton wool, foam balls), and gift wrapping must have at least one opening sash, for example, a door, a roof slope.


How to make DIY crafts from fabric
Wonderful do-it-yourself toys are sewn using fabric. Moreover, not only a solid cut, but various shreds, household napkins and even socks. Look at the photo, isn't it, a cute bunny came out of a sock? An older child will do it on his own, and the baby will have to help. Make the necessary cuts and seams, and instruct the child to fill the figure tightly, as well as draw a muzzle.
You can also sew crafts for children with your own hands, which will become not only a decoration, a toy, but also a useful little thing, for example, a large soft ottoman duck, the photo of which is in our catalog, a star pillow.


Children's DIY crafts from felt
Felt is a wonderful comfortable fabric that has bright palette colors. It allows you to sew various crafts with their own hands for children, and then decorate the children's room with them. Help replace fabric household napkins(usually they are sold in a set of four colors). Such crafts-toys are sewn with their own hands without help sewing machine, manually.
Children's crafts for the New Year do it yourself
In anticipation new year holidays, children's matinees, rooms are decorated everywhere, lush Christmas trees are dressed up. It is quite possible to make a lot of interesting symbolic additions on your own without spending money on purchases. These may be the most original balls on the Christmas tree, garlands, other decorations that are quite within the power of a child to make.


DIY snowman craft
The snowman is a kind of symbol of winter and, of course, his presence for the New Year's interior will come in handy. The photos of our selection show options for how to make such crafts with your own hands in stages, using foam balls, socks, pompons. A larger figure, decorated with a thread, will suit the kindergarten matinee, balloons, glue. Inflate five balloons different sizes(two identical for handles). Wrap each of them with a thread dipped in glue (PVA is quite suitable). When the blanks are completely dry, the balls need to burst, get it from the inside. Finished balls are fastened together. The do-it-yourself snowman craft is almost ready. It remains to draw eyes (beads, buttons), a mouth from a thread, a nose-carrot (sew from fabric). Traditionally, the head is complemented with a bucket, the neck is decorated with a scarf.


Santa Claus DIY craft
In the New Year's interior, Santa Claus is indispensable. Most easy way- arrange it with thick paper (cardboard). Use a ready-made template, or make a conical shape from a sheet, which you then “dress” using multi-colored paper, shaping your face, beard, and pens. Similar children's crafts New Year they make it with their own hands using fabric (here you will find examples of patterns), plastic bottles, and other improvised means.


DIY crafts for kindergarten
Various creative work for small children of kindergarten age should differ more simple techniques, materials. The child is just starting to learn how to make something beautiful on his own, so you need to choose the most simple, but interesting options.


DIY crafts for kindergarten children: applications
The most common way to teach children how to create pictures is through appliqué. Such crafts in a kindergarten with your own hands (the photo is presented below) can be designed not only using colored paper, they also take thick fabric, artificial leather, velvet paper, improvised materials (cotton pads, cereals, etc.), natural raw materials (leaves, seeds). Older children can start voluminous works, for example, to make an applique in an "aquarium" box with hanging representatives of the water world.


DIY crafts in the garden from natural material
Often, especially in autumn, exhibitions of works are held that demonstrate do-it-yourself crafts for kindergarten from natural components. Chestnuts, acorns, cones, sunflower seeds, pumpkins, colorful autumn foliage- all this gives great ground for the development of children's imagination. To make various figures, the compositions additionally use plasticine, which fastens the parts or forms the base. Pictures of DIY crafts using natural raw materials are presented by our photo selection. Feel free to try using them by making a chestnut caterpillar, a hedgehog, and other patterns.
DIY crafts for school
Schoolwork varies in complexity. If do-it-yourself crafts in elementary school have simple forms, then high school students who have enough skills are able to arrange more complex compositions, for example, a bouquet of roses from maple leaves, cardboard town or paper basket with asters.
Do-it-yourself crafts for school, the photos of which are posted below, involve the use of a large selection of raw materials, including all sorts of improvised means ( plastic utensils, DVDs, matches, buttons).


Do-it-yourself crafts for schoolchildren with trimming technique
Facing is a rather entertaining creative process that is suitable for children. different ages. It allows you to create "fluffy" pictures that will decorate the room, as well as original gift relatives. Crafts in elementary school with their own hands have simplified options until the child acquires certain skills. For example, in this way you can only draw the outlines of the picture.
To make a magnificent application you will need corrugated paper, scissors, glue, match or toothpick with a blunt end, sketch drawing on cardboard. Before making a craft with your own hands, we cut the paper into small squares (0.5 cm), which we sort by color. Lubricate the sketch with glue. We put the match in the center of the square, turn it (so that the corrugation is fixed on it), then glue the end to the sketch. Thus, we draw up the entire drawing, applying the necessary colors of the corrugated squares.


Learning how to create beauty yourself is The best way development creativity child. Children's crafts with their own hands greatly develop the imagination, giving the joy of an interesting joint pastime with adults.
DIY crafts for children: a selection of 50 ideas with step by step examples updated: May 2, 2018 by: Kyiv Irina


