Beaded bracelet with step by step patterns. Beaded bracelets: do it yourself
For bracelet #1
- beads size 11/0;
- fishing line for working with beads;
- bead needle.
For bracelet #2
- beads 11/0 and 15/0 different colors;
- needle;
- fishing line for work with beads.
Beaded bracelet for beginners #1
This weaving technique can be used to create not only various bracelets, necklaces and rings, complementing them with inserts of bright beads or larger beads.
Step-by-step master class with a photo and a weaving pattern for beginners No. 1. Go!
Step 1: make a beaded ring
On a piece of thread or fishing line of a length convenient for work, we string 9 beads. Next, we pass with a needle through the first three beads, and then through the second, closing the low in a circle.


We add 6 more beads, and pass the needle through the triple of beads of the previous row (we did not use it to form the first circle). Again we pass through the triple of beads, just added row.


Step 2: form the petals
Thus we form 5 petals. For the sixth last petal, the thread should come out of the triple of beads of the last petal as shown in the photo. We string three more beads on it and send the beads of the next petal into the top three (we made it first).


Step 3: Gaining Length
For the next row, the thread should come out of the triple of beads of the outer circle. We string 6 beads on it and get the basis for the formation of the next circle of triangles. So we weave until the product is the length you need.


Step 4: weave several tiers
The second tier is performed in the same way, only the thread should not come out of the side lobe of the circle, but from the top one. Row after row, you can create a product of any height, including a phone case, a small handbag or an elegant beaded napkin.


Step 5: add bright beads
Inside the circle, you can place various beads or beads bigger size, this will add brightness and originality to the product. In this way, you can make a bracelet, and a ring, or even a pendant, using only one motif as a basis. In the same way, you can make earrings to get a set of jewelry, where each element is combined with another not only in color, but also in execution.
Beaded bracelet for beginners №2
Step-by-step master class with a photo and a pattern for weaving a beaded bracelet for beginners No. 2. Go!

Step 1: weave a strip for the base
First we need to make a strip that will be the base of the bracelet. The width of the strip depends on the width of the bracelet, since further weaving will go up. Therefore, already at this stage, you should at least approximately imagine what you want to get in the end.
We string 4 beads on a piece of fishing line, and close them in a square. Weaving goes in one thread, which we go through these beads several times.


For the second step, the beads should come out of the last pair of beads. we string two more beads on it and send it back to the previous pair, moving from the back side. we pass through the newly added pair, and form the next one.


Step 2: form the second row
Thus, we form a strip of the length we need, and are taken to form the second row. To do this, we string two beads 11/0, one 15/0 and 2 more 11/0 on the thread. We send the needle to the next pair of beads of the first row along the way, pass through it, and go to the next pair to form the next row.


Today beaded bracelets have already ceased to be children's trinkets, they are chosen by teenage girls and adult women, emphasizing their style and lifestyle. In this article, we will look at several common weaving techniques and techniques, designed for both experienced craftswomen and beginner needlewomen. Work with beads will be interesting for children school age, and adults, in addition, for each age category there is a fascinating technique. In the future, having mastered the weaving technique to perfection, beaded jewelry will be able to bring you income, because handmade jewelry is in demand at fairs.
Beaded bracelets
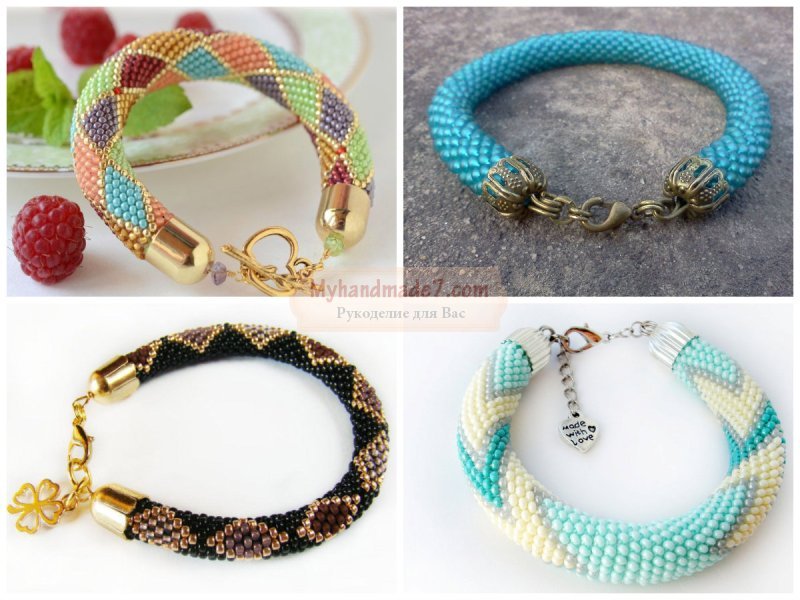
If you decide to weave beaded bracelets, schemes most different models you can find on the Internet, especially for complex techniques, for example, knitting beaded cords or machine weaving.
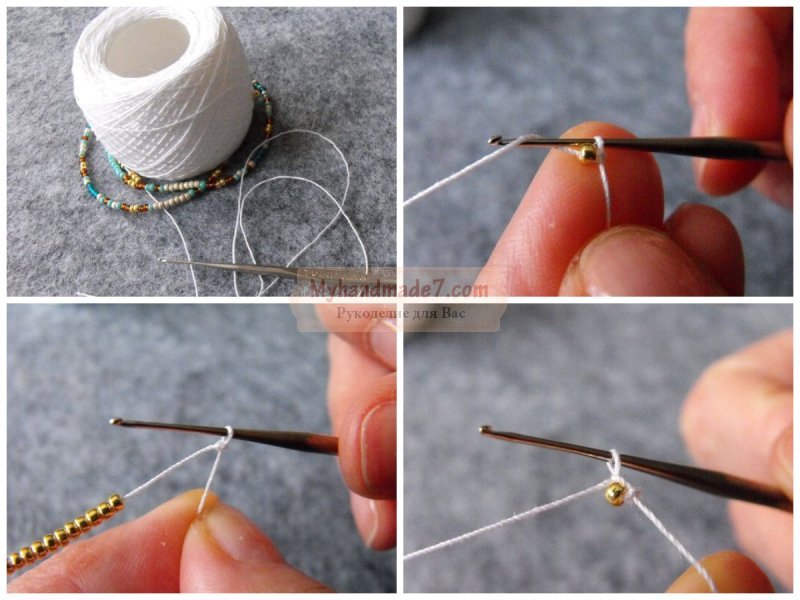
We will look at the most popular way to create beaded necklaces and bracelets today - this is knitting harnesses, this technique is a generalized knowledge of crocheting and working with beads. On the Internet, you can find many different schemes, and once you choose the right one, you can proceed to the master class. For the first lesson, you can choose a solid color bracelet or use two colors to guide you in how to lay down the pattern.
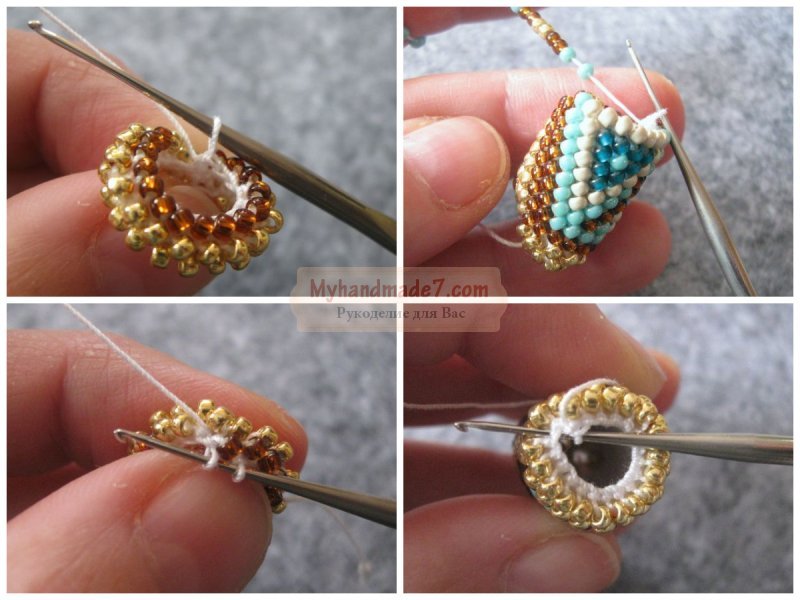
In this case beaded bracelet weaving patterns are the order of the set of beads on the thread, and then you start crocheting in a circle, so you get a tourniquet. There can be 6-10 beads in a circle, then knitting is done in a half-column, for a bundle of 11 or more beads, knitting is done in a column. The difference is immediately visible, looking at the product, you will immediately know which technique was used, if you knit with a half-column, then the beads will lie exactly in a checkerboard pattern, and if you knit with a column, then they lie a little at an angle.
These methods differ in the necessary materials, and we will start with a half-column. The easiest way to master this technique is to knit a solid color bracelet or jewelry with a color transition. For this product, we will use the thread "Iris" and a metal hook made in Japan by the company "Tulip" number 0.75.
To string small beads on a fairly thick thread of Iris, you can use one tricky trick. Take a thin thread for beading, thread it to a thin special needle and tie it into a knot to make a small loop, now thread the “Iris” thread into this loop. With this transition, the bead will freely pass into the eye of the needle, and then you can move it to the "Iris".
On the bracelet you need to collect about 1000-1050 beads, in one 10-gram bag of beads there are approximately 1000 pieces. If you want to make a color transition, then divide the total number of beads into several parts, and between them type a mixture of colors, so you get smooth transition colors.
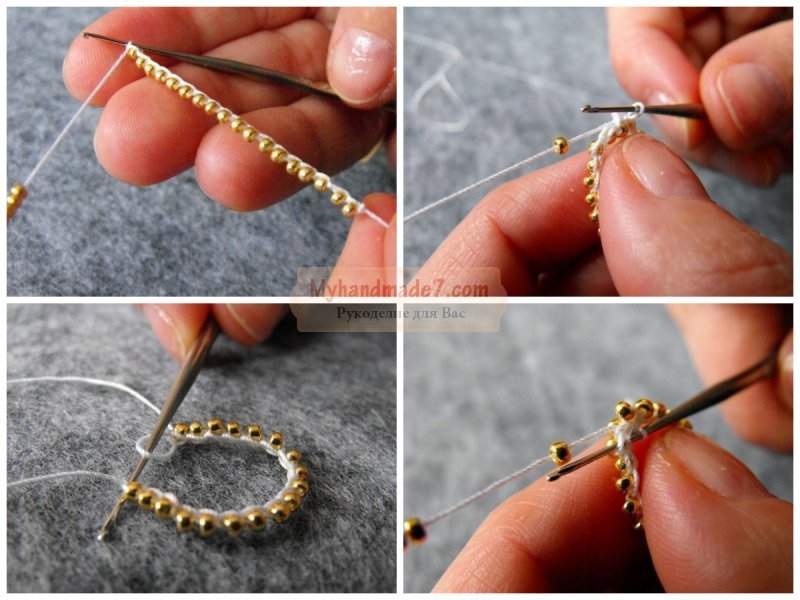
Our tourniquet will be 10 beads in a circle, so when the low is ready, you can start knitting. To easily complete beaded bracelets video look at the lessons on the net, but be prepared for the fact that the first time you may not get an even tourniquet, because a lot here depends on the knitting experience.
First you need to dial ten loops and close the circle into a ring, but do not knit a connecting column, but move in a spiral. There should be a bead in each loop, when you knit the next row, the hook should be inserted under the bead, moving it to the right, and then perform a half-column.
Beaded bracelets: schemes
Now you know, how to make a beaded bracelet half-column, but this option is suitable for thin products, you can also knit thick bundles with a variety of patterns, but for this you should take a smaller hook, for example, number 0.55 - 0.6, but it all depends on individual characteristics. Practice braiding with different threads and different hook numbers to find your perfect combination.
As for the thread on which a thick tourniquet is knitted, here the absolute leaders are the Jeans threads, which are sold in ordinary spools, and the Turkish Canaris threads, which are used by most experienced craftswomen.
The main difference between these two methods is that when knitting with a column, the hook is not inserted under the bead, it is inserted into the first loop of the loop, the one that is inside the bundle.
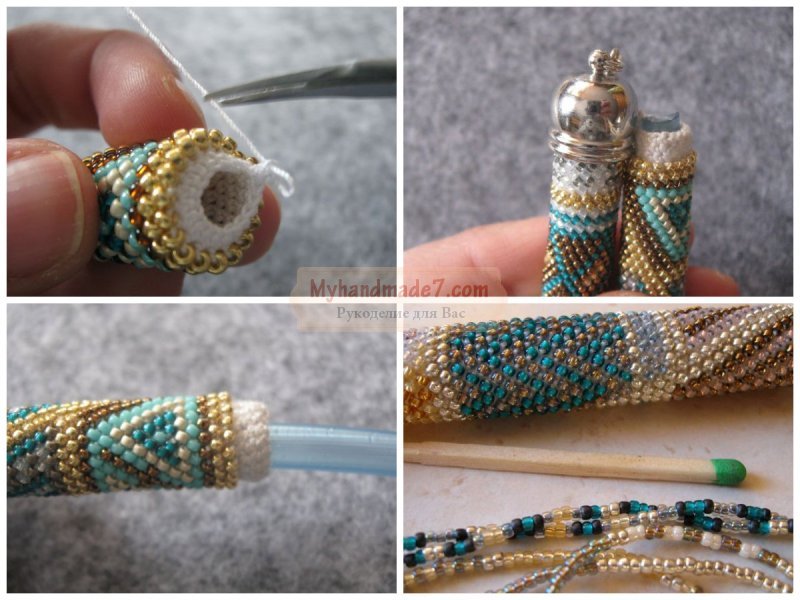
When the harness is ready and you have knitted a sufficient length, you need to attach the fittings, for this, limit switches are used, it can be a trailer with a magnetic fastener or it is necessary to fix the pin. When you attach the limit switch, you need to drop a little Moment glue inside, which will ensure a secure fit. The clasp for the bracelet can be a regular hook or toggle.
Weaving bracelets from beads
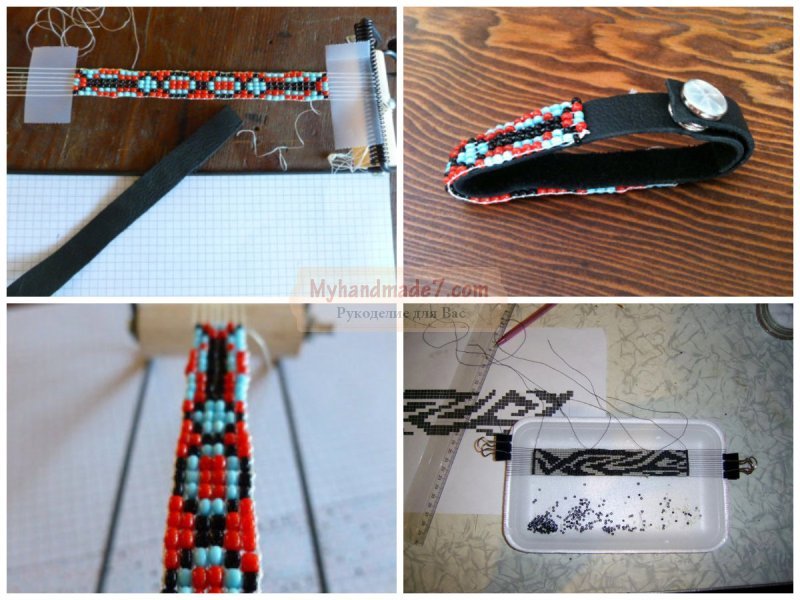
An exciting process weaving bracelets from beads on the machine. This technique allows you to create original, unique patterns and ornaments, you can make such a bracelet with your name. The width of the product also depends only on your wishes, however, to create it, you need a special tool called the Beading Machine.
We can say that this is, but you can’t call it primitive. The machine itself can be made by hand, for example, for simple option used cardboard box, suppose, from under the shoes. On opposite sides, it is necessary to make cuts at the same distance from each other, about 3-4 mm. The sides should be cut off a little so that it is convenient to perform all actions.

For weaving, we need a strong thin monofilament, it is necessary to cut off so many pieces that their number is one more than the width of the beads in the product. To make the base stronger, you can make the warp thread double, then you need to go through each slot twice. If the machine has the ability to adjust the thread tension, then you need to cut the appropriate number of pieces of monofilament.
Another piece of monofilament should be threaded into a thin beaded needle. According to the picture, it is necessary to string the beads on the needle, moving along the rows, then thread them low under the stretched threads and distribute the beads so that each of them is located between two threads. Now the needle must be threaded in the opposite direction into the bead, but this time over the stretched threads. Learn more about how to do DIY beaded bracelets you can look at the photo in the master class.
Reflecting, many needlewomen come to the tatting technique, where different types of beads are used, which creates a unique texture of the product.
The decoration made on the machine can later be attached to the base, for example, a piece of leather can become it. If you want to make a textile base, then you can use a tin can to give it strength.
DIY beaded bracelets
There are others more simple ideas, how to weave beaded bracelets, which will surely become stylish accessories in your wardrobe at any age. We can recall brick and mosaic weaving in one thread, classic "chess" in two threads. For this product, you can use a thin fishing line or a strong monofilament. Even when you are braiding, you can use large beads through which you need to thread the elastic bands. Beads will become an original addition to even the simplest product made of rubber bands.
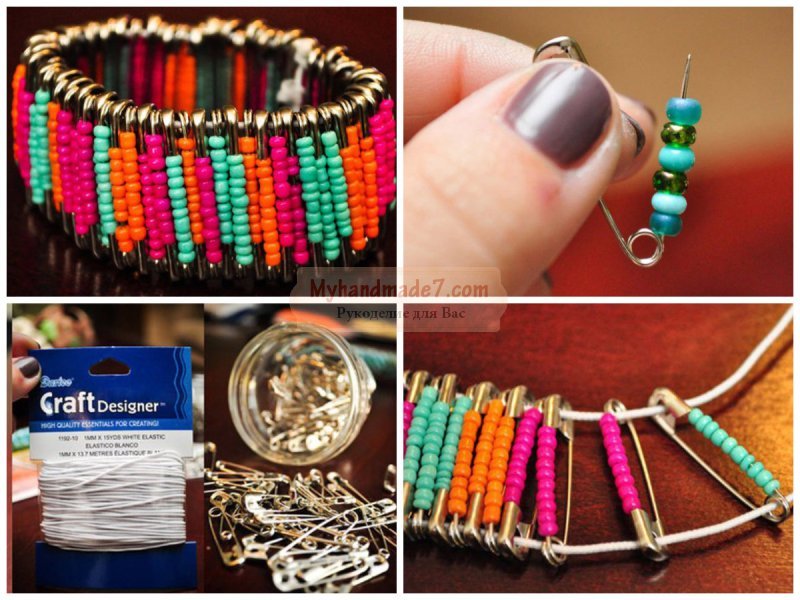
Pins can also be the basis, and you will be interested in this interesting option creating jewelry, firstly, it is easy to perform and you do not need to have special knowledge, and secondly, you can create a steel jewelry that is bold and original.
Unlike harnesses, in this case we need large beads, for example, size 8 or 6, because a pin needle must pass through their hole.
Let's start doing beaded bracelets for beginners from what we prepare necessary materials: medium-sized pins and beads, they can be of different colors or one, for example, such an ornament will look interesting if you use only black beads. As a base that will connect the pins, you should use a thick rubber band, so you can put on the jewelry without a fastener. You will need two pieces of elastic band, the length of which is the circumference of the wrist.
Now you need to string elements on the needle of the pin, in any color scheme, after closing the pin. You will need enough of them so that they completely cover the length of the rubber base. When all the elements are ready, they must be strung on an elastic band, threading it into the ring of each pin from below and above. At the end, it remains only to sew or solder the two ends of the elastic band, and you can put the jewelry on your hand.
How to weave beaded bracelets
We can offer you another option, how to weave, this time on a thread basis. This simple decoration can be made on a floss thread. To do this, cut off three pieces, make a loop on top and tie a knot on one side. We will simply braid a pigtail, on the side links of which there will be beads. When you have braided the required length of braid, you need to attach a small button on the second side, so the clasp for this simple bracelet will consist of an eyelet and a button.
Weaving of beaded bracelets is available for children aged 8-9 years old, at this age they will already carefully handle small elements. As the very first weaving experience, you can choose a simple bracelet with two ends of the fishing line.

A lot of interesting ideas for a novice master who is eager to try not only the simplest ideas, but also original ones. You must remember that even the simplest beaded bracelet pattern for beginners weaving will help you, but to make them look beautiful, you should choose the right main material. Do not be afraid to use bold color combinations, because at your disposal are matte, glossy beads, alabaster and with a silver-plated core. Naturally, it differs in quality, for example, Chinese can be used only for the most elementary crafts, and for neat harnesses you only need calibrated Czech or Japanese beads, although its cost is much higher.
Many people are interested in how to weave stylish beaded bracelets for every day, because for beginners this is a complex art that requires patience and painstaking work. But in reality there are many simple circuits, thanks to which a person who previously did not hold a needle and beads in his hand will be able to make himself a wonderful piece of jewelry. This activity does not take huge amount time and also will not reduce the wallet.
How to weave the easiest beaded bracelet for beginners
Such a simple bracelet is woven according to the "cross" pattern. In weaving, you can use either one color or two.
For work you will need:
- beads of one or two colors;
- fishing line;
- needle.
First you need to take a fishing line with two needles and string 4 beads on its middle. With one end of the fishing line, pass through the extreme bead towards its other end, tighten so that the cross comes out. Next, you need to dial one bead at each end of the fishing line, skip the third bead through both ends and tighten.
The end result will be a chain, as shown below in the photo.
You can also make a simple, but very original bracelet, if you collect 2 more beads each, go through both ends through the first bead of the chain, then tighten and fasten the fishing line, cut it off.

Bright flowers do it yourself with a description
A master class on making this bracelet will be another good lesson for those who have begun to learn the beading technique.
For manufacturing you will need:
- beads of two colors (for example, let it be red and yellow);
- fishing line;
- needle;
- padlock.
Tie a knot, fasten the end of the fishing line and leave a small tip to secure the ends of the bracelet. Dial 5 red beads and one yellow. Pass the needle through the first bead. Then dial 3 more red beads, insert the needle into the nearest red bead and tighten.
As a result of weaving, it should turn out beautiful flower. In order for the bracelet to come out, you should make the required number of such flowers, fasten the ends of the thread and cut it off.
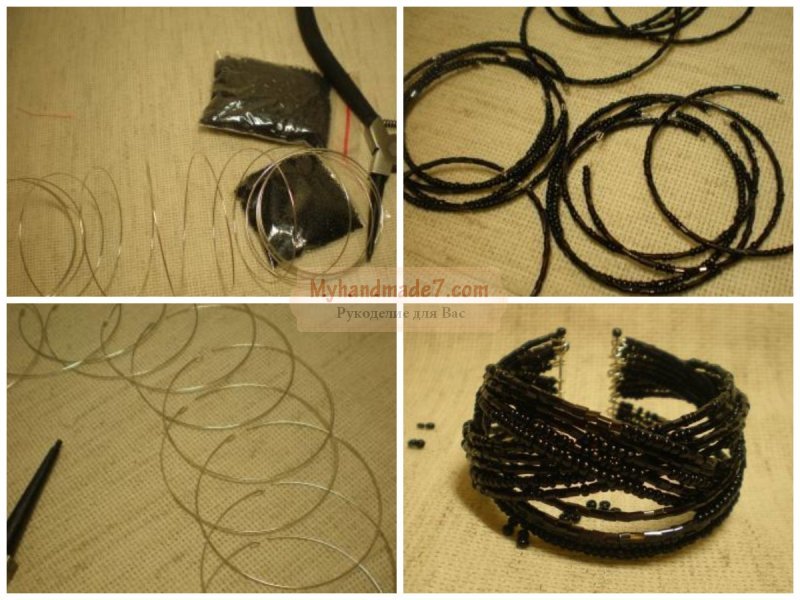
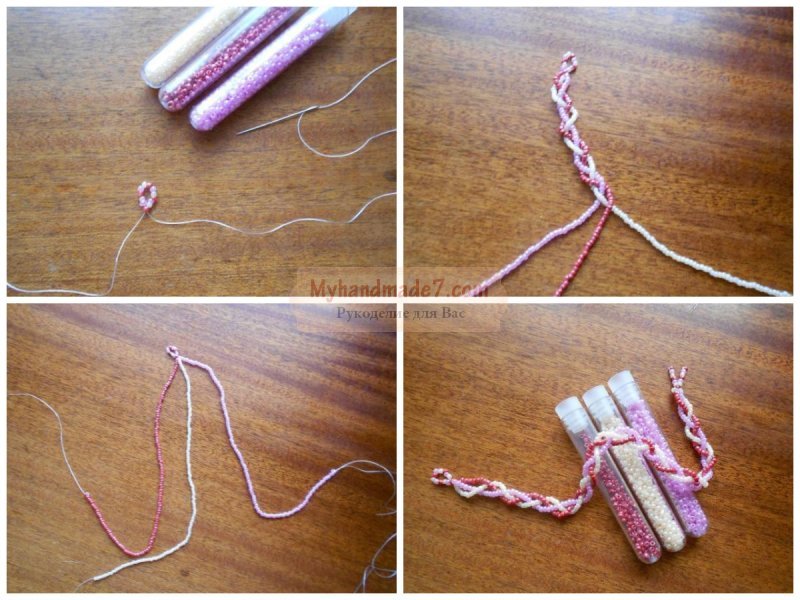
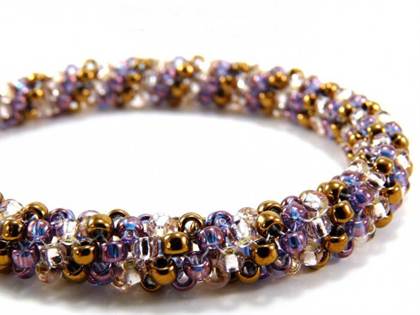
Weaving a beaded harness bracelet
For those who have already mastered the technique plain weaving beads, this MK will be very interesting.
To make a harness bracelet you will need a large number of beads, as it is woven in a circle.
First you need to fix the end of the thread and leave a small piece. Dial 7 beads and close into a ring, threading the thread through the first. String a bead and thread the thread through the third bead. Take one bead again, draw the thread through the fifth bead. Then continue weaving, putting on one bead and passing the thread through the bead, located through one from it. Weaving will have to go in a spiral.

When the tourniquet becomes the desired length, it is necessary to tie the ends together. Or you can sew a lock to one end and a clasp to the other.
"Zigzag" from small material
To make a bracelet made using the zigzag weaving technique, you must do the following steps.
First you need to put 3 beads on the fishing line. In the first two, it is necessary to stretch the end of the fishing line and tighten the resulting chain link. Next, string 2 more beads onto the fishing line. After that, pass the end of the fishing line through the last bead of the previous link and the first bead of the new link in the chain. Continue until the bracelet reaches the desired length. The product can be both monophonic and multi-colored.

We make our own nominal charm
A bracelet with a name will be a wonderful present for a loved one or friend. The product is woven according to the "brick" pattern and for its preparation you will need beads of several colors.
First you need to draw a diagram of the future bracelet on a sheet of paper in a cage, paint over the beads, which will be letters. To make a bracelet 10 beads wide, you need to: fasten the end of the thread, put 10 beads on it. From the last bead they will return to the previous one through the top, so that the fishing line looks down. Thread the thread back into the last bead through the bottom. Continue weaving in this way: take a bead, thread the line into the tenth through the top, and into the eleventh (extreme) through the bottom. And so on.
You need to follow the pattern and weave beads desired color to get the desired name.
Someone may say that beaded jewelry is suitable only for teenagers, and for adults they are not in status. This is a fundamentally wrong position. After all, needlewomen create such masterpieces from beads that at first glance it is not possible to recognize what material was used.
A bracelet is a popular women's jewelry that the fair sex loves to experiment with. Despite the fact that fashion dictates its own rules for the size, decor and type of this accessory, products self made always highly valued
A handmade beaded bracelet keeps a piece of the creator's soul. This is a landmark thing that will emphasize the individuality of the owner, allow him to stand out from the crowd.
Bracelet weaving techniques
If you want to learn how to weave bracelets yourself, then you have come to the right place. Here you will learn the basic techniques of weaving bracelets:
- mesh and ;
- or a Christmas tree.
Having studied the basic techniques, you can easily create your own masterpiece.
Types of beaded bracelets
This may be the simplest bracelet, which is an intertwined beaded thread. This option looks gentle, weightless and suitable for any occasion. Narrow multi-colored "baubles", which also do not differ in the complexity of execution, are suitable for children and adolescents.
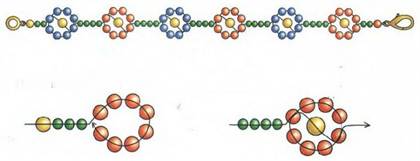
Bracelets from beads of the scheme of weaving

DIY beaded bracelets video
For stylish self-confident women, a wonderful option would be wide bracelet in the form of a dense ribbon with a beautiful clasp. It surprisingly emphasizes the elegance of the wrist. Such bracelets are made with geometric or floral ornaments, animal figures, names, signs, using the technique of dense weaving. But this option requires much more time and attention for its implementation.
Volumetric bracelets are considered the most difficult to perform, but the result will amaze even sophisticated craftswomen. Volumetric tourniquet with a color transition and an original clasp or a work of art using several techniques, different types beads, beads and stones, ideal for an evening dress, for example, for a prom.
Weaving bracelets from beads video
Beaded bracelets have recently become fashionable. Recently, among needlewomen, a new creative occupation- weaving bracelets from beads. The work is laborious and requires patience.
Today, manufacturers offer a huge selection of beads for weaving jewelry. Handmade bracelets look especially beautiful and elegant. They will be appropriate in many styles: country (), safari, boho (see), street and even classic. You just need to play it right.


- Before you start weaving a beaded bracelet, it is important to choose not only the material itself, but also a scheme that would be understandable. The work is described in detail in video tutorials, master classes. Even an inexperienced needlewoman can cope with weaving.
- To work, it is important to be patient. If something does not work out, you need to do an analysis and understand what is the reason.
- You need to start with a small product that will be easy to master. Volumetric complex technologies will take a lot of time and effort, work will not be a joy.
- It is important to buy beads exactly the same as in the scheme, otherwise the result will not look much like the original.


How to choose beads for work?
- Beginning needlewomen need to pay attention to large beads. After the technique is mastered, you can purchase ordinary beads of a smaller diameter.
- When purchasing beads from a Chinese manufacturer, you need to be prepared for additional work. It will have to be sorted, as it often varies in size. It also contains beads with marriage. The advantage of this material is its price.
- Czech manufacturer's beads are the best. Each bead is a clear copy of the previous one. The beads are even, with holes of the same size. Such material is slightly more expensive than Chinese.
- If you wish, you can buy glass beads - thin tubes.
- Beads are distinguished based on their number. The smaller the number, the larger the diameter of the bead.


About yarn and wire
Given the weaving technique, it is important to purchase a thread or a special wire. The second option is recommended for beginner needlewomen. The advantage of this material is excellent shape retention and easy modeling of various elements.
It is important to have a special needle for beads. The most popular needle number is number 12.
Beaded bracelets - weaving techniques
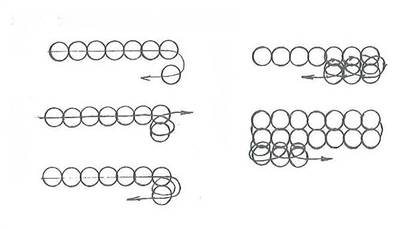
Mosaic
Seven beads are collected on a thread or wire. The needle needs to be turned around and pulled through the third bead (from the end). Then one more bead is strung and pulled into the fifth bead from the end. So weave to the end of the row. The algorithm for the further action of the next row is similar to the technique of the first.
brick
The method of fastening beads is different from the previous technique. The first row is considered the main one. It can be done in different ways. You can start the first row with a mosaic technique. To weave the next row, the work is turned so that the wire comes out of the last bead up.
A pair of beads is strung on it and a thread is threaded under the top thread between the last two beads. Then the thread must be threaded in the opposite direction into the added bead.


To work, you need to stock up on beads, at least two colors. The base of the bracelet will be of one color, the name will be the other. Before starting weaving, you need to draw a diagram of the future accessory (more details -), in which the sequence of beads that will form words will be clearly visible. The scheme must be folded from 9 or more rows (odd number). The easiest way is to draw a diagram on a piece of paper from a notebook in a box.
Having typed the required number of beads, weaving continues up to 3 cm. Now you can start weaving letters. When finished, fasten the clasp.

A little perseverance and patience and soon you will enjoy a unique accessory made by yourself. And most importantly, no one will have such a bracelet. Moreover, beaded bracelets will help create a unique image, especially if you are a young girl.
And here is one of these master classes, be sure to check it out.


