How to crochet a rug from threads. We decorate the house with handmade products: crochet patterns for knitting carpets from a cord
Many housewives love to decorate their home with various products. Made by hand, they create an atmosphere of warmth, coziness and comfort on winter evenings. A good option diversify the interior of the apartment, bring elements of antiquity into it - make a crochet rug, which is easy to make from old things. Please note that the execution scheme is very simple and accessible.
You will need to prepare source materials. Sort out old things. T-shirts, dresses, tights, skirts and others made from knitted and synthetic materials will come in handy. Cut them in a spiral into strips, wind them into balls.
The width of the strips depends on the density of the material. The thinner it is, the wider the cut strips.
Prepare a hook size 8.5-10. It will be great if the balls turn out to be multi-colored.
We knit a crochet rug from old things with a pattern
The main rule is the observance of the principle of circular knitting.
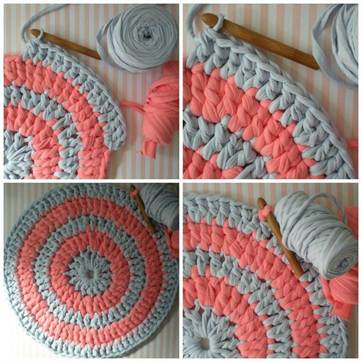
Dial 3 in. p., connect them into a ring. The first row, knit 6 single crochets. In each next row, 6 columns must be evenly added. In the finished form, the product will be smooth, without bulges and distortions. Knit the rug to the required size.
For a better understanding of the knitting pattern:

To get a more spectacular mat with a convex relief, follow the steps in the diagram. Only knit columns by picking up the back wall of the loop

We make a pentagonal rug according to the scheme
When knitting such a rug, it is better to use soft knitwear. You need to start by knitting a circle of 5 loops. In the 1st row - 3 air loops, 2 columns with one crochet in the first loop of the bottom row, 2 in. p., * 3 columns with a crochet, 2 c. n. * Run the scheme between the asterisks 5 times. In the 2nd row - the same as in the first row. But after 3 double crochets knit 1 air loop and further according to the diagram below.

Knitting a rug in a circle is performed to the required size. Each corner of the star is tied separately.
How to make knitting threads out of unnecessary things
To get long stripes, cut the T-shirt from the bottom up in a spiral. Immediately wrap it in a ball so that the "threads" do not get tangled.
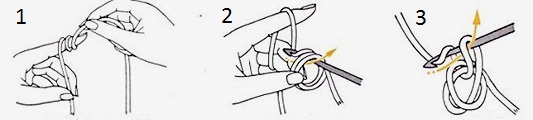
Short strips are easy to connect. Step back from the edge by 1.5 centimeters, cut each strip.

Align the two strips so that their slots match up.

Pass the other end of the upper strip from below through the aligned slots and pull out. As a result, you will get a knot.

In this way, you can fasten all the strips when knitting the product.
Master class on a rug in the form of a path for a corridor
After watching a master class on knitting an original rug, you can make a beautiful carpet path from old things, which is convenient and practical for the corridor.
Cut into strips old T-shirts, T-shirts, skirts. Roll them into balls. It is better if they are different colors.
Run a chain of air loops equal to the width of the future rug. Next, knit with loops with one crochet


When one ball ends, connect another. Sew the ends with thread.

The track is knitted rectangular shape, so the fabric when knitting will need to be turned over.

If there is not enough thread, cut more strips of the desired width.

As a result of creativity, you will get a beautiful path for a balcony, cottage or corridor.

Options for the correct use of weaving
Prepare the frame according to the size of the future carpet product, stuff the carnations on two opposite sides. Set the distance at 2.5-3 centimeters apart.
To learn how to weave a rug, including from old things, the following do-it-yourself instructions will help.
Stretch the strips of material. It is advisable to take its colorless shades. This will be the base.

Stretch the working strips first over the thread, then under it.

At the end of the row, pull the strip under the warp and work in the opposite direction.

While weaving the rug, sometimes shift the already finished rows to the initial row. At the end of the work, hide all the knots on the wrong side. Now the finished product can be removed from the frame.
Trying to work with knots
The basis is cut strips from old T-shirts about 12-15 centimeters long. You will need quite a lot of strips. Now they need to be rinsed washing machine. As a result, twisted strips are obtained, from which the rug is made.
Place the carpet net on the table, bring a strip of material from below. With a thick crochet hook, pull both ends of the strip and tie them tightly with a knot pull on one side. Now tie the next strip. It is advisable to start from the center of the grid, gradually moving in a circle to its edges.

Knotted rugs can be made in different shapes and colors.
Round rug from unnecessary things
To better understand how to knit a rug, study the following instructions for creating products from old things.
Pre-cut unnecessary knitwear into strips 3 centimeters wide.
To make the rug smooth and beautiful, try to make the strips the same width.
Material use different colors.

Make a loop, insert your hook into it.


Knit a few loops to make a small braid.


The loops are connected in a circle.


Knit an air loop.

Pass the hook through the loop of the circle, pick up the thread and pull it through two loops.


Knit a rug of the desired size according to this pattern. Make a fringe along the contour of the finished rug.

Tip: while the circle being knitted is small, make air loops before each loop.
A simple lesson for beginners


Over time, each of us accumulates a large number of knitwear that no one wears for a long time. Do not rush to throw them away, if you show a little imagination, you can make wonderful and functional rugs from them that will decorate the interior of your apartment or house. Crocheting rugs from knitted rags is available even to beginner knitters, as the knitting patterns for these products are quite simple to perform.
Tools and materials Time: 1-2 days Difficulty: 3/10
- yarn from old knitwear;
- a hook corresponding to the thickness of the thread (usually number 12-15);
- scissors;
- thread with a needle or sewing machine to connect the strips into a single whole.
Crocheting rugs from knitted rags is available even to beginner knitters, as the knitting patterns for these products are quite simple to perform.
Step by step description with diagram:
Step 1. Making knitting yarn
In order to make yarn from old things, you will need scissors and, in fact, the things themselves. T-shirts, knitted shorts, children's sets and the like are perfect as a material.
We start making yarn by cutting the old thing into strips about 2 cm wide. This must be done on a flat and hard surface, for example, on a table. First, carefully cut off the bottom of the T-shirt.


Then cut into strips. In the process of cutting, each strip should be slightly undercut, stopping about 3 cm before the opposite side edge of the product. When all the strips are cut, we separate them from each other along the uncut seam so that the seams are located diagonally.


After separating all the strips, you need to sew them into one knitted thread.
Yarn from old things is ready, now you can start knitting a rug.
Step 2. Choose a shape and determine the size of the product
Choosing a shape and determining the size is an important preparatory moment when knitting a rug. From this master class you will learn how to knit a round and oval rug from knitted yarn.
Step 3. Knitting a rug of a certain shape
Round rug
We start knitting with an arugumi loop.

After that, the arugumi loop is carefully tightened.

The first row of our rug is ready.
2 row. We knit 24 columns with a crochet, two loops in one loop of the previous row.

3 row. We increase the number of loops to 36. To do this, we knit 2 columns with a crochet in every second loop of the previous row.

4th row will be slightly openwork. To do this, we will knit according to the following pattern: 1 double crochet, 2 air loops, skipping one loop of the previous row, 1 double crochet. Thus, each double crochet must be knitted through the loop of the previous row.

5 row. We knit with double crochets.

Important! In order for the product to expand evenly, you need to knit 2 double crochets in every fourth loop of the previous row.
6 row can be done in a different color. The knitting pattern remains the same, starting from the 2nd row.


After the rug of the size you need is knitted, we finish knitting according to the following pattern: one lifting air loop, 6 double crochets in the third loop of the previous row, a semi-column in the sixth loop of the previous row. Then repeat the pattern to the end of the row.

This is how the finished knitted product looks like:

Oval rug

We start knitting with a set of chains of air loops.
The length of the chain is calculated as follows: the desired length minus the width. For example, if you want to knit a 100x40 rug, then your chain will be 60 cm long (100 - 40 = 60). Next, we knit according to the scheme:

You can complete knitting in the same way as in the previous master class.
Now you know how you can rationally use old things, extend their lifespan and give originality to your interior, making your home even more comfortable and colorful.
For those who are into needlework and are familiar with the basics of crochet, it will not be difficult to create stylish rugs for the home from multi-colored cords.
In addition to the numerous advantages of the material itself, these rugs will delight you with a bright and sophisticated appearance: thanks to the variety of knitting patterns, you can easily choose the option that will be in harmony with home interiors.
We propose to start by considering the features of the material and getting acquainted with some patterns for knitting carpets from a crochet cord.
Cord crochet carpets, photo
Necessary materials
The traditional material used in such works is polyester cords for knitting carpets. These threads are synthetic fibers that are 100% polyester.
Due to the elastic structure of the material rugs are elastic and when stretched, they easily return to their original shape.
 Polyester cords for knitting carpets
 In the photo above - a polyester cord for knitting carpets and rugs with your own hands, diameter 6 mm, package price - 280 rubles per 100 meters. How much cord do you need for a carpet?
Important! Do-it-yourself cord consumption (approximate): it will take about 800 meters for a meter rug, 2200-2300 meters for a 2-meter rug.
It is worth noting and beneficial features polyester cords:
- long service life and resistance to scuffs;
- the material does not absorb moisture, mats dry quickly;
- mold resistance;
- high strength products;
- soft texture.
Many people use polyester cord with a core for knitting carpets: inside it is a thinner cord wrapped with fibers. It is this structure of the material that provides it maximum wear and deformation resistance.

Rugs knitted from such material will delight you and ease of care. They will not accumulate dust, so dust mites do not threaten you either.
To clean the surface of the rug, just wash it in washing machine at a temperature of 30 degrees, and after washing is completed, straighten it on a flat surface.
Attention! Polyester rugs retain their color perfectly even after numerous washes.
This type of material is environmentally friendly, non-allergic, high-quality and pleasant to the touch, and it looks like a natural raw material, so the rugs will fit into any interior.
 Carpets made of polyester cord, photo
 To create crocheted carpets from a cord, cotton materials can also be used. The cotton cord also has a pleasant texture and does not require super complex care.. So you can look for such materials for needlework.
Before moving on to the diagrams and description of crocheted cord crocheted carpets, let's find out how much material we need.
Please note that with the increase in the number of complex and three-dimensional patterns on the surface of the mat, the need for raw materials will also grow. The weight of such a homemade rug will be at least 3 kg.

Description of works
It is necessary to start crocheting carpets from a cord from the center. But for this there is no need to create air loops: we suggest you use a different technique. Wrap the edge of the lace around the index and middle fingers twice, then remove them and knit the required number of stitches inside (for rugs, as in the photo below, about 20 double crochets in the first row).
- three air loops (VP) for lifting, after which four air loops and a double crochet (CCH) are made to the end of the row;
- three air loops and 50 double crochets;
- three VPs and repeat to the end of three VPs, five double crochets with a common top, three VPs and one double crochet;
- three VPs and 90 SSNs;
- repeat of five VPs and a single crochet;
- once again a similar series;
- chain and repeat of 4 double crochets, three chain stitches, four dc and one single crochet.
Because the pattern has a scalloped outer row, your rug will look like a flower.
 Schemes of knitted carpets from a cord
 Any other patterns fit in the same way, and you can even use patterns to create napkins by changing their parameters.
If you want to knit a semicircular rug according to such patterns, follow these steps:
- knit the first row with only half of the required number of double crochets;
- unfold the fabric, make three air loops with a rise - and start knitting the second row;
- do the same for the rest of the rows;
- the last two rows are made without three air loops.
Thus, the knitting procedure will not go in a circle, but by creating straight and return rows with loops.
 Cord carpets, photo
 Pattern "Magnificent"
Let's move on to the patterns of knitting carpets from the cord. To create a patterned embossed rug, you can use the Splendid Pattern Scheme.
Thanks to its texture, it will even play the role of a foot massager, so it will provide a relaxing effect.

Using this scheme, you can knit a carpet with a diameter of 1 meter. For convenience, you can use the video instructions, which are many on the Internet. Here is one example of such a video of crochet cord rugs:
Carpet "Grand"
Another popular knitting option is the Grand pattern. Such a rug will have a diameter of about 2.3 meters. For knitting you will need about 2200 m of cord. Weight will be from 9 kg.
Carpets in the Grand style can be laid in any living room: they will not only make the interior more comfortable, but also replenish it with new bright colors and expressive ornaments. Like the previous knitting model, Grand allows you to feel the massage effect on your legs.

Attention! Unlike finished carpets woven on looms, hand mats this type can be easily folded and hidden in a suitable place.
By the way, schemes of this type can be replaced by any other. You can even stop at napkin knitting patterns and create new, unique ornaments.
We suggest you start with the following crochet rug patterns:


A useful video and a master class in crocheting carpets from a cord:
Oval rug
Rug Grand or any other can be optimized for the size and parameters of your room. Often patterns are lengthened to create an oval shape. Download free crochet rug patterns online or choose from the options below.
Such a rug has dimensions of 1.05 by 1.4 m. To weave it, you will need a cotton or polyester cord 700 m long. The finished product will weigh about 3 kg.
Due to its good density and resistance to moisture, it can be laid not only in the bedroom, living room or nursery, but even near the bathroom or shower.


If you know the basics of crochet, create a stylish rug self made home will be easy.
In knitting, you can use cords of bright colors and even combine them with each other to create a more elegant and positive design. This rug will great gift for a housewarming or other occasion, so that you can please not only yourself, but also your friends and loved ones.
Every hostess wants her house to radiate warmth and comfort, so that after a hard day's work, her family would like to get into their native walls as soon as possible. In many ways, the "weather in the house" depends on the overall interior of your home. It happens that expensive and beautiful furniture is bought, and fashionable chic curtains hang on the windows, and the floor is covered with a thick fluffy carpet, but the atmosphere of comfort and warmth is not felt in the house. Correcting this situation is within the power of every housewife. Everyone knows that things made with love and care with their own hands always radiate positive energy. Add things made by you to the interior of your home, and you will immediately notice how the aura of your home will change in a positive way. Rugs, independently crocheted with a regular crochet - these are exactly the items that will fill your home with warmth and comfort. In addition, they will harmoniously fit into the overall modern interior of an apartment or country house.


Craftswomen-knitters have learned to knit rugs for the home not only from yarn, but also from such unusual materials like shreds, plastic bags, out old clothes cut into strips. And believe me, products made from these materials look very original and interesting, and in everyday life they are practical and durable.
The master classes offered in this article will tell you how to crochet a rug from different materials. You will definitely set aside something for yourself in your “favorites”, or maybe you will be inspired and immediately start knitting these products for your home.
The best crochet rug for beginners
Even the most inexperienced knitters will be able to cope with the manufacture of a rug without any problems thanks to a master class for beginners. It is recommended to start with a square rug on the floor. In the photo you see an example of such a product.

To knit such a model, you will need thick cotton yarn, which knitters call "spaghetti". Choose yarn colors of your choice.
Step-by-step master class with a description:- Dial a chain from v.p. the length you need.
- 1 row. All loops knit st. s / n. Turn knitting to wrong side.
- 2 row. All loops knit st. b/n. under the front wall of the loop. Turn knitting to the front side.
- 3 row. Knit st. b/n. under both walls of the loop.
- 4 row. Knit in the same way as the 2nd.
- 5 row. Columns s / n. knit under the back wall of the loop.
- Row 6 and all subsequent rows knit with a pattern repeating from the 2nd to the 5th row.
See the video for an example of this work.
Multicolored grandmother's heritage in a round shape
As a child, most of you probably had the so-called "grandmother's rugs" in the room. These are multi-colored round rugs for the floor, crocheted from strips of fabric.

In order to knit a "grandmother's" patchwork rug, you will need hook No. 10, fabric trimmings. The flaps need to be cut into strips and sewn (or tied) together, wound into a ball.
We knit in a circle with columns without a crochet. To do this, you need to know the “circle rule” developed by knitters: dial 3 ch. and connect them into a ring. Further into the ring of 3 ch. knit 6 tbsp. b/n. Now divide the circle into 6 wedges and in each row evenly add 6 tbsp. b/n. on a circle. In other words, it should turn out like this: 1 row - 6 tbsp. b / n., 2 row - 12 tbsp. b / n., 3 row - 24 tbsp. b/n. etc.
The crochet pattern for a round rug looks like this:

If you knit the product according to this scheme, but knit only single crochets behind the back wall of the loop, then the rug will turn out to be more embossed. The photo below shows how to knit st. b/n. behind the back wall of the loop.

Such an accessory can be laid on the floor, and cover a chair or armchair with it.
See the video tutorial for more details on the process.
We create a product from old and unnecessary rags
Here is such an interesting little thing that turns out if you knit it from strips of fabric that are cut out of old clothes. So you kill "two birds with one stone": get rid of unnecessary things and create a practical necessary thing for the home.

To make a crochet rug from rags, first of all, prepare the material for knitting. To do this, go through your wardrobe, sort out the selected unnecessary things at the seams and cut in a spiral into strips 1.5-2 cm wide. We sew the strips together and wind them into balls. A hook for knitting from stripes will need a thick one - No. 10 or more.
Knitting start from 8 vp, which must be closed in a ring. Next, we knit st. b/n. according to the "rule of the circle", the knitting technique of which is described in this article above. Uniform additions are needed so that the circle is flat and not convex, like a hat. If during the knitting process the circle turns out to be wavy, then this problem can be corrected by subsequent steaming and ironing of the product.
Everything is simple and clear. For a couple of evenings, you can easily knit a warm home accessory.
Video lesson:
Star with a simple pattern and description of knitting
It looks original and interesting in the interior of the dwelling such a pentagonal knitted accessory. Job description below.

You can knit such a rug in the shape of an asterisk from any desired material: yarn, bags, flaps.
Knitting starts from the center. You need to score 5 v.p. and close them in a ring.
1 row. 3 vp lifting, 2 tbsp. s / n. over the 1st ch. previous row, ch 2, * 3 tbsp. s / n., 2 vp Knit from * to * 5 times to form a pentagon.
2 row. 3 vp lifting, 2 tbsp. s / n. over the 1st ch. of the previous row, 2 ch, 3 st.s / n., 1 ch and then continue knitting according to the pattern shown in the photo below.
The pentagon is knitted in circular rows to the size you need, and then each "ray" is knitted separately.
Knitting pattern Stars:
If you knit this accessory from soft thick yarn, then it can be used as a bedspread or a blanket.
A simple plastic bag rug
An excellent discovery of our housewives was the use of plastic bags for knitting household items. Rugs from packages, crochet, are good because they can be easily washed and dried, they are pleasant to the touch. For the bathroom, toilet and kitchen - this is simply an irreplaceable thing. The polyethylene product is not afraid of water, it will be enough to shake and dry it.

First we need to prepare, in fact, the packages themselves. To do this, any plastic bags are cut into strips 2-3 cm wide, sewn together with a thread or glued with a warm iron through the fabric and wound into a ball. Crochet knitting No. 4. The photo above shows a rug made of multi-colored garbage bags. One such copy takes about 40 packages.
Two types of loops are usually used: air loops, columns with 1 crochet. This rug is oval in shape.
Dial the desired number of loops. In this sample, 12 v.p. + 3 v.p. lift = 15 v.p.
1 row. Insert the hook into the 4th loop from the edge of the chain and tie 5 tbsp. s / n. Further in each n. knit 1 tbsp. s / n. 10 times. In the last v.p. knit chains 6 tbsp. s / n. Knitting turn. In the same way, we knit the other side, forming an oval. Close the row with a connecting column.


2 row and all subsequent rows knit according to the scheme. Thus, the middle of the canvas will remain straight, and the edges will expand and round off, thanks to the additions in the semicircles. Thus, an oval canvas is obtained.

Knitting pattern for an oval rug from garbage bags:

To decorate the product, you can knit decorative elements: flowers, leaves, bows.

The product is shiny and bright. And the main advantage of this product is its cheapness and practicality. For examples of work, see the video:
An interesting technique for creating on a filet grid
If you are completely new to knitting, find out - this is one of the most famous techniques!
Knitting rugs on a sirloin net is another innovation invented by needlewomen. Such products look rich and magnificent. At first glance, it seems that it is very difficult to knit anything in this technique. In fact, the work is done easily and quickly enough. Even a novice craftswoman will cope with this task if she already knows how to knit air loops and double crochets.

You can take any yarn you want and the corresponding hook number. The knitting process begins with the execution of a sirloin mesh of the size you need. The photo below shows a knitting pattern.

When the mesh is tied, start knitting the outer part of the product. It is recommended to start knitting from the middle of the fabric, then the pattern will be even and the “waves” will go in one direction. Each side of the cage should be tied with st. s / n. They can be from 1 to 3 on each side. The thinner your thread, the more stitches you need to knit.
Thus, focusing on the diagram-drawing, you tie all the "cells" of the fillet net.
This is what the back side of the piece should look like.


Such products have an attractive appearance, and due to their structure they look very elegant and rich.
Technique from experienced needlewomen originally from Japan
Japanese floor mats crocheted- This is a special knitting technique. Products connected by this technique are unique and unrepeatable. The interweaving of rings, stripes, interesting color combinations captivate at first sight. Look at the next photo. Agree that this is just a masterpiece!

The following master class will tell us about knitting from rings with a description of the work step by step.
The base of the rug is a circle. To get started, dial a chain of 6 ch, close it into a ring.
1 row. In the ring, tie 3 ch. lift, 7 tbsp. s / 2n.
2 row. 5 lush st. s / 2n., between them 3 v.p.
3-4 row. According to 2 tbsp. of 4 lush st. s / 2n., knitted together, under v.p. the previous row.
5 row. Link a chain from ch, attaching it to the previous row with half columns.
Rings. Dial a chain from vp, connect into a ring. The length of the chain depends on the diameter of the ring you want. Tie a ring. s / 2n.
The second ring is knitted as follows: cast on a chain from the ch, stretch it through the first ring and connect the first and last loop with a half-column. So the two rings are connected to each other. Tie the second ring st. s / 2n.
Thus, knit and connect all the rings. Connect the first and last ring to each other.
Then sew the rings to the round base of the rug. And you can immediately, in the process of knitting each ring, attach it to the base.


Working with this technique is a very exciting experience. Here the emphasis should be on the right choice. colors yarn. And then stylish and colorful things in the Japanese style will update and complement the interior of your room.
We make a bedspread to decorate chairs and stools
All of the above models of rugs can serve as a cover for chairs or stools. But I would like to show you another very cute model - a knitted rug for a chair, which your children will like first of all. Look at the photo below. Beauty is not to take your eyes off, right?

We need light yarn (wool or wool mixture) and the remnants of red, black and pink threads.
The base-circle is knitted from yarn of a light shade. In knitting a circle, air loops and a single crochet are used. Knit a circle according to the “circle rule”, which is described in this article above and according to the scheme. To make the rug warm, it is recommended to tie two circles and sew them together. For children who are very cold, you can also insert a layer of synthetic winterizer between the circles.
Then, focusing on the diagrams that are presented in the next photo, complete the eyes, mouth and ears, sew them to the base and that's it - the product is ready.
Scheme:

Your baby will love this knitted stool cover. He will be happy to sit on it, as well as play, and maybe even sleep.

A continuation of this idea of rugs-toys can be coverings on chairs in the form of faces of other animals. And bright, and beautiful, and fun!
All models of home rugs presented in this selection are simple in execution (suitable for beginners) and attractive in appearance. Do not be afraid that a homemade homemade rug will not fit into your modern interior. Approach with creativity and inspiration to the selection of the model and color scheme of the future product and the result will pleasantly surprise you. Experiment and you'll be fine. Enjoy your time in the company of a hook and a ball!
Using a hook, you can dress up in wonderful things, decorate the interior of the apartment, make holiday gifts. An excellent addition to decorating the interior of a building can be a do-it-yourself rug. Knit it, perhaps from threads, scraps of fabric, just old things. Let's look at how to crochet rugs. These items can be placed anywhere in your home.
The choice of thread, its color, thickness depends on the place where you place it, on the purpose of its creation. If you need it for beauty, just jewelry, you can use thin threads, light shades. If you decide to put it at the threshold, take a thread thicker, darker. I want the bedside rug to be soft, fluffy, gently hugging tired feet. The bathroom rug can be knitted with a dense, large volume.
The location of a do-it-yourself rug can also be furniture. In such cases, it is more like . When you decide on the thread, pick up a hook under it. Its size should be twice the diameter of the thread. In this article, we will consider a description, a master class of several models of carpets that you can easily knit yourself using a crochet hook and our patterns.
The size of the future square rug will be 114/84. Buy a kilogram of white yarn, it can be made of polyester, 400 grams of blue and yellow, hook number 15. To make the future masterpiece compact, take three balls, combine them into one. Starting any odd row, do not forget about such as air ones. Cast on a chain of 32 loops.
- 1r. Thread yellow shade 3 double crochets in third st, skip 2, then repeat: 3 double crochets in a single stitch, skip two, 3 double crochets, double crochet in the loop that ends the chain.
- 2r. Take the thread blue tint, use it until the end. Single crochet, air two loops, skip three, knit a single crochet between subsequent loops.
- 3r. Now you need a white thread. Without skipping arcs, double crochet 3, finish by knitting a double crochet in the final loop.
- 4r. Change thread, take yellow color. Knit according to the example of the second.
- 5r. Return the thread of blue color, knit according to the model of the third.
- 6r. Knit with a white thread, as you did the second.
- 7r. Engage the yellow thread again, knit like the third row.
- Subsequently, the rows are repeated from the 2nd to the 7th. In total, forty-three rows or one hundred and thirty centimeters of the product are obtained.

Knitting pattern for a square rug
At the end, tie a square rug around the edges with a white thread in two rows. The first single crochet, the second, as the instructions show: 1 single crochet, skip two loops of the previous row, 3 double crochets in a single loop, skip two, thus knit until you finish the row. In conclusion, form a unifying on the product.
Another example and pattern of a crocheted rug is shown in the following video:
Every home always accumulates a lot of unnecessary rags. Do not rush to throw them away, they can get new life. A particularly good option would be rags from linen, knitwear. Their multi-colored appearance will give brightness to the product. Using shreds, you can knit rugs from rags of various shapes, for example, square, rectangular, diamond-shaped. In such cases, fantasy always comes to the rescue. The only thing you need to have is the initial skills of owning equipment at least.
Before starting work, you need to prepare the material that you need, draw carpet patterns, view photos of finished products.
Take unnecessary things, cut them into pieces. The width of such tapes, as a rule, is three centimeters. Tie ribbons, roll into a ball. Take the hook twice as thick as the resulting tape. Even in the last century, rugs knitted independently from colorful flaps. How to crochet patchwork rugs is not a difficult science, people have passed it on from generation to generation.
In every house there were a large number of such products. Mostly round. They lay everywhere: near the bed, at the threshold, next to the closet door, near the stove. Why round? Because this technique for knitting a round rug is the simplest. It is not difficult to study it, remember it, perform it.

Do-it-yourself patchwork rug
Follow these instructions step by step, and everything will turn out pretty easily and quickly:
- Cast on the first loop, as always, when you start knitting.
- Knit 6 air loops.
- Connect in a circle, a half-column will help in this.
- Then knit an air loop for lifting.
- Knit as if you are knitting a circle with double crochets with ordinary threads.
You can make approximate additions without adhering to any strict rules. If it is more convenient to use a reminder, then:
- 1r. In each loop, knit two single crochets.
- Divide the circle into six equal parts. In the final stitch of each piece, double crochet inc.
The finished product will have an even appearance, if you do not forget to knit, starting each row of the circle, an air loop for lifting. In conclusion, unite the rows with a half-column.
Many women often ask how to crochet rugs from rags or other fabrics and threads. We hope that here they will receive a complete answer to their concern. Given that knitting is becoming a popular type of needlework.


