How to make baskets from plastic bottles. Plastic bottle basket
Decor items purchased in a store are far from always interesting and unique, in contrast to hand-made jewelry. Crafts made by yourself will not only cost less, but will also delight those around you with their unusualness and beauty. In particular, wicker baskets from improvised materials can serve as containers for every little thing, and as an element of the country landscape, if you place them, for example, on the lawn near the house. If you decide to master the weaving of baskets from the most common and already unnecessary plastic bottles quickly and easily with your own hands, then this master class for even beginners will be useful to you!
Plastic bottles are a versatile material and at the same time very cheap. Therefore, if you have several pieces of empty plastic containers lying around, do not rush to take them to the trash. Take some time to get creative - the results may surprise you.
We weave baskets from plastic bottles with our own hands in a master class for beginners
Before you get started, prepare the following items in advance:
- plastic bottles in large quantities;
- scissors;
- fishing line or strong nylon thread;
- a piece of cardboard or thin plastic;
- glue for plastic products.
The color of the bottles can be anything, but at first it is better to do the first job completely in one color, and only then experiment with shades of plastic. Baskets made entirely from green or brown bottles look best. If the final version does not suit you, use ordinary paints.
The first way to weave a basket is with “corners”.This step-by-step guide will guide you through every step of creating a shopping cart. It is better to start by cutting bottles into component parts. Cut bottle plastic into long and narrow strips 1 cm wide. Their number varies depending on the size of the product, but in any case, you will need quite a lot of strips, so it's better not to be lazy.

After cutting the bottles, fold each of the resulting blanks in half so that a fold appears in the center. Both halves of the strips are also bent separately, wrapping them inward. The ends of the parts should fold with a central fold.
In the end, you will get a strip that is 4 times shorter than its original version. On one side there will be a fold, and on the back - 2 free edges hidden inside the workpiece.
Now take two parts and connect them by inserting the tips of one into the second and moving both middles towards each other. You will receive a "corner". Then insert the third part into it in the same way, then the fourth, and so on, to make a zigzag. Continue until the length of the zigzag is equal to the girth of the basket.
Fasten the ends of the zigzag elements by tying with a fishing line or thread. Make one more piece for the basket handle.
The number of elements depends on the desired height of the craft. When there are enough of them, it will be possible to start the assembly.

Tie all the rows with a fishing line and attach a handle with it. It is better to make it in 2 or 3 rows wide. If necessary, insert a bottom cut out of cardboard or plastic into the basket. If the finished basket will be on the street, it is better to use the second option. Glue the bottom glue gun or just glue.
The second way of weaving is "chess".This method may seem more complicated than the previous one, but only at first. Materials and tools will be the same as before, plus cardboard box.
It all starts with cutting the bottles into the longest possible strips. You will need thin tape for this. Here's how it's done: wrap the middle part of the bottle with duct tape at a slight angle. The layers of adhesive tape must not overlap. Cut the bottles along the lines obtained, and peel off the tape and remove it.

Next you need a box. It will serve as a convenient guide for the size of the product, and, one might say, a machine tool. Put it upside down and fasten the strips of plastic on it close to each other, in one (horizontal or vertical) direction, as shown in the photo. Attach them to the sides of the box using tape. Then take more strips, and alternately thread them between the parts fixed on the box.
This can be done without a box, on any flat surface, for example, on a table.
Weave the sides of the basket in the same way. When they are ready, carefully fold the edges of the plastic and glue them to the inside of the product.
The handle for the basket can be made from parts - "corners".

These baskets are quite suitable as a stand for flower pots. If you make a basket without a bottom and fill it with soil, a wonderful flower bed will come out of it. The material from which the crafts are made is very durable and will not lose its beauty for many years.
Plastic is easily washed from dirt, so it is easy to transfer baskets to the house for the winter. Such an unusual decoration will certainly attract the attention of guests, and making plastic baskets will be interesting for the whole family.
The following videos show other basket weaving patterns that you might be interested in.
Video on the topic of the article
To make a basket you will need:
- plastic bottles;
- scissors;
- fishing line or kapron thread;
- cardboard or a thin sheet of plastic for the bottom;
- plastic glue.
You may want to decorate the finished work with flowers. They can also be made from plastic bottles and glued to a basket with a glue gun. If you plan to make a flower bed inside, then you should do without a bottom at all.
As for the color of the bottles, first you should do all the work in one color, and then try to combine with each other different variants. Baskets made entirely of brown or green plastic look best. But, if the final version disappoints, the work can be painted with ordinary paint.
Step-by-step instructions for completing the shopping cart
Method one - "corners"
It is better to work in stages (below there will be an explanation for each stage):
- first cut the bottles;
- then make strips of plastic;
- bend the strips into blank corners;
- twist the corners;
- tie all the rows together;
- form a basket into a circle and fasten the edges;
- attach a handle;
- glue the bottom.
Long narrow strips about 1 cm wide are cut from a plastic bottle. A lot of strips will be needed, and their number varies from the size of the finished product.
Each such blank is folded in half so that a fold forms in the center. Then both halves from the edge are also bent separately. They do it inward, the tips should eventually touch the fold in the center of the workpiece.
As a result, the part will be 4 times shorter than the original plastic strip, on one side of which there is a fold, and on the other - 2 free edges (they are also in the fold, because the free ends “hid” inside).

From the folded "corners" in the end you should get such a zigzag
They take two blanks and stick the ends of one into the second and shift both middles closer friend to friend. The result is a "corner".
The third part is inserted into the second in the same way, the fourth into the third, etc. As a result, a zigzag should be obtained from such “corners”. Do this until the length of this strip is equal to the desired girth of the basket.
The extreme details are simply tied with a fishing line or thread. Similarly, they make a “handle” for the future basket.

Baskets can be woven with various patterns
The number of these "circles" depends on the height of the finished product. Further, the weaving of baskets from plastic bottles goes into the assembly of the structure.
All rows are tied together with a fishing line, a handle is tied (it is better to make it 2-3 rows wide from the corners) and, if necessary, cut out the bottom according to the shape of the finished basket.
For the street, it is better to take plastic and glue it with glue or a glue gun. If the basket will stand under a canopy, then you can use thick cardboard.
The most painstaking work in the manufacture of a basket is to fasten the finished rows of “corners” together with fishing line or thread. The bottom, if desired, can be made from the same blanks. But since no one sees it anyway, you can not waste time on this.
Method two - "chess"

Using electrical tape, we cut plastic bottles into the longest possible strips.
This method may be more difficult than the first, but only in the initial stages. The tools for it are the same, but you will also need a box.
First, the longest strips are cut out of a plastic bottle using thin electrical tape. They do it this way: the middle part of the plastic bottle is wrapped slightly at an angle with thin electrical tape so that its layers do not overlap each other.
Then the bottle is cut along these lines, and the tape is removed. It turns out a long strip of plastic.
Then a cardboard box is taken, which will serve as a guide for the size of the future basket, and at the same time almost a machine for its production.

The box is turned upside down and plastic strips are fixed very close to each other in one of the directions (vertically or horizontally). Do this with tape on the side faces. Then, in turn, they take new strips and thread them in a checkerboard pattern between those that are fixed.
The same steps can be done without a box, on any flat surface, for example, on a table.
The age-old question of the masters about where to put the mountains waste material, resolved. From plastic bottles you can make excellent baskets that will decorate your summer cottage or original packaging for a gift. If you want to learn how to weave baskets from plastic bottles with your own hands, a master class for beginners will help you with this.
History of weaving
Weaving originated in ancient times. This technique was used to create kitchen utensils, baskets for harvesting and storing crops, hunting traps, house walls, furniture and toys. Wicker items were made from various natural materials- reeds, grass, vines. Toys had a sacred meaning, because they were made by hand. They were slandered about health, good luck. It was believed that wicker products scare away evil spirits. Everyone knows an item called a "dream catcher" and its properties to keep nightmares out of the owner's mind. And wicker furniture is always in trend, light, comfortable and durable. The first wicker chairs were found during excavations of ancient Rome.

Times changed each other, new materials began to appear. From what they just do not weave in our time - from ribbons, ropes, small colored rubber bands, plastic bottles and newspaper tubes.
Technique corners
This type of manufacturing baskets from plastic bottles is quite simple. First, corners are made from cut plastic bottles, and then the product is assembled from them into a single whole. To complete the product you will need:
- Plastic bottles;
- Scissors;
- Fishing line;
- Glue gun.
To work, you need to cut the bottles with scissors into strips, the width of which is 1 cm and the length is 8.
If you decide to take strips of a different size, then when calculating, remember that the length of the strip is eight times the width. It is important to choose bottles that do not have unnecessary bends.
Cut off the bottom and neck, and use the rest for cutting blanks.

The strips are ready, now they need to be bent in half, unfolded and folded the edges to the center as shown in the photo.

You will need a lot of these blanks. Connect them together by inserting into each other.

Weave the bottom of the basket from several parts, alternately fastening the corners. For strength, you can glue the bottom with transparent tape. Details are attached to each other on a fishing line.

After making the bottom, a long horizontal zigzag strip is made. Its size is equal to the girth of the bottom. The strips are also fastened with a fishing line. You can fasten them in tight rows or make diamond-shaped passes. Don't forget to attach the correct size handle. The basket is ready!
It can be used as a vase for sweets or a country planter. The advantages of such a product are that plastic is not afraid of changes in temperature and humidity. If you plan to use the basket as a planter, then the bottom can be omitted. Just fasten the zigzag strips together. Dig a little decoration in the flower bed and plant beautiful flowers. At the end of the summer season, you can simply rinse the basket with water and put it away for storage.


"Chess"
This weaving method is a little more complicated than the previous one, but using detailed step by step instructions, you can easily cope with the implementation of the basket.
The complexity of this method lies in the manufacture of strips: they must be long. But even here, experienced needlewomen brought the process almost to perfection. They came up with a great method that allows you to cut strips of the same width, using the entire bottle efficiently. In order to dissolve the container into strips, you need to remove the bottom and neck and neatly apply electrical tape or narrow masking tape to its surface. And already in turns cut the entire surface into a long strip.
Do not try to straighten it, in the work it will still fall correctly.

To work on making a basket, you will need:
- Strips from plastic bottles;
- Scissors;
- Rubber;
- clamps;
- A small container that you will use as a basis for weaving.
Weaving starts from the bottom. To do this, place vertical stripes on the table and weave horizontal ones in a checkerboard pattern using this pattern.

It should turn out like this. Go over the side edges with transparent tape to give strength to the bottom.
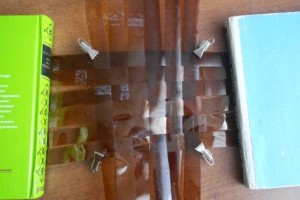
Now this blank can be transferred to a braided box. For convenience, fasten the strips on it with an elastic band.

Various products made from plastic bottles are becoming popular among craftsmen. A capacious laundry basket for the bathroom can be woven from plastic yourself. It will turn out to be light, durable and hygienic, since this material is not afraid of moisture and detergents.
Cutting bottles into strips
This is the most painstaking and responsible stage, since the aesthetics of the finished product depends on the quality of the resulting “ropes”. There is a special tool that allows you to cut a plastic bottle into perfectly even strips. In the absence of a bottle cutter, you will have to use ordinary scissors and a clerical knife.

There are two types of weaving: corners and ropes. Depending on this, the material is cut. In any case, before cutting, it is necessary to cut off the bottom and neck of the bottle. When weaving with corners, the resulting cylinder is cut along the seam and a plastic rectangle is obtained, which is cut into thin short strips. To make them even, you need to draw the material with a marker.
For weaving in stripes, the bottle is glued spirally with electrical tape or adhesive plaster desired width. The thinner the stripes, the neater the weaving will look. Then the bottle is cut with a clerical knife in a spiral along the joints of the electrical tape. Thus, one strip is obtained from one bottle. Sliced blanks have the form of spirals. Do not try to straighten them, as in this form they more easily take the desired shape when weaving.
Basket weaving from plastic strips
Experienced basket weavers can use the scheme and get a more accurate product.

Beginning needlewomen can use an easier way:
- Choose a box of the desired shape and size.
- Turn the box upside down and weave the bottom directly on it.
- To make the weaving process more convenient, fix the strips around the edges of the box with clothespins and rubber bands.
- Once the bottom is done, fold the strips around the edges of the box and secure with a rubber band.
- Continue weaving in a circle. The first two rows will be the most difficult.
- After weaving the basket to the desired height, bend the free strips through the upper horizontal strip and weave them from the wrong side. It is more convenient to do this by laying the basket on its side.
Corner basket weaving method
- Cut the prepared plastic rectangle into strips 1.5-1.8 cm thick.
- Fold the strips in half lengthwise.
- Fold both edges of the strip in half again and fold inward. The length of the resulting rectangle will be 4 times shorter than the original strip.
- Connect the blanks together by threading the "ears" of one part into the holes of the other.
- Similarly, assemble the chain of the desired length, depending on the diameter of the basket.
- Connect the rows assembled from the corners with a fishing line.
- The bottom for the basket can be made of cardboard, wrapped with oilcloth, and glued to a wicker basket using a heat gun.
Video on how to make a basket of plastic bottles
Recycling bottles is an easy way to save the environment and make things that are comfortable and beautiful. In many courtyards, you can find compositions of plastic flowers and animals, but most often they do not look very beautiful and spoil the flower beds a little. There are more profitable options plastic product: a fishing line of various diameters is cut from it, which is used in gardening, and also for construction and repair. Why do we need basket weaving from plastic bottles?
Use cases
Having made a special device for cutting, the craftsmen take a small fishing line or thick strips of material for weaving baskets and other containers. Strong, wear-resistant containers become important gardener's assistants. They can be used for harvesting, storing tools, containers for not very beautiful flower pots, or as a decoration for a summer house.
Basket weaving from plastic bottles helps to improve the environment and can become an exciting hobby for everyone. The plastic is quickly painted with acrylic, which helps to create great images on the surface of the container.
Rope basket weaving
Creating products from simple containers saves cash, which would have to be given to storage containers. Pros and cons of such weaving:
- The main advantage of the art of weaving baskets from plastic bottles is the use of creative resources and the development of imagination. Every thing can be made special by decorating it. various crafts from the same material, for example, flowers.
- The only disadvantage of this hobby can be called only that the job is very addictive and, having started weaving plastic baskets, it will be difficult to stop. Using different techniques and by combining the colors of the stripes, a person is able to create a basket that is visually indistinguishable from a container made of vines or wood. The process of making a wicker product takes about 2 hours, if you prepare everything you need for work in advance.
The lesson has both positive and negative sides.
Tools and materials
 To create a basket with your own hands from improvised materials, you need to prepare the following: plastic tape; scissors; small fishing line; blank for the bottom; glue for decorating. Find material to create baskets usually it is not difficult: many bottles and caps made of plastic are thrown away by unscrupulous vacationers in the forest, on the beach, in summer cottages. Therefore, you won’t have to spend money on buying a ribbon for making crafts.
It is only necessary to make a special tool to speed up the process of harvesting plastic yarn. You can make a fixture from a clerical knife and an iron corner by connecting them to each other. In the corner above the blade, a pair of holes of a certain diameter is made with a hacksaw, and then a handle is attached to the base, on which you can hang the bottle.
Having cut off the bottom of the product, you need to disconnect the beginning of the ribbon, put its “tail” into one of the holes and simply pull the edge. In contact with the sharp part of the blade, the bottle will cut itself, and the diameter of the hole will set the thickness of the yarn.
Basket weaving, master class
If you prepare strips of plastic of different colors, then you can combine them with each other to get different images. Optionally, if you don’t like the standard shades of plastic, acrylic is used to color the products or the finished container. Weaving baskets from plastic bottles, step by step instructions:

So you learned how to create a basket of plastic bottles with your own hands step by step.
This is just one method of making plastic laundry baskets. There is also “chess weaving”, which requires a strong frame when applied. In this variant, strips of ribbon are sequentially threaded through adjacent ones in a checkerboard arrangement. You can also try different methods making baskets from plastic bottles and choose for yourself the most the best option. In addition to baskets, you can also make a dress out of bottles, a bag or even a box.
Even if you are a beginner in this business, the main thing is to follow the instructions, then everything will work out. The box is the easiest to make, you need to make a minimum of effort.
Attention, only TODAY!


