How to make a small cardboard box. The easiest way to make a paper gift box
Getting ready for solemn event, a person always carefully thinks over his image, style, demeanor and, of course, a gift. It happens that the turn comes to the last when there is practically no time left for its purchase and packaging. In this case, the invitee begins to rush about in search of a present, and when he is found, he puzzles over how to present it. If there is no time to go to specialized gift wrapping workshops or run to the nearest market to buy packaging, improvised materials and imagination will come to the rescue.
Learn how to make a box out of cardboard, and perhaps these methods will save you in an emergency. Also, these accessories can be used not only for gift wrapping, but also for storing various household trifles. There are several methods for making cardboard containers.
Material selection
Before you make a box out of cardboard, you need to decide on the material itself. You can take an already colored sheet or decorate it later. If you intend to store heavy objects, then you need to take a dense material.
The decoration of the made box can be paper applications, drawings, various stickers or fabric. It all depends on who and for what reason it is made.

How to make a rectangular box
Perhaps one of the simplest packaging options is a container. rectangular shape. To make it, you will need a sheet of cardboard, a pencil, a ruler, sharp scissors and hard glue.
Lay the sheet in front of you and decide on the size of the bottom. Draw with a pencil and a ruler its borders. After the preliminary drawing is made, it is necessary to sketch the sides of the box. To do this, from each bottom border, draw a pair of perpendicular lines to the side. Remember that their length should be the same. On two of the future walls, draw a couple more segments parallel to the bottom border. It is with the help of these parts that the sides of the box will be fastened together.
Carefully cut the workpiece with scissors and bend evenly along all the drawn lines. After that, you can start assembling. Apply glue to the additional pieces coming from the walls and fix them by making a corner of the box. Let the glue dry and you can start decorating the container.

How to make a box (round container scheme)
A round container looks more original, but it is also somewhat more difficult to make it. You will need a sheet of cardboard, a pencil, a ruler, scissors and glue, as well as an ordinary school compass.
Lay the material in front of you and draw the required size of the bottom with a compass. Carefully cut the workpiece with scissors so that the borders are perfectly even. After that, you need to make the walls of the box. To do this, using mathematical formulas or a simple measurement, calculate the circumference.
Draw the resulting length on cardboard with a pencil and make a rectangle out of it. The width of the sketch you create should be one centimeter more than you need. Cut out the workpiece and, using scissors at the border, make small cuts with a depth of one centimeter. Next, you need to bend the created cuts and apply glue to them. After that, carefully place the bottom of the box on the glue and press firmly. Let the adhesive dry and start decorating.

triangular variant
There is a way to make a box without glue. In this case, it can be replaced with ordinary or double-sided tape. You will need cardboard, a ruler, scissors and a pencil.
Draw a triangular sketch on the selected material in such a way that all its sides are equal. After that, from each side, draw lines for future walls. Since you can make a box without glue, there is no need to draw additional segments, which usually attach one side to the other. Cut out a neatly created blank and bend along all available lines.
After that, bring the sides together so that an angle forms. Carefully stick a piece of tape on it. Do the same with all three sides. Next, you can start decorating the product.

Cubic packing
How to make a square box out of cardboard? There is nothing easier!
cook necessary tools- ruler, pencil, glue and scissors. Draw a square on the cardboard, then from each side - another square. Do the same for each side. As a result, you will get five identical squares, one of which is in the center and borders the rest. On two sides, create small segments that will be attached to adjacent walls. Cut out the workpiece and carefully glue the sides, after bending them along all lines.
Follow the same steps and create the same box, but the sides of the squares should be half a centimeter larger. Cut and glue it. Your box now has a lid. IN closed such a container looks like a cube.
simple box
We will tell you about how to make a box out of cardboard without any materials at hand. All you need is a sheet of thin cardboard and your own skilled hands.

Fold the sheet in such a way that you get two folds that will divide the base of the future gizmo into three parts. After that, bend each extreme part in half inward. Bend the corners on the received elements. As a result, you will get four identical corners on each side.
Straighten the resulting part, equaling its center. You will get a container that does not have corners. You need to make them yourself. To do this, gently press the sides of the box with your fingers. Then you can proceed to decorate the created packaging, but remember that thin cardboard is not able to withstand heavy objects.

Before you make a beautiful box, decide on its decor. Prepare the necessary decorations in advance. Think over everything to the smallest detail. Only after that you can start creating a form, drawing a picture or gluing applications.
If necessary, a suitable lid can be made for each box in the same way (remember that it should always be slightly larger than the main part of the product).
Select the cardboard material according to the purpose of the packaging. Make masterpieces with your own hands and delight your friends and relatives with them. Give them storage boxes and various gifts wrapped in them.
Good luck in this interesting work!
Content
“If you want to do it well, do it yourself” is a well-known phrase that different situations confirms its truth. So, if you want to arrange a gift in a beautiful and interesting way, then it is not necessary to contact specially trained people and spend money on their services. Let's create better gift box with our own hands made of cardboard, we will do it well and efficiently.
From cardboard, you can make a box with a lid-valve, with a removable lid, a gift bag, a small chest for a souvenir and other products.
Scheme
In order to make a high-quality and beautiful box, you will need special templates that you can use to cut the blank. We offer several options for schemes so that you can choose the one you like. Note that among these schemes you will also find products that do not require glue. The design itself is designed in such a way that the box is assembled and fastened by itself.
Such a do-it-yourself cardboard gift box scheme is suitable for thin cardboard products. The template needs to be enlarged to the size you need, transferred to cardboard and cut out.

The dotted lines show you where to fold the cardboard. Use an old pen or a nail file to pre-draw thin grooves - then the cardboard will bend better and more beautifully. It is easy enough to work with cardboard when you already know how it will behave in a given situation.


To fasten the parts, you can use PVA glue, hot glue, double-sided tape, or any other material that can withstand thick cardboard.
Manufacturing process
First, let's deal with the materials and tools:
- cardboard (corrugated thick and thin colored);
- PVA glue or glue gun;
- double sided tape;
- scissors;
- stationery knife;
- ruler;
- a pen that no longer writes or a nail file;
- all kinds of decor - beads, ribbons, lace fabric, twine, quilling paper, decoupage napkins and so on.
What's next? Choose a template suitable for your gift, transfer it to cardboard, carefully cut it out with scissors or a sharp clerical knife, connect the parts. Now all that's left is to complete the box. Use the birthday boy's favorite colors, remember his hobbies, passions and use this knowledge in the design of the box. Let's take a look at some interesting options:

Laconic design is often the most stylish and original. Try not to overload the gift box big amount decor. Or at least choose the decor in one style or in one color scheme.
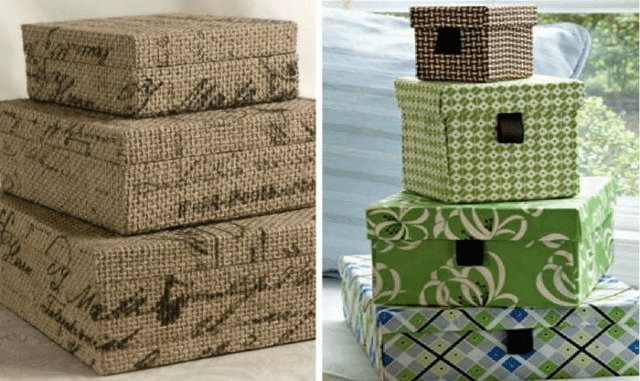
The main box for the box can be cardboard, but on top it can be decorated with burlap, wallpaper, gift paper and other materials. To make the box really perfect, do not forget to decorate it inside.
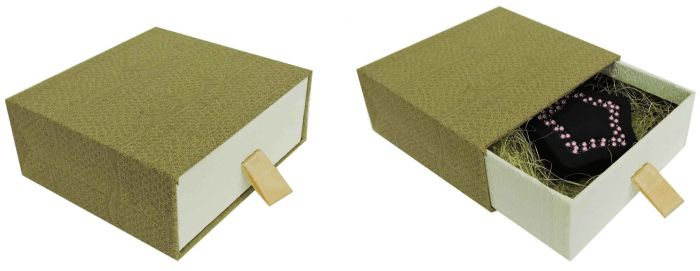
At the bottom of the box, you can put a sheet of foil, a soft pillow, satin fabric, decorative hay or any other material.
Big gift box
To create a large gift box, you can use a ready-made box from under a small TV, food processor, or any other medium-sized appliance. What else is needed:
- beautiful wrapping paper;
- satin ribbons to match the paper;
- glue gun;
- scotch;
- stationery knife;
- thin plain cardboard;
- decorative elements (if you want).
It will not be difficult for you to make a cardboard gift box with your own hands, all the more so for you, but you will spend almost 4 times less money on it than if you buy ready-made packaging.
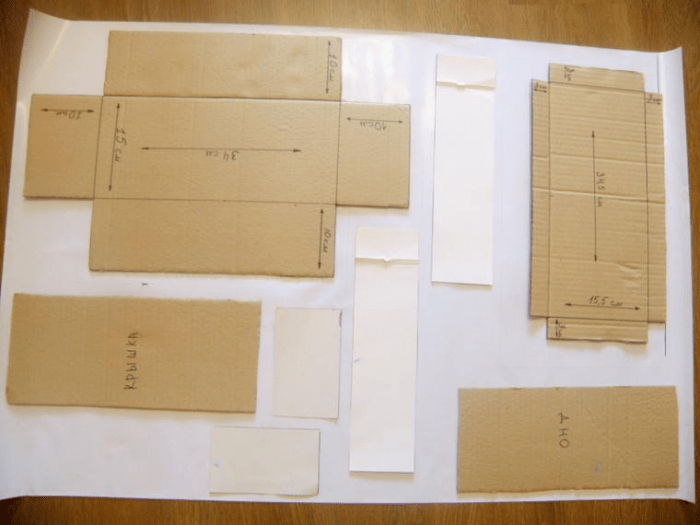
First you need to lay out the finished box so that you get a blank sheet of cardboard. Next, you need to draw a diagram, taking into account the dimensions of your gift.
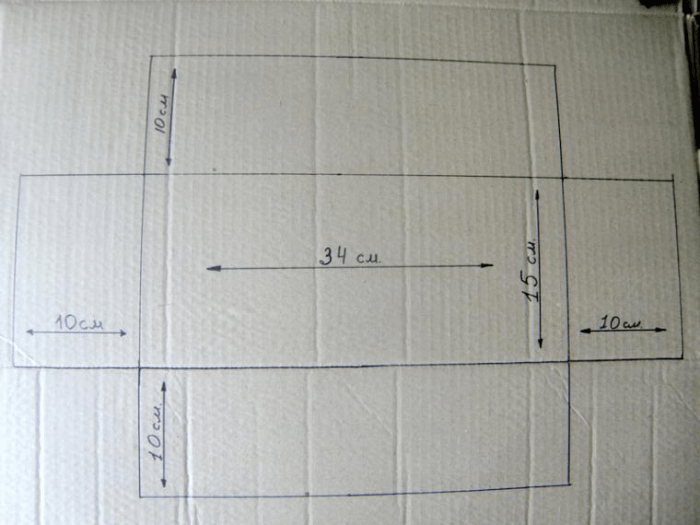

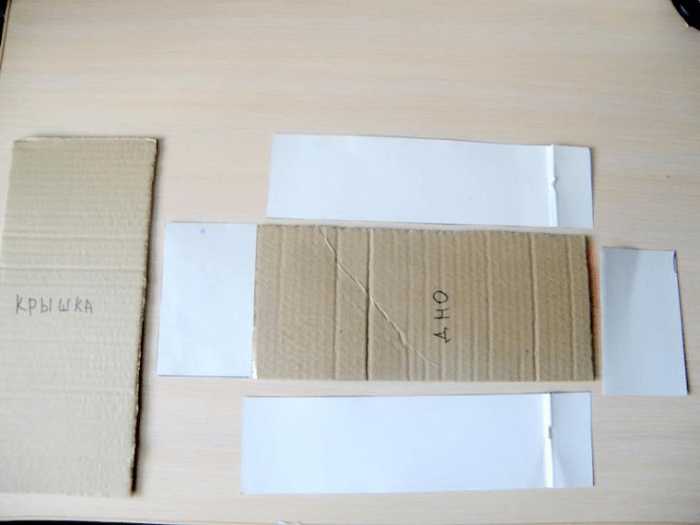
Next, using a clerical knife, you need to cut out all the details. You will also need the bottom of the box, which will also need to be cut out. For the bottom sides, use thin cardboard that will not reduce the internal space of the box.
Now all the details need to be laid out on a sheet of your wrapping paper. Leave a few centimeters everywhere so that you can neatly arrange the box and close the cardboard completely.
Circle all the details, and then carefully glue the cardboard to the wrapping paper with glue. Try not to use too much glue so that it does not remain on the product.

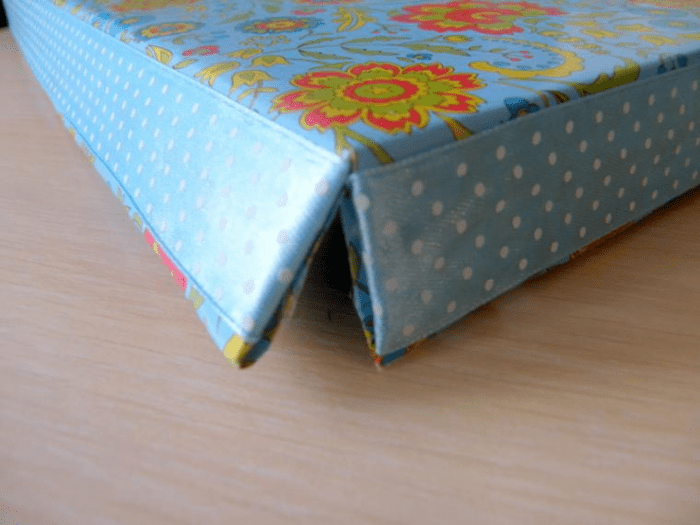
Now, using a glue gun, you need to connect the sides of the bottom and all other parts of the box.

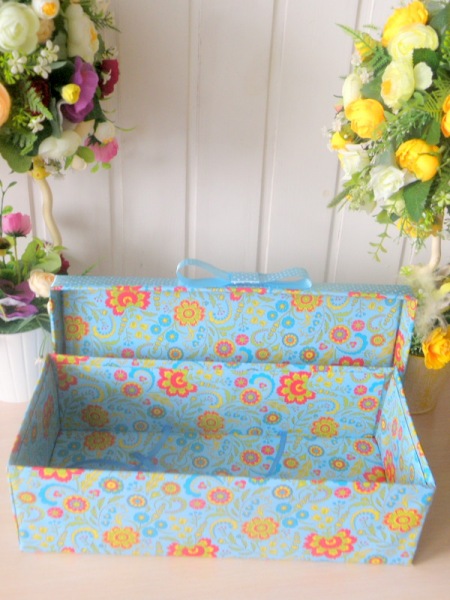
Now take satin ribbon, carefully hide its edge under the packing paper of the lid, as shown in the photo:


From the same tape make beautiful bow, which will decorate the finished product.

Do not forget to decorate the inside of the gift box with your own hands from cardboard.
Inside, you can adapt special ribbons to firmly secure the gift. You will need this if you are sending it.
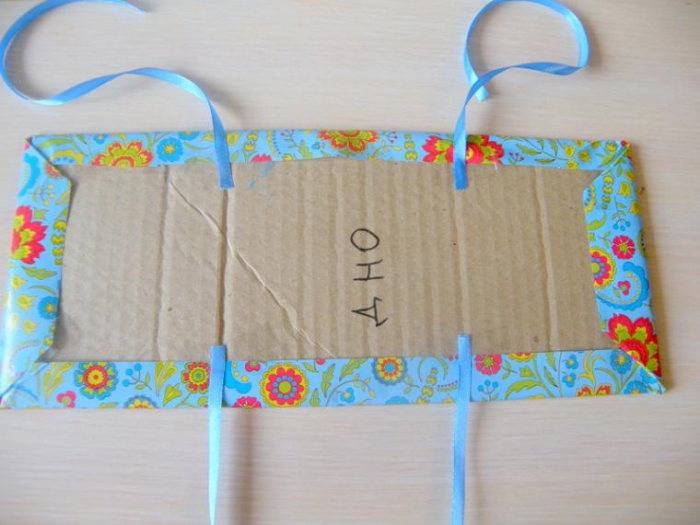
The box inside must also be decorated with wrapping paper, then it will turn out neat and complete.

Who would have believed that such beauty could be made with my own hands house from improvised means?
round box
If the gift is intended for a lady, and you want to present it in an original way, then your choice is a round cardboard box.
For it, you will need not too thick cardboard, from which you need to cut two circles and two rectangles.

Don't invent complex schemes and do not make unnecessary movements - for a small gift such simple option creating a round box will suffice. But think about the design well:
You can use the quilling technique, fabric decorative flowers, beads, appliqués, fresh flowers, postage stamps and other decor.
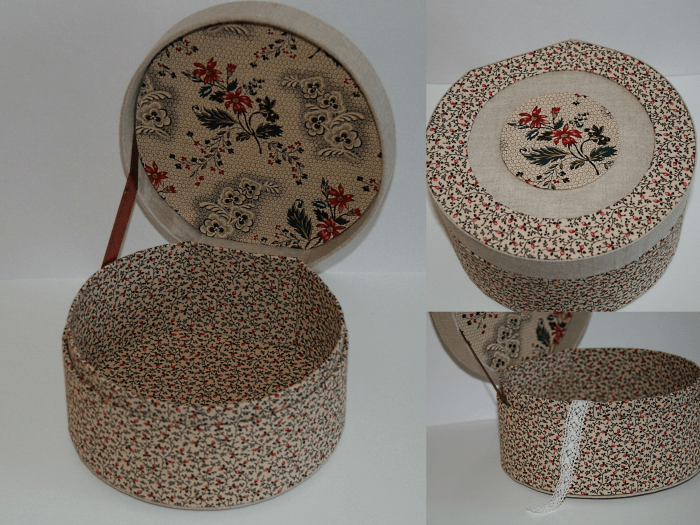
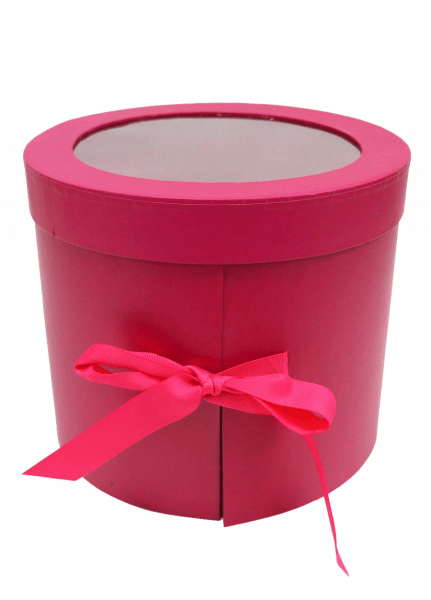
As a highlight, you can use thick, colorless cellophane to make a transparent lid for the box.
Try to start any craft in good mood, in a place prepared for this. It is desirable that the room is ventilated, because you will be working with glue. There should be a lot of light in the room so that you can not strain your eyes. All these nuances are very important, because the quality of the product depends on it.
A do-it-yourself master class on creating a cardboard box will help you fix the material that was outlined above:
Post Views: 617
Beautiful and unusual gift wrapping gives a pleasant impression, creates a little intrigue. Just want to check what's inside? To arrange a present, it is not necessary to contact the packaging department, but you can work on your own. Let's try to figure out how to make a gift box with your own hands.
There are actually a lot of options for such packages. You can simply make it out of cardboard and decorate it with a paper bow or ribbon. The most interesting are the options with scrapbooking elements. Below we will consider both the first and second types of packaging.
Simple gift box
It is necessary to prepare decorative thick paper, scissors, ribbon, pencil. Below is a master class with which you can make just such a box.

Let's start with the lid. Draw and cut out a square with a side of 21.5 cm. Draw two diagonals.

Bend one of the corners of the square so that the top coincides with the intersection of the diagonals.

Then make a quarter diagonal fold and turn the corner.

Now do the same for each corner.

Make two cuts in opposite corners, as shown in the illustration.

Fold the corners without notches along the folds already made.


Turn the sides inwards.


Then fold up the loose ends and tuck in.

The lid is ready.

Cut out a square 21 × 21 cm from cardboard of a single color and do all the same manipulations as with the lid.

By changing the size of the square and the color of the paper, you can easily make beautiful boxes in the right amount in a short period of time.
The packaging is decorated with ribbons or decorative bows. Here are some photos.


Let's make a voluminous bow for our box.

Cut out 9 strips from colored paper, the length ratio is clearly visible in the picture. Glue each in the form of a figure eight. It turned out 4 sizes of parts.

Now you need to connect the elements, superimposing them on top of each other, following the principle: from largest to smallest. As soon as the glue dries a little, fix the bow on the box.

Gift box with a heart
Let's make a wedding gift box with charming hearts.

For crafts take:
- double-sided cardboard 25x25 cm;
- scissors;
- glue;
- stationery knife;
- plastic for lamination 12x12 cm;
- strips on glue with beads, beads or rhinestones;
- artificial flowers;
- leaflets (they can be cut out of lace and glued onto interlining to give them density);
- scheme.


Cut out the templates and follow the indicated lines with a dull knife to easily make neat folds in the right places.

Transfer the heart template to the lid part and cut it out with a clerical knife.

Make folds along the lines and fold the box, fix it with glue.

Carefully cover the window with foil from the wrong side.

Decorate the lid with flowers, stripes with beads.


Make the bottom like this. Complete the composition with a ribbon.
creative ideas
A box of coffee flavor? It is this version of the packaging box that we offer you to make:

To make such an unusual design, you need to print the text in calligraphic font. Lightly wet the leaf with water and evenly sprinkle with a small amount of instant coffee, rub gently. Coffee is better to take in the form of a powder, not granules.
Then cut the paper into several pieces of irregular shape and paste over any suitable finished box.
Video on the topic of the article
The video shows master classes in the manufacture of original packaging.
In order for a gift to make an impression, it must be skillfully presented. A beautiful box, made with love, plays an important role in this.
A bright original beautiful box is ideal for packing your gift, because the very first impression of a gift depends on the packaging. And, of course, it will be best if you make it yourself. How to make your own small cardboard box, we will tell you right now!
So, we are learning how to make various boxes on our own.
How to make a square cardboard box
To begin with, we make a pattern. On a sheet of cardboard, draw a square or rectangle of the size we need. Then we draw straight lines of the required length from each side, which determine the depth of the box. On one side of each side of the box we draw small protrusions 1-2 cm wide. Then they will need to be cut near the bottom of the box at an angle of 45 degrees. Then we cut and bend the workpiece along each line. We glue the protrusions to the adjacent sidewall of the box with glue or tape.

We make the lid a little larger than the box itself, literally by 1-5 mm. If you make it too big, then it will not hold well on it and constantly fly off. We transfer our original square or rectangle to the cardboard sheet and increase it on each side by a few millimeters. Then we make protrusions that will hold the lid on the box. Before you start gluing the lid, we fix the workpiece with paper clips and try it on the box. If the cover is too large, you will have to draw a new one.
Also looks great packing box in the form of a cube. Let's try to make her. We make a template. To begin with, we draw a square of the required size, then from its sides we draw five more of the same squares, four of which we place along the perimeter of the base, and the last one is attached to one of the just drawn ones. Now we make small allowances to connect the parts. After cutting out the blank, on the outside it needs to be painted or glued with colored paper to give it a festive look.

Finally, we glue the resulting box. Everything is ready, now you can pack a gift into it.
We make a triangular-shaped gift box with our own hands
On a cardboard sheet, draw a triangle, twice the size of the future finished box. We divide all sides in half and connect their midpoints with lines that will correspond to the fold lines of the box.
We place our gift on the inner triangle and glue the box. If you suddenly didn’t make allowances for fastening parts, you need to pierce small holes along each edge and thread a colored tape through them.

Trying to make an unusual round product model
To begin with, we determine the size and select necessary cardboard. We use thicker cardboard for the bottom and lid than for the side surface. Draw two circles on sheets of cardboard. This will be the lid and bottom of our box. To do this, you can use the most common compass. We make the diameter of the lid a little larger than the diameter of the box. We do everything carefully, since all the parts to be cut must have an ideal shape, otherwise, the box will look skewed. At the next stage, we make a blank of the side surface of the box. To do this, we use the school course of geometry. It is known that the circumference is Pi*2R. This is the length we need to cut a strip of cardboard. To do this, inside the circle prepared under the bottom of the box, draw another circle with the same center, but with a radius of about 1 cm less than the radius of the workpiece for the bottom. The strip of cardboard intended for the side is bent into a roll. We do everything very carefully. Do not allow kinks and cracks in the cardboard. We fasten the ends with glue or tape from the inside. Then glue the side wall to the bottom of the box. To do this, we make small cuts along the entire length of the strip of cardboard. After that, they gently fold over. This is necessary for better contact between the bottom and the sidewall, and, therefore, the reliability of their gluing.
Do-it-yourself cardboard box scheme:

Using the same principle, we make a narrow strip of cardboard, which, after giving it a round shape, is glued to the circle intended to become the lid of the box. We carefully select a suitable difference in the diameters of both strips, no more than a few millimeters, so that the lid does not fly off the box. For the convenience of making a small gift round box, you can use for its side surface a neatly cut piece of a round tube, or a cardboard towel roll. To make the box more attractive and festive, we decorate its surface, for example, with colored patterned paper. Here everything depends on your imagination.
Video on the topic of the article
A simple version of a paper box. This is my first instruction here and I tried to make it as clear and understandable as possible. It was difficult for me to explain some steps in a way that was clear, but I think that everything will be clear from the photographs. If you have any problems, write in the comments and I will try to explain better.
I know that there are several versions of A4 paper boxes, but I didn't see my method here, so I hope it will be useful to you. Enjoy!
Stage 1: Materials

You will need:
- 2 sheets of plain office paper (box + lid)
- Scissors
- Pencil
- Ruler
You may also need some glue.
Stage 2

We fold a sheet of paper as shown in the photo.
Stage 3

Draw a line with a pencil, tracing one of the sides of the resulting triangle.
Stage 4

Cut a sheet of paper along the line.
Stage 5

Now you have a square (you can throw away the extra piece of paper).
Stage 6


Now you must fold the square along the other diagonal and unfold it again.
Stage 7


Then fold all 4 corners of the square towards the center.
Stage 8


Fold one of the sides of the square towards the center (as shown in the photo), then fold the opposite side in the same way.
Stage 9


Now we bend the just bent sides of the square. We turn it 90 degrees and bend the other two sides of the square in the same way.
Stage 10


Make cuts as shown in the photo. The cuts should only be top and bottom, they should not be too deep or short.
Stage 11


Unfold the top and bottom as shown in the photo. Bend the other two sides so that you get a box.
Stage 12


The final stage of the box assembly. We bend the remaining two sides. Ready!
Stage 13


Now, if you have a desire, you can make a bottom for our box, i.e. the box we made in the previous steps will become the lid (it will be difficult to insert one box into another if they are the same size). In order for the lid to be easily put on the box, we need a ruler.
It's pretty simple. First, follow steps 1 to 5, and then measure and draw a line with a pencil indented 5 mm from the top and right edges of the square. After that, cut off these thin strips. Now the bottom and lid will fit perfectly into each other.
It remains to repeat steps 6 to 12 and the box with a paper lid is ready!
Stage 14


If the inner triangles bend down at the top, then they can be fixed with glue.
Stage 15


All that's left to do is connect the boxes together.


