Print a small cardboard box template. DIY gift boxes for friends and family
The article will tell you about how you can do it yourself and use a cardboard box. Here you will find templates and master classes for making boxes of various shapes.
A box is the easiest way to pack or hide something. The box can serve as an excellent means of storing things: jewelry, postcards, small items and cosmetics. Of course, modern stores will provide you with a lot of options for boxes: large, small, curly, square, with lids, decorated and simple cardboard.
It is much more pleasant to create something with your own hands and decorate it the way you would like it and the way the product itself will correspond to the style of the holiday, room, occasion. You can make crafts from absolutely any cardboard. The material can be purchased at the store for creativity (you will find a large selection of colors and textures of cardboard), or you can use the one that is often packaged household appliances(refrigerators, for example, or washing machines).
For work you will need:
- Cardboard (as many as required for your preferred product size).
- Hot glue (you can, of course, use any other, but hot glue is preferable to the extent of its quick drying and strong bonding of the material).
- Template (with the help of it you can understand exactly how you should cut, bend and glue the material).
- Scissors and a pencil - for basting, cutting. This is necessary in order for your product to look neat and aesthetically pleasing.
Hinged lid box templateIMPORTANT: There are two main types of cardboard box with a lid. One suggests the presence of a lid that covers the top of the box, the other a lid that leans back, but is part of the box.

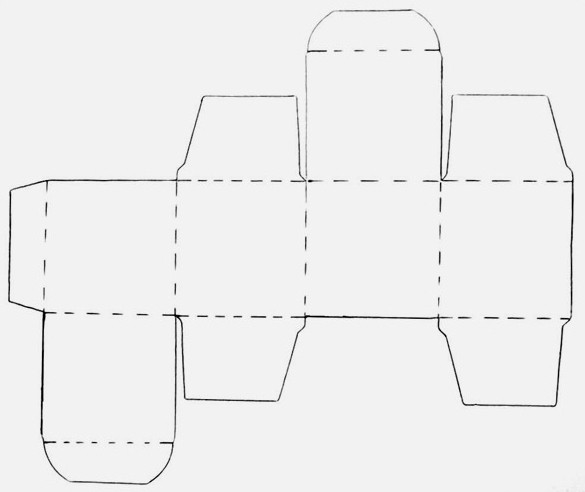
 Box template with cover lid
 How to make a box with a lid step by step:
- Prepare all the supplies, print out the template for the box on the printer or draw it in the exact ratio on the cardboard.
- Cut out two pieces of cardboard
- Start bending the dotted lines and carefully gluing them together.
- Press the edges firmly to hold the material together.
- Let the product dry a little.
- After drying, you can decorate the box to your liking.
Video: "Box: master class"
How to make a round cardboard box: diagram, template
A round cardboard box is a very beautiful and practical product that will always find its use. Having decorated it to your liking, you can store jewelry and bijouterie, sewing and embroidery kits inside, cosmetical tools, clippings and more.
Making a round cardboard box is a little more difficult than, for example, a square one. However, it is quite realistic to “figure out” with your own hands, without spending a lot of money on materials. Use thick cardboard and exactly follow the template provided, you can only change the size, but not the shape of the parts.
How to make a round cardboard box, templates:

 Round template cardboard box № 1

 What parts does a round cardboard box consist of: template No. 2
 In what order should the parts of the round box be glued together: template No. 3
 Round cardboard box with handle: finished product
 Video: "Gift box or cardboard box: a detailed master class"
How to make a heart box out of cardboard?
A heart-shaped box is much more difficult to make than a round or square box. However, if you follow the tips and patterns, you will easily create this beautiful piece.
A heart-shaped box is not only a storage box, it is the perfect package for giving a gift to a loved one. Such a box can be filled with many surprises: sweets, souvenirs, trinkets, gifts, key rings, flower petals, even butterflies can fit in it.
IMPORTANT: In many respects, the heart box is similar to a round box, but here it all depends on the bottom: if it is proportional, then the whole product can look neat and even. The box has two bottoms: inner and outer, the walls of the box are attached according to the principle of a round box.
Different patterns for making a heart-shaped cardboard box:

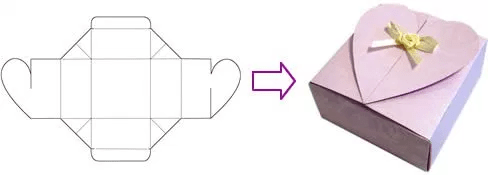
 One Piece Heart Box Template: Template #1
 One Piece Heart Box Template: Template #2
 Step by step work in photo:
 Prepare identical hearts: two bottoms and a lid
  Tape the bottom of the box
 Fix and wait for it to dry completely, make a cover
 Video: "Heart-shaped box: master class"
How to make boxes out of paper and cardboard?
Giving gifts in bags, plastic wraps and paper wrappers is no longer beautiful and is considered a sign of "bad taste". Your gift will look much more effective in paper or carton package, which you glue and decorate yourself.
IMPORTANT: The size and shape of your box depends only on what exactly you will give. More "heavy" gifts require thick cardboard, and for small and light ones, you can even glue a paper box together.
Boxes made of cardboard and paper different templates:

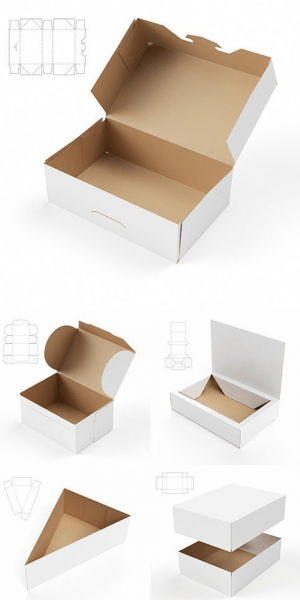
 Simple Rectangular Box Template
 Flip-top box: template
 Triangular box: template
  Simple square box template
  Pouch box: template
 How to make a box of colored cardboard?
In the modern art store you will find a huge selection of cardboard:
- Kraft cardboard (solid sand color material)
- Colored cardboard
- Velvet cardboard
- Holographic cardboard
- Glitter Cardboard
- Cardboard with prints, drawings and inscriptions
- Textured cardboard and more
IMPORTANT: All this variety of choice allows you to create cardboard boxes of incredible beauty and use them for any purpose.

 Cardboard for creativity
 Video: "How to make a cardboard box?"
How to make a cardboard box without a lid?
In case you need to make a cardboard box without a lid, you should also use the template. This product is perfect for storing personal items: pencils, cosmetic brushes, hair accessories and much more.

 Box template without lid
 Video: “Do-it-yourself origami box without a lid”
How to make a cardboard box for sweets?
Boxes of chocolates do not have to be bought in the store, you never know for sure what will be inside. It is always more pleasant to make a box with your own hands, fill it with sweets to your liking and give it as a gift. close person. It will be not only a "delicious" gift, but also very original and special.

 Box with pens: pattern
 Butterfly box: template
 Box triangle: pattern
 How to make a cardboard jewelry box?
It is very comfortable to store jewelry, bijouterie and watches in a cardboard box. You can buy it or make it yourself, decorating it to your liking. If desired, inside the box you can make one or several departments.
A few tips and templates for making a flat cardboard box will help you make your own packaging of any size.

 Flat box template
 Video: DIY Flat Storage Box
How to make a square cardboard box?
The small square box can be used as a bombonnière or as a package for small surprises for your loved ones.
 Simple square box template
 How to make a triangular cardboard box?
A triangular box can exist as a separate unusual package, or it can be part of a package in the form of a cake.

 Triangular box template
 Do we decorate cardboard boxes with our own hands?
Decorating a homemade box depends only on how original and great your imagination is. You should also decorate the box, focusing on the occasion (holiday, for example, or indoor decor).
How and with what you can decorate any cardboard box:
- Lace and fabric
- Satin ribbons
- Twine and burlap
- Stickers and stickers
- Buttons and other accessories
- Sequins and stones
- colored paper
- kraft paper
- Drawings and inscriptions
Video: "5 ideas for decorating a box"
Content
You can pack a beautiful and original gift with your own hands. The very process of creation will bring you a lot of positive emotions, and you will also save money and give a piece of your soul and love. To create a square box with your own hands from cardboard, you will need quite a bit of effort, imagination, love, and some tools and materials:
- cardboard (thin and corrugated);
- PVA glue, glue gun, stationery glue;
- adhesive tape (double-sided and regular);
- scissors and stationery knife;
- ruler;
- a pen that no longer writes;
- all kinds of decor.
Ready template
Any cardboard box starts with a template. Without it, it will be difficult for you to create a beautiful and neat gift wrapping. We have prepared for you several box templates that can be used not only as packaging, but also as a box for storing jewelry, threads, needles and other small things. Template variations great amount you can design your own. Our advice to you: first try to build a box from a newspaper or thick sheets of a magazine, and then take on the final version.

The template needs to be enlarged to the size you want to see the box. Then it needs to be printed and transferred to cardboard. The dotted lines are the folds. Use a non-writing pen or the thick edge of a pair of scissors to go over these lines and mark the folds so that the cardboard gives in easily and folds just the way you want it to. Making a square cardboard box with your own hands is as easy as shelling pears, especially if you use patterns that do not require the use of glue:
We offer a few more cardboard box templates that can be created without a single drop of glue.
It's all about the special "hooks" with which the structure holds and does not crumble. Well, now let's get to the decor.
A do-it-yourself square cardboard box (especially if the cardboard is thick) can be framed in the most different styles and using different techniques. It can be decoupage, thick cardboard will withstand this technique, it can be a composition made using the quilling technique, flowers from various materials. You can also use appliqués, ribbons, beads, stones, rhinestones and other decorations. Try to choose details in the same style so that the design does not look too rough and ugly. It is not necessary to completely decorate the box with decor, sometimes only kraft paper or the texture of the cardboard itself and the usual delicate satin ribbon are enough.
Don't forget to decorate the box inside too. From this will depend on its completed form. Inside the box, you can put a soft satin pillow, decorate the inside with foil, wallpaper, gift paper and other materials.

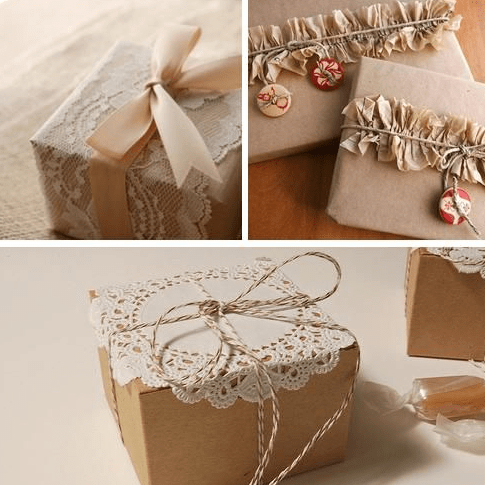
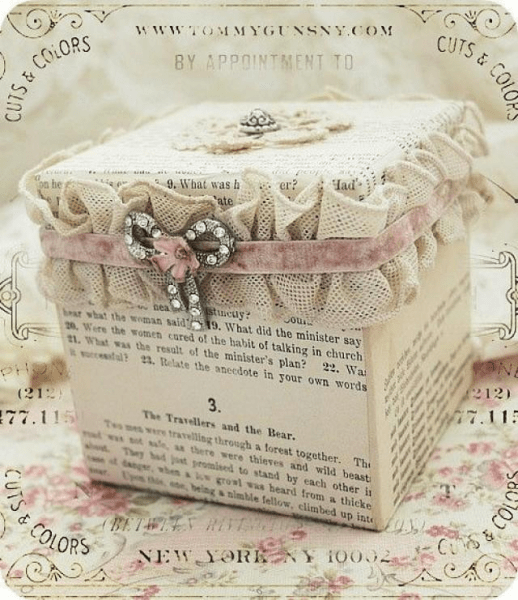
The lace material looks very beautiful in the design of the box - the packaging is obtained in such a rustic or rustic style.
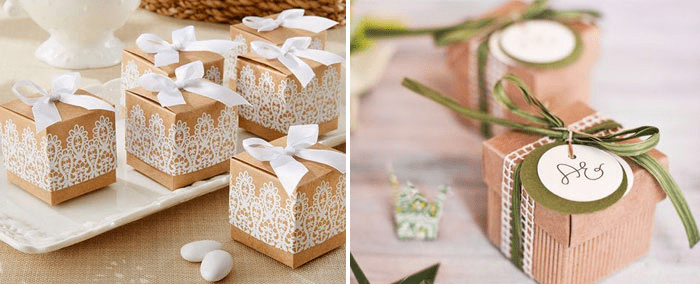
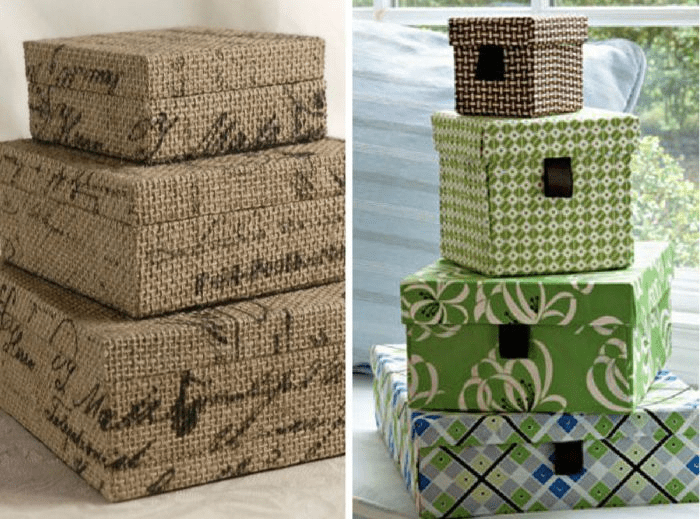
For decoration, you can also use burlap and thick wallpaper with an interesting print. Such boxes can be used to store things, small parts, jewelry. If you make partitions inside of cardboard, then this will turn out to be a real organizer for jewelry, buttons and other little things that can be presented as a gift.
Think about the hobby that the person to whom the gift is intended is fond of. Maybe he loves traveling and the box can be decorated with stamps, he loves flowers, then use a floral theme, he is a lover of cars and technology, then use some details characteristic of this hobby.
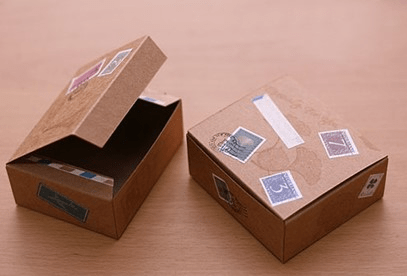
Even ordinary postage stamps can become original design do-it-yourself cardboard boxes
We create a template with our own hands
You can create a template for a square box with your own hands. To do this, on a sheet of the main material, you need to draw a square of the required size. Next, from each corner you need to draw straight lines as long as you want the height of the box. For the box, you also need to make a lid that will be literally 2 mm larger than the package itself.
Use double-sided tape, PVA glue, or a glue gun to attach the cardboard pattern pieces. You can also use thin multi-colored cardboard if your gift is not too heavy.
Cardboard box in the shape of a Lego piece
For this square box, we need a fairly thin cardboard, which should be colored on both sides. Such packaging will appeal to children, you can hide sweets, designer toys, small children's jewelry, collectible cars and other souvenirs in it.
First you need to create a template, print it and transfer it to colored cardboard. By the way, the template can be immediately printed on colored cardboard.
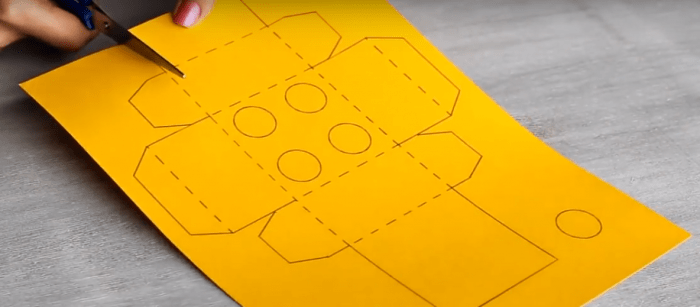
Next, with blunt scissors, you need to run through the places of the folds so that the cardboard bends beautifully. And then you can start creating interesting packaging. Use regular stationery glue to join the pieces.

Now you need to cut out four identical circles from the same cardboard from which you are making the box. By the way, the size of the box will depend on the size of your gift. You can even make a traditional design: a box in a box. It will be interesting for the child to open one box and find a new one in it.
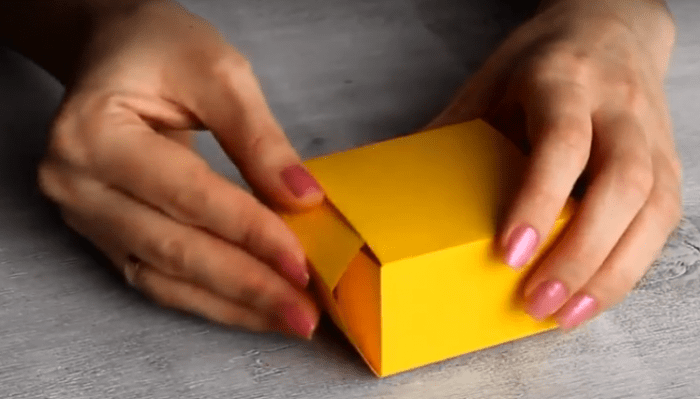
Now you need to take a thick adhesive tape or thick double-sided tape, on which we will attach our rounds.
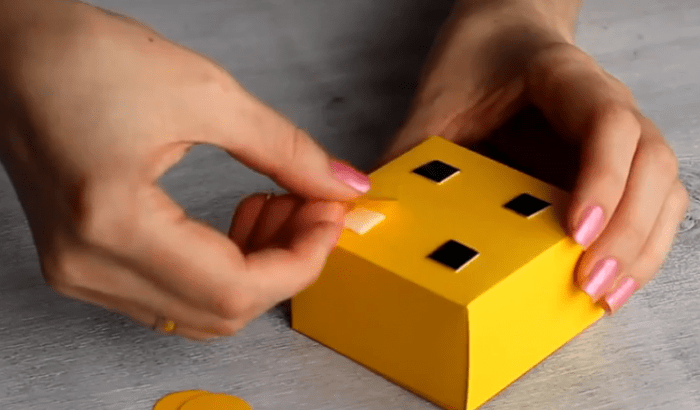
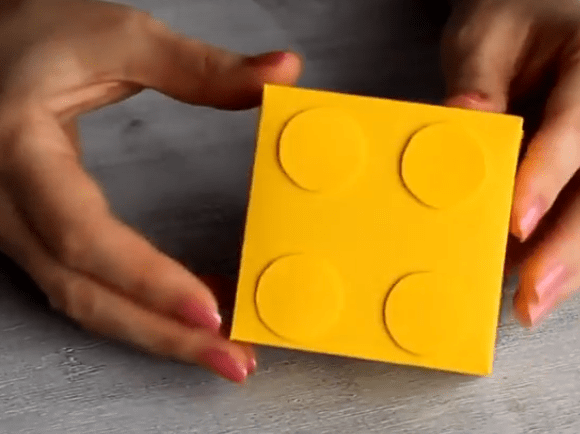
As a result, you should end up with such an interesting box in the form of a Lego constructor.
A box in a hurry
If you need to arrange some kind of gift very quickly, and there is no suitable packaging at hand, then you can quickly make it yourself. In this case, use thin cardboard - it is more convenient to work with it and the packaging is more accurate.
First you need to cut a square out of cardboard and draw straight lines from corners to corners.
Now carefully assemble your box and secure with glue. From a slightly larger sheet (about 5-6 mm), make a cover according to the same principle.
It remains only to decorate our packaging. If the gift is not too heavy, then you can attach a ribbon to the lid, for which you will hold the box and present the gift.
After analyzing several MKs for packaging, I found an option that suits me so far. So you can make a box of any size and color for a jewelry box, plate, etc. There is nothing new in the box layout itself. The main thing that I "invented" for myself is the manufacture of my "designer" paper. Find in a small town beautiful paper difficult, and here is what I propose to do.
1. Materials:
- whatman paper or cardboard,
- napkin or corrugated paper
- sheet of tracing paper
- PVA glue
- scissors
- ruler
- pencil
2. Determine the size of the box, then to draw a diagram.
The size of the bottom of the lower part: add 1 cm to the size of the product itself.
The size of the side parts is equal to the height of the product or slightly higher.
The size of the folds for the lower part: 1 cm less than the size of the side part.
Cap size: 0.5 or 1 cm more than the bottom.
I make the size of the side parts of the lid 3 cm.
The size of the folds for the lid is 2.5 cm. (For a simple box, you can do without them)
For example: the size of the box is 5X5X4. Box dimensions: bottom 6x6 cm; sidewalls 5cm; fold 4 cm. Lid 7x7 cm, sides 3 cm, fold 2.5 cm.
Now we determine the dimensions of the square, which will be the basis of our scheme. We add 4+5+6+5+4=24cm. This is the length of the square, which we will draw on whatman paper.
In fact, making all the calculations is not as difficult as it seems))) If you do it once and understand the principle, you will easily make them in your head without any papers and notes.
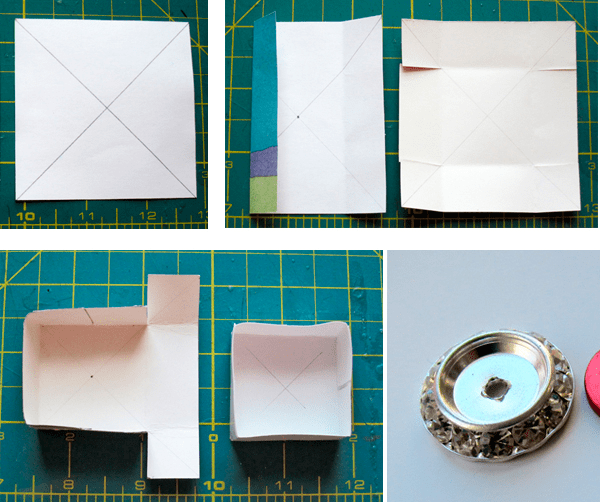
3. We draw a square on a Whatman paper, in our case with a long side = 24 cm. Cut it out.
4. Now we mark the square on each side according to the scheme: 4cm - 5cm - 6cm - 5cm - 4cm. We connect all the points, we get such a scheme.
Here are shaded those parts that are then cut off.
5. Now, in fact, we start making paper. To do this, you can use a regular napkin of a suitable pattern and size. Or corrugated paper, then the box will be plain. The square that we cut out of whatman paper. lubricate with PVA. Here it is important to coat the entire surface well, especially the edges, but there should not be too much glue so that the napkin does not get wet.
While the glue dries slightly, iron the napkin with a hot iron so that there are no wrinkles. corrugated paper may not be ironed. Then we put a napkin on whatman paper, cover it with a sheet of tracing paper and carefully iron it with an iron. I did it neatly not the first time, some skill is needed here))) That's what happens.
6. Now we cut off the extra parts of our square. We get such a figure.
7. We make cuts along the red lines.
8. Carefully bend everything with a ruler
9. We wrap the valves and bends inside and get a pretty box. More precisely, its lower part.
10. For the cover of the box, we repeat all the operations, only the dimensions of the square will be different. In our example, 2.5cm + 3cm + 7cm + 3cm. + 2.5cm = 13 cm
As a result of all the described manipulations, such a box appears
Everything is done quickly enough, in about an hour I did 6 such things
And this is what the finished product looks like in a beautiful package.
Any gift or product for sale requires even the most minimal packaging. I bring to your attention a selection of templates for the manufacture of boxes of different shapes.
All photos were found on the Internet, all copyright logos are saved. I propose to consider photographs without signatures as folk. If you know the author of an untitled work, write the author's name in the comments and I will sign his work in the near future.
To make boxes, you will need thick, but thin enough cardboard. Boxes made of designer cardboard (sold in many stationery stores and in all specialized stores with needlework goods) will look most spectacular.

More budget and no less spectacular option- Make your own box paper. To do this, you will need a decoupage napkin or any picture you like (printed on a color printer, cardboard, cling film, PVA glue and an iron. We glue the napkin or printout to the cardboard, cover it with cling film on top and gently iron this “sandwich” with an iron. To film did not stick to the iron - it is better to iron through a white cloth or through baking parchment.Thus, we get an excellent material for making boxes.

Next, select the box template you like, increase it to the proportions we need and transfer the outlines of the template with a simple pencil to the already prepared beautiful cardboard(on the wrong side). Then cut along the contour with scissors or a clerical knife. In order for all the folds of the future box to be even and neat, they must be pushed through with a wooden stick or the back (not sharp) side of the scissors blade.

Next, with the handles, we bend the box along the pressed contours. According to the layout, in the right places we apply a thin layer of PVA glue, tightly fold the parts to be glued together (you can temporarily fix them with a paper clip or a clerical clothespin) and wait for the glue to dry completely.

We decorate the finished box with a bow or other decor of your choice.
The packaging of a gift is just as important as its contents. Just as a person is greeted by their clothes, so are gifts by their wrapping. Seeing a sloppy wrapper, thoughts immediately creep in that the gift is no less cheap, even if there is an expensive piece of jewelry in the middle. The portal site offers you to make a beautiful gift box with your own hands, which will delight the eye of the gifted for a long time.


Do-it-yourself box with a lid, master class
It is quite simple to make a box with a lid, and multi-colored cardboard, scrap paper, cardboard from boxes can serve as a base, which can be pasted over with cloth or multi-colored paper, giving it presentability. We suggest making a box with a hinged lid.
For crafts, prepare:
- cardboard;
- ruler;
- glue "Moment" or glue gun;
- pencil;
- scissors.
To get started, you will need a template. You can print the proposed by us on the printer, use it as a stencil, or you can draw it yourself. To do this, you need to decide on the size of the box and draw 4 squares vertically and draw horizontal squares on both sides of the second square from the top. All squares must be the same size. Further, to the extreme squares horizontally, it is necessary to draw allowances of 1 cm. In our picture, the allowances are indicated by the letters A, B, C, D and E.

Then cut out the model of the future box. You should get the same blank as below.

We bend the workpiece along the lines. We form a box and glue the allowances. This is the box you should end up with.

How to make a small box with your own hands, templates with photos


Do-it-yourself Valentine's box, step by step with a photo
We suggest you make an open box "Valentine" in the middle of which you can put both a gift and sweets.
Materials:
- cardboard or thick scrap paper;
- pencil;
- glue (PVA or "Moment" is suitable);
- scissors;
- pencil;
- the marker is one tone darker than the cardboard.
Use your printer to print the diagram below to serve as a template. If there is no printer, you can draw a diagram yourself. The bigger your hearts are, the bigger the final Valentine will be.

Circle the contours of the hearts with a marker from the back and outside. Work out the dotted lines (they are the fold lines) with the blunt end of the scissors. This is necessary so that in the end the bends turn out to be even, especially if thick cardboard was chosen as the material.

Fold the box along the folds and glue the sides of the hearts. After the box has dried, on its outer side, write congratulatory words or confessions in a beautiful font with a marker. Put sweets or gifts in the box. Valentine is ready.

Do-it-yourself box for a man, photo 5 options


Do-it-yourself wedding box, photo 5 options


Do-it-yourself round box schemes, templates


How to make a heart box with your own hands, master class
You can not just pack gifts for your loved one or loved one in rectangular box, but in a spectacular box in the shape of a heart, which can be easily made by hand. Anything that comes to hand can serve as a decoration for the box, for example, beads, rhinestones, artificial flowers, pieces of lace, beads, etc.
For work you need:
- cardboard;
- glue "Moment" or glue gun;
- decorations;
- scrap paper;
- satin or rep ribbon 2.5 cm wide;
- ruler;
- compass;
- pencil;
- paperclips;
- scissors.
The first step is to draw 2 identical hearts on cardboard. In this case, a compass will come in handy. Draw 2 circles that overlap each other (see picture), and then draw straight lines from the sides of the circle so that you visually get a heart. Exactly the same blanks need to be made only of a smaller size from scrap paper, which will serve as a substrate for subsequent decor. For example, if you got big hearts 16 cm in height and the same width, then make scrap paper hearts 14x14 cm. Choose the size of the heart according to the size of the gift or your personal preferences. Cut out hearts.

To finish the sides of the heart, cut 2 strips of paper from the same cardboard. The length of the strip should be equal to half a heart + 1 cm for gluing, and the width should be equal to the height of the box itself + 2 cm for gluing teeth. Choose the width at your discretion, the larger it is, the higher the box. Then exactly the same strips need to be cut out of scrap paper, only without allowances for cloves. Diagram of the heart with details in the picture below.

Bend the cut strips of cardboard by 2 cm and draw with the blunt side of the scissors to form a fold line. We cut triangles (teeth) with scissors. Stepping back from the edge of 0.5 cm, glue the strip to one of the blanks of the heart made of cardboard.

We glue the second strip on the other half of our heart, sticking it slightly overlapped on the previous one in the upper and lower parts, and fix it with paper clips.

We cut off 2 pieces of rep tape approximately 5 cm (adjust the length at your discretion), and glue it in the middle of the heart. Tape is needed to connect the base of the box to the lid.

Glue the tops of the ribbons to the lid.

Now we glue the lid with the previously cut blanks from scrap paper, and the box from the middle and outside with stripes.

Decorate the box however you like.

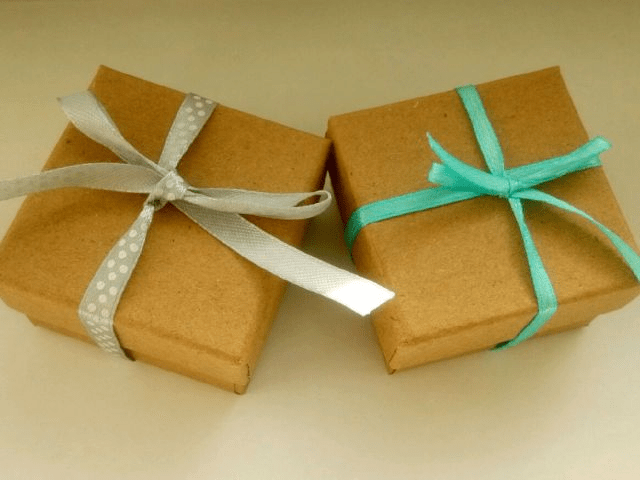
Do-it-yourself cardboard gift box on March 8, step by step with a photo
We suggest you make small box on March 8 in the style of Tiffany, which will definitely appeal to every girl.
To create a box, prepare:
- cardboard;
- blank paper;
- compass;
- pencil;
- ruler;
- glue brush;
- glue;
- lace or lace doily;
- satin ribbon 0.5 cm wide.
The first step is to make a blank in the form of a circle with a diameter of 10 cm from any paper. We apply a circle to a sheet of cardboard, circle it with a pencil. We mark the center of the circle, divide it into 4 equal parts with a ruler.

We apply the template to the circle just drawn so that it touches the 2 side closest points (see picture). In the same way, mark the center and divide the circle into 4 parts.


Apply the template to each section of the circles so that it touches the 2 nearest points and circles.


We cut out the part from cardboard and work out the rounded lines with the blunt end of the scissors.

We collect the box.


We decorate the middle of the box with a lace napkin, forming the number 8, applying glue with a brush. You can also use lace.

Decorate the top of the box satin ribbon, tying it crosswise, and form a bow. A box for March 8 in the style of Tiffany is ready. In such a box, you can safely present jewelry as gifts.

DIY scrapbooking box, master class
The gift box can also be made using the scrapbooking technique. Such gift packaging its originality and beauty. In addition, you can use all the flight of your imagination to create it, timing it to a specific holiday, performing it in the appropriate color scheme.
For work you will need:
- cardboard with a density of 250 grams;
- decorative elements in the appropriate color scheme;
- scissors;
- pencil;
- glue "Moment Crystal".
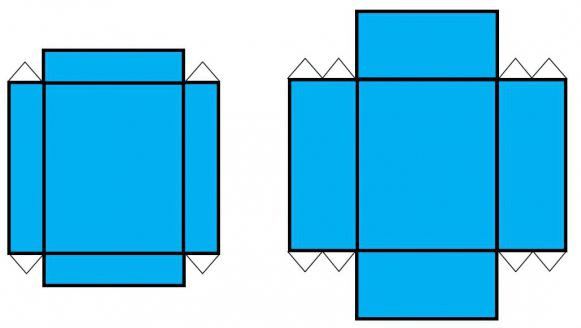
1. For work, you need 2 blanks made of cardboard. We take the first blank with dimensions of 24x24 cm, form the box itself from it. We retreat from the edges of 6 cm, connect the opposite points with lines. Cut each side square to a perpendicular line. We make cuts opposite each other.
2. In the same way, we take the second blank of cardboard with dimensions of 25x25 cm, retreat from the edges by 5.5 cm and do the same as with the first blank. This will be the cover. We carefully push the fold lines with a blunt object, such as a crochet hook or scissors.

3. We collect and glue both boxes with Moment glue.
Important: With the parameters of the workpiece given by us, the lid of the box will close it completely. If you don't want the lid to be that deep, trim the edges to whatever length suits you before you start the gluing process.


4. Let's start decorating the lid of the box. At this stage, you can apply all your imagination. We glue a square of scrap paper on the lid with dimensions 0.5 cm smaller than the lid itself.

5. We apply the desired decorative elements, trying not to overload the composition, and as soon as appearance suits you, glue the parts to the lid.

The scrapbooking box is ready.

Do-it-yourself box for February 23, photo 5 options


Do-it-yourself boxes with wishes, photo 5 options


DIY birthday gift boxes, photo 5 options


Do-it-yourself triangular box, diagram with photo


How to make a DIY surprise box, master class
The box with a surprise looks spectacular, and you can easily place several small gifts at once in its middle. To create a box, prepare:
- colored cardboard;
- colored paper;
- scrapbook paper or any other with a print;
- satin ribbons;
- decorative elements at your discretion;
- glue gun;
- scissors;
- ruler;
- PVA glue;
- pencil.
For crafts, you will need several sheets of cardboard. It is advisable to take cardboard of the same color for the cover and base, and another for the remaining tiers. We make the first tier. To do this, take a sheet of cardboard measuring 36x36 cm. You can find such non-standard sheets of cardboard in needlework stores. We divide each side of the cardboard into 3 equal parts with sides of 12 centimeters.

We connect the dots opposite. You should get 9 equal squares.


With the blunt end of the scissors, we work out the lines of the squares, and then fold all the squares into the middle, forming the walls of the future box.

From 2 sheets of cardboard with dimensions of 33x33 and 30x30 cm, we make exactly the same crosses, dividing the sides into equal segments of 11 and 10 cm, respectively.

We take the smallest cross, which will serve as the upper tier and decorate it with colored paper. For this, squares of scrap paper measuring 10x10 cm were taken.

We decorate each side of the cross at our own discretion. IN this master class decorative clothespins bought at a handmade store, decorative inscriptions, an envelope and stickers were used. You can also use photos, print wishes on a printer, stick flowers, ribbons, etc.

We will decorate the center of the cross with a pedestal on which you can place main gift. To do this, we will make a small box. We take cardboard with dimensions of 12x12 cm. We mark 3 cm from each edge. We connect the points opposite and push the lines with the blunt end of the scissors.

We take a medium-sized cross-shaped blank and glue interesting printed paper on the side squares.

We do the same with the largest workpiece. The center in both blanks is left without decor.

Collecting tiers. We take the largest cross, glue the center of it with glue and glue the center of the middle cross to it. We do the same with a small blank, gluing it to the middle one.

Now you need to form the lid of the box. We take a square of cardboard 24x24 cm. We retreat from the edges by 6 cm, connect with lines with dots opposite. Thus, in the center you will get a square measuring 12x12 cm.

We cut the side squares in the same way as in the small pedestal box. We work out the lines for bending with scissors and fold and glue the cover clockwise in the same way. We glue a satin ribbon to the lid, hiding the edges of the ribbon in the middle of the lid and a bow.


