How to sew a satin ribbon tie. How to make a men's bow tie or tie from fabric or satin ribbon with your own hands? How to make a paper tie
We bring to your attention a wonderful master class on sewing a very beautiful tie-brooch for a girl for school. The width of the tape is 3.8 cm, but it is quite possible to take a tape 4 cm wide, since 2 mm will not play a big role.
To make a tie-brooch you will need:
Satin ribbon 3.8 cm wide;
Lace ribbon 3.8 cm wide;
Brooch, rhinestones, half beads and other decor;
Hot glue;
Scissors, lighter;
Tie brooch step by step:
Usually I don’t stick to sizes and cut everything by eye, I just decided to measure everything for MK.
Prepare blanks for the TAIL. One piece 26 centimeters long, three pieces of ribbon and three pieces of lace, 15 centimeters each, six pieces for the smallest details, 13 centimeters each.

All segments must be folded in half and soldered along the edge, while three pieces of tape, which are 15 cm each, must be folded with lace and also soldered or sewn.

We fold the tail. First, we take the longest segment and begin to glue shorter blanks to it in the same order as in the photo.

Next, make blanks for the BANTIK itself. One piece of 30 centimeters, four pieces of ribbon of 28 centimeters and two pieces of lace of the same length, a piece of ribbon and lace of 25 centimeters, pieces of ribbon of 15 centimeters.

We glue the blanks, as in the photo. And the edges can be glued not end-to-end with each other. And so that the middle is empty, that is, glue it 1-3 cm after the bend. The brooch is not so heavy and thick. There is only one side in the photo, not turned upside down ... there the lace is so glued, otherwise it is very thick. Outwardly not visible, but the product is thinner and lighter.

We glue all the parts together with hot glue and then sew them together, as in the photo .... after we glue the blank with the brooch.

Connect the two elements together and glue. I glue the tie with hot glue, the width of the tapes is 3.8 cm. At the end, you need to glue the base with a pin.
A bow tie is a recognized attribute of both women's and men's wardrobes; it is usually made of silk or cotton fabrics, wool is much less common here.
It is also interesting that there are several wearing options: in the classic one, the one who will wear this tie must independently fix it each time, tying a neat knot in the middle, when, as in a simplified tie, it is already formed at the factory, and all that remains is to fasten it at the back using fasteners adjustable to the size of the shirt collar.
However, it is not at all necessary to rush to the nearest clothing store for a new thing - it will be much more interesting, cheaper and even more original to try to make such a bow tie with your own hands. Work should begin with the preparation of all necessary materials by the list. So, we need:
Satin ribbon desired color- comfortable, recommended for tailoring, the width starts from four centimeters. Length is one meter.
The satin ribbon is narrower, about a centimeter wide - the desired length will also be equal to a meter;
Ordinary matches or clear nail polish will come in handy to process the "loose" edges of the tapes;
Needle (preferably thin), scissors, as well as bobbin or silk threads in the color of the ribbon;
Hooks, Velcro, buttons or any fastener convenient for you;
Glue for fabric - in the event that you do not like to sew;
Usually a tie of the type that we will consider in this article consists of two bows - the smaller one is superimposed and fixed on the large one. However, you can make a simpler butterfly - then it will consist of only one bow, tied with a ribbon.
A small digression: the low complexity of the craft here allows you to do without seams, using only glue, but it is recommended to iron the improvised “seams”, that is, the places of gluing, with an iron at temperatures acceptable for a particular fabric. However, it must be taken into account that some types of glue may not be designed for heat treatment.
For a tie of two bows, prepare two pieces of ribbon - one is shorter (twenty to twenty-five centimeters), the other is longer, thirty to forty centimeters long.

If satin ribbons not found, the butterfly can also be made from nylon, but keep in mind that then all the seams will have to be carefully hidden, because they can be seen through the fabric. If you decide to make a tie from a cotton ribbon or a piece of wool, then be prepared for the fact that such material can be quite rough in structure - which means that some difficulties will most likely arise with drapery.
Having previously processed the edges with a transparent varnish or a flame, take a twenty-centimeter piece of tape and fold it in half, combining the ends of the matter. The resulting joint should be at the back, so if you see it in front of you, turn the butterfly so that it faces you. With a “forward needle” seam, we assemble exactly in the middle of the workpiece; at the same time, try to overwhelm and flash the ends located at the back. In the end, the thread will need to be tightened and secured, for strength, you can even wrap the assembly place with a thread and glue it. Make sure that the glue is as transparent as possible and does not leave ugly yellow spots on fabric. If there is no suitable glue in the arsenal, the assembly site can also be smeared with clear nail polish. A large bow is made in the same way, then the bows are connected by superimposing a small one on a large one. The junction can be both stitched and glued.
Advice: if you decide to make a simple bow tie from ribbons with your own hands, then you may need a slightly wider ribbon, say five to six centimeters wide. It is recommended to make the assembly more magnificent: for this, having completed one “forward needle” seam, you need to make two arcuate seams on each side, as shown in the picture:

Prepare a narrow, centimeter wide ribbon - it will act as the base that holds the butterfly and is placed under the shirt collar. The length here is selected based on your own measurements, plus a few centimeters in case you plan to attach adjustable fasteners.
The edges to which convenient fasteners will be sewn must not only be singeed or varnished, but also strengthened. This can be done in several ways: the tape is slightly bent and stitched close to the edge, if desired, you can sew a square of fabric, the edges of which do not crumble. It can be felt, drape or even a leather substitute.

cut off wide tape about three or four centimeters. We will need this piece in order to close the assembly place on the small bow; the required length should not be selected end-to-end, but taking into account the fact that the butterfly will, if necessary, move along the tape. However, if you want to keep the tie static, you can simply sew it to the ribbon, but in this case you will have to very accurately calculate its position on the neck.
The ends of a piece of ribbon are sewn back into a ring, and thus the tie can move freely along the ribbon.

DIY bow tie for ... pets. Fashion cat!
If your pets wear a collar, then a butterfly can be made for them too - then a thin base tape is not needed. The bows are assembled in the manner presented above, and the finished butterfly is attached with thread or glue to the collar. If the animal shakes off the product or feels uncomfortable, it is better to refuse such an idea.
DIY ribbon tie decor
There are a lot of options for decorating a bow tie. Can be used as artificial or natural, precious or semiprecious stones, and ordinary applications (for example, if the butterfly is intended for a child). Small sequins are also suitable, which need to be “planted” on a special glue, for example, this is how you can decorate a homemade tie by applying powdered sequins along the lines highlighted with a blue dotted line in the picture:

A handmade bow tie can be like original gift, as well as a luxurious, exclusive element of a personal wardrobe that you will never find on anyone else.
Wear with pleasure!
A stylish kanzashi tie for a girl will complement a school uniform and make a young fashionista stand out among her classmates.
Make an elegant set with your own hands dark blue colors from a tie and two hair clips. Also for school accessories fit black, white, black and white, cream, gray accessories - everything should be expressive, but not bright. Carefully study the master class and clearly follow step by step instructions and photo. If something doesn't work the first time, repeat the steps.
Preparing materials for the school kit
For making kanzashi ties to school with your own hands, it is better to use rep ribbons, although they are more expensive than satin ones. This is due to the high density of the material, suitable for the implementation of the described products. Reps create a dense base, and lace decorates a set of accessories.
Materials for modeling one bow:
- six pieces of dark blue dense rep ribbon and lace "path" of a rich ink shade - 4 * 10 cm;
- black satin stripe for ennobling the middle - 1.2 * 12 cm;
- 16 pieces of dense ink rep tape of a saturated shade - 0.5 * 7 cm;
- a piece of lace "path" (in this case, only a half cut along will be needed) - about 16 cm;
- two dark blue or black felt circles as a base for fastening and under a clip with a diameter of 2.5 cm;
- traditional metal clamp 7.5 cm long;
- the middle is a flower or another decor option selected in the store.
To do tie do-it-yourself kanzashi for a school uniform prepare materials taking into account different components.
Top part tie (choose a denser material so that the shape holds well):
- four pieces of dark blue rep ribbon and lace “track” of thick ink color - 4 * 13 cm;
- three pieces of ink rep tape - 2.5 * 24 cm;
- two strips of a dark blue rep ribbon and a lace “path” of a rich ink tone - 4 * 20 cm;
- a piece of ink ribbon from reps - 2.5 * 14 cm;
- lace "track" (cut in half lengthwise and use only half) - about 16 cm;
- the middle in unison with blanks for bows.
Additionally, prepare for a tie in a dark blue rep stripe - 4 * 26 cm, ink-colored lace "path" - 4 * 26 cm. These details must be glued at the very end.
Bottom part kanzashi tie for girls:
- two pieces of a dense dark blue rep ribbon and a lacy ink "path" - 4 * 13 cm;
- ink rep ribbon - 2.5 * 10 cm;
- pin - 3 cm;
- dark felt rectangle.
How to make school hair bows
To make two floral bows in the same style with a kanzashi tie for a school uniform, take a double portion of the materials according to the list. This refers to dark rep and lace ribbons, felt circles and centers.

Align the pieces of rep and lace - six strips of 4 * 10 cm. Close the edges, leaving the lace on top.

Double gather where the ends meet and singe to secure.

Prepare six identical loop parts and a long thin ribbon for the middle.

Glue a bow from all the loops, dividing each in half. Wrap the middle with black material.

For a simple but beautiful flower, prepare a half of a lace track 16 cm long, thin rep stripes - 16 pieces of 0.5 * 7 cm, a black felt circle and a flower in the middle.
Make thin rep loops. Glue all 16 loops on the felt circle evenly. Lace can be immediately gathered into a circle with a needle and thread.

Glue the top flower.

Two parts of the bow are created.

Glue the hairpin. Glue the clip on the back, pressing down with felt.

Duplicate all the steps to get a stylish pair.

You can also make simpler reps for the kit using the selected color scheme.
MK for assembling a tie from rep ribbons
To make a do-it-yourself kanzashi tie for a girl, prepare the accessories indicated in the list, consisting of various-sized rep and lace ribbons and the middle.

Model four combined pieces of rep and lace measuring 4 * 13 cm. Make loops.

Gather the details into a bow.

Bend three dense ink pieces measuring 2.5 * 24 cm on both sides, docking opposite ends in the center. Collect the resulting blanks together.

Also combine pairs of dark blue cut and lace details measuring 4 * 20 cm. Gather into a bow.

And one more fragment of a kanzashi school tie will consist of a folded dark strip measuring 2.5 * 14 cm, gathered into a circle of lace 16 cm long (halves) and the middle.

17. Glue the X-shaped bow from the first portion of the parts and the triple design prepared in the second.

18. Glue the third and fourth model - crossed combined parts and a lace flower with a center.

19. Now fasten the two lush fragments.

20. Prepare materials for the bottom of the tie: two pieces of dark rep and lace ribbons measuring 4 * 13 cm each, a rep strip measuring 2.5 * 10 cm.

21. Aligning large parts, cut them obliquely on one side symmetrically, sharpen a thin strip.

22. Glue two strips and a thin tongue.

23. Glue the ponytail to the bottom of the bow.

24. And the remaining details that will hide the back of the structure: one piece of dark rep 4 * 26 cm in size and lace. Collect a double strip with loops at the ends.

25. Glue from below. Attach a pin to the felt rectangle.

A little effort and you will definitely get a beautiful set with hairpins and a kanzashi tie. A stylish set can be presented to a friend or sister on small holiday or without any reason. Check out our section with assembly tutorials to always be stylish and fashionable!
A master class on making a tie from rep ribbons and kanzashi-style hairpins was prepared by Svetlana Sorokina with her own hands. Especially for the online magazine "Women's Hobbies".
Many small and adult men go to events where you need to look beautiful and tasteful. For children, it can be matinees, performances, festive events, for adults - parties, holidays, weddings and much more. One of the most important accessories for a man's outfit is a bow tie. But in stores, such jewelry costs a lot of money, but what prevents you from making a bow tie with your own hands from a satin ribbon at home? After all, such little things will always be in fashion, and what is done on your own will not only save money, but also make it possible to make a very beautiful and original little thing.

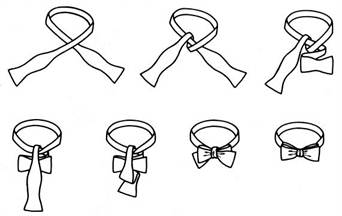
There are several types of bow ties. This is a classic - it is a long ribbon that must be tied independently into a bow tie; the second type is ready-made, such ties are already fixed to the tape, so you just need to attach it to the shirt and you're done. The first type of tie is quite complex, so only real men can use this kind. Below is a pattern for a classic bow tie and how to tie it.
Accessory for women
IN Lately such ties are used not only for males, but also for girls. Such interesting accessories came to us from the eighties and are now used not only on solemn events or for the office, but also in Everyday life. In addition, girls can wear such ties not only around the neck, but also decorate their hair with them, which is very important in our time.

What we need to create a women's bow tie:
- ribbons, different in width, length and colors;
- it is worth picking up threads by color;
- thin needle;
- universal glue, which should be colorless;
- scissors;
- measuring tape or ruler;
- rubber bands for decoration;
- regular rubber band.
Now you need to cut pieces of a certain length from each ribbon; for such a tie, the size of the ribbons does not matter.

For our bow tie, you need to take white and black ribbons, which will be 2 cm wide. It is recommended to purchase a black tape a couple of millimeters wider.
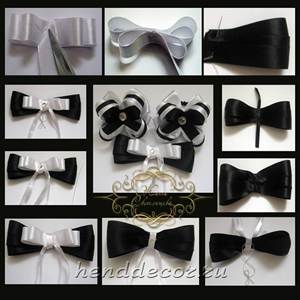
We take a white ribbon and form a flat double bow out of it, after which we sew the middle with a needle and thread. Next, take a black ribbon and fold it as shown in the photo. The black part should consist of two particles of connected ribbons. Cover the resulting seam with black thin tape. In addition to the fact that this tape hides the seam, it also compresses the middle of our tie. On top of the black thin ribbon, lay out a piece of white ribbon, which should be double. Through this tape it is necessary to pass thin white ribbons. An elastic band or fastener is attached to the reverse side to attach to a shirt, other clothes. In the middle of our tie it is possible to glue a pebble, a bead for decoration.
From satin ribbons, you can make various interesting decorative things that will always look stylish. The color of the ribbons is very large, and there are also beautiful drawings that, if desired, you can make decorations for each family member.
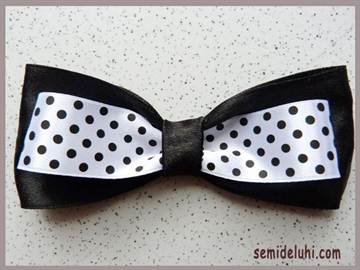
Tie for boys
Basically, such ties are sewn not only for girls, but also for a boy. After all, this accessory is specifically for men, so the master class will tell you how you can make such a tie from satin ribbons with your own hands.
What you need to prepare to create such a tie:
- black ribbon 5 cm wide, length should be 30 cm;
- white ribbon with polka dots 2.5 cm wide and 25 cm long;
- thread, needle and scissors;
- hairpin or elastic band for fastening.
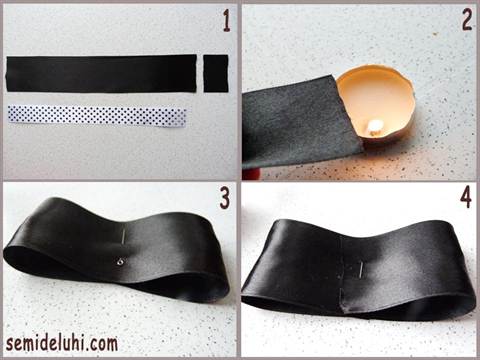
We cut off a small part of 3 cm from the longest ribbon. Next, you need to hold the ends of the ribbons under fire to secure the threads. From a wide ribbon you need to make a bow, as indicated in the photo. We do the same with a narrow ribbon. We fasten with an English pin.
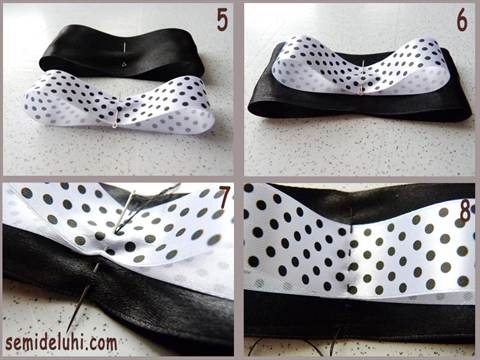
Now we put the narrower part on the wide one and fasten it with a pin. At this moment, you can see what sizes the future bow will have. If too large, then cut off the excess. Next, sew the two parts of the bow in the middle. We make folds, as shown in the photo.
Next, we fix the seam of the bow and sew the jumper from the wrong side. Now you need to attach a hairpin or other fastening to our bow, which can also be Velcro, which is very convenient.
Today, school ties for girls are gaining more and more popularity. Such jewelry can be considered brooches. They look amazing in black and white. school uniform, and are themselves usually performed in the same color scheme. To transform an ordinary white blouse into festive attire for the first or last call, simply decorate it with a tie, like the one shown in this lesson.
What is needed to create an accessory

Ribbons for creating a tie
Prepare for the ponytail:
- white rep ribbon 4 cm - stripes 30 cm and 25 cm;
- black rep ribbon 2.5 cm - a strip of 30 cm;
- black lace 2 cm - stripe 25 cm.
For bow:
- white rep ribbon 4 cm - stripes 26 cm, 24 cm (2 pieces), 22 cm and 18 cm;
- black rep ribbon 2.5 cm - stripes 24 cm (2 pieces);
- black lace 2 cm - stripe 18 cm;
- a stone and a base for it or a camellia - to decorate the middle of the brooch;
- a pin and a strip of felt 2 cm by 3 cm.
How to make a school tie-brooch from ribbons step by step:


This tie measures 12 cm by 17 cm. In order for the accessory not to be too heavy, it is better to use a lightweight middle.
Shared the master class
Svetlana Sorokina


