Do-it-yourself elastic band from satin ribbons: ideas, master class. Beautiful hair bands from satin ribbons for hair How to make elastic bands from ribbons 2.5
For girls with long hair, an elastic band from satin ribbons. With their own hands, mothers can create many of these accessories. It is not difficult if you delve into the basics of several techniques for working with fittings. From the article you will learn how to make an elastic band from satin ribbons using the kanzashi technique, how to make a lush American bow. You will learn the intricacies of working with fittings by studying the master class. Elastic bands from satin ribbons do not happen much! Keep it up, you will succeed!
Satin Ribbons for Beginners
In this master class, we'll talk about how to make 2 elastic bands with bows for young princesses. To create a product you need:
- 2 satin ribbons 2.5 cm wide and 1 m long.
- Two satin ribbons 0.8 cm wide and 1 meter long.
- A piece of satin ribbon 8 mm wide and 0.5 m long.
- Decor for the middle of the bow.
Cut out two 6cm x 8cm U-shaped pieces of cardboard. Cut off the end of the large ribbon so that it becomes sharp.
Wrap it around the template so that the end and two folds are at each edge of the cardboard blank.
Fix the tape in the center with needles and sew. Use a forward needle stitch for this.
From thinner ribbons, fold two bows, connecting them into a ring. Lay one on top of the other and fasten. Do the same with the second item. Wrap the middle with a thin ribbon, attaching an elastic band at the back. Glue.
Elastic band on a bunch of satin ribbons
In this master class, you will see how to create an elastic band from satin ribbons. With your own hands, you can make a hair bun decoration. This accessory is especially relevant for little girls who are engaged in rhythmic gymnastics and dancing.
An easy option for beginners
In order to understand the principle of sewing such an accessory, we recommend starting with a simple decor. Prepare 5 small bows, following the recommendations of the previous master class.
Take a rubber band. It is convenient to use a blank with perforation. You can sew a button to it to adjust the size of the product depending on the thickness of the beam.
Cut out 6 circles from felt. Make 2 cuts in them for threading the elastic.
At the back we will have a large bow, decorated with a cabochon and rhinestones. For this element take:
- 2 pieces of satin ribbon measuring 5 by 28 cm.
- 2 satin ribbons 2.5 cm wide and 23 cm long.
Form two bows. Put the small one on top of the big one and fix it.
For the elegant ends of the bow, prepare two pieces of satin ribbon 5 by 10 cm. Cut the corners of the blanks obliquely so that the ends look symmetrical.
Gather the top of the ribbons. Sew the blanks together. Glue the ends to the back of the bow. Decorate them with rhinestones, rhinestone ribbon or lace.
Take a small piece of thin satin ribbon and wrap it around the bow, while grabbing the elastic in the middle. Thus you attach the most big bow to the base. You can decorate the middle of the decor with a cabochon or a small flower made of fabric or foamiran.
All parts on the elastic band for the beam are movable. You can disassemble the product and use the bows separately, putting them on the hairpins.
In a similar way, you can attach more complex decorations to the elastic band, for example, flowers with leaves created using the kanzashi technique. So we figured out how to make an elastic band from satin ribbons.
American satin ribbon bow
Prepare for work:
- Two satin ribbons 5 cm wide and 60 cm long.
- 2 ribbons 0.5 m long and 2.5 cm wide.
- Six grosgrain ribbons 12 cm long and 2.5 cm wide
- Four ribbons of grosgrain fabric, 35 cm long and 1 cm wide.
- Two rubber bands.
- 2 mugs made of felt or foamiran.
- Decor for the middle of the bows.
Tools that will be needed for work:
- sharp scissors;
- candle;
- needles and threads;
- glue gun or Moment Crystal glue
Scheme of work in stages
Take the two widest blanks and melt their ends over the candle. Close their edges into a ring. Make a bow from the blanks by sewing two pieces in the middle. Pull the thread and hide it. Do the same for the decor of the second gum.
Melt the edges of the rep ribbons as well. Sew a bow from the blanks.
Making flags
Now you need to add the resulting bows. Take six blanks and cut the edges as shown in the photo. Treat the corners with a lighter. The thinnest blanks are folded into loops.
All parts of the bow are ready. You can proceed to the assembly of the product. This must be done strictly in a certain sequence. Attach flags to a large bow. Sew the blank with threads for reliability.

Next, lay the loops of thin tape and also quilt with a needle. Lay the ribbon bow last. Sew and glue the product for reliability. Fix the decor in the middle of the bow.

Attach an elastic band to it, dropping a little glue, and close it with a felt base for reliability.
Lilac flowers in kanzashi technique
At the end of spring, we hide the hats of our daughters on the mezzanine. I want to decorate their heads with something cute. We suggest you make lilac flowers using the kanzashi technique for decorating rubber bands.
Making petals
Cut the satin ribbon 4 cm wide into squares. Take one and fold it in half to form a triangle.
We bend the lower and upper parts to the center to form such a figure as a rhombus. We bend it in half and get a petal. The edge of the workpiece must be compressed and melted over a candle or processed with a soldering iron.

Everyone knows that lilacs have four petals, but you can make those flowers that you were looking for for good luck - lilacs from five elements. Collect the elements with a thread and a needle. Glue in the middle of the rhinestone.
In order to shade the white lilac, we will make some green petals. Cut a 4 cm wide satin ribbon into rectangles. Their length should be 6 cm. Fold the element in half horizontally. On one side, cut off the tip with scissors and melt. Before singeing the edges, connect them together. The blank should come out as in the photo. Wrap the remaining tips in the opposite direction to the center. Melt and pin the end.

Glue a few leaves to the back of the lilac flower. Using a hot gun or instant glue, secure the elastic to the decor. Cover it with a circle of felt. Here we have such an elastic band made of satin ribbons. With your own hands, you can make headbands, hairpins, bandages with such decor. Hats, caps, belts, dresses are also decorated with flowers using the kanzashi technique, brooches are made from them, decor for caskets, mirrors, soft covers of wedding albums.

Small flower "Flower-semitsvetik" for gum
For very young girls, whose hair is not yet very thick, voluminous decor with elastic bands is not suitable. Mom for her crumbs can make accessories with small delicate and simple flowers.
Following the title, we will make a flower with seven petals. Prepare thin ribbons in seven different shades. For each petal, we need to cut pieces equal to 2, 3 and 4 cm. Melt the edges of the blanks with a lighter.
We sew blanks
Fold each piece into a loop. Insert all three parts into each other and sew. Similarly, collect all seven multi-colored petals. Straighten the workpiece. Tighten and hide the thread.
Cut out two circles from felt or foamiran. Stick one on the back of the flower. Put a drop of glue, attach an elastic band and close it with a second piece of felt. Similar flowers will also be an excellent decor for hairpins.
Hair bands made of satin ribbons are accessories that will come in handy in any situation. Girls should have a lot of them. Now you can independently decorate such an accessory as an elastic band from satin ribbons. With your own hands, create jewelry for every day and delight yourself and your daughters.
Kanzashi hair accessories are distinguished by their originality and attractiveness, ease of manufacture and low cost.
To make these beautiful satin ribbon elastic bands with your own hands, you will spend one evening. Delicate candy flowers are suitable for a girl with any hair color. You can also attach hairpins to the composition, and even more practical - make the mount removable and change it depending on the hairstyle being created.
What you need for the master class
For one candy gum or hairpin, prepare ribbon of different colors:
- 8 square pieces of mint 5 * 5 cm;
- 8 squares of pink 5*5 cm;
- 6 rectangles of white 2.5 * 7 cm;
- 2 pieces of narrow white 0.5 * 10 cm.
Also prepare accessories:
- the middle in the form of an appetizing candy;
- huggers silver bells - 2 pcs.;
- pink beads with a diameter of 0.8 cm - 4 pcs.;
- white beads with a diameter of 0.8 cm - 2 pcs.;
- 2 felt bases with a diameter of 3 cm;
- elastic band or clip for hairpins.

To fix the edges, you will need to singe with a lighter or candle flame. Be careful and follow the safety measures! For more information about the reception, see another publication on our website.
Modeling colors for elastic bands from satin ribbons
The choice of hardware color is dictated appearance wonderful center in the form of candy. Mint, pink and white ribbon will do. From pink and mint, cut out squares with a side of 5 cm, from white - rectangles 2.5 cm by 7 cm. Also prepare the rest of the accessories, adhering to a delicate pink and salad color ensemble.
To model diamond-shaped white petals, take rectangular segments. Turn inside out towards you and bend to the right or left side right angle top.

After that, bend the beveled corner so as to combine the two ends and get a blank in the form of a house. Turn the piece right side up and crease the bottom edge to create a diamond shape.

Prepare 6 white diamond-shaped petals with a fold in the center. And also cut out the felt circle-base.

Use pink squares with a side of 5 cm to model petals of a different shape, bend them diagonally.

Bend the resulting isosceles triangle in height. Then fold down the center of the longest side in the triangle. Bend the remaining sides, adjoin the corners to the fold obtained in the center, singe in this position with a lighter, cut off the excess to get an oval petal with a triple fold in the center.

Make 8 identical rose petals and prepare a second felt circle to fix the flower for the satin ribbon elastic band, as in the photo.

Menthol squares with a side of 5 cm also bend diagonally and later in height.

Make the petals the same shape as the pink ones. Form a fold in the center of the base of the square, join two sharp corners to it and solder.

Gather 6 mint petals into a flower on a thread. Prepare an unusual candy center for decoration.

String beads, bell huggers on thin satin cords and prepare one mint petal each. Thus, you will get brushes made in the same candy range.

Glue the middle and bottom layers of the flower onto felt circles - pink and white petals. Glue the candy to the top flower, and glue one mint petal to each brush.

Collect decoration from satin ribbons for an elastic band or hair clips. Paste bright flower on a white layer, and attach a greenish blank with candy on top. Glue the tassels on the laces from below. Immediately make a couple of charming hairpins for the girl, you are unlikely to get by with one piece when it comes to such wonderful and necessary accessories.

Glue the elastic on the back of the composition of satin ribbons with hot glue.

Many more step by step master classes for making do-it-yourself hairpins, headbands and hair bands from satin ribbons and other materials are waiting for you on our website, and kanzashi instructions have been collected. Do not be afraid to create, even if the first time it doesn’t work out the way it does in the photo of the craftswomen, everything comes with experience!
Take a look at the site "Women's Hobbies" and find yourself a new activity for the soul, relaxation and good mood!
From satin ribbons 2.5 cm wide with buds on a cord.
For the manufacture of gum you will need materials:
- satin ribbons 2.5 cm wide dark and light pink.
- scissors.
- glue gun.
- a needle with a thread in the color of the ribbons.
- a satin ribbon 1 cm wide in green.
- hair tie medium size.
- three shiny beads.
- two wooden balls with a large hole.
- a large needle for ribbons with a large eye.
- a little thick fabric to match the colors.
- lighter.
The decoration consists of two roses with a diameter of 5 cm and two buds hanging on cords, and they are 3 cm in diameter. Let's start with the bud. We take a dark pink satin ribbon and cut off 5 strips of 5 cm each. But the ribbons Green colour we take 4 strips of 5 cm each. And for the cord we cut 30 cm. For it, you can use a tape 0.5 cm wide.

We take a pink strip, expand it along the length, face down. We bend a little of the upper edge towards ourselves, press it with a needle. Now we need a large needle, we place it on the upper corner with a hem, at an angle of 45 degrees.

And starting from the very corner, we scroll the tape along the needle until the upper corner of the twist is in the middle of the strip. We take out a large needle, and a small one in the color of the tape, fasten the twist along the bottom edge with small stitches. In the opposite corner we do the same twist.


Pulling the thread, we slightly connect the resulting two bundles to each other, fix it.

We unfold the resulting petal on the front side and straighten it a little.

In this way we sew 4 petals for a rosebud.

We twist the fifth petal in a different way. We arrange the strip along the length from the wrong side. And we bend the upper edge towards us along the entire diagonal of the strip.

And we twist along the entire length, and fix the resulting tube.

We use such a tube-shaped blank as the base-middle of the flower. And with a needle and thread, we begin to assemble the bud. We apply one petal to the middle and fix it.

Alternately, we continue to connect the petals, placing them in a circle, fixing with a needle and thread.


But do not forget that our decoration has two buds.

Now let's start working on the roses. For one flower, we take 2.5 cm ribbons, but you will need 10 pieces 5 cm long, 5 pieces each of a dark and light shade of pink. We twist them in the same way as petals for buds. We make the middle tube dark.

We start assembly. Tube and 4 petals dark shade we'll use it first. And then sew the rest of the light petals.

In this way, two roses were obtained.

It's time for green ribbons. For two buds, the mode is 8 strips 5 cm long. And for two roses there will be 8 pieces of 6 cm each. First, we make individual leaves in the kanzashi style. Take a strip and fold it in half, right side inside.

We place the fold of the strip on the left side of ourselves, and we will start cutting on the right side. We start from the bottom corner, directing to the opposite upper corner, not reaching the 3 mm fold. And we connect this section with a lighter.

We turn it right side out and get a bag with a small hole in the bottom corner.

Now we fasten 4 leaves together at the bottom of the bag with a thread in the color of the tape.

And on the wrong side, we sew the side edges of the bags of neighboring leaves.

It turns out a blank sewn in the middle on the wrong side and with four sharp corners.


We take a bud and connect it with a leaf blank with a thread, leave a tail on the front side for further work.

We also make a lace for the bud. We take thin ribbon 30 cm long and a wooden bead.

With a ribbon needle we wrap the bead with a green ribbon, leaving two tails in one direction.

Alternately, each piece of tape is twisted with your fingers in one direction. Then we connect both twists together, relax a little and they twist together with each other, making a beautiful tourniquet.

We sew this blank to a bud with leaves left with a thread. Now the bud on the cord is completely ready, but do not forget that we have two buds.

Now we take an elastic band for hair and sew a small strip of dense red fabric to it.

For the complete assembly of the decoration, all blanks are assembled. It remains to add 2 circles of dense red fabric with a diameter of 3.5 cm. And three more shiny beads, as well as a few triangles cut off from the green ribbon for the leaves.

Let's start the assembly. We take one red circle and with the help of a glue gun we fix two buds to it by the edges of the cords. And the places of gluing are closed with green corners.
Evgenia Smirnova
To send light into the depths of the human heart - this is the purpose of the artist
Content
Modern needlewomen make such skillful jewelry that one can only be surprised. They are able to make a hair ornament that will emphasize the beauty of the hairstyle, in a few different techniques. Satin ribbons for elastic bands are considered a convenient material, because you can create from them from a flower to a decoration for a beam using simple techniques.
How to make rubber bands from satin ribbons
Craftswomen are able to make rubber bands with their own hands from ribbons in several techniques, which, upon careful consideration, become quite simple. The main thing in this business is to learn the basic skills, follow the schemes and master classes and use your imagination to make it happen. beautiful decoration, characterized by individuality and spectacular appearance.
The basis of the manufacture of elastic bands is the technique of weaving, folding and collecting elements into one large pattern. It is better for beginner craftswomen to take basic skills as a basis, learn them, and then start to complicate. Even simple rubber bands can look spectacular on a girl's hair if they are skillfully decorated. Options for decorating finished products are embroidery, weaving, beads, beads, sequins. You can try the most different variants decorations to make beautiful decorations.
The materials for the manufacture of rubber bands are satin ribbons of different colors and shades, beads, beads, decor elements. Of the auxiliary tools, you will need textile glue, scissors, a glue gun, a fire source (lighter candle) and skillful hands. Sometimes craftswomen take a ready-made rubber band bought in a regular store and decorate it in their own way. In this case, you will need a base where the elements will be attached - cardboard, metal hairpins, plastic crabs.

Elastic bands from ribbons using the kanzashi technique
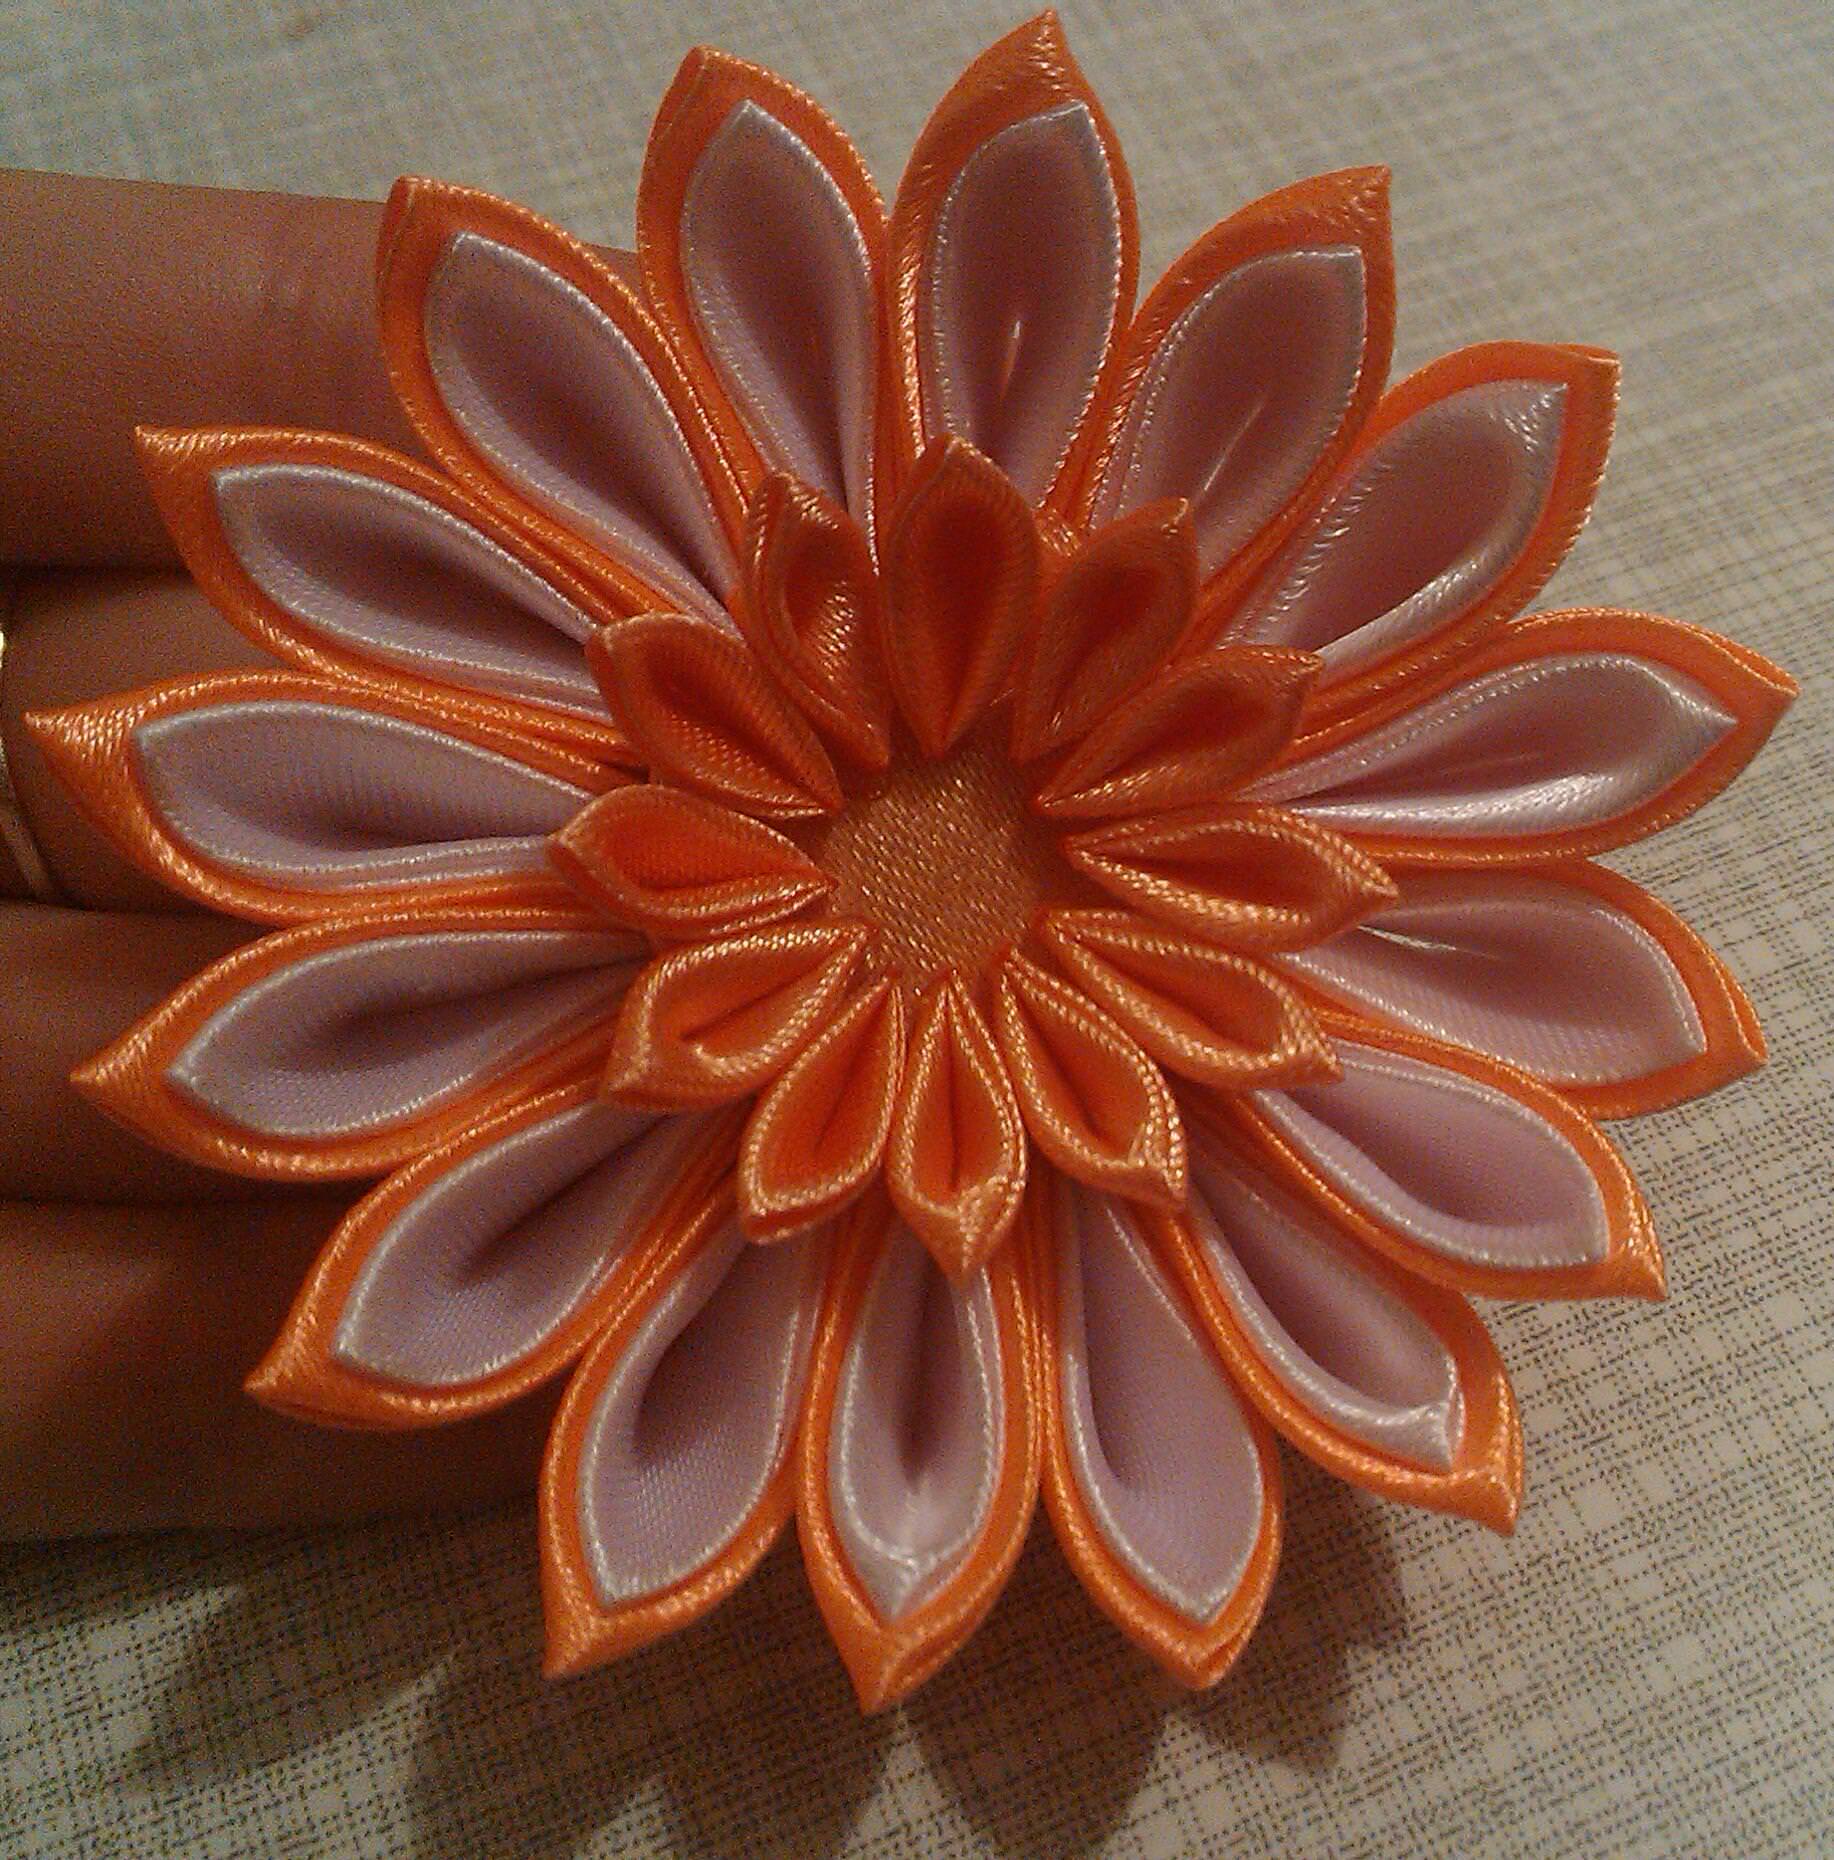
A well-known technique for creating elastic bands from satin ribbons is the Japanese art of kanzashi. To make beautiful children's accessory for hair resembling a dahlia or chamomile, girls need to follow the master class:
- From a satin or silk cut, make 16 square patches 5 * 5 cm in size, run along the edges with a lighter so that the threads do not come out. Repeat for the other color (inner petals).
- For the outer row of petals, bend each square diagonally, repeat, fire over the corner. For the inner row of petals, the squares are bent diagonally three times.
- Fold the smaller workpiece inside the large one, glue it.
- Make 12 single-layer blanks for additional decoration.
- From thick cardboard cut out 2 circles with a diameter of 3.5 cm and 2.5 cm, glue over with a cloth.
- Glue each two-layer petal to a large base in a circle. Repeat for the second tier. Glue single-layer petals to a smaller base. Glue 2 bases together.
- Decorate with beads, glue the resulting flower on a hairpin or crab.

Elastic bands for hair from ribbons of different widths
Do-it-yourself rubber bands from satin ribbons made of material are effective and voluminous. different widths. There is a master class for making an accessory:
- Cut out a rectangular blank 9 * 16 cm from cardboard, draw horizontal line in the middle. Wrap ribbon around it.
- Remove the skein without damaging the coils, stitch the middle, pull it off until a bow is formed.
- Repeat the technology for making a bow from a different material and a narrower ribbon.
- From a fabric of a contrasting color, cut out pieces of the same length and width as the resulting bow, singe the edges.
- Collect all the elements on a string.
- Cut out a cardboard circle, cover with a cloth, sew to the rubber band.
- glue gun glue a bow on a circle, decorate with small beads, rhinestones, buttons or pebbles.

Elastic band on a bunch of satin ribbons
To make rubber bands from satin ribbons with your own hands, decorating a bun-bun, girls will need to follow the step-by-step instructions
- Cut 6 pieces of green ribbon 4 * 2.5 cm into a dome, singe from 2 sides to create a wave - these will be leaves. Bend the bottom edge in two places, glue in the center to get a concave even part.
- Cut 12 pieces of white ribbon 4*2.5 cm and 5 pieces 3.5*2.5 cm in a semicircle, singe, glue into a droplet.
- Glue 5 blanks together by overlapping each other, decorate with stamens.
- Repeat for 14 rose petals from 4.5 x 2.5 cm pieces.
- Round off the first layer of white details, glue the remaining petals, make the second layer around the circle from pink elements. Glue on the leaves.
- Make 5 similar blanks.
- Bend 4 pink segments 10 * 5 in half, glue the ends with a fold, connect with a bow. Repeat for 2 white blanks 9 * 5 cm.
- Fasten 2 white ribbons 8.5 * 5 cm and pink 9 * 5 cm with a white overlay on the pink layer, form a fold, decorate the bottom with beads. Glue the bow, masking the middle.
- Glue felt circles with a diameter of 3.5 and 2.5 cm to the back of the bow and flowers, sew all the elements onto the sewn lace elastic. Decorate the bun.

Ribbon bands with bows
Bow decorations look spectacular on the hair, which can be made by following the instructions:
- Take 2 ribbons 2.5 and 0.8 cm wide, 1 meter long; 1 ribbon 8 mm wide and 50 cm long.
- Make 2 cardboard templates in the form of the letter P, 6 and 8 cm in size, cut off the edge of the wide ribbon along the oblique, lay it on a large template so that the cut and 2 folds are from each edge.
- Fasten the ribbon in the center with pins, sew a “needle forward” seam, assemble, fasten.
- Repeat for the second bow, sew together, attach a bead in the middle.
Check out the tutorials on how to make.
DIY ribbon hairpins with photo workshopsDIY ribbon hairpins with photo workshops
IN Lately, become popular, make hairpins from ribbons with your own hands, as well as elastic bands and braid pigtails with ribbons. In such needlework, the kanzashi tsumami technique from satin ribbons helps. Our master class, as well as video tutorials, will be devoted to creating kanzashi tsumami hair ornaments. 


We make a hairpin from ribbons
We will start our master class by creating kanzashi hairpins for beginners. To do this, we need such accessories, namely:
- cuts of satin ribbons, you can also rep ribbons, orange and white;
- decorative material in the form of a rosette and a black bead;
- scissors;
- textile glue;
- fire candles or lighters;
- simple hairpin.
The scheme for creating a hairpin is simple. Take the ribbons and put markings on them with a simple pencil, 5 by 5 in size, in the amount of 16 pieces. We do this procedure with a white ribbon. Cut everything into squares and pour fire over candles or lighters so that the threads do not spread, and you could make kanzashi tsumami. Look at the photo, here's what you should get. 

For such a hairpin, we will make pointed petals. This technique is very common and on video, on the Internet, you can easily find it.
Pointed double petal, make it orange, inside it, there will be White color. Take the orange square and bend it diagonally, then one more time and fire over the corner. Fold the white blank also diagonally, only three times. Look at the photo to see what happens. 


Attach the white blank to the orange one and make a petal. Remove the end and excess material and scorch with a flame. We should have 16 such elements.
To decorate the hairpin, we need a few more pieces of simple single-layer blanks. Do from a piece of tape, exactly the same actions that we did above in the text. 
Simple pointed petals are made in the same way as two-layer ones. Let's not repeat ourselves so as not to waste time. Such a process can be seen in the video or photo in the text. 
We need twelve pieces of such blanks.
Our master class continues, and we begin to make with our own hands, the main part of the hair clip. We cut out a circle with a diameter of 3.5 cm from thick cardboard and stick a tape on it. In the end, it should form, such an element. 
Now let's move on to connecting all the elements together. Take double pointed petals, and after smearing them with glue, we attach them to the round base. We do it in a circle. Do this technology, clearly along the edge, attaching tightly all the petals. This should be the first tier of the flower, as shown in the photo. 


Next, you need to cut out another circle with a diameter of 2.5 cm and also paste over with satin. Then, in a circle, glue simple petals. In the end, you should have such a do-it-yourself tsumami kanzashi blank. 


This small flower, it is necessary to coat with glue from the wrong side and carefully glue it to a large bud. 
Our master class is coming to an end, it remains only to decorate the flower. For this, we need a socket with a black bead. 
Drop a drop of glue on the rosette, and then on the bead, paste this decoration into the center of the flower and press it with your finger. Look what a kanzashi tsumami we got. 
Now take a simple hairpin, crab or elastic bands, on which we will attach a flower.
We apply glue on a hairpin or crab, and press the flower to it, holding it a little with our fingers, for complete solidification. 


On the finished accessory, spray a little hairspray.
This master class for beginners is fully completed. In the same way, you can decorate hairpins or elastic bands. We hope that our video tutorials will be useful for you, and you will be able to create new hair jewelry with your own hands.
Kanzashi hair band
Such interesting master class, will be devoted to the creation of elastic bands using the tsumami kanzashi technique for hair. For this, we will need the following materials:
- narrow blue and blue ribbon. For use, it is better to take satin ribbons, but you can make an elastic band from rep ribbons;
- scissors;
- candle or lighter;
- textile glue;
- piece of satin fabric;
- rhinestones;
- regular gum or crab.
These rubber bands are for, we will make two-color ones. To do this, take the blue and blue ribbons. One is two meters long and the other is one meter long. Blue material, cut into cuts of eight centimeters, and blue material, into cuts of seven centimeters. 

Fold each flap in half so that you get an overlap and pour over with fire. 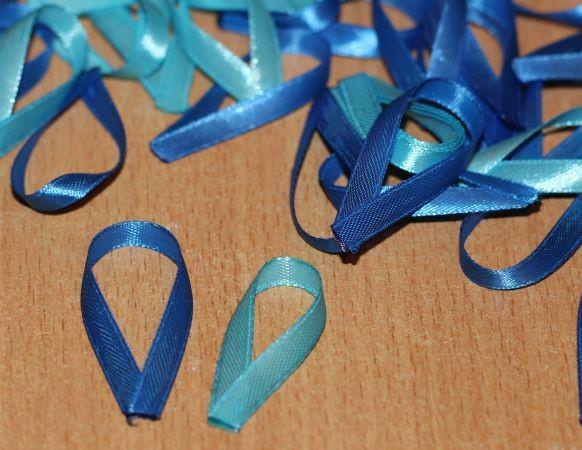
From a piece of cloth, it is necessary to cut a circle with a diameter of 2.5 cm and douse it with fire. Then, we begin to glue the blanks, symmetrically to each other. 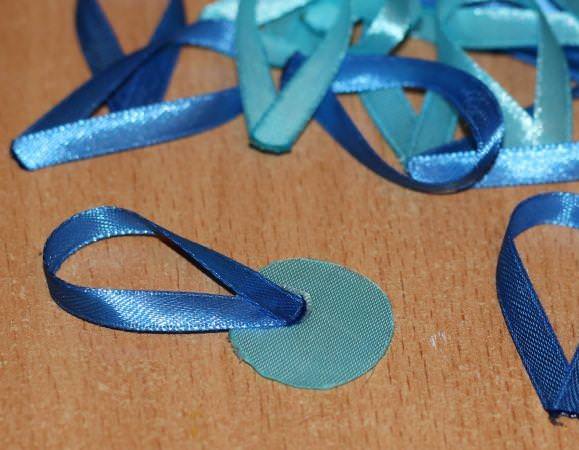


From the first to the third tier, the color of the petal will be blue. The next two tiers, you need to create a blue tint. Trim the topmost elements to make them shorter. 
In the middle of our kanzashi tsumami flower, which we made completely with our own hands, we glue beautiful rhinestone, shaped like a heart. 
From the wrong side, we attach a simple elastic band for or a crab bought in a store for little money. Before that, make a small mount for her. 

Our simple master class on creating an elastic band is completed. We hope that these lessons for beginners on the kanzashi technique impressed you. The same method is used when decorating hairpins. Detailed video can be viewed on our portal.
Master class for weaving a ribbon into a braid
Since ancient times, shiny and beautiful hair, counted as a sign of beauty in women. A braid with a ribbon was considered a symbol of chastity and wisdom. If your hair is well-groomed and shiny, then you are a wonderful hostess.
Nowadays, braids with ribbons have not lost their uniqueness. On the contrary, they have acquired many admirers. How to weave a ribbon into a braid, every representative of the weaker sex asks herself a question when she is going for a holiday or just to work.
Our lessons will help you master the art of weaving braids with ribbons.
Braids woven with satin ribbons make a woman more mysterious and tender. Especially interesting, the tape looks on dark and long hair Oh. If you don’t have a suitable ribbon at hand, you can create a thread with beads with your own hands. Such an accessory will turn simple hairstyle in the evening version. 
cook everything necessary materials to create a beautiful hairstyle, such as:
- crest;
- satin ribbon;
- crab and hairpins;
- decorative hair material, such as kanzashi tsumami flower.
You can insert the tape into a simple pigtail. If you want to create a bow at the end, then take a material that is longer. So, let's start our lessons:
- comb your hair well and make a ponytail with an elastic band;
- tie a ribbon on the elastic to hide it under you. The resulting edges of the tape should be the same length;
- divide your hair into three buns, and connect the outer strand with a ribbon. Then, weave a pigtail, as always;
- at the end of such work, tie an elastic band, and make a bow on top of it.
A hair style like a braid with a ribbon can be braided not only on the back of the head, but also on the sides or on the crown. If you have very long hair, braid around your head and secure it with a hairpin.
Now let's weave french braid for beginners, also decorated with ribbons. Let's start the lessons:
- comb your hair and make an even parting. Braid the braid from one side, and then from the other;
- make three bunches of hair on top, grabbing auxiliary strands from the face and start weaving french braid. When your weave reaches the neck, secure it with bobby pins. On the other side, do exactly the same actions;
- connect the braids together and decorate with a ribbon. Then, start weaving a simple braid with a ribbon.
Our wonderful master class is completely finished, with the help of your imagination, you can weave beautiful braids, decorating them with ribbons of your choice. An interesting video on how to weave braids with ribbons can be viewed on our website or on the Internet.
Video: DIY kanzashi hairpin
Comments
related posts:
 DIY hairpins from beads in a master class (photo)


