DIY modular origami carnation flowers. How to make a carnation out of paper with your own hands
For folding flowers in the origami technique, the basic forms “double square” and “double triangle” are most often used.
However, they are far from the only of the basic forms. One of them - the so-called "frog" for beginner origamists is the most difficult.
It got its name from the classic inflatable frog figurine, which is made up of this basic shape.
The basic form " frog"It is also used when folding modules for carnations, invented by a twelve-year-old schoolboy Dima Proskurin.
His “carnation” is assembled and glued together from several such basic forms, in which the position of the “legs” is only slightly changed. Sepals are formed from a separate square for carnations.
1. We start with a flower. Fold the basic "double square" shape. Open and flatten the pocket.

2. Check the result and open the remaining three pockets.

3. Lines of inflections divide the corners in half.

4. Pull up the edge, bending the paper along all the indicated lines at the same time.

5. Check the result and repeat steps 3 - 4 with the rest of the edges.

6. Drop down the four triangles and base form"frog" will be ready. Turn it around.

7. Bend the top two "legs" inward.

8. Repeat with the other two legs.

9. Again bend the two legs inward so that their sharp corners look up.

10. Repeat with the other two legs.

11. The petal module is ready. Make six or eight more of these modules. Glue them together by folding in half and joining the halves of the dotted surfaces together.

12. The sepals are made from a regular hexagon, which must be prepared in advance. Mark all the indicated lines on it.

Do-it-yourself paper carnation is a craft that will decorate any interior and add coziness and color to the house. A few of these carnations can replace a whole bouquet of fresh flowers. The main materials for creating products are corrugated paper and paper napkins. Perhaps at first glance it seems that such a carnation is difficult to make on your own. But this is a big delusion, the origami technique, thanks to which products are created, is very easy to work with.
This masterclass consists of the best descriptions and a photo, will definitely come in handy for everyone who is not indifferent to needlework.


Delicate carnation from napkins
This manufacturing technique is very simple, so such a flower can be made even with a child.
Necessary materials:
- paper napkins of several colors;
- pencil;
- marker;
- compass;
- sharp scissors;
- stapler;
- tubules for drinks;
- plasticine.
First you need to take a few paper napkins and put them on top of each other. The more napkins, the thicker and more magnificent the flower will be. Then you need to fasten them in the center with a stapler. Use a compass to draw a circle with a diameter of 8 cm on napkins and cut it out. If there is no compass, you can use a glass or cup. Here are the carnation petals. Mark the edges of the napkins with a marker.
Then, in the center of the circle, make a hole for the stem with an awl. Insert a cocktail tube into it.

Fix the napkins on the tube with a small piece of plasticine.


We work with corrugated paper
Roses made of special corrugated paper are very beautiful and elegant.
To make a beautiful carnation, you need to take:
- corrugated paper (red, white and green shades);
- green tape;
- wooden skewers;
- wire;
- glue;
- sharp scissors.
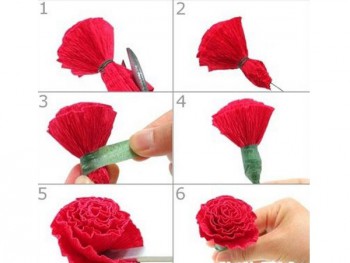
From red corrugated paper, cut out four squares with sides of 10 centimeters. Fold it in half twice. The square that turned out, 5 × 5 cm, bend diagonally. Next, lift the lower right edge and cut off the excess paper at the top so that a triangle comes out. On the upper side of the triangle, make teeth with scissors. Then unfold it in some places and make cuts to the middle. Thus, make three more petals for the carnation.
Now take a skewer and glue one end with red paper. Make a hole in each of all the petals and put it on a skewer, seal it. Next, straighten the leaves and lift up, fixing the bud as in the photo. For the stem of the flower, wrap the skewer with green ribbon.
It's time to start making carnation leaves. To do this, take green leaf and cut off four strips: two pieces of 10 cm and two of 5 cm, 3 cm wide.

Next, take each strip and fold in half to trim the edge of the paper. We got beautiful leaves. Then cut the wire along the length of the leaves with a margin for attaching to the stem. Put it in a piece of paper and glue a small piece of white paper. Fold all the leaves and attach them to the stem: small at the top, large at the bottom. Such a carnation will decorate your apartment wonderfully!


Video on the topic of the article
Similar articles:
The white dove is a bird of the world, which is known to absolutely everyone and is associated exclusively with goodness, hope and love. Image of this bird with...
What do lovely ladies just not come up with to look bright, beautiful and unique? Among the huge selection of ready-made jewelry and accessories, many fashionistas ...
Carnation - beautiful flower, which has more than three hundred varieties. By the way, earlier in England and France, the carnation was the flower of the upper classes, in Belgium it was made the flower of ordinary people, and in the era of the USSR, not a single parade and demonstration could do without a carnation. Making a carnation out of paper is very simple if you follow the simple instructions on the picture diagram.
Origami scheme: Carnation from a piece of paper
(Click on the image to enlarge the image)
I. Flower

1. Fold the square sheet along the dotted lines to make creases and turn back.
2. Turn over the sheet.
3. Fold along the dotted lines.
4. Fold into folds, as shown in the picture.
5. Now carefully align.

6. Fold along the dotted lines to the center line.
7. Cut out the patterned top of the flower with scissors.
8. Fold the product along the dotted lines and then open the flower.
9. The flower is ready
II. Stem

1. Fold a square sheet in half to create a crease.
2. Fold along the dotted lines to the center line.
3. Fold along the dotted lines to the center line.
4. Open the pockets in the direction indicated by the arrows.

5. Align both pockets as shown in the picture.
6. Make a stepped fold of the upper part of the product and fold the lower part forward along the dotted lines.
7. Fold back along the dotted lines.
8. Fold in half.
9. Gorgeous carnation is ready.
Lesson objectives:
1. Teach children to convert the basic form into different crafts, develop variability of thinking.
2. Develop the skills to perform accurate, neat folds.
3. Practice the implementation of the basic shape of the "triangle".
4. Cultivate attention, perseverance.
5. To develop a steady interest of children in the art of origami.
Tasks:educational: to form knowledge about the heroism of our compatriots during the Great Patriotic War, ideas about the symbols of Victory; to teach how to perform the “carnation” craft using the origami technique; developing: develop the ability to plan their action in accordance with the task; vocabulary enrichment;educational: to cultivate deep respect for the heroic past of their country, to cultivate a humanistic attitude towards the elderly, to cultivate sincerity and responsiveness.
Methodical methods:
1. Verbal - questions, explanations, teacher's story.
2. Visual - monitoring the sequence of work.
Materials for the lesson:
Square sheets of colored paper for each child, 6 sheets of red and 2 green 10 by 10 cm; 1 sheet A 4 and 1 rectangle 20 cm by 5 cm green
Preliminary work: The day before, students in grade 4 cut out squares of red and green colors from A 3 sheets
Demonstration material: Presentation "Carnations - flowers of winners"
Lesson progress
/The lesson is held on the eve of the Victory Day/- What holiday will come soon? (Victory Day, May 9)
This holiday with gray hair at the temples
This joy with tears in the eyes ...
70 years have passed since the Great Victory Day - May 9, 1945 ... Unfortunately, every year there are fewer eyewitnesses and participants in those terrible military events. But the memory of the feat that they accomplished is immortal. The memory of those people who wrested this Victory at the cost of their own lives will live in the hearts of many more generations to come. To date, we have 1 veteran of the Great Patriotic War Lidzhiev Kondrat Orgadykovich and 3 home front workers Sandzhieva Syakhlya Kopkaevna, Serkisheva Dovar Goryaevna, Mandzhieva Matsak Chulchaevna
You can express your deep gratitude and respect to our dear veterans on Victory Day different ways. But on this symbolic day, the main thing for our old people is to know that their children and grandchildren remember about them, about their feat. Flowers are the best sign of attention and respect.
What flowers would be most appropriate in a bouquet for May 9th?
What is the Victory Day associated with?
In the list of such symbols as the Eternal Flame, Victory Parade, Salute, St. George's Ribbon, occupies not the last place.
Much blood was shed during the military battles of 1941-1945. The red carnation is the symbol of this innocently spilled blood. That is why this flower is given a place of honor on May 9 - after all, it is also a day of remembrance for all the fallen.
And also a red carnation is the personification of courage, bravery, victories and overcoming difficulties. they talk about the admiration of a person, that we will always remember him. After all, we admire our veterans and owe them a lot that we now have!
Today in the lesson we will make origami carnations and give them to our guests on May 9th.
Before starting work, let's see the presentation "Carnations - Flowers of Winners"
Fizminutka.
Show teacher finished crafts
The teacher tells the children that we will make the flower itself from red squares, from green squares - a cup of a flower, from A 4 - a stem, from a rectangle - a leaf.
Let's start making petals. We take a red square, fold it in a “valley” diagonally. the basic shape of the "Triangle" was obtained. Fold the resulting triangle in half. We turn over. Fold the top corner up. Side to fold line. We've got our first piece. From the rest of the red squares we make the same blanks. For a cup of a flower from green squares we make such blanks
And now guys, it's time for our blanks to turn into a beautiful flower. We take two blanks in our hands, put the middle of 2 blanks into the pocket of the 1st. The 3rd middle of the workpiece into the pocket of the 2nd. Align from the bottom. Glue the green cup to the flower. With us, this is the first side of the carnation. We do the other side as well. Now the stem - from sheet A 4 we turn the tube. We flatten the tube on one side and glue it to the wrong side of the green cup of the flower. Then glue the second side of the carnation. And the last we cut out a leaf from a rectangle and glue it to the stem.
So, guys, our triangles turned into a beautiful flower - a carnation.Exhibition of student work. Poetic montage for Victory Day. Song "May 9"Summing up the lesson
What did you learn about yourself in class?- What did you learn in class?- What is your mood now?12. Workplace cleaning

Carnations are beautiful decorative flowers that delight our eyes in parks, squares and home lawns. There are many different varieties of this flower, but only three can be called popular: large, mini and dwarf.
In this master class, I will show several options - how to make do-it-yourself paper carnations with step by step photos and video. Carnations are most often presented as veterans, as well as for grandparents' birthdays.
Also this flower will look great on voluminous applications, made by own hands for mom for some holiday, for dad for Defender of the Fatherland Day, for grandfather by May 9th. Once you see the raft of your creativity, you are sure to find a worthy use for it.
What is summer without flowers?! So we boldly take corrugated paper, which can be easily replaced with plain napkins. From such a light and thin material, we can easily get a delicate flower with bright red petals.
In addition to corrugated paper, green semi-cardboard will come to the rescue. You can’t do without it here, because you need to add a stem, receptacle and leaves to the bud.

Necessary materials:
- red corrugated paper;
- green semi-cardboard;
- scissors;
- pencil;
- glue.

Manufacturing steps:
1. Draw an even circle on the green semi-cardboard. We cut along the contour and get a template that should be transferred to red corrugated paper. To do this, draw the outline of the template five to six times with a pencil.

2. Cut out all the details along the contour. We get ready-made elements for creating petals.

3. We put all the circles of corrugated paper in a pile.

4. Bend the lower part up in half.


6. With scissors we create many cuts along the upper round edge.

7. Open the blank once and get a clove bud.


9. Glue the receptacle to the center of the red carnation bud. Next, we attach the stem, and to it - two leaves.

10. All layers of corrugated paper in a carnation bud should be carefully spread to obtain lush petals.

11. So a cute corrugated paper carnation flower is ready, where half-cardboard was used as an addition.
These have a flat look, so they are ideal for creating some kind of "zest" on the front of the postcard.


This variety of carnations can be immediately distinguished from others due to the fact that they have only one large flower on the stem. This is what we will learn to do from the available material.

Necessary materials for cloves:
- red corrugated paper;
- teip tape tape;
- wire;
- scissors;
- glue;
- pencil;
- ruler.

Manufacturing steps:
1. To create a carnation bud, you need to take red corrugated paper. Also, this material can be easily replaced with crepe paper or plain plain napkins.
We measure the dimensions of 20 x 7 cm on the strip. Cut it out and get a long strip. Bend the top down 2 cm.

2. Cut off a small piece from the floral wire. Attach one end to the right side of the paper strip. You can immediately prepare a few more blanks in the form paper strips to immediately get a whole bunch of red carnations.

3. Now we will make small teeth along the entire upper edge with small scissors with a sharp end.

4. We begin to twist the red strip around the wire. We create several folds to get a three-dimensional flower.

5. Glue the end of the corrugated paper to the wire. As a result, we get a magnificent clove bud with small cloves.

6. We create a receptacle at the bottom of the craft using a green teip tape, which should be tightly wrapped around the bottom of the red corrugated tape. Next, we move on to thin wire.
To give it the necessary texture and color, you should grab the teip tape again. We wrap it tightly around the entire length of the wire. Also, if desired, large leaves can be cut from it to the stem of the flower.

7. As a result, we will get a cute crepe paper carnation flower in a short period of time. We create a couple more of these flowers in the same way and get a cute bouquet for any holiday.

These flowers are artificial, so they do not need water and careful care. So they will decorate the interior of the room for more than one week and even more than one month!

If you want to know the easiest way to create a crepe paper carnation flower, then this article is exactly what you need. The resulting flower will be bright if you take suitable paper, airy if you use enough layers, small or large as you wish. In fact, there is nothing difficult in such work.

To learn how to make a lush flower, prepare the following materials:
- corrugated paper - bright or white, pale pink;
- scissors;
- cardboard circle template;
- thin wire or thread with a needle.
How to make a carnation with your own hands in stages
Prepare a minimum weight corrugated paper roll. In the process of work, you need to make thin layers, crumple them, so it is soft paper fit better. Cut the strips, adjusting the width depending on the size of the bud you want to make. Cutting off the desired strips, you can move along or across the roll, in this case it does not matter.

Fold one or more strips in a zigzag pattern to make a square layered piece. Our task is to study the most easy way flower modeling, so all layers will be processed together at once, and not separately. This will save a lot of time.

Holding the folded tape in this position, use a thin wire or needle to make 2 holes clearly in the center. Thread the ends of the wire into the holes obtained and twist or sew with threads.
Thus, you fasten all the layers at once. Glue in this case is also not needed. The above method of fastening is faster and more reliable.

Attach a cardboard circle template on top, draw with a pencil or immediately on the eye, cut out a circle. Even if you get a slightly wrinkled edging, this will not cause any difficulties. This is exactly the effect that should be achieved.

Make random small cuts along the edge of each circle, moving the scissors about 0.5 cm inward. It is also allowed to make the outer edge wavy.

Now it remains to model the flower. Its splendor directly depends on the number of layers used. Starting from the top circle, begin to lift each layer up and push through with your fingers. Corrugated paper holds its shape well, so after creasing it will not straighten out. Collect the middle and continue this operation further.

So gradually process all the layers. Raise one circle up, press down from all sides. Circumferential notches will provide a lighter and more believable construction. After processing the last layer, you will see a weightless ball in front of you.

A beautiful carnation is ready. Her petals are tender and quivering, like in a real flower. Make a stem for it or glue it on paper.

04. Simple origami carnation
05. How to make voluminous carnations from napkins with your own hands


