Crochet Christmas balls. How to tie balls on a Christmas tree with your own hands
Balls in an openwork mesh
 Interestingly, the knitted balls themselves can be completely different. For example, it can be an openwork mesh worn on ordinary balls. Imagine how old toys will be transformed! All their scratches, chips, scuffs will disappear - the mesh will skillfully mask any flaws. It can be crocheted from snow-white thin threads, which are perfectly emphasized New Year theme. But you can also use absolutely any colors and types of threads - to match the balls or in a single color scheme. In a word, create! Such products are made very simply and do not require much time - just follow the knitting pattern and you will tie your old balls, breathing new life into them.
Openwork knitted balls
The next option is even more unusual and beautiful balls. They differ from the previous ones in that there is no ball under the mesh. No - emptiness! Such openwork and airy knitted balls will look just great on your Christmas tree. You can make them in different ways. At  one method uses starch, sugar, and gelatin to allow the bound strands to take on the desired shape. But this is a rather troublesome method, so it will be easier to use a small balloon. That is, in fact, this method comes close to the previous version, except that at the end the ball is removed and just a beautiful empty shell remains. Such balls can be decorated with additional elements - for example, flowers suitable color or whatever else you like. Of course, they can be of various shades, they can even include several colors. And here are openwork knitted balls made of thin acrylic or cotton threads white color look just incredible. They can decorate not only the Christmas tree, but also the rest of the room. New Year mood guaranteed! Such balls are usually made in several stages. First, two halves of the ball are knitted, then they are connected by a row of loops. Then the balloon is used again - it is pushed inside and inflated to straighten the threads well. To make such a knitted ball hard and durable, it can be starched or simply dipped in diluted PVA glue.
Knitted balls
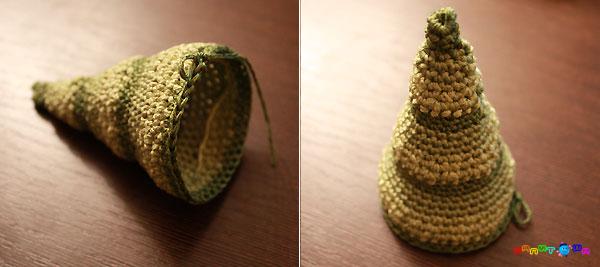
 And one more version of hand-made knitted balls for the Christmas tree, which I would like to talk about. They are most similar to ordinary balls, but their main difference is that they are completely knitted! That is, there is no longer an openwork mesh, and not even knitting a shell with holes. Here is a ball tightly knitted from threads of one or more colors. It can be both thin threads and thick ones - the latter will be faster and more convenient. You can combine colors and come up with something new with this option! It is best to place foam rubber inside such a ball. Knitted Christmas decorations– creative, interesting and attractive
Knitted Christmas toys
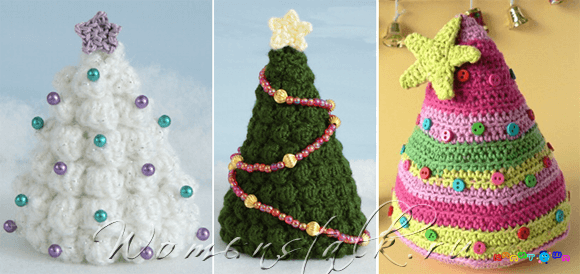
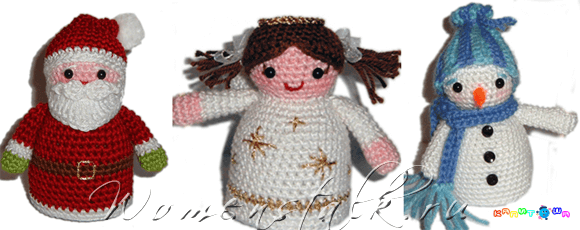
 Since we have already talked about knitted balls stuffed with foam rubber, it is worth remembering knitted Christmas toys that can be made in exactly the same way. Think how much you can knit or crochet! Christmas trees, snow maidens, bells - in new year theme so many things. Crocheted Christmas decorations can be hung not only on a Christmas tree, but also on keys or a bag - it will look fresh and original!
PACKAGE OF IDEAS


Why not move away from the usual ready-made Christmas decorations and knit Christmas balls on the Christmas tree with their own hands. For example, the ones you see in the picture. These Christmas balls knitting thought up and connected by braindead, the author of the blog "General Hogbuffer". It will turn out unusually stylish and comfortable! The designer offers everyone completely free of charge two different knitting patterns Christmas balls.
We also really liked these balls on the "Handmade Runet" and we decided to tie them together on our new year marathon vkontakte this week, November 28th to December 4th. Join. waiting for you!
The author of these Christmas balls with knitting needles has published two options for free patterns with descriptions, you can download them in PDF format on the Ravelry website on the page How to knit Christmas balls. Patterns for Christmas balls with knitting needles are very simple and understandable without knowing the language, in addition, we will definitely analyze them one by one as part of a collaborator, right on this page. So, let's get to work.
What materials do we need to work?
For work, we need to prepare:
Hosiery needles 2.5 mm (5 needles)
Remains of yarn (approximate density 100 gr about 400 m), two different colors(maybe more)
32 sts x 42 rows = 10 x 10 cm.
Helpful Hint #1: it is not always possible to find a plastic ball of the right size in the store. What if it is a little more or less? You can play around with the yarn, pick up a thinner / thicker yarn, or you can also with the size of the knitting needles (a size larger / smaller).
Helpful Hint #2: it is not always convenient to knit the initial rows from a small number of loops on stocking needles. You can, of course, look in a needlework store for special short hosiery knitting needles for such cases, or you can use ordinary toothpicks.
We knit Christmas balls with knitting needles according to the description # 1 from General Hogbuffer
According to the first free description, you can link four options for balls. Description can be found. All balls are knitted exactly the same, the only difference is in the jacquard pattern, which is located in the middle. Each ball consists of three parts: a section of increases (the beginning of the ball), a straight section (without increases and decreases, where the pattern is knitted) and a section of decreases (we finish the ball).
Rows 1-13: increase area
Starting row: Cast on 8 sts and evenly distribute on 4 double-pointed needles, 2 sts on each needle.
A convenient way to set the initial row with a hook: make eight single crochets into it, connect the ring with a connecting post. Then we crochet through the front thread of each single crochet one loop and transfer them to the knitting needle. View a photo-master class on the site Valentina.ru.
Row 1: from each loop of the initial row, knit two, one behind the front wall, the second behind the back wall of each loop (= 16 loops, 4 loops on each knitting needle).
Row 2: and we knit all even rows with facial loops according to the pattern (without increments).
Row 3: repeat on each needle: knit 1, inc 1 st (from broach), knit 2, inc 1 st (from broach), knit 1 (= 24 sts, 6 sts on each needle).
Row 5: repeat on each needle: knit 1, inc 1 st (from broach), knit 3, inc 1 st (from broach), knit 2 (= 32 sts).
Row 7: repeat on each needle: knit 1, inc 1 st (from broach), knit 4, inc 1 st (from broach), knit 3 (= 40 sts).
Row 9: repeat on each needle: knit 1, inc 1 st (from broach), knit 5, inc 1 st (from broach), knit 4 (= 48 sts).
Row 11: repeat on each needle: knit 1, inc 1 st (from broach), knit 6, inc 1 st (from broach), knit 5 (= 56 sts).
Row 13: repeat on each needle: knit 1, inc 1 st (from broach), knit 7, inc 1 st (from broach), knit 6 (= 64 sts).
If you need help on how to add loops correctly (how to knit two from one, how to add a loop from a broach), you can watch a video tutorial from the Peppy Hand channel " How to discreetly add loops when knitting "
Rows 14-26: straight section
We open the description, scroll to the very bottom, select the jacquard pattern we like (or take our own, the main thing is that it is divided by 4 or 8 or 16 or 32) and knit 13 rows straight.
Rows 27-42: Decrease plot
Row 27: knit straight without decreasing (this row is not included in the straight section because in the next row we will start decreasing and if you knit with jacquard, it is technical so as not to lead to a shift in the pattern)
Row 28: repeat to end of row on each needle: knit 6, 2 sts together (= 56 sts).
Row 29: and all odd rows are knitted with front loops without reductions
Row 30: repeat to end of row on each needle: knit 5, 2 sts together (= 48 sts).
Row 32: repeat to end of row on each needle: knit 4, 2 sts together (= 40 sts).
Row 34: repeat to end of row on each needle: knit 3, 2 sts together (= 32 sts).
The time has come to insert a polystyrene ball or other spherical object inside, then it simply will not fit. From this point on, further knitting must be done with the selected base inside, although this is not very convenient.
For those who decide to fill our blank with filler and not use the ball, you can wait a little more with stuffing, but it's best to start right now.
Row 36: repeat to end of row on each needle: knit 2, 2 sts together (= 24 sts).
Row 38: repeat to end of row on each needle: knit 1, 2 sts together (= 16 sts).
Row 40: repeat to end of row on each needle: 2 sts together (= 8 sts).
Row 41: knit straight.
If you do not plan to make a loop to the ball, we tighten all the loops and fasten. Our christmas ball needles ready.
If you want to make a ball with a loop so that it can, for example, be hung on a Christmas tree, continue to knit further.
Row 42: repeat to end of row: 2 sts together (= 4 sts).
Then we knit 10 rows with a hollow i-cord and fasten the loop.
The cord can be crocheted and knitted as you like. There are many videos on the Internet on how to knit this element, such as the tutorial video " i-cord edge finishing. Set and close loops in the way. i-cord. All about i-cord"from the channel" Knitting secrets from Irina Akman ".
Hooray! Our New Year's beautiful ball is ready!
Happy knitting!
Discussion of the article
Today I want to tell you how to knit about the New Year's ball. In preparation for the New Year, I decided to crochet not only and, but New Year's balls. This decoration on the Christmas tree diversifies New Year's decorations.
Just like crochet bells and snowflakes, crochet balls are quick and easy to make. To make such a ball, I chose pink threads and crochet No. 1.5. If there is, you can add Lurex,
A novice needlewoman can also crochet such a New Year's ball.
Description of work:
To begin with, I knitted eleven air loops. At the end of knitting such a chain, I closed it in a circle using a connecting post. After closing in a circle, I rise with the help of two air loops and then knit nineteen single crochets.

Second row I do it this way: first I do the lift with the help of three air loops and one more air loop. After that, I knit a double crochet into each previous single crochet and separate them with one air loop. I finish the row with a connecting post.
third row I perform it this way: I make a lift with the help of one air loop and knit one single crochet into each double crochet. And in each air loop I knit two single crochets. I finish the row as the previous one. The remaining rows are performed according to the above diagram.
After finishing knitting, I break the thread and follow the above pattern for the second half. When performing the tenth row, I connect with the first half.
After connecting the halves of my Christmas ball i put it in ordinary ball and inflate. After giving the necessary shape to my Christmas tree toy, I starch the ball and wait until it dries. Then I blow off the base and fasten a ribbon on the top of the ball - you can hang it on the Christmas tree.
With a sufficient number of hand-knitted Christmas decorations, such as and or, you can decorate your home in an original way.
If you are looking for a variant of an unusual Christmas tree decoration, then by all means use the tips from our master class on how to knit crochet christmas ball. The finished product will be openwork and weightless, it will add coziness to your festive decor. Handle such Christmas tree decorations with care, they are fragile like glass toys. In addition to openwork options, there are other ideas, for example, a ball can be knitted using the amigurumi technique or you can string beads on a thread first, then you get a bright beaded ball, plain or with a pattern.
Crochet Christmas ball
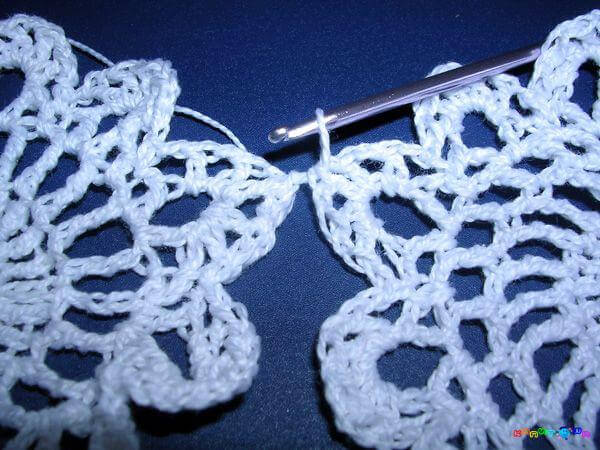
For our first master class, you will definitely need other round openwork motifs. If you decide to knit a small openwork ball, then it will consist of two circular motifs connected to each other.
A set of materials to make knitted Christmas balls crochet, we will need the simplest one, such New Year's creativity will not be a blow to the family budget, and some materials will certainly be found in your home.
- White strings "Iris" Russian production
- PVA glue
- Balloon not inflated (preferably round shape)
- Knitting tool of appropriate size

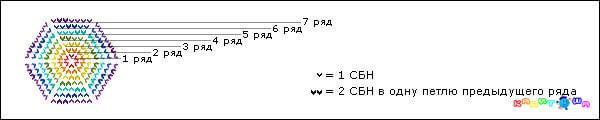
Now we need to connect two identical round motifs, following the diagram presented. You can use our version or find your own scheme that you like more. At the base of our motif there will be 12 air loops, so the central hole will be large enough to then push a deflated balloon into it.
Let's start by knitting the first motif: we collect 12 air loops and close them in a vicious circle using a connecting column. Now we rise to the second row thanks to three lifting loops. In the next row we will have 24 columns with one crochet (23 columns and 3 lifting loops at the very beginning). It is necessary to knit the columns into a ring, trying to make them as uniform as possible so that the loops are not too stretched or too tight.
In the next row we will have arches, they are knitted every two columns of the previous row. The arch itself consists of seven air loops. We knit seven loops, then skip two more columns from the base of the chain and knit a single crochet into the next column of the base. Next, we again collect a chain of seven loops, and again we close the arch with a single crochet. According to this principle, eight arches must be knitted in the third row. The same number of arches will be in the next row, but this time they will consist of nine air loops. The base of the arch should come out of the middle of the arch of the previous row; you can knit it not specifically into the central loop, but into the arch itself.

In the next row, each arch must be tied with double crochets: 11 columns in each arch without connecting air loops between each group of 11 columns.
The main part of the motif is connected and it remains only to make three bumps in the middle of each arch, and then knit chains of air loops between them to close the last row. Knitting a motif is not at all difficult, only three types of loops are used here, so even if you are holding the tool in your hands for the first time, you will cope with this task without any problems. The main thing is to follow the proposed scheme step by step, and you can also master it.
Now we need to make a second motive to get crochet Christmas ball, scheme for the motif, the same one is used, because we need the finished decoration to turn out to be a symmetrical round shape. For the second motive, the last row should not be knitted, it will be used to connect both received round motives.

Knitted Christmas balls crochet
We will get the simplest crocheted Christmas balls, patterns it is better to take elementary ones, for beginners, so that there are no difficulties in the process of work. This is a great opportunity to practice before doing more difficult work, larger balls.
Both round halves should be folded with the wrong side to each other, and then connected in a circle. Here we will knit like this - three columns with two crochets, then two air loops, here you need to follow the diagram and step by step pictures in our master class. Thus, having finished knitting these elements in a circle, we will combine both halves into one piece. After that, we need to give the resulting workpiece a spherical shape and fix the result.
It is necessary to pour PVA into a plate, if necessary, slightly dilute it with water, if the glue seems too thick for you - just a couple of tablespoons per 100 ml of glue. The resulting knitted blank must be lowered into the glue and left for a few minutes so that the glue soaks the threads properly. Then the workpiece must be removed and squeezed a little to remove excess glue, you can put the product on a dry cloth and get a little wet. If you have too much glue in the threads, then the finished decoration will take too long to dry and may turn out to be heavy.

Now we need to roll the rubber ball into a tube so that it is more convenient to push it into the central hole of our workpiece. The rubber tube must be inserted into the hole and pulled out from the other side. Now you need to stretch the knitting, but at the same time, the tail must be left authentic so that it inflates more evenly inside.
It remains only to form crochet Christmas balls with patterns, for this you need to inflate the balloon. It should be slightly larger than a knitted blank, as it may deflate a little during drying. The thread with which you tied the rubber tip must be moistened periodically, as it will tighten the knot too much after drying. When the knitted blank is completely dry, it is necessary to cut off the knot so that the ball begins to deflate slowly, and when it decreases to a minimum, it can be removed from the ball-shaped knitted decoration.

Now you have an openwork Christmas tree decoration, all that remains is to tie a loop on top and you can hang it on the Christmas tree. The finished decoration can be varnished with sparkles, and sparkles can also be mixed into glue, then the Christmas tree toy will turn out to be even brighter and more original.
As you can see, it's not difficult at all. crochet Christmas balls, and a novice craftswoman can handle such work. It is also easy to give knitted product spherical shape, but you need to enlist patience so that it dries completely and does not deform when you remove the ball.

Crochet Christmas ball: diagram and description
With the help of knitting, you can create original Christmas decorations, whether it is or an openwork ball. Using the amigurumi technique, you can knit multi-colored, bright, striped products that will decorate any interior. They can be used to decorate a children's room, because such Stuffed Toys completely safe for the child, they can play with them. You can also knit them with knitting needles, but expanding and narrowing the canvas is easier if you use a hook.
To get the amigurumi principle crochet Christmas ball, diagram and description you will need for the simplest even ball. According to this scheme, it can be obtained in any size: from the smallest ones to tie a wooden bead to large ones, which we will use to decorate the Christmas tree.
Unlike the previous version, for the amigurumi toy we need a spherical base so that the finished decoration keeps the shape we need. Of course, you can buy a wooden or foam blank, which we usually use to make. But we offer you a budget solution - use an old plastic Christmas tree toy.

Crocheted Christmas balls
When we have decided on the basis, we can begin to perform christmas balls, crocheted . Here we only need threads and a tool, and you can also prepare a marker pin so as not to get confused in the rows. If this is your first attempt, then it is better to opt for a solid color product, and in the future you can impose a variety of striped toys and even with a geometric pattern.
First we need to make an amigurumi ring and knit six stitches into it, then the product will expand in each row according to the usual circle pattern. By the eighth row, we should have 48 loops - in each row, their number should increase by six pieces. Then you need to knit without changes, without performing an increase. From the 9th to the 15th row, we will knit 48 columns each, and from the 16th, decreases will begin.

Decreases in an amigurumi ball are made according to the same principle as increases - six columns must be reduced in each row. Thus, by the 21st row you will have only 12 columns, and in the next - 6 columns will remain, after which you just need to pull the hole and the ball is ready in you.
Be sure to calculate how many rows with increments you have knitted, because in your knitting you will be guided by the size of your plastic blank. Accordingly, we will have the same number of rows and decreases, and, most likely, we will knit the same number of rows without change. In the presented version, we have a scheme - 7-7-7.
This is the simplest crochet Christmas balls, patterns they won’t be useful to you at all, but in the process of creating a knitted fabric, it is important to “try on” it on a plastic blank so that the fabric tightly fits the walls. You can choose for each row new color yarn to make the finished decoration bright and unique.

Crochet Christmas balls: video
The main assistant for every beginner knitter who wants to learn how to create crochet Christmas balls, video master classes are. You can read hundreds of pages and view a million pictures, but the video tutorial will be the most clear explanation. The video not only shows how to knit Christmas decorations from the first step to the stage of designing an already finished product, but also tells the main subtleties and secrets. In addition, in any incomprehensible place, the video can be stopped and rewound by several frames in order to view it again and clarify this stage of work for yourself. And if knitting doesn’t work out, you have other ideas for knitting at your disposal. New Year's decor presented on our website.
You can not only knit crochet Christmas balls, master class we have already considered this process, but it is also easy to tie the purchased Christmas decorations openwork mesh. So you can decorate old toys that have already lost their beauty and festive appearance, and now with your help they can get a second life and once again please the eye for the holidays.

You may not need a pattern, if you have experience in knitting, you can come up with one as you work, but for example, a possible pattern is presented in the master class.
- Workpiece with a diameter of 6 cm
- Tool #1.5
- WarnArt strings are thin, with lurex (they shine very effectively in the light of garlands)
- Scissors

In the process of tying the workpiece, at the first stage, be sure to try on the finished part of the product after each row so that it fits in all areas and does not bulge. When you move on to narrowing the product, you need to fix the plastic blank inside and continue to knit along it. This step will be a little more difficult, as you need to make sure that the tool does not scratch the plastic surface.
Can be tied with a mesh or performed various patterns, such as wedges, pineapples or petals. The easiest strapping is a mesh, it is obtained with the help of arches that are knitted row by row, while the next arch should start from the middle of the arches of the previous row. The number of air loops in each arch must be varied individually, depending on the size of your plastic blank.
The authors of the book "55 Christmas Balls" Norwegian Arne Nerjordet and Swede Carlos Zachrison founded Arne & Carlos in 2002. The company specializes in the production of knitwear in the traditional Scandinavian style.
In 2010, Arne and Carlos published a book entirely dedicated to the design of knitted Christmas balls.


 |
 |
| Knitting pattern for a ball with a snowflake |
 |
| Scheme of knitting a ball with a snowman |
 |
| Knitting pattern for a ball with a snowflake |
 |
| Knitting pattern for a ball with a pattern |
 |
| Knitting pattern for a ball with snowflakes |
 |
| The scheme of knitting a ball with a Scandinavian snowflake |
 |
| Scheme of knitting a ball with a bump |
 |
| The scheme of knitting a ball with hearts |
 |
| The scheme of knitting a ball with a butterfly |
 |
| Scheme of knitting a ball with candles |
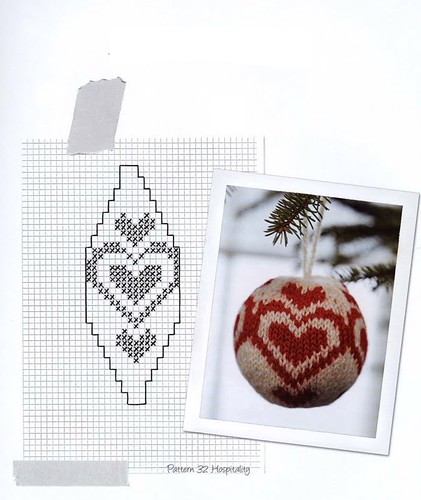 |
| The scheme of knitting a ball with hearts |
 |
| The scheme of knitting a ball with an anchor |
And here are some more interesting knitted work on a New Year's theme.


Materials:
For 2 wine bottles of 0.75 l
50 gr red yarn
50 gr white yarn
Spokes: 3 mm
Gauge: 24 sts x 32 rows in stocking st = 10 cm x 10 cm
Knitting process:
Knit in the round on 5 needles.
Option 1: Cast on 60 stitches of white yarn. Knit 1 front row, and then 3 rows with a 1x1 elastic band. Change to red color and knit further pattern A1.
Having connected the canvas with a length of 22 cm, finish the pattern with two red rows and switch to white. Knit 1 front row and go to the elastic band 1 front x 3 purl. After two rows, reduce the number of loops to 45 and change to a 1 x 2 elastic band. Knit two rows, cut another 15 loops and change to a 1 x 1 elastic band. Continue knitting with an elastic band until the total length of the product reaches 30 cm. Finish knit with the front row and close the loops.
Option 2: Cast on 60 stitches of red yarn. Knit 1 front row, and then 3 rows with a 1x1 elastic band. Knit 1 front row and then pattern A2 repeat 3 times (3rd time without the last row). Finish the pattern with two red rows and go to the elastic band 1 front x 3 purl. After two rows, reduce the number of loops to 45 and change to a 1 x 2 elastic band. Knit two rows, cut another 15 loops and change to a 1 x 1 elastic band. Continue knitting with an elastic band until the total length of the product reaches 30 cm. Finish knit with the front row and close the loops.


Materials:
Height is about 14 cm.
25 gr red yarn
25 gr white yarn
Knitting needles: 3 mm for the lapel and 4 mm for knitting the main fabric
Gauge: 21 sts x 28 rows in stocking st = 10 cm x 10 cm
Knitting process:
Knit in the round on 5 needles. Cast on 36 sts on needle size 3 mm using white yarn in 2 strands. Work 10 rows in garter st (white lapel). Change the needles to 4 mm and, having knitted 6 rows of white stocking yarn in one thread, proceed to knitting pattern M1 or M2. At the end of the pattern, continue to knit with red yarn and cut the number of loops in half (up to 18). Repeat this procedure through the row and reduce the number of loops to 9. Cut the thread, pull it through the loops and fasten off. Sew on the top of the white ball.
To make a ball, you need to dial 3 loops on a 4 mm knitting needle and in the next row increase their number to 5 (loop, yarn, loop, yarn, loop). Knit 5 rows in stocking st, close the loops as follows - knit the second from the first, the third from the first, the fourth from the first and the fifth from the first. Sew up the ball and fasten it to the crown.
Napkin ring
Materials:
For knitting the 1st ring you will need:
8 gr red yarn
8 gr white yarn
Needles: 3 mm and 4 mm for knitting the main fabric
Knitting process:
Knit on 5 needles. Cast on 36 stitches. Knit 4 rows and switch to 4 mm needles. Link pattern M2. Change to size 3 mm needles and work 4 rows in white garter st. Close loops. Fold the canvas in half and sew the edges so that you get a double cylinder.
Make brushes and fasten them along the edge of the cylinder.
To make 1 tassel, cut 4 white threads approx. 13 cm Fold them in half and fasten with a hook to the edge of the cylinder (with a hook, pull the loop through both layers of the cylinder, thread the base of the brush into it and tighten it well). Make 3 more brushes and fasten side by side so that they are all on the same side of the ring.

Materials:
Height: about 15cm
For knitting 2 heating pads you will need:
50 gr red yarn
50 gr white yarn
Needles: 3.5 for hem and 4 mm for knitting the main fabric
Gauge: 16 sts x 22 rows in stocking st = 10 cm x 10 cm
Knitting process:
Knit in the round on 5 needles. Cast on 30 sts on needle size 3.5 mm using 2 strands of white yarn. Work 12 rows in garter st (white band). Change the needles to 4 mm and switch to red yarn in two threads. Continue to knit in stocking stitch in the round. After knitting 7 cm in length, start reducing the number of loops on three sides - set three markers every ten loops and in each row reduce one loop after each marker (three loops in one row). Repeat 9 times until 3 loops remain. Cut the thread, pass it through the remaining loops and fasten off.
Make a pom-pom approx. 5 cm and fasten it to the top of the cap.
100 g - red
100 g - white
Needles: 3 mm for knitting the main fabric
Gauge: 23 sts x 32 rows in stocking st = 10 cm x 10 cm
And for dessert, a few more New Year's schemes


http://www.garnstudio.com/lang/en/kategori_oversikt.php


