Isolate on a winter theme. Isothread for beginners: simple instructions and tips
Do you like pictures but don't know how to draw? Or maybe you love embroidery. self made but not enough time for a big project? There is a great solution for you - to isolate.
This needlework is also called thread graphics, thread graphics or thread design. This type of arts and crafts is basically a graphic technique for producing images on various solid substrates, such as cardboard. The estimated date of its appearance is the 17th century. IN different languages there are several variants of the name. "Embroidery on paper" in English means embroidering on paper. You can also find "paper embroidery", or sometimes "Form-A-Lines", which can be translated as a form of lines. In French, this needlework sounds like “broderie sur papier”, in German - “pickpoints”, which in translation can be called a dotted pattern.
According to one version, weavers in England invented this variant of weaving threads. With such an unusual method, they created sketches of new patterns for fabrics. On the carnations, which were driven into the planks, threads were stretched in a certain way. In this way, wonderful crafts were obtained, unusual and elegant, well suited for decorating a house. Over time, the technology was improved, it became more and more popular, and instead of planks, more convenient base options were used - cardboard or thick paper with pre-made holes.
In addition to very beautiful and original crafts The isothread technique develops aesthetic and artistic taste, contributes to the formation of a creative view of the surrounding things. These activities have a positive effect on the development of perseverance and motor skills of the hands, the latter is very important for the development of children. This type of creativity, such as creating crafts with isothread, will contribute to the versatile development of kids, because it will be necessary to use not only pens. They will be able to choose the shape of the craft, the colors they like and think over their combinations.
In this technique, both kids and adults can create both large items, such as panels, landscapes or even portraits, as well as miniature crafts: postcards, bookmarks for books or notebook covers, and many other options.
Materials and tools for creating products using the isothread technique
- Directly the basis for embroidery. It can be a sheet of cardboard or special velvet paper.
- The necessary items for working in this technique will be an awl or a safety pin. The choice of tool depends on the thickness of the base, if you choose thick cardboard, take an awl, for thinner materials they are suitable safety pins(the bead on one end is very comfortable to hold on to).
- Scissors. As in any other needlework, the main requirement for them is sharp sharpening.
- Compass. Helps to draw a circle for diagrams.
- Pencil. Its shades or hardness are not particularly important. Most importantly, it must be sharply sharpened. This will leave smooth, thin and clear lines.
- Ruler. A length of 15-20 cm will be enough for working with children or for creating small crafts. If you want to create a large-scale painting or panel, you will need a ruler at least 30 cm long.
- Needles. The choice of needles will depend on what kind of thread you decide to use.
- Thimble. You will need it if you are planning a lesson in the technique of isolating with children. With it, children's tender fingers will be protected from needle pricks.
- Glue or narrow tape. After completing individual details or motifs, the thread must be fixed on the wrong side.
- Stationery clip. It is very convenient to use it to fix the patterns on the basis before starting work (piercing holes). Such tools securely fix the pattern and the base material and do not allow it to move.
- Substrate. It is necessary to protect the work surface. Creating crafts using the isothread technique is very inconvenient to carry out on weight. In order not to scratch the work surface with needles, you can put a piece of thin foam or thick linoleum. You can use cork tiles or a towel folded several times.
- Threads. You can use materials such as floss or iris.
As with many types of needlework, for crafts using the isothread technique, everything starts with the basics. Cardboard used in children's creativity is well suited for this type of needlework. It is dyed in different colors(one side is gray, the second is red, blue, green, etc.). The density of this material allows you to make neat punctures at a minimum distance from each other, and pulling and tightening the threads will not break through the holes made. Products will turn out smooth, neat and beautiful.
For the background color, you can choose not only the finished shade of cardboard. Multi-colored pictures or even wallpapers pasted on cardboard will look very unusual. If you want to add luxury to your work, use velvet paper. For the convenience of work, it is also better to stick it to the cardboard, because it is quite current.
Another important component beautiful work there will be strings. They can be shiny or matte. The first option is the most popular. One of the most popular threads are floss. They are bright, have many shades and are easy to handle and work with. It is important that the threads are uniformly colored and of equal thickness. Needlewomen also use iris for such crafts.
Woolen threads do not have the proper characteristics. They are fluffy and do not have bright enough shades. They are best used for training. Although, perhaps your creative idea will find application for such materials.
Those who want to learn how to create crafts using the isothreading technique will only need to master 2 techniques - “filling the corner” and “filling the circle”. All other forms in the form of an “asterisk”, “square”, “triangle”, “oval”, “spiral”, “arc” and “petal” (otherwise it is called a “drop” or “tear”) will be derived from these two .
The basic techniques of working in the technique of isothreading
Below are diagrams where the numbers show in what sequence to make punctures and stitches.
Filling in the corner
On the wrong side of the base we draw an angle (any angle of inclination).
We divide each side into 6 identical parts. Use a ruler. The step width can be up to 5 mm.
We denote the vertex of the corner as 0 and number the remaining points, as shown in the figure.
We make holes with an awl or a pin at all points, without affecting the zero one. Now we take a needle thinner than the instrument used to make the punctures and, following the pattern, fill in the corner. We start work from the wrong side.
In Figure 1, arrows show the filling of right, acute and obtuse angles. We perform all corners in the same way: on one side the thread runs from the edge to 0, on the second from 0 to the edge. Figure 2 shows that even if the sides of the corner are not equal, the number of holes must still be the same.

If you want to make a part without lines that limit the contour or avoid a straight-line element, make the first stitch (from hole 1 to hole 2) shifted one hole forward from 0 corner.

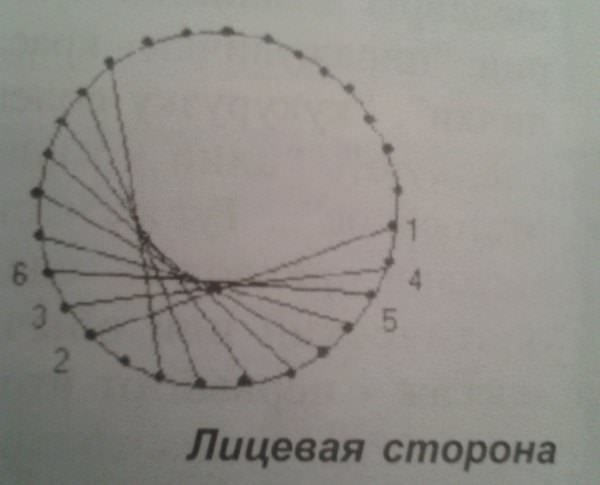
Filling in the circle
We draw her. For training, a radius of 5 cm will be enough.

Now we divide it into 12 equal intervals. When you master all the tricks, you will be able to make more holes through equal sections. It is important to observe only one condition - the number of points must be even. The more there are, the more interesting the work will be.
We number the points, pierce the holes.
We fill the circle with a thread, as shown in the diagram.
Stitch length may vary. The longer they are, the fuller the circle will look, and the empty space in the center will be smaller.

The procedure will be the same as in the previous case. We bring out the thread at point 1 on the front side. Then we make a stitch and go through the darkness to point 2 on the wrong side. Now we bring the needle from the inside to the face at point 3 and make a stitch to point 4 on the front side. Next, we proceed in a similar way. As a result, 2 threads come out of each hole. On the wrong side there will be only short broaches, and on the front side there will be a beautiful star with many "rays". The figure shows how the shape of the “rays” depends on the step width (the number of points between stitches).
To create an additional accent, any closed outline can be embroidered in several approaches by selecting stitches with different length. Those. each step will have a different step length. In the figure below, these approaches are indicated by Roman numerals.

You can combine the rules for embroidering corners and circles by dividing the latter into sectors. The vertex of each corner will be the center of the circle.

And here is an option when holes along the perimeter of the circle serve as the vertex of the corner.

You can flash it in 2 passes. First every first corner of the sector, and then every second.
Filling the arc, spiral and petal
They are filled in the same way as a circle.
For arcs the step width must be less than half the arc. The smaller the step width, the thinner the arc will be.

Spiral is filled, moving towards the end in one direction (indicated by arrows in the figure). We begin work at the first point of the turn. The length (pitch) of the stitch will be 3 to 5 holes.

Petal. We start and finish work with a sharp edge. It is better to take the stitch length along the length of the tangent to the bottom of the element.

If it is necessary to embroider with a fan (this is how flowers, their petals and buds are stitched), then “triangle stitching” is used.

To lengthen the thread, you can simply attach new thread from the wrong side or tie a knot on the wrong side to the old thread and bring it to the front.
For convenience, do not choose long threads. This will avoid tangling it.
And at the beginning of work and at the end, it is necessary to carefully fix the thread. This can be done with PVA glue or narrow tape. Similarly, it is necessary to fix all knots when adding threads.
In order for the pattern to be clear, it is necessary to pull the thread, try not to overdo it. In this case, you risk deforming the cardboard.
Upon completion of the work, the craft can be glued to a white cardboard of a larger format with the wrong side. This will hide the wrong side and at the same time create a border that can be decorated and turned into a frame.
Isothread card with a snowflake

You will need:
- Blank for a postcard made of thick cardboard;
- The basis for embroidering a snowflake (in this lesson, the cardboard is blue);
- Thick pin for making holes;
- Needle for embroidery;
- Blue threads;
- Scissors;
- Glue;
- Decor elements for decorating postcards.
This simple circuit embroidery will be within the power of even beginner needlewomen. The direction of work in the figure is indicated by arrows, and the beginning of work is highlighted with a blue circle. We embroider all elements in steps 1-4. This means that the stitch will run along the right side from point 1 to point 4 (through three holes).
To get started, print or draw a snowflake diagram. After that, having folded the colored base and the pattern, fix them so that the pattern does not move while making holes according to the pattern.

After that, we embroider a snowflake with a blue thread, using the information gleaned above.

It remains only to glue it to the base of the card and decorate.
Isothread card with a snowman

You will need almost the same materials and tools as for creating a snowflake.

We start work with embroidery big ball. It is marked on the diagram as A. We carry out embroidery in steps 1-26. There are two points on the diagram. in green. We skip them at work.
For the middle ball of the snowman's body, use step 1-22. It is marked as B, on the image. We start work with a mark 1 and end at the point marked in blue. All crossed out marks are skipped.
The last ball is the head, we embroider in steps 1-5. It is indicated on the diagram by the letter IN.
Embroider the arms separately from the body using steps 1-9.
We embroider the bucket according to the scheme, like a petal. We start at point 1 and end at point 24. Use step 1-10.
For the mouth we use steps 1-4, for the spout 1-6.
Eyes are marked on the diagram. yellow. They can be made from half beads, beads or sequins.
Now it remains only to decorate the postcard with this cute snowman.
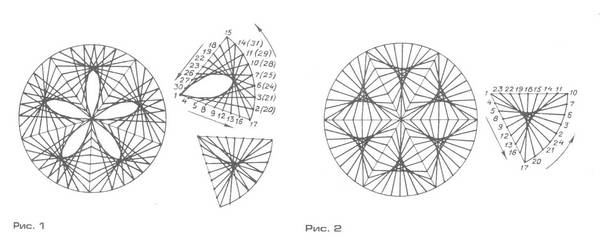
Christmas ball embroidered using isothread technique

For the next craft, several bright colors threads. The diagram shows in detail the sectors for embroidery in different colors.
Such a technique of arts and crafts as working with isothread has two easy-to-perform techniques: mastering embroidery according to geometric shapes- circle and angle. Thanks to the wide imagination and uncontrollable fantasy of two figures, you can come up with masterpieces worthy of the showroom. Paintings created using the isothread technique are unusual gift close person, a great addition to the interior style and just good mood on a sad day.
Paintings created using the technique of isothreading are an unusual gift for a loved one.
In practice, there are two types of scheme.
For circle
- On a sheet of thick cardboard, select the starting point - the center of the circle. Draw a circle with a compass. To determine the equal distance between future holes, we use a protractor. On the circle we make an equal number of holes according to the markings.
- We conditionally number clockwise from 1 to 16 without skipping holes. Following the instructions, skip the thread in sequence: from wrong side 1 to 3, return on the wrong side to 2, from 2 to 4, back to 3, from 3 to 5 and so on until the end of the circle. The pattern is good for embroidering the contour of curly images. In order to create an arc with the base, use a semicircle.
- The next pattern is obtained with long stitches, it is convenient when making ovals in the pattern. From designation 1 we count seven punctures, on the front side we make a stitch in the eighth. From the wrong side we go to the seventh and the front one goes back before the designation 1. The movement of the thread is counterclockwise. Ornament is perfect for embroidery New Year's snowman, decorative elements in the images of animals, butterfly wings and bows.
- Now we make the same pattern with long stitches with a distance of five punctures. The center circle will be slightly larger, which makes it possible to make an internal ornament with stitches "through one" or obliquely.
For Angle
- We draw an angle of arbitrary shape on thick cardboard from the inside. On both sides of the figure, mark the same number of points at an equal distance. Pierce the markings with a pin, 5 punctures on each side.
- We number the points on one side from above - down from 1 to 5, on the other from below - up from 6 to 10, respectively.
- Filling out the schema. From point 1, stretch the thread to 6, along the purl to 7, from it the front thread to 2. Then down 3 and along the outer 8. Finish the pattern by fastening the end of the thread with a sketch from purl 10.

Gallery: isolate (25 photos)


How to embroider a circle with isothread: master class
Making a circle with isothread requires concentration and a sequence of actions.
Necessary:
- A sheet of thick cardboard;
- Threads of iris, floss;
- Compass, needle, awl;
- Scissors, glue, protractor.
How to do:
- Turn the cardboard over to the wrong side, draw a circle in the center with a compass. Using a protractor, accurately distribute the points around the circle with a pencil, taking the degree ruler as a basis. For example, every 10 degrees we put a designation.
- Carefully pierce the places of designations with an awl. Place a cloth or piece of wood under the cardboard to prevent damage to the work surface. To make the holes smaller, you can use a needle.
- Now mentally imagine a clock face. Where the number 12 should be, put the number 1 above the puncture, then clockwise number all the holes with numbers.
- Start work with the designation 1. From the wrong side of the paper, through the number 1, we stretch the needle and thread up to 5 from the front side. Then to 6 wrong side up to 2. Observing the digital order, from the wrong side, a circular seam is obtained, from the front side - a circular pattern like a multifaceted star.
- You can’t tie knots, pulling together, the thread deforms and spoils the image of the picture. Fasten the ends of the thread with glue.
There are options for other circle patterns:
- Stitch equal to the diameter: Inside the figure, measure the center, put a point. Poke a hole from the inside with an awl. Then, from purl 1 along the front to the center point, stretch the thread, return to purl 2, from it along the front to the center and again return to the bottom by 3.
- Equal length stitches: Mentally divide the circle into a clock face. Where the number 12 should be, we retreat on the wrong side to 11, from it the front thread to 5, on the wrong side from 5 to 4, from 4 front up to 10.
It is very important not to stray from the sequence of designations, before making a seam, consider the location of further numbers.
Isothread embroidery on nails for preschoolers step by step: how it is
Such crafts look spectacular, creating visual volume by raising the thread above the surface of the base.
You will need:
- Small carnations with hats;
- floss threads;
- Wooden board or plywood sheet;
- Drawing template, hammer.

Such crafts look spectacular, creating visual volume by raising the thread above the surface of the base.
How to do:
- Having chosen a drawing for a future masterpiece (print new schemes), fix it with a strip of tape on the work surface.
- To maintain the exact distance between the nails, use a pencil to mark the base. Drive in nails at the points of the contour borders. Remove drawing.
- At the end of the thread, form a loop, throw it over the nail of the first corner, scroll around the mount. Then stretch diagonally to the opposite carnation. The technique of isothread on nails allows you to form a pattern both in a certain sequence of applying a thread, and in a chaotic manner.
- Perform the work clockwise, without violating the order of the threads.
At the end of the execution, fix the end of the thread with glue.
Isothread: star for children
You will need:
- A sheet of thick paper;
- Threads of iris or floss;
- Pencil, ruler;
- Needle, awl.
What to do:
- Draw a symmetrical star on the wrong side of the sheet. For the initial basis of the drawing, we take the upper ray of the star. The vertex point of the beam will be conventionally denoted by the letter A. From the designation down the sides of the corner, count an even number of points. For example, five on each side, for a total of ten. We denote them by numbers from left to right.
- Make holes with an awl at the point designation. I got a diagram of the drawing.
- From the inside of point 9, stretch the thread to the top of A. then return from A to point 2 and down to point 7. Accordingly, from 7 to 5 we move on the wrong side, on the front side from 5 to 4. From 4 to 6 down the wrong side. From 6 to 3 on the front, from 3 to 1 on the wrong side and up to 8. From 8 to 10 and to top A. According to this scheme, gradually make all the rays of the star.
- After finishing the embroidery of the corners, you can come up with an original image in the middle of the star. For example, here we use the technique of embroidery of equal stitch length.
Just keep in mind the obligatory nuance - in order to prevent mixing of graphic styles of the drawing, it would be more expedient to make some deviation from the punctured holes of the original image.
How to make a snowflake isothread
The snowflake pattern will be very easy for inquisitive and restless needlewomen.
The thread graphic of the image is a circle or square, from the middle along the edges covered with a thread. Here the size of the seam can be varied, for example, one can be made larger, that is, outside the figure, the next seam is smaller, respectively, not reaching the edges of the image.
At the beginning of work on a snowflake, the kid will need the help of adults. Draw a square on a piece of paper with a center point O inside. From it we measure the same distance segments to the edge of the figure and beyond, alternating through one. In the marked places, we put the designations from 1 to 10. From 1 we pull the thread to O, then from O to 2, from 2 to 3 and back to the center point. If you follow the sequence of the pattern, the picture turns out a small snowflake. After finishing the drawing, with light movements, erase the shape of the square with an eraser.
The snowflake pattern will be very easy for inquisitive and restless needlewomen.
The second option for embroidering a snowflake involves sheathing the contours of the pattern with a stitch “through one” (1-3,2-4). Inside the contours, you can decorate the image with beads or sequins, weaving them into stitches.
The idea of executing a snowflake according to the principle of corner embroidery is more complex. You will need:
- Cardboard or velvet paper;
- Scheme of an octagonal snowflake (from the Internet);
- Colored threads of wool, acrylic, iris;
- Pin, needle, tape, paper clips.
How to do:
- Fasten the pattern diagram to the cardboard with paper clips, pierce holes in the image with a pin.
- We conditionally number the corner of the snowflake, the number one is the end of the segment from the beginning of the corner, then down to the beginning of the corner. The other side of the number is from bottom to top, for convenience we denote from 9 to 1.
- We make the first seam from the inside 1, fixing the tail with tape. From 1 we go down the thread to 9, return to 8 on the same side and to 2 on the next side of the corner. Fill in the corner consistently, without violating the order of imposing threads.
- Follow this principle to complete the remaining corners of the snowflake.
monkey thread
To make an image of a monkey, you need:
- Threads for embroidery or floss, iris of appropriate shades;
- Colored cardboard (green under the lawn), a sheet of thick paper;
- Needle, scissors, glue, pencil, pin.
How to do:
- For the picture, you need to take a drawing of a monkey. You can copy it through a carbon paper from a coloring book or find it on the Internet.
- To make the picture have a wrong side, copy the figure of the monkey through the glass. Transfer the inverted image through carbon paper to the wrong side of the background cardboard.
- Pierce the contours of the figure with a pin.
- The tummy, the inner parts of the paws, the ears are embroidered with yellow thread as a circle. We sew the contours of the pattern Brown thread stitch "through one". The peculiarity of such a stitch is that the distance between its beginning and end is one puncture. That is, if we conditionally divide the punctures into numbering, we get the stitch length 2-4, skip 3, skip 5-7, skip 6. In the second round, we capture the missed holes, skipping already 2, 4, 5, 7, respectively.
- Nose, eyes are embroidered with black thread.
You can add decorative elements to the picture, for example, embroider a ball next to the monkey with beads or make eyes in the form of black buttons.
Isothread: heart embroidery technique (video)
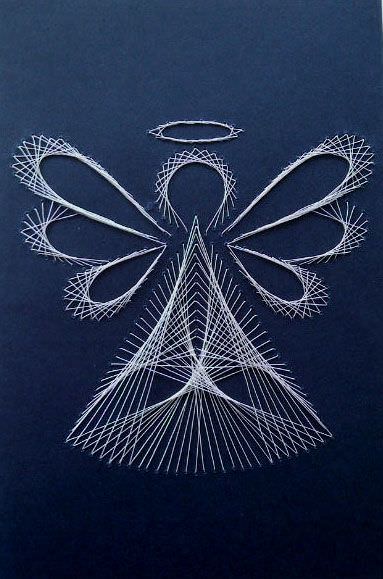
The unique technique of embroidery on a solid surface allows not only creative development, but also plenty of imagination. Schemes are different, the most popular and easy are a heart, a flower, a ship, a rose and other various schemes for the new year. The initial patterns of thread graphics are understandable, and the desire to create and surprise will help to prepare an original and colorful hand-made gift for a loved one. And paintings stylized for the interior will complement the homeliness with notes of extraordinary painting.
The technology that we will discuss in this article is safe and accessible to kids. Just keep in mind that a little mess and ... fireworks of emotions are provided.
You will need:
- Multi-colored floss yarn.
- PVA glue diluted with water.
- Balloons in an amount corresponding to the desired volume of toys + a few pieces for draft and unsuccessful options.

These are the basic materials. Depending on the degree of “advancement”, rhinestones, beads, foil, gold paper, braid and other decorative “sources” at your discretion can be added to them (we will talk about additional decoration methods at the end of the article), but the blank itself is made only with the participation of data three materials.
Of course, helpers aged from 2 to 7 years old (you can be older) will be very useful to you, and their number is not limited by the instructions. The floor of the working area and within a radius of at least a square meter around it is pre-covered with old newspapers. Get by with a minimum of clothing or use aprons: glue stains are quite difficult in most cases, and some artificial materials can deteriorate beyond repair. Many dreamers like to dress up in special clothes, imagining themselves at least as the chef of the best restaurants in Moscow or as an astronaut in a spacesuit.
Algorithm
- We take balloons, inflate them to the desired size of the toy and tightly, “on the conscience”, tie it with a thread so that your workpiece does not crumble into pieces even before it hardens just because the “form” is blown away.
- Soak the floss in a bowl filled with a mixture of PVA and water (a second or two is enough).
- We begin to carefully wrap the ball blank with adhesive thread, each next row tightly moving to the previous one. Everything here is up to you: you can alternate colored stripes, you can make the ball monophonic, bring the winding to the very top or stop in the middle, getting a hemisphere ...

- Dry the "thread balls". Just don't give in to the temptation to speed up the process with the help of a battery, otherwise unexpected "fireworks" from bursting balls from excess heat are inevitable.
- We take out the form, while the specific mechanism depends on the degree of winding of the ball. If you made a hemisphere, then balloon it will fall out of it by itself as soon as you pierce it. If the sphere has been brought to the end, then you will first have to cut off the “tail” with scissors and carefully pull out the ball, trying not to destroy the thread frame (an option is to pierce the needle directly through the threads and drag it by the tail, choose for yourself, as it will be more convenient for you).
Children's help can be involved at every stage, but, as practice shows, the last stage causes the greatest delight - namely, the bursting of balloons. And in terms of skill in this younger generation, there is definitely no equal. What, in fact, is the main value of this craft - it is unlikely to "pull" it for professional performance, but it is indispensable as a developmental aid.
Decor
Thus, we got a lot of thread blanks. You can decorate them in different ways: for example, stick around with foil stars or wrap them with sparkling braid. The tinsel-“rain” passed through the bottom point of the ball looks festive. You can put cotton wool (“snow”), cones in the hemispheres and hang them on a long ribbon as a kind of flower pots. Even at the initial stage, it was possible to thread beads or rhinestones through the thread of the floss, place them at some distance from each other and soak them right in this form, and then wind the already finished “garland”.

Katerina Rusakova


