From yarn with your own hands. A variety of options for crafts from threads
Lovers of knitting quite often have balls with threads that are no longer needed, but at the same time it is a pity to throw them away. Of course, you can try knitting colored socks or a rug later, but it's better to transform old items and decorate them with ordinary threads. In this article, we have collected for you a lot of thread craft ideas that anyone can do.
Interesting Thread Craft Ideas: Creative Headphones
Necessary materials :
— threads (2 colors)
- scissors
- sticky tape (adhesive tape).

Step 1: Take threads of 2 colors. The length of each thread should be 3 times the length of the wire. Tie the ends of the threads to the wiring.
Step 2: Attach the wires with tied threads to the tabletop with adhesive tape (so that they do not move).

Step 3: Take the thread of the main color that will be visible. Draw this thread under the rest and then overlay it on top of them. In this case, a loop is formed, through which it is necessary to draw the main thread and tighten it.

Step 4: Repeat the previous step. To change the thread, repeat 15 times, then take another color.
When performing knots, do not forget to make sure that the "ladder" is spiral.
Thread wall decor
Necessary materials :
- wooden stick 90 and 120 cm;
- multi-colored threads;
- scissors ;
- PVA glue.
For convenience in work, fasten the stick between two chairs.

Step 1: We cut the threads of different lengths, and each color of the threads has its own length. In our case, the long thread was 60 cm, and the short one was 30.

Step 2: Apply glue to the stick - PVA. We begin to hang threads on it, throwing them over it. We try to arrange the threads evenly.

Step 3: After hanging all the threads, we are waiting for the glue to dry. Then we cut the threads diagonally.
Fantasize and choose your drawing, subsequence colors , cutting method . It turned out to be a very original piece of decor that will bring a touch of creativity to your interior.

Thread decor
How to make a picture of knitting threads
Materials :
- canvas on a frame;
— a thread of average thickness;
- adhesive tape (adhesive tape);
- spray paint.

It is recommended to spray paint - spray not indoors and in protective clothing.
Step 1: Create a thread pattern on the frame. On the reverse side of the frame we fix the threads with adhesive tape.

Step 2: Colorize the canvas with one or more colors of your choice.
Step 3: After the paint has dried, remove the threads.
Original decoration using the isothread technique
Materials used :
Thick paper (cardboard, box);
- threads of different colors;
Scissors .

Step 1: We cut out a geometric figure from thick paper, any one you like.
Step 2: We make small cuts (2 cm) along the entire length of the figure at the same distance from each other.
Step 3: Take the thread, insert it into the incision and wrap the entire figure (using the remaining cuts), creating a pattern.
Step 4: At the end of the work, after we have received the desired pattern, we leave a loop of thread, for which it will be possible to hang the decoration.
Mouline thread embellishment
Materials :
- a metal ring ( like a washer);
- scissors ;
- chain ;
- multi-colored threads;
- Super glue .

Step 1: Take a long thread, fold it in half, thread it through the ring, forming a loop. The thread is fixed on the ring when it is pushed through the resulting loop.
Step 2: Holding the ring in one hand, wind the thread around the ring with the other hand, passing it through the loop. Repeat until the entire ring is wrapped. At the same time, make sure that the thread lies tightly to each other.

Step 3: Make several similar rings, only in different colors. To do this, repeat step 1st and 2nd.
Step 4: The resulting rings are put on a chain.

Alternatively, you can replace the chain by connecting the rings with the thread that they were wrapped around. This is done as follows: in the 1st ring, the thread is not cut off after wrapping, but is threaded into the 2nd ring and wrapped around it several times, a knot is made at the end. In the same way, you can attach both 3 -e and the subsequent ring. The color of the thread can be either one or alternate. If the thread is over, then just tie a new one and continue to connect the rings.
Upon receipt of the required number of rings, tie threads to the outermost rings and connect them into a circle.
Woven cup made of threads
Materials used :
- threads;
- PVA glue ;
- brush;
- scissors ;
- cup ;
- wide sticky tape (or cling film);
dye .

Step 1 : Several layers of cling film or adhesive tape are applied to the outside of the cup .
Step 2 : A 50 cm long thread is cut and twisted in a spiral to form a circle .
Step 3: Flip the cup upside down and place it on the table. Twisted disk ( circle) placed in the center of the cup. We apply glue on top of it so that the spiral does not fall apart.
Step 4: From the glued disk, we begin to wind a new thread in a circle, in the shape of a cup. We coat the thread well with glue for reliable fastening. We wind the thread not to the very end of the cup, leaving about 3 cm from the bottom.

Step 5: The end of the thread must be secured. After that, we proceed to plentiful smearing with glue of the resulting form of threads. We leave the work for a while until the glue is completely dry.
Step 6: After the glue dries, carefully remove the resulting
Unusual thread wall decor
Materials :
- small carnations (or buttons);
- long brown thread;
- sheet of plywood.

For wall decor, a large sheet of plywood is taken, on which a large tree is made. On a small plywood, you can also create a tree. Then you get a picture that will decorate your apartment.
So let's get to work:
Step 1: On a sheet of plywood, we sketch our future tree.
Step 2: We drive in small carnations along the contour of the drawn tree. Don't try to be symmetrical and draw lines precisely: the wood should look natural, alive.
Step 3: Start creating the tree, moving from the bottom up. To do this, wrap the thread around the carnations. Strict sequences no, everything is random.
Step 4: Since the work is large and laborious, you can take a break and leave the work for a while. In this case, wrap the end of the thread around the stud. Returning to work, unwind the thread and continue weaving the tree.

Yarn can be wrapped around, yarn can be glued, creating curly elements, yarn gives a special texture and any color to any surface you choose. Yarn is a completely unique and versatile material for needlework, and we are not talking about knitting here!
1. We collect the remains of yarn of approximately the same thickness (slight variations are possible), but of different textures and different colors and shades. We take the cheapest frame for a photo - from any material. With glue, we simply more or less evenly wrap the yarn around the edges of the frame, alternating colors. The frame under the yarn should not be visible. In several places we add 4-10 different small beads, stringing them on the yarn (one by one or in small series) and then fixing them on the frame with drops of glue.

As you can see in the picture, the frames wrapped in white look just as good, if not better.
Anything can be inserted into the frame, from a mirror to a quote, a photograph, or a picture with a view/family and friends.
2. With shades / lampshades a similar situation. It’s just that much more yarn will be needed, and with it the base of the ceiling is necessary not arbitrarily, but in turns tightly fitted to each other, periodically adding a drop of glue.

If you already have a ceiling - good, if not, then the top of the lampshade is, in fact, just a frame made of strong wire (two circles - the lower one is larger, the upper one is slightly smaller, and 4 vertical connections between the circles) and glued on top (or sewn ) thin rigid cloth or sheet of plastic. Therefore, you can always assemble the ceiling with your own hands.
3. According to the same principle, bracelets are decorated with yarn - in the style of an ombre or gradient, napkin rings and other shapes are formed.


Combine two or more types of yarn - different thicknesses and textures, and get absolutely amazing things.


4. Make pom-poms of different sizes from yarn - as in the pictures below - and already from pom-poms a variety of elements from rugs, postcards and toys to flowers, mobiles for the crib, Christmas garlands and curtains.


5. Thread balls (and other figures) are created from fine yarn. How - see .

6. In the middle, also when using drops of hot glue, you can wrap a box, a jar and any other suitable container with yarn. Elementary and very effective.


7. Contours of wire wrapped with yarn. We glue the wire with a strip of crepe paper, wait until the glue dries. We bend the glued wire into the desired contour. We tie the tip from the skein of yarn to the contour in the optimal place and in arbitrary directions we begin to wrap the wire contour with yarn. At the same time, each time, touching the contour, we wrap the yarn around the wire twice.


An offshoot from this direction, in a slightly different style:

8. You can draw with yarn. How - see more details.


9. Naturalistic feathers can be made from fine yarn. We wrap the wire with yarn, fixing it with drops of glue. We cut pieces of yarn of different colors of the same length (in the range of feathers), we tie them (in the middle of the length) in a row one after the other close on the glued wire. We dip the future pen into an adhesive solution (or a solution with starch), put it on polyethylene on a horizontal surface, align the ends of the yarn, laying them strictly parallel and directing them slightly upward at an angle. We are waiting for drying, cut off the resulting to the shape of a pen.


11. Yarn creates panels for walls. To do this, you just need to tie long pieces of multi-colored yarn on a thin wooden stick. At the bottom we cut the yarn, giving the edge the desired shape.
Helpful Hints
From ordinary threads you can make a large number of beautiful and useful crafts.
Such works can decorate a home or workplace, as well as give to someone or use as an addition to a gift.
Here are a few interesting ideas how else you can use threads and what interesting work you can do with them:
How to make a DIY wall decoration out of thread

You will need:
Small book or notebook
Scissors
Wooden pin or even branch.

1. Wrap a book or notebook with thread about 30 times. Tie the ends into a double knot.
2. Cut the wrapped thread on the side opposite the double knot.
3. Cut a small piece of thread and tie it at the top of the folded threads (see image).

4. Cut off the excess threads. You have one of several blanks for wall decoration.
If the thread is white, it can be dyed, but this is not necessary. You can use threads of different colors.
5. Tie each blank to a wooden pin or branch.
6. Tie a piece of thread to the pin so that the craft can be hung.
How to make a simple pom-pom out of thread

You will need:
Piece of cardboard (15 x 15 cm)
3 skeins of thread
Scissors
Thread and needle and a blanket or pillow (if desired).

1. Start winding the thread around the cardboard as shown in the image. Wind up until you reach the desired thickness. For this craft, the thread was wrapped 55 times.

2. Cut off a small piece of thread and, passing this piece under it, tie it around the wound thread. Move this knotted piece of thread to one of the edges of the cardboard.


3. Pass the scissors under the thread at the opposite end of the cardboard and cut the wound thread.


4. Cut another piece of thread and tie it just below the top of the thread bundle.

5. Cut another piece of thread and tie it slightly below the previous piece.

6. Use scissors to trim the bottom of the craft.

You can make several similar crafts and, if desired, use a thread and a needle to decorate a blanket or pillow with these pompoms.


How to make a pom pom rug


How to make a simple DIY wall decoration out of thread

The circle for this craft can be made of thick wire or you can use a hoop.
You will also need:
Threads of different colors (3-4 colors)
Scissors.

1. Cut the threads of different colors into long lengths (see image). You will have to cut many pieces of thread, so please be patient.

2. Bend all the threads in half and start attaching them to the circle. You just need to hang the thread on the circle and thread one end of the thread folded in half into the other.

3. Fasten the threads in a circle, alternating colors in any order.

4. When the whole circle is covered with threads, tie another piece of thread to it so that you can hang your craft.
Here is another similar one:


Original crafts from threads with your own hands: wigwam

You will need:
5 small branches
Several threads of different colors
simple pencil
Hot glue (if necessary).

1. Tie three sticks.

2. Cut a small circle out of cardboard. Make 5 small cutouts for twigs along the edge of the circle.

3. Insert cardboard between three linked sticks.

4. Use hot glue to secure the sticks in place.
5. From top to bottom, start wrapping three connected sticks with thread until you drop a couple of centimeters below the junction of the sticks. Add 2 more sticks, tie them and continue wrapping the wigwam as shown in the image.

It is worth wrapping so that you have the entrance to the wigwam. Choose two sticks that will act as the doors of the door and wrap them up to one door, then back to the other, and so on, until the entire wigwam is covered with threads.

* You can cut off the extra parts of the cardboard.
How to make a dream catcher out of thread

You will need:
Hoops in different sizes
Acorns, branches, leaves.
Scissors

1. This may seem like a complicated craft, but in reality you will be using the same knot over and over again.
2. You need to weave a thread around two pairs of hoops with a figure eight - go around the top of one circle with the thread and then the other from the bottom. Repeat the same movements until you cover both circles with thread as shown in the image.

3. Tie the threads to the decor details and attach them to the hoop.


4. To learn how to weave a "web" inside the craft, pay attention to the diagram:

How to weave a dream catcher (video)
How to make a chandelier from threads

You will need:
Hoop or wire circles (you can do it yourself)
Scissors.

1. Tie two pieces of thread to the hoop crosswise.

2. To hang the chandelier, you need to cut off another piece of thread and tie it to the place where the threads cross from point 1.


3. Cut many pieces of thread and attach them to the hoop.

4. If necessary, trim the hanging threads so that they hang straight.
Thread doll

You will need:
Any cardboard part (for example, a sleeve from toilet paper or piece of cardboard box)
Scissors.
1. Wrap the thread around the cardboard. The length of the cardboard depends on the length of the doll you want to make.

2. When you have wound enough times, remove the thread from the cardboard and cut with scissors at one end so that you get several threads of the same length.

3. To make the head, fold the threads in half, cut a small piece of thread of the same color and tie it around the bundle of cut threads, just below the fold.

4. Now you need to divide the bundle of threads into 3 parts - 2 parts will become the handles, and the third part - more magnificent - will become the waist and legs. Cut 2 more pieces of thread and tie them just above the center of the workpiece.


5. Now you need to twist or braid the "arms" of the doll. The lower part will play the role of a skirt.

6. If you want to make legs for your doll, but you should also divide the threads into two parts and weave a “leg” from each.
How to make a doll from threads with your own hands (video)
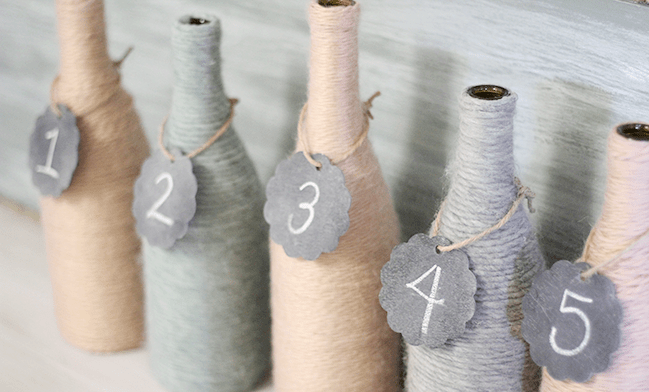
Bottle decoration with threads

You will need:
Threads of different colors (the thicker the thread, the less it will be needed to decorate the bottle)
Bottle
PVA glue.

1. Start wrapping the bottle with thread from the bottom up. Add glue little by little so that the thread does not unravel.
2. When you decide to change the color of the thread, new thread start exactly where the previous one ended.
How to make a thread mandala (video)
This section presents creative work, made from threads, using various styles: thread printing, cut thread appliqué, pom-pom crafts.
Most of the crafts in the publications of the section are equipped with detailed descriptions their performances and are accompanied by colorful photographs. Not only kittens and kids like to play with balls. Very beautiful figures can be folded from multi-colored yarn. These may be folklore motanka dolls; chickens, bullfinches and other birds; mobiles for seasonal interior design. Some of the thread crafts described in this section will serve as great toys for kids. And hundreds of options for creating applications from colored threads are suitable for creative pursuits even with children early age. Also pay attention to the thread crafts created to decorate the interior.
Magical ways to use threads and yarn - on MAAM.
Contained in sections:Includes sections:
- Isothread. Schemes and work in the technique of thread graphics. Embroidery threads on cardboard
Showing publications 1-10 of 1308 .
All sections | Crafts from threads. Pompoms, yarn, isothread, nitcography
Master class "Making a pom-pom toy" Master class on the topic "Making toys from pompom» Target: to form the ability to make a toy from pompom; - to acquaint colleagues with the manufacture of toys from pompom : - give recommendations for playing games with toys from pom-poms. Equipment: Cardboard, scissors, yarn, colored...
Presentation of the master class "Bird made of woolen threads" Zukhra Piterskaya Master class "Birds made of wool thread» Master class for parents and children middle group DOW "Birds made of wool thread» Prepared: educator of the 1st qualification category of the Municipal Preschool Educational Budgetary Institution "Kindergarten ...
Crafts from threads. Pompoms, yarn, thread, nitkography - Didactic game for children of early and younger preschool age "Pick the thread to the ball"
Publication "Didactic game for children of early and younger preschool age ..." Didactic game do-it-yourself for children of early and younger preschool age"Pick a thread to the ball" Author: educator of the Municipal Budgetary Preschool Educational Institution kindergarten No. 25 of the urban district of Vichuga Lebedeva Ekaterina Andreevna. Tasks:...
 MAAM Pictures Library
 As part of the children's acquaintance with the traditions of our ancestors, it was decided to make a motanka doll from threads. Such a doll looks like a little man: it has a head, arms, torso, and if it is a doll - a boy - then legs. Initially, our ancestors, the Slavs, made such dolls ...
 Applications for children from finely cut woolen threads. Master class gr.16. Purpose: Create a painting as a gift, decoration. Objectives: To promote the development creativity. Develop fine motor skills, visual and tactile perception. Cultivate attention...
 Flower tears - Dewdrops on the leaves Flowers, like stars, Painted brightly with a heavenly brush. They sparkle, they shine. Heaven is a gift to us They fall on our hearts. (Larisa Kuzminskaya) The purpose of the master class: to show the manufacturing method original suspension. Material will be useful: ...
Crafts from threads. Pompoms, yarn, threading, nitkography - Master class on drawing with cut woolen threads "Dandelions"
 Summer is unforgettable bright time of the year. I associate our northern summer with a yellow field of dandelions. Drawing in non-traditional techniques always causes positive emotions in children. Likewise, the use non-traditional technique drawing develops in children figurative ...
 Knitted yarn - a tape, which is a thick thread made of natural cotton. She is most famous among those who like spaghetti knitting. Because of her nickname, many believe that the yarn appeared in Italy, but in fact it was first used ...
 Elena Frolova Photo report about the acquaintance of children senior group with a new type of artistic and creative activity - the "thread" technique Elena Frolova Photo report on the acquaintance of the children of the older group with a new type of artistic and creative activity - the "thread" technique Isothread -...
Abstract of a drawing lesson in the second junior group "Beautiful flags on a string" Drawing lesson in the second junior group“Beautiful flags on a string” Natalya Kosetchenkova Program content: teach children to draw rectangular objects with separate vertical and horizontal lines; introduce rectangular shape; continue...
Very interesting compositions of pom-poms. You can take any yarn for such crafts, both new and the remnants of the old loose one, boucle, and fleecy, and smooth will do. Pompoms always come out soft, fluffy, funny. And how do you like the possibility of thread writing? This original idea when real colored threads are used instead of pencils or paints. They are laid out on the glue in parallel, or in pieces.
Many crafts in the future can be presented to your family and friends as a pleasant souvenir for the holidays. Agree that a gift made by the hands of a child is the most expensive and touching. And the resulting fluffies can be used as real toys. The value of such a thing for a child will be much higher than the value of the toy that is bought in the store. After all, it took so much effort, time and patience to make it.


