Patchwork baby blanket. Patchwork in the interior (80 photos): how to assemble a puzzle from multi-colored patches? Instructions on how to sew a patchwork baby quilt
If you decide to sew a bedspread from pieces of fabric, acting as a designer, cutter and seamstress, we will support you in this endeavor with valuable advice. We will tell you in detail how to sew a patchwork quilt, offer options for patchwork patterns, show a master class with step-by-step instructions and photos.
Patchwork is a special type of needlework, which, unfortunately, is forgotten in our country, and once in every family, a bed was covered with a bright bedspread made of small pieces of fabric. Abroad blankets made of shreds of matter self made are in demand, they are happy to buy.
Patchwork has many names - patchwork technique, textile mosaic and patchwork ( in translation - patch and mosaic work).
Patchwork bedspreads and blankets are made from three layers:
- the front side is made in the technique of patchwork
- middle - a layer of batting, cotton wool, synthetic winterizer, interlining
- the back side is made of scraps of fabric or a whole piece of matter.
If three layers of a blanket are stitched through, such work is called quilting, A quilted products. The older generation remembers how their mothers and grandmothers sewed beautiful quilts with a bright cheerful pattern from scraps of fabric.

Today, an elegant patchwork quilt is back in fashion, which can become a design solution for a country-style room, minimalism, Provence or hi-tech.
How to start sewing a patchwork quilt?
To sew a patchwork quilt, you need to have on hand:
- needles, pins, thread
- scissors or a special roller knife
- iron to smooth seams
- sewing machine, knitting needles or hook, if we knit shreds from the remnants of thread
- pieces of fabric for a patchwork quilt or special kits for making blocks
For a patchwork quilt, you can use old things if you open them and wash them. The material should not be dilapidated and most importantly, it should not shed.
Best for patchwork:
- cotton
- chintz
- satin
- The fabric for the bedspread can be plain or patterned.
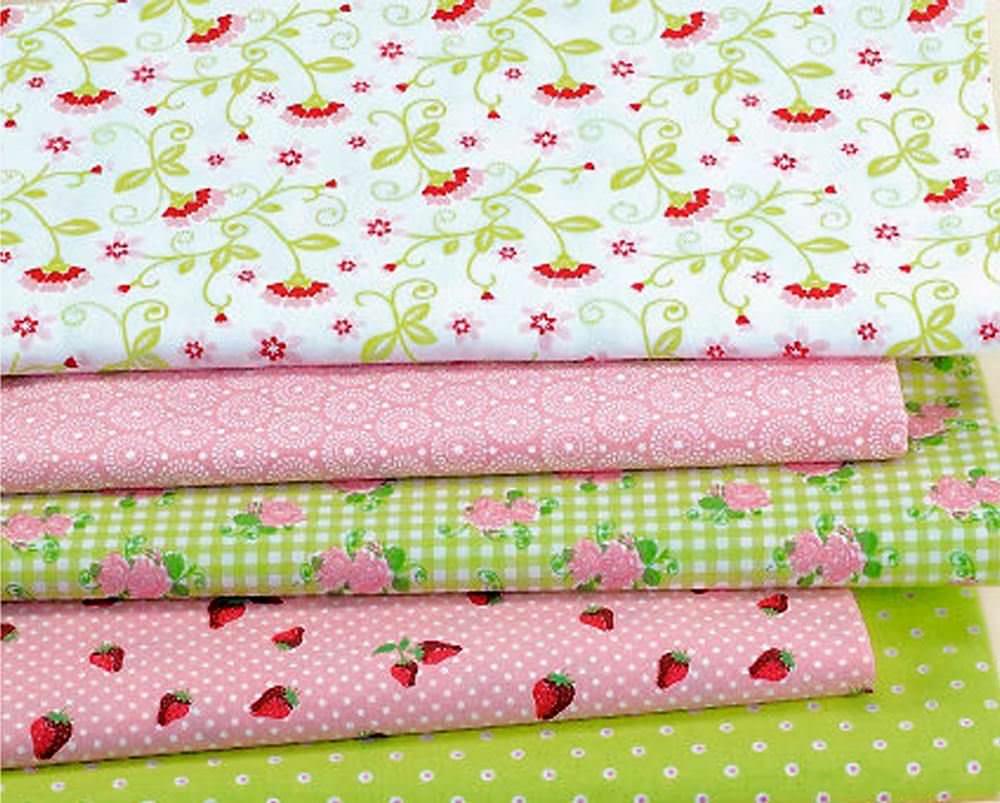
- We select a fabric for patchwork that is close in color, for example, delicate pastel colors in the Provence style, or bright with a pattern or ornament in the country style.
- Black and white material looks good when finished.
- Almost all drawings are made from scraps geometric shape cut according to a pattern or special patterns.
- We make the back side of the blanket using the patchwork technique or take a whole piece of fabric that matches the face of the product.
- Threads are selected to match the fabric or contrasting colors.
Sew a patchwork quilt with your own hands: step by step instructions
We invite you to sew a blanket with a New Year's mood, made of alternately arranged bright decorative patterns (blocks) on a white background. The first block is made in the original and very expressive Ohio Star technique, the second is a simple cut of small squares. The size of the patchwork blocks is the same, the number depends on what size we are going to sew a blanket.

- The back side of the blanket is a piece of fabric matched to the front side

Cutting:
- We select 13 pieces of fabric and divide into squares and stripes

- Stripes of four, six and eight squares with a side of 5 cm
- Squares with a side of 10 cm, assembled from 4 small squares with a side of 5 cm

Execute the first block:
We will need:
- 5 squares of different colors, with a side of 10 cm
- 8 squares with a side of 10 cm from white fabric
- strips of 8 and 4 squares with a side of 5 cm

Completing of the work:
- Divide the square into 2 triangles
- We take a triangle, apply it to a white square

- Sew the triangle to the white square, stepping back from the corner by 2 cm

- Bend the triangle and smooth

- Cut off a piece of white square under the triangle

- We take a triangle from the next square of a contrasting color, apply it to the white square

- We sew the second triangle, it partially closes the first, smooth

- Cut off a piece of white fabric and a corner of the first triangle

- We get an uneven square, cut off the excess so that all sides become 10 cm again

- Let's make 4 blanks from four types of fabric

- We decomposed all the elements of the block into a single composition, using the four remaining white squares

- We connect all the details, we get a star on a white background

- We take pre-prepared strips of squares, each with a side of 5 cm
- Stripes of four squares are arranged vertically
- Stripes of 8 squares horizontally

- Sew on the vertical stripes first, then the horizontal ones.
Execute the second block
To work, you need to take:
- strips of white fabric 3 cm and 4 cm long, 5 cm wide
- strips of 4 and 6 squares, with a side of 5 cm
- central square with a side of 10 cm

We do the work:
- We take a ready-made square, consisting of four smaller squares
- Apply white stripes to it
- Vertical - 5 cm wide, 10 cm long
- Horizontal - 5 cm wide, 20 cm long

- Sew strips, starting with vertical

- We apply strips of squares to the resulting square
- Horizontal of 6, vertical of 4 squares, each 5 cm wide

- We sew in the same sequence - first vertical stripes, then horizontal

- Sew white stripes to the resulting square with a side width of 3 cm
- Vertical stripes 3 cm long are sewn on first
- Sew horizontal stripes 4 cm long after vertical

- Let's lay out the square blocks on the floor, they must fit exactly, you determine the quantity yourself

- Take a synthetic winterizer the same size with a patchwork top
- The back side is cut from the fabric 5 cm more in width and length than the top of the blanket
- With the help of pins we connect three layers and sew on a typewriter
- Quilting a blanket
- We sew the edging strip, apply it with the front side to the front side of the blanket
- Bend to the wrong side and sew with a hidden seam
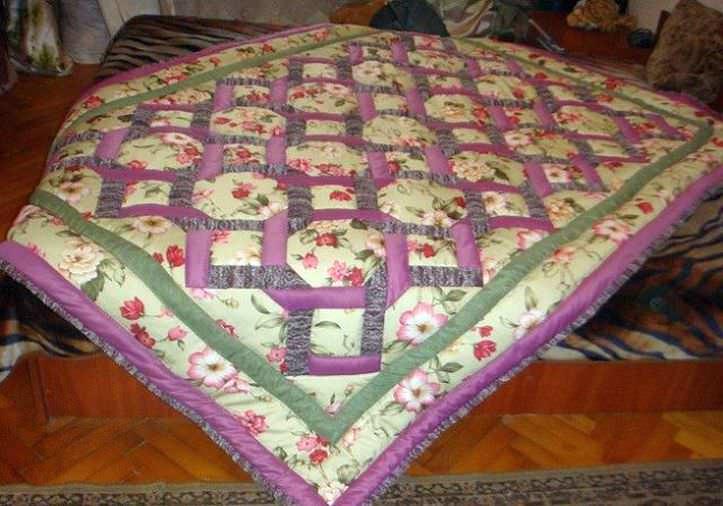
If you look at the finished blanket, it seems that it is very difficult to make, but it is not. Be patient, the blanket consists of many small pieces, but the result is worth your effort.
Instructions on how to sew a patchwork baby quilt
A great option for beginners is to make a simple square quilt for a kid's room to take on a picnic.

For a blanket 130 cm x 150 cm we need:
- 4 pieces of natural cotton fabric in different colors 60 cm x 120 cm
- fabric on the back side with a margin of 130 cm x 170 cm
- bright fabric for edging edge 7 m with a width of 8 cm
- applique 6 pieces
- filler according to the size of the bedspread
- white fabric for the circles to which we glue the appliqué

If we use a blanket for walking, it is best to take a nylon or waterproof fabric for the back so that we can spread it on the ground.

We do the work:
- Cut out squares from each type of fabric, size 15 x 15 cm
- We lay out in piles in each of 30 pieces
- There are 120 square pieces in total.

- The pattern is performed according to this scheme horizontally 13 squares, vertically 9

- Sew the squares, folding, right side to each other
- We iron the seam in the center, 1 cm from each square was left for the allowance

- We sew two strips together, laying the front side on top of each other

- We sew the squares collected in ribbons
- In the second row, the last will take the place of the first, etc.

- We look carefully so that the squares match in size

- We smooth the seams, on the reverse side the canvas looks like this

- Cut out 6 circles from white fabric, onto which we transfer the application

- Through gauze or paper, using a hot iron, transfer the pattern to the fabric

- We sew the circles with a “narrow zigzag” stitch, we get a fun addition to the children's bedspread

- We lay out the bedspread on the floor or a wide table, alternating layers: patchwork on top, then filler, third layer face down

- We get a "layer cake" - the future blanket

- With fixing needles, we grab three layers of material along the edge around the entire perimeter

- We manually sew the edging to the front edge of the bedspread, fold it in half, connecting all the layers, stitch it with a beautiful seam

- We put on the machine a foot special for patchwork with a side guide
- We sew together three layers for reliability, making a line in the perimeter of the red squares, stepping back from the edge of 1 cm

- As a result, we get a beautiful and even line.

Everyone can make a bright and comfortable patchwork quilt for walking. It is possible to experiment with the color and pattern of the fabric, choose a different layout of the squares and the size of the product, it all depends on your imagination. The bedspread does not take much time to work on, it can be made from the remnants of fabric and old unnecessary things.
How to sew a patchwork quilt with the seam out?
The original function of patchwork needlework is the disposal of old things or pieces of fabric left after sewing clothes and linen. One variation of patchwork quilts is seam-out denim.

There is a lot of denim in the wardrobe. Instead of sending things that were once loved, but already worn or out of fashion, to a landfill, skilled housewives turn them into necessary, beautiful and original bedspreads.

The manufacturing process of a patchwork fabric with an outer seam differs from the traditional method:
- We sew squares, triangles, stripes, applying to each other not with the front, but with the wrong side. We also sew ribbons.
- We make cuts along the edges of the seams with scissors and comb with a metal brush (for denim), choosing threads so that the edge resembles a pile.
- We shake out the blanket well so that the remnants of the thread fly around and wash it in the machine.
- The back side can be closed with cloth, and the middle can be insulated with a sentipon.
- Along the edge, we sew an edging strip of fabric or sew on lace or a frill. Denim goes well with cotton and linen.

- It is good to use such a blanket for outdoor recreation, for the reverse side we choose nylon fabric

- A patchwork quilt with a seam outward can be sewn from any fabric, the main task is to cut the edge and remove the transverse threads

The outer seam makes the blanket fluffy and soft, such a product is suitable for a children's room and walks with a child in nature.
How to sew a patchwork quilt for a newborn?
Patchwork quilt made in the technique of "biscuit" ("ottoman", "bombon")
- Blanket size: 130 x 130 cm
- Drawing from squares 9.5 x 9.5 cm (5 mm allowance)
- Fabric, American cotton

You will need 5 pieces of fabric, cut into squares, in various shades of pink, with a pattern:
- hot pink squares with hearts 141 pieces
- with cartoon pattern 205 squares
- pale pink 63 squares
- flowered 66 squares
- polka dot 28 square
- with ladybugs 70 squares
- interlining bag

Baby blanket- backside:

We do the work:


- It is better to start drawing from pads from the middle, in which case there is less chance of making a mistake, it will be well viewed

- Sew the pads by hand, starting from the middle, with a blind seam
- We choose threads that are strong so that they do not break.

- A gentle light and warm blanket is ready, it can be washed, it will not stray into separate lumps

- A blanket made in the same way, we sew a frill along the edge, and the size of the sides of the squares was made 8 cm

- Light-colored blanket in floral fabric with a ruffle for a newborn, can be completed with an elastic band with a bow

If you don’t know how to sew a voluminous patchwork quilt, then the option of separate pillows should please not only beginners, but also experienced needlewomen.
Patchwork technique
To make a pattern out of pieces of fabric, they need to be assembled into patchwork blocks of triangles, squares and hexagons and other geometric shapes. To perform a particular pattern, there are many techniques.
How to sew a patchwork quilt from squares?
If you are a beginner, it is better to start with a square blanket.
For this you need to know:
- If the side of the square exceeds 5 cm, it is necessary to cut the fabric along the share.
- Squares are sewn into long stripes according to the intended pattern or randomly.
- We sew the rectangles to each other along the short side.
- We sew the first square with the second, folding them with the front sides, to each other, we sew along the allowance line.
- We iron on the edge, and then iron in the direction of a darker square.
- We sew the third square, fold it with the face of the second and repeat the same as in the first case.
- We sew the strips of squares together, sew along the allowance line, iron on one of the sides.
The simplest, basic basics of patchwork needlework is a square-based technique.
Technique "Quick squares»
Laying out a mosaic of squares is simple, the main thing is to choose the right fabric. Scraps are cut out of pieces of fabric in the form of geometric shapes. To form blocks, we sort by color, pattern, texture.

Such a coverlet is made quickly, especially if it is not necessary to follow the sequence of flaps. We sew the squares into ribbons, and we connect the ribbons together.
Technique "Chess"
We alternate two colors, as on a chessboard, and we get beautiful drawing. It is good to use fabric with the same pattern, but different colors. Combinations of squares with a pattern of stripes look original, some are placed horizontally, others vertically.

The pattern is simple, it can be done by a novice needlewoman. The main thing is not to make a mistake with the choice of material and carefully connect the squares into a single chess plot.
Technique "Watercolor"
The bedspread consists of squares arranged in a certain sequence, resulting in a floral pattern. If you choose the right color and pattern, patchwork bedspread will complement the interior in the style of Provence, Rustic, Empire, Baroque.

Skillful hands of masters create from squares blankets-pictures in the form of flowers, sea and natural landscapes.
Technique "Diamond»
The intricate square-in-square pattern is called "Diamond", often used as an element in the ancient "Russian Square" or "Pineapple" technique. The pattern is simple and easy to do.
- We take two pieces of fabric and cut out squares - two from one fabric, and one from a fabric of a different color
- Two identical squares are cut diagonally in half
- We apply an isosceles triangle with the large side to the square and sew
- Seam allowance 0.5 - 0.75 mm.

There is no clear line between the technique using the square, triangle and stripes in the pattern, there are products made by all three figures.
How to sew a patchwork quilt from stripes?
Strips of fabric, from which craftsmen sew a patchwork fabric, is an ancient technique. A great option for those who are taking their first steps in needlework.
- We cut strips of various sizes - these can be tiny pieces of fabric 5 cm wide, this technique is called "Branded"
- You can use strips of solid pieces of fabric, wide and long, matched by color and texture.
- Stripes are sewn into large blocks along the edge of a smaller size
Stripes are a popular quilting technique for quilts and bedspreads.
Technique "Hut"
If you meet in the literature on patchwork the names "American Square", "Firewood", "Well", "Hut" - the same technique.
We do the work:
- In the center of the block we place a piece of fabric, symbolizing the hearth, made of orange, red or yellow material.
- Around we sew strips in a spiral - the logs of the hut, often use light-colored fabric.
- The block is necessarily divided into a darker and lighter side.

The smaller the size of the stripes and the greater their number, the more interesting the “Hut” pattern.
How to sew a patchwork quilt from triangles
Triangles are present in almost all patchwork patterns. The technique using triangles is popular with Russian needlewomen working with patchwork.
We make two or more triangles from squares or cut them out of pieces of fabric according to a pattern.
- The direction of the grain line of the fabric should coincide with the smaller side of the triangle.
- Sew the triangles along the long side.
- If you need a lot of triangles of two colors, cut out squares with a seam allowance:
- fold two different squares right side up
- we make two lines, stepping back from the diagonal line by 5 mm
- cut in the middle
- we get two squares with triangles of different colors
Card Trick Technique
The focus of the pattern is that we see squares, in fact the pattern consists of triangles of different sizes.
- We take 4 pieces different fabric(excluding background pattern)
- We divide diagonally 2 times, we get 4 triangles from each square
- From the resulting triangles we sew the squares according to the pattern

The focus is open - there is nothing complicated in the pattern!
"Russian square"
Traditional Russian northern pattern. The basis is small squares and triangles that our ancestors had when cutting a straight suit. Initially, pieces of material were distributed randomly, and then began to be collected in blocks with a small pattern. All elements were sewn by hand.
- The center of the pattern is a square, to which we sew isosceles triangles
- We take dark fabric for triangles, light and bright fabric for squares and stripes.
- The size of the pattern depends on the central square
- To work, you need to make a pattern pattern in life size otherwise the drawing will be uneven.

For beginner needlewomen, this pattern is complex, requiring patchwork skills.
Technique "Star Ohio"
Despite the apparent complexity, even a novice needlewoman can perform this pattern if she is patient, accurate and attentive.

A step-by-step description of how to assemble the Ohio Star patchwork block can be found at the beginning of the article in step by step instructions to a handmade blanket.
Technique "Crazy»
Free theme for your creativity. What geometric pieces of fabric fell under your hands, such will find a place in the fantastic extravaganza of patchwork.
- We select the fabric of the same texture
- In the center we place the brightest piece, most often triangular in shape - the “pupil”
- Around we sew triangles, regular and irregular shapes
- Quadrilaterals can complement the composition on a free patchwork theme
Agree in this mess, there is a beauty:

Patchwork needlework is a pleasure for a creative person, an opportunity to show their imagination and realize ideas. The patchwork quilt is a vintage element in a modern interior, it creates a special atmosphere and coziness in your bedroom and children's room. The main thing is that for work you do not need anything other than threads, needles, a sewing machine and pieces of fabric that will always be found in your home.
Video: "How to sew a patchwork quilt with a padding polyester and a voluminous rim"
If you look at numerous photos or videos depicting patchwork things in the interior, you will be amazed - such man-made beauty definitely decorates any home. For beginners, patchwork is a technique in which you can find yourself and start decorating the house with your own hands. And the very first work can be a blanket in the style of a patchwork, or bedspreads in the same technique.
You need to start by repeating other people's mistakes. True, the repetition of the theoretical. Often such a huge, complex work ends in disappointment - the needlewoman does not like something in the blanket.

So, the main mistakes of beginners:
- Color spectrum. Do not try to embrace the immensity. Find a photo color wheel(spectrum), where you will see all the options for combining colors. Too colorful blanket is not suitable for every interior style. Some combinations still need to be taken into account, look at the video, considering in detail how a patchwork quilt looks in a particular setting.
- Fabrics should be the same in thickness and structure.
- All seams need to be ironed very carefully, any master class focuses on this.
- During assembly, you can allow the edges to stretch - be careful in this process, the parts of the bedspread may be deformed.
- There must be a common logic in the pattern - clear schemes, pictures, not patchwork chaos.
Review any master class, re-read several times. Do not deprive attention and schemes: schemes allow you not to get confused.
Patchwork quilts in the interior (video)
Master class: patchwork blanket
First, of course, it is worth collecting all the necessary tools and materials together. Make sure you have everything you need.
Namely:
- Scraps of fabric for squares;
- Schemes or patterns;
- Do-it-yourself cardboard template (you can also use plastic);
- Scissors;
- pins;
- Threads;
- Sewing machine.

- Decide on a pattern. For beginners, blankets with a large pattern or pattern are preferred (look at the photo for examples). Since you have to sew a blanket from squares, the pattern can be quite simple, geometric (snake, mosaic).
- Fabric choice. You need bright enough patches that will go to the front side. You will also need a plain canvas for the inside, as well as a synthetic winterizer for the layer. If you choose fabrics of the same texture, they will not wrinkle on the first wash.
- For beginners, precise cut is equally important.. For this, there are templates, they can be cardboard or plastic (examples can be seen in the photo). When laying out the templates, consider the direction of the shared thread.
- After cutting the required number of squares, proceed to assembly. The patches are applied to each other with the front side, and they need to be sewn along the marking line from the inside. Do everything according to the conditions of the color scheme. After the front part is sewn, iron it well.
- On a table or other flat surface lay out the fabric for the wrong side of the bedspread (quilt). Put a synthetic winterizer on top, straighten the fabric with your own hands. Cut out the insulation with some margin on each side. The insulation must be quilted, otherwise it will “walk” on the blanket. Stitch patterns are always the same - from the center to the edges.
- Master class draws to a close. You need to pin all three layers with needles or pins. Layers align to the topmost. It remains only to sew. Taping around the edges will help keep the quilt from fraying, so take the time to sew on tape or something similar.

Regarding squares: to simplify the work, use diagrams on paper. You lay out squares on the diagram (their number is from 48 or more), and so you will not go astray what to sew with. Take a photo of such a calculation, which will also serve as a guide for you.
Do-it-yourself country-style blanket (video)
How to sew a patchwork blanket: color selection
The master class will also be complemented by tips for beginners on how to choose colors for a do-it-yourself blanket. For such a bedspread of squares, you need to select shreds that fit well.
Consider the combinations of the most popular colors:
- Red combined with blue, yellow, gray and green;
- Yellow can be emphasized with green, blue, brown, golden;
- burgundy"friends" with green, pink, gray and blue;
- Grey combined with black, red, pink, green, blue, yellow, blue;
- Brown suitable for beige, yellow, golden.
If you don't want to make a quilt too colorful, three colors is the golden mean. A baby blanket can be more colorful, and the patchwork pieces in it can be with funny and fun patterns.

Patchwork quilts
And now a tip for beginners on how to decorate such blankets with your own hands. For example, you make a blanket from squares as a gift for a child. Today it has become a tradition to give a patchwork blanket to a newborn. With your own hands on one of the squares you can make a festive embroidery. Wishes, date of birth of the baby or author's signature.
For novice craftsmen, it is important to show class: you can decorate a blanket with an original braid, or make a patchwork insert from some special fabric. Often, old children's things that you don’t want to part with for a longer time are converted into blankets.
It is believed that handmade things from old things carry a special energy. So you can make a blanket for either a child or an adult.
Any DIY patchwork work, either videotape the making process or take a photo. This will help you in the future, and maybe it will be a hint for someone else.
Quilt patchwork (video master class)
Patchwork is the art of turning small, meaningless patches into something solid, weighty, large. The gallery of photos of such works inspires the craftswomen to their discoveries in this technique, and things last a long time and can even be passed down from generation to generation.
Patchwork blanket (photo)


Remember we wrote about hygge style? How did you not read? Be sure to read and feel this lifestyle and philosophy of the organization of the Scandinavian interior. The philosophy is very simple: coziness, comfort, nothing superfluous, nothing that could annoy, distract or tire.
Patchwork bedspread in the interior
A maximum of soft and comfortable things, a lot of textiles, a home, natural materials. The house is calm and safe, friends gather here, it’s not boring to be here yourself, spinning in your favorite handmade blanket and plunging into dreams. By the way, about handmade and bedspread. We offer to bring this luxurious picture to life and create a patchwork patchwork quilt with your own hands.
What materials are needed for a patchwork bedspread
Well, let's start by defining the concept of patchwork. This is such a technique that allows you to sew a whole bedspread, or rug, or even a bag, clothes, stole from many different small patches. Such products are not only warm, which means practical, but very stylish and authentic, which means they can decorate the interior. We will sew a blanket. What we need:
- remnants of various tissues (it is desirable that they be of approximately the same quality, or at least the same thickness);
- ruler, pencil;
- scissors;
- fleece;
- fabric for the wrong side (you can use denim);
- thread, needle or sewing machine;
- for a more complex option, you need a circuit.
Technique for creating bedspreads from flaps
For starters, you can try to sew DIY patchwork blanket from squares. Then you can not think about the scheme and it will be easier to sew the bedspread.
From the scraps you need to cut out many identical squares - use a pencil and a ruler so as not to be mistaken in size.
If you have a sewing machine, the process will go much faster. Sew the squares in rows, and then stitch the rows themselves. When the canvas is ready, it must be ironed on the inside to straighten the seams.
 Patchwork bedspread pattern
 Then you need to measure the product in order to cut the appropriate fabric from the fleece. Now lay the cover over the fleece with the right side facing up.
The next step is to cut the canvas out of denim or any other fabric - this will be the inside of the blanket. Next, place the denim right side up on top of the pile of fleece and bedspread.
Your pile can be basted a little, and then stitched. Leave a hole in one of the corners so that the cover can be turned inside out. If you did everything right, then on the one hand you will have denim, on the other - the front side of the patchwork blanket, and inside - fleece. The hole must be sewn up with hidden seams and iron the finished product again.
 Patchwork quilt pattern
 If you want to increase the size of the blanket, then at the assembly stage, plain strips of fabric can be laid between the squares. So you have a patchwork patchwork quilt ready.
Video instruction for beginners:
Do-it-yourself patchwork blanket: use patterns
A more complex scheme will require you to have a precise cut and a diamond eye. To get started, examine your stock of flaps: what material is a lot, what is less, and what is generally in short supply. Then you can come up with a diagram yourself by drawing it on a piece of paper with paints or pencils, or take ready-made templates.
Remember that it is most convenient to sew the patches together in blocks, and already sew these blocks together. Remember to leave seam allowances, otherwise you will end up with a product that is half as large as you expect.
 Scandinavian motifs
 Patchwork style: bedspread in different techniques
More precisely, the execution technique remains the same, but the products will differ from each other in appearance.
The patchwork style is a godsend not only for needlewomen, but also for lovers of extraordinary things. This direction has found application in various areas of life - in the manufacture of clothing and footwear, in the design of premises, in the production of furniture and carpets. Today we will figure out how to include patchwork in the interior, get acquainted with the techniques for its implementation and give some interesting patchwork ideas.
A bit of history
Sewing from patchwork - patchwork - an ancient direction of applied art. Even in ancient Egypt, Persia, Africa, India and other countries, the manufacture of textile products from multi-colored pieces of fabric sewn together was widespread.
Kievan Rus was no exception. Our ancestors also highly appreciated the colorful bedspreads, rugs and other interior items made in this technique.
This direction gained the greatest popularity in the 19th century. It was at this time that mass production of bright printed chintz, cambric, calico and cotton was launched. This led to the fact that many needlewomen began to perform bright pillows, towels, carpets, scarves and patchwork blankets.
DIY patchwork: where to start?
If you have a burning desire to try your hand at patchwork, let's decide what you need for this.
- Textile. You can find suitable scraps of matter in any home: rummage thoroughly in a closet or pantry - there you will find the remnants of fabric from tailoring, bed linen, and so on. A variety of fabrics for patchwork are suitable, but it is desirable that materials that are similar in texture and density are present in one product.
- Sketch. If you have experience in patchwork, making it yourself is easy. But if you are still new to this area, it is better to use drawings from specialized magazines or look for sketches on the Internet.
- Lining fabric. Usually, plain bright matter is suitable for her, which will go well with colors front side of the product.
- Scissors, thick cardboard for templates, chalk or a small bar of soap for marking future flaps, pins and a needle and thread for basting.
- A sewing machine for stitching the finished product or a crochet hook with threads (if you use the knitted patchwork technique).
As you can see the list necessary tools quite simple, and you can find it in the house of any craftswoman.
Advice! If you have never experienced patchwork before, and you do not have the right tools, schemes and materials, there are special kits for patchwork on sale. They include the required number of flaps, templates and schemes.
Interior use of patchwork technique
It is easy to guess that many ethnic interiors are "friendly" with patchwork. In styles such as, Indian, Oriental and some other areas, patchwork products look very organic.
However, not only national and "village" interiors go well with patchwork. Many designers are not afraid to include them in sophisticated styles such as art deco, art nouveau, vintage and so on. Refined armchairs in patchwork technique, as well as small poufs and couches, look great even in baroque.
Strict hi-tech and loft can also be decorated stylish details interior, made in the spirit of bright sewing. Well, kitsch and with their variegation and riot of colors are simply made for a patchwork patchwork.
How can such a direction manifest itself in the interior? First of all, these are all kinds of textile details - curtains and curtains, screens, lamp shades, furniture covers, tablecloths, napkins, mittens, pillows, bedspreads, blankets, bedside rugs and large carpets, wall panels. It is interesting that a set of patches can be made not only from fabric, but also from paper - wallpapers pasted in the form of geometric shapes, intricate patterns and asymmetric patterns look very interesting. flower arrangements on the wallpaper.
Also, when decorating a room in the spirit of patchwork, solid materials can also be used - wall tiles, flooring, tiles and so on.
What types of patchwork exist?
- Traditional patchwork. This direction is based on a game with geometric shapes - most often these are squares, rectangles, rhombuses and triangles, which are sewn into a single canvas. An indispensable attribute of this patchwork technique is the presence of a lining consisting of a single piece of fabric. In the spirit of traditional patchwork, both small interior items (pillows or potholders) and more complex ones (quilts, carpets and bedspreads) are created.
- Crazy patchwork differs from its traditional counterpart in the randomness of patterns that can have any, even the most bizarre shape. As the name implies (crazy means “crazy” in English), the more intricate the patches used, the better. Non-standard applications, wavy lines, the use of beads, beads, buttons and decorative stitches are also welcome. Patchwork bags made in this style look very nice.
- Knitted patchwork implies two options: in the first case, the cloth flaps are connected using a crochet hook and threads of contrasting colors, and in the second, the elements are knitted initially. To make this type of patchwork bedspread or any other large product will take a lot of time, but the result will be amazing.
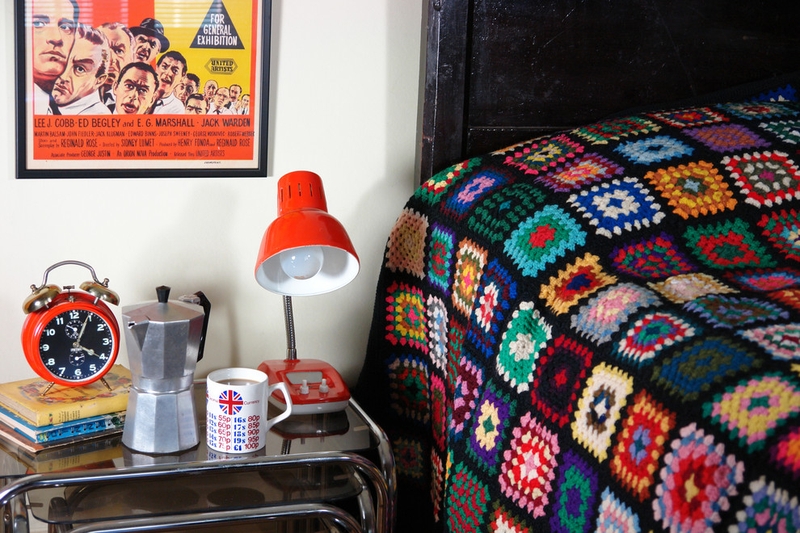
Knitted patchwork is a great home decoration for those who appreciate vintage accessories and unexpected combinations.
Previously, every grandmother had potholders, blankets, pillows and some items of clothing made from patchwork details. . Now this sewing technique is called patchwork..
The square block patchwork quilt is not only warm, but also a stylish home decoration..
Patchwork is a patchwork of fabrics of various interior items known from ancient times and is popular all over the world.
Beginners should start with blankets made of large square blocks. This is the most easy option making a blanket complex schemes in patchwork technique.
First you need to decide on the size of the future product, the color scheme. For the wrong side of the blanket, a synthetic winterizer fabric or a synthetic winterizer and a soft fabric are suitable.
You should also choose a fabric for edging. It should be plain, you can use a decorative silk ribbon, just cut off four strips 8 cm wide for edging.
Also for work you will need:

Fabric for future square blocks should be pre-soaked in hot water, after 10 minutes rinse in cold water. Next, starch and iron well.
Gallery: patchwork blanket (25 photos)


Patchwork blanket: patterns from square blocks
The production of elements begins with the preparation of strips. To do this, cut out two identical and fairly wide strips from two pieces of fabric. Fold them right side to each other and sew on a typewriter.
From a fabric of a different color, cut the same strip. Sew it to the first and second strip so that you get a sleeve on the wrong side. Cut the resulting sleeve in an even zigzag into identical triangles. For the evenness of triangles, you can use a template or a triangular ruler. As a result, you should get several triangles, and squares in the turn.
 There are many schemes. In order to create a pattern in accordance with the one you like best, it is recommended that you first try to simply fold the parts in the desired combination. Only then can you proceed directly to sewing. The assembly of square blocks is as follows: the parts are sewn in accordance with the selected pattern with a longitudinal seam, and then to the canvas. After finishing work, iron all seams.
A synthetic winterizer is sewn to the finished product, all that remains is to complete the edging. Attach the prepared piece of fabric to the front edge, fit and sew. Repeat the action for the wrong side of the product.
If instead of edging is used decorative tape, then before sewing it is necessary to iron it. If you refuse this step, then you can face a lot of difficulties during work, because the tape tends to twist. You can also add beads, beads as a decorative element to the blanket.
Making baby blankets using patchwork sewing technique
 Sewing children's blankets using the patchwork technique is not difficult, and even a novice seamstress can cope with such a task. Those who have ever worked in this style can create real masterpieces from children's blankets with drawings on a children's theme, for example, from a cartoon.
The creation of children's blankets consists in making identical squares, filling them with synthetic winterizer, attaching to a camel wool bedspread or synthetic winterizer base.
Before you start sewing baby blankets, you need to decide on the technique of stitching patchwork elements. The design of the finished product depends on the choice of technique. It is recommended to use for a blanket the technique of combining squares and triangles using small elements.
To sew a blanket, you need to prepare fabric with baby pattern and two pieces of plain fabric. Windmill shreds and drawings should be the same size. To get a picture in a square, you need to use chalk and a ruler to pre-mark and cut out the squares.
Windmill drawing is assembled from small triangles of two colors. Triangles of the same color are folded along the star pattern, and triangles of a different color are laid out between the elements of the star. Everything is swept away and collected in a single square. In addition to the pattern and the windmill square, you need a plain square of the same size.
Sewing patches for a baby blanket
 Before you start stitching, you need to place all the squares on a flat surface in a single mosaic pattern and fasten it into stripes with pins. Check the resulting drawing for compliance with the scheme.
After that, sew the squares into stripes, and sew patchwork strips into a single canvas. Sew a edging tape along the edge of the product.
Put the finished product on a flat surface with the front side, a synthetic winterizer or a camel wool coverlet on it, then cover it with a cotton cloth. Sew all these details and finish the edging. In order for the blanket to serve for many years, you can stitch it with an artistic stitch.
Choosing fabric for patchwork
Making a patchwork quilt special attention is paid to the working material. These may be the remnants of fabric, kits specially purchased in specialized stores for needlework. But if you want to create real masterpiece do not choose the material from what is. There is no need to limit your imagination, because there is a huge selection in fabric stores.
Since it is the fabric, and not the work, that plays the key role in the patchwork technique, it is worth approaching its choice with all responsibility. The fabric should not only be beautiful, but also of sufficient quality, and therefore it is better to choose natural material. This fabric fits all five requirements:

But when working with silk or wool, some difficulties may arise due to the vagaries of the material, so they try not to give preference to products in the patchwork style.
Types of sewing using patchwork technique
 On warm patchwork quilt geometric patterns, applique with the image of animals or abstraction can be located. It all depends on the chosen style of work. There are only three of them: classic English, oriental and crazy patchwork.
Schemes in the classical English style are quite primitive. Only square blocks are used, usually in two colors.
The Eastern style uses the same method, As in classical style , using a large number flowers and decorative items. It can be beads, ribbons or locks. For oriental style there are a lot of different patterns, you can also use arcuate or wavy patterns from shreds interconnected by a decorative tape.
Crazy patchwork gives free rein to any fantasy. The shape, color, decoration and size of patches, their lines are not limited by anything. There is no pattern as such. In this style, you can, for example, create paintings with nature or abstraction.


