Do-it-yourself handmade rugs. Stylish carpet for the home with your own hands
Good day!
Say what you like, but nothing creates comfort in the house so quickly as a soft rug on the floor. Moreover, it does not have to be large at all, it can be shaggy carpet islands, cleverly “scattered” throughout the room, and small rectangles, comfortably located in the bedroom, and, of course, we will not get anywhere from rugs in the nursery and near the front door. To be honest, I am an opponent of carpets, but it happened personally in my house, where, in addition to two children, there is also a dog, a cat and a cat. Can you imagine how many times a day I have to vacuum the bare floors and sofas during the molting period of animals, despite the fact that we scratch our animals with the whole family? And if I still had carpets, I would probably go crazy :) Therefore, from the carpets I have a rug near the door and a small rug that is spread only while the child is playing on the floor and animals are not allowed there :) And so I want to put my feet in something soft on the floor :), and so that it’s clean, and so that you can wash it in a typewriter :) Well, as always, needlework comes to the rescue, and not some kind of modern, but quite ancient-traditional , slightly adjusted to modern design realities, in a word, a little effort and at the end we get a stylish and practical do-it-yourself rug.


And the best part is that you can successfully use fabric-thread waste and leftovers to make a handmade carpet, create a beautiful decorative element and at the same time get rid of deposits :)
I want to bring to your attention an excellent article about the most basic techniques for creating carpets with detailed description and photo processes: knotted carpets, rugs from braids, air chains and from fabric balls with filler. Enjoy watching!
Famous do-it-yourself nodular rugs
For work we need:
Mesh for carpet (we buy in a needlework store or in a hardware store). Nets are different. We buy large-mesh, it is more convenient and faster to work with it.
A thick crochet hook that should fit freely into the mesh.
Knitted tapes.


Where can I get knitted stripes? Of course, in the closet with old things! Carefully touch summer wardrobe all family. All knitted T-shirts, unwearable for various reasons - in business! Let's give them a second chance. We rip the T-shirts at the seams and cut strips of five centimeters wide from the details.
How much do you need? A lot of. Up to twenty T-shirts may be needed. If you are lucky to find so many things of the same or similar colors, you were born under a lucky star. Because professional designers are not too lazy to attack second-hand stores. Shredding T-shirts long and tedious. It is not necessary to follow the ideal line. The main thing is to bring this boring activity to the end.
Sliced? Now turn on your favorite movie, which you know by heart enough to enjoy looking at it with one eye, and cut the strips into pieces of twelve or fifteen centimeters.
It will take just enough time to watch a comedy. It remains only to scroll in washing machine these lovely patches. It is possible even without any detergents. Just in the water. As a result, they will take on the appearance of tubular pasta, which should give the rug a mysterious design look.


Lyrical digression: as an option, you can use non-knitted items. The main thing is that the fabric is soft and does not crumble. For example, old terry towels. True, such strips do not twist into a tube.

Well, now comes the most interesting part - the carpet weaving itself! We sit down comfortably, arrange a grid on our knees, put a box with “pasta” on the left, in right hand hook. At a distance a little more than a meter, we put a box of chocolates from those that we rarely allow ourselves. And we agree with ourselves that every hundred knots is crowned with eating one candy. Believe me, they will taste fabulous!
It is more convenient to start from the center. We put the first “pasta” under the grid, pull both ends outward with a hook. And we tie a knot tightly with a brace on the nylon wall of the cell. This is an elementary technique, you have done it thousands of times.
We also stretch the second strip and tie it side by side. And we move, preferably in a spiral, until there is no empty space left. If the pasta ran out earlier, make more blanks, or just cut the mesh.
For the first time, it is better to knit a rectangular rug. The next one can be round or oval, you can even play with colors. Just do not get carried away excessively, do not leave the family without clothes!


Do-it-yourself rug from "t-shirts"
And another option for a T-shirt rug. We make blank strips as mentioned above, but do not tie them to the grid, and the grid can not be used. And any fabric, which will be referred to as the "base". On this base we glue rows of double-sided tape. And already on the adhesive tape, on each row in turn, we put the “pasta”. We're trying to make it smoother. Laid and stitched in the middle. They unfolded the already sewn row, put on a new one, stitched it. The process looks something like the photo.


The rug turns out to be indistinguishable from the same, but knitted with knots. And it has not yet been proven by science which way is easier and faster. The second one is probably the thicker one.
When everything is finished, you can mow your rug like a lawn. And you can leave the natural shaggy.
Homemade rug for the hardworking
From any durable fabric such as raincoat fabric, a considerable number of circles are cut using a template. Inside each we put a piece of padding polyester and, after stitching it with a thread along the diameter, we pull it together. It will turn out such an elastic ball. Threads, of course, we use kapron.
Then we sew the balls together, attaching each new one with several strong stitches to the previous ones. It can be in rows, in a spiral, in random order ... Children love such “pimple-shaped” rugs very much - it’s nice to walk on them barefoot.


Grandma's do-it-yourself rug
The oldest, most famous way is the so-called "grandmother's rug". Today you can call it a "country-style rug." The fabric is cut or torn into strips, and these strips are woven into colorful braids. And the pigtails are laid in a spiral and sewn with large stitches using a large needle and thick thread.
A country-style rug will look very elegant if you choose a monochromatic fabric for it. And it is not necessary to twist the spiral at all! You can cut wide strips, weave large braids, lay them next to each other, and secure them well.


Knitted rug
In America, their own method of weaving from knitted remnants was widespread. Stripes of knitted items were wound into balls and knitted with a thick crochet chain of air loops. Then the multi-meter chain is twisted into a spiral and stitched. American grandmothers did not weave rugs, but huge carpets in this way. It took more than a month for one such instance. This is what American needlewomen do today, creating carpets in the style of the 60s of the last century. But the result is worth it.
The only drawback is household sewing machine Seamstress will not pull such a thick canvas! You need a special industrial or do a manual seam. A little slower, but the seam can be made deliberately decorative, which will make the rug beautiful to the point of impossibility.
American rugs self made:


You can get creative with this method and combine several small rugs together into a composition. The main thing here is to choose the right colors. Such a rug will fit into the most modern interior.
Using the spiral principle, you can give a second life to several old sweaters. If you cut the strips across, they will roll themselves into tubes. It is necessary to carefully sew the strips together into one long one, then lay and stitch.


And you can use not ready-made things, but the remains of threads. Knit a scarf ten centimeters wide and ten meters long from them. If the last loop in each row is knitted as a purl, the fabric will twist itself into a thick “sausage”. We twist the spiral, and sew!
And you can immediately knit a spiral, grabbing and knitting the extreme loop of the finished fabric.


The article was prepared by Elena Bessmertnaya, for which many thanks to the author!
Evgenia Smirnova
To send light into the depths of the human heart - this is the purpose of the artist
Content
Floor covering for the house can be not only bought, but made with love with your own hands. Many needlewomen can sew a patchwork rug with their own hands in just a few hours if they use a little trick in its manufacture.
How to make patchwork rugs with your own hands

There are many techniques for making a do-it-yourself fabric rug. Each allows you to fantasize and be creative on the topic of flooring. At special classes and master classes, they teach how to create voluminous or flat rugs, pleasant to the touch or the simplest, “rustic”. When choosing any technique, it is important to prepare a lot of scraps of fabric, for which old things, unnecessary yarn, or even T-shirts and T-shirts bought at the lowest price will come in handy.
Basic techniques for making rugs:
- Knitting - natural yarn or narrow strips of fabric are prepared here, which are knitted according to the classical pattern.
- Patchwork is the creation of a mosaic of different shreds that are sewn together into one whole.
- Weaving is similar to knitting, only knitting needles with a hook are not used here, but there is a base on which threads or shreds are superimposed.
- Stitching - either pigtails from shreds are used, or balls with synthetic winterizer inside - this is how the volume is obtained.
Do-it-yourself knitted patchwork rug
To make a do-it-yourself rug from strips of fabric in knitted style follow instructions:
- Prepare the material for work - you can take old T-shirts, T-shirts, from which the bottom seams are cut off.
- The material is cut with scissors into narrow long strips. Cutting goes in a spiral or like this: stripes are cut in a folded product (slightly short of the seam), then the thing is opened and cut into one continuous tape.
- It can be used for knitting needles, but it is more convenient to do it with a crochet.
- The rug is knitted from the simplest air loops with single crochets - you get a rectangular shape of the product.
- If you take 5 loops, close into a ring, and add loops on each row, you get a round shape.
- For a change, you can mix colors - the rug will turn out bright, intricate.
Do-it-yourself carpets in patchwork technique

Beautiful and original are "patchwork" products. Do-it-yourself patchwork-style rugs from scraps of fabric are easy to make. To make them, follow the instructions:
- Prepare the material - scraps of fabric, shreds, themed pieces with prints specially bought in stores or on the Internet.
- Wash new fabrics, steam them, and starch and iron old scraps.
- Dense fabrics are perfect for rugs - tweed, gabardine, drape.
- For a longer product life, take a lining - it can be foam rubber, synthetic winterizer, batting or a dense carpet base.
- Bring all pieces of fabric to the same size and shape, for this use a template, seam allowances for dense materials are not needed.
- Take the base, stitch all the pieces of fabric on it in a chaotic manner or following certain patterns and images. Patterns for patchwork can be found in specialized magazines or on the Internet.
- Once you've mastered simple sewing, you can try making rugs with curved lines or intricate patterns.
- A variety of patchwork is a knitted type, in which the shreds are not sewn together, but tied together.
- To obtain a soft voluminous rug, you can use the quilting technique, in which 2 canvases are sewn together, and a synthetic winterizer is laid between them.
How to weave a patchwork rug without a hook
If you are not a master of crocheting, then you have the opportunity to weave rugs from scraps of fabric with your own hands without it, using a little trick. How to do it:
- Take a special large photo frame or make a base for a future product according to the desired dimensions from wood.
- On two opposite sides, stuff the carnations in 2.5 cm increments.
- For threads, use all the same old T-shirts or T-shirts, knitted ones are better.
- Pull the threads over the studs - this will be the base.
- Take working thread- let it be contrasting, skip it by alternating under the base and above it.
- Continue to weave the threads, include different colors.
- To get a fringe, you can tie the threads to each other and not cut the ends, for smooth weaving, it is better to cut them.
- Periodically, weaving will need to be pulled up to the first row to get the desired density.
- When finished weaving, remove unnecessary details on the wrong side, remove the finished product.
- You can decorate the rug if you wish.
Volumetric patchwork rugs

Making voluminous rugs from scraps of fabric with your own hands will take more time and fabric, but it's worth it. The coating is original, fun and very popular with children. There are several varieties of manufacturing volume rugs:
- Pompom base - for it, take square pieces of fabric, form balls of them with filler in the form of a padding polyester, sew them together.
- Grandma's rug - pigtails are woven for it, which then need to be sewn together in a spiral or in any other order with a thick, strong thread.
- Cut thick knit fabric (sweaters) into strips and let them spin on their own - to speed up the process, you can wash the strips in the washing machine with water only. The twisted strips are sewn together to form a voluminous rug.
- You can knit a long ribbon of yarn 10 cm wide and several meters long, in each row knit the last loop as a purl so that the fabric is twisted. Then lay the material in the desired order (spiral, circle) and sew together.
- It is possible to immediately knit a spiral - for this you need to grab and knit the extreme loop of the finished fabric.
- To create a do-it-yourself rug in the form of grass, you need to prepare the base - a rigid mesh, which is sold in hardware stores. It is better to take with large cells, wherever the hook goes. We prepare the fabric - knitted stripes or cotton. It is better to start weaving from the center - you need to place the strip under the mesh and pull both ends to the front surface with a hook, then tie a tight knot on the cell wall with a brace. After filling in all the cells, you will receive a fluffy rug.
The art of making carpets has a long history. For exclusive floor coverings, you can use leftover yarn, thread, pieces of fabric or fur, old terry towels, T-shirts, sea pebbles, clothesline, plastic bags, caps, corks, banknotes. How to make a carpet with your own hands? It is enough to show imagination, patience, perseverance to sew, knit or weave a unique decoration for decorating a home. The mat will turn into a massage one if you insert a removable pad with an abrasive filler into it.
Do-it-yourself carpet according to the photo can be knitted, made from pre-made pompoms or thread pile, weaved, weaved.
Knitted
You will need cardboard, a black marker, threads of various thicknesses, scissors, a hook from No. 7 and above (or knitting needles). To determine the width of the future product rectangular shape the required number of air loops is dialed. To knit a round rug, 5 air loops are connected into a ring and then loops are added in a circle.
It is more convenient to tie several parts, then crochet them or sew them with a regular needle (this technique is called “patchwork”).
Remains of yarn, a hook, scissors, a thin construction mesh with cells for the base of the rug are needed. Thread balls are made by winding yarn around fingers or cardboard. Then it must be tied with a long thread in the middle and carefully cut along the edges. The denser the pompoms are placed to each other, the more beautiful and effective the rug will turn out. The edges of the base should be treated with strips of fabric, ribbon or tied. For such a rug you will need threads, flaps for the base, cardboard. Threads are tightly wound on two cardboard strips 3 cm wide folded together. Then you need to fasten one side of the strip with stitches, and cut the other. Several such fringe blanks are made, which are adjusted along the contour of the base of the rug to the center. You can use two or more colors of thread, creating, for example, a heart in the middle or an ornament over the entire area. A beautiful carpet is woven with their own hands, using thick cardboard for the base, thick and thin multi-colored threads, twine. Cut out a circle from cardboard, make cuts to secure the twine at the ends of each of the 32 sectors marked with a pencil. Then you should wind the twine from one sector to the next through the center point of the circle. You need to twist the threads with twine from the center and monitor the density and evenness of the resulting rows. At the end of the work, the base must be removed. By combining several rugs of different diameters with each other, you can get a unique product for decorating your home. In the process of carpet weaving, you will need: a frame, a stick, threads for the warp and making villi, a cardboard strip 3x20 cm, scissors, a thick needle. Woven handmade carpets consist of longitudinal and transverse layers of threads intertwined in a checkerboard pattern. The pattern on both sides is the same, so the product is used as a two-sided one.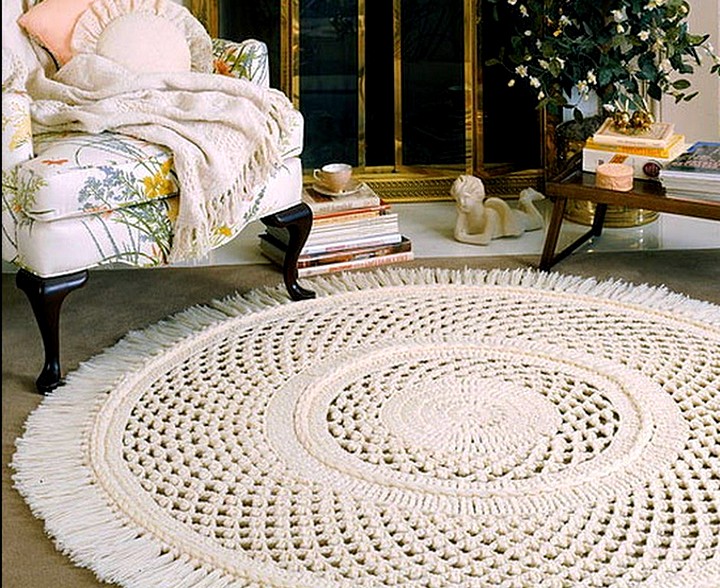
From pom-poms
From thread pile
Wicker
Woven
The interior of some home rooms will seem unfinished if there is not at least a small rug on the floor that emphasizes comfort. Moreover, such an element of decor is appropriate in absolutely any room of your home.
If you are ready to spend time usefully, learn how to make spectacular and stylish rugs yourself.
It does not take much time to create a small carpet, and considering that even without much experience you will quite succeed in making something interesting, such creativity will clearly be worth the hours spent.
We invite you to familiarize yourself with several of the simplest ways that involve weaving and knitting a rug on a grid of threads with your own hands.
Rug on the grid, photo
Idea 1: patchwork rug
If your room lacks colors, why not make do-it-yourself rugs on a grid from pieces of fabric? You can use different materials to make rugs bright, soft and pleasant to the touch. Most often, for such purposes, residues are used unwanted t-shirts, because the jersey stretches perfectly and is tied around the base mesh.
In addition to the material that will form the design, it is important to think in advance which mesh will serve as the base of the carpet.
In fact, absolutely any mesh with holes of a suitable size will do, but we advise you to make a do-it-yourself rug on a construction mesh, as it is especially strong and durable.
 Construction mesh for the manufacture of rugs
 Advice: in specialized stores you can find ready-made mesh for carpets.
To make a rug based on a construction mesh, you will need fabric, the base itself, as well as scissors (for cutting patches) and a hook (useful in the weaving process).
We proceed to the design of the construction grid for the rug:
- in the process of weaving the rug, the mesh may fray. Therefore, it would be more correct to initially process its edges: cover them with adhesive tape, tie them with a hook or hem them to the inside;
- cut the prepared fabric into long shreds with parameters one and a half centimeters. You can take shreds and more: then you will get an even softer rug. Using a hook, pass the patches through the holes in the mesh. Or follow this procedure manually. In this case, each shred must be tied into a knot.

That's all it takes to create a rug from mesh and patches. Nothing complicated: a little patience and perseverance - and a comfortable carpet will be ready!
You can choose any do-it-yourself rug patterns on the grid - and, using different shades, make a certain pattern or pattern on the surface.
If you have shreds lying around, or you just decide to usefully use unnecessary fabric, you can choose another similar technique. All that is needed is to sew the patches to the mesh, burlap or other dense material.
 Rug on a grid of scraps of fabric
 Idea 2: crochet yarn
More experienced craftswomen will be able to crochet a rug on a grid from threads. To get started, decide on a knitting pattern: it can be floral images, plots with animals, landscapes, abstraction, geometric ornaments and much more.
Now get ready to work: you will need a grid with square cells or canvas for carpets, bright yarn and a hook with a foot (in a pinch, an ordinary one).

Advice: when choosing threads, pay attention to their properties. For example, for bathroom interior better fit synthetics, more resistant to permanent moisture. And for the bedroom, natural woolen or cotton threads are suitable.
In order for a do-it-yourself rug made of yarn on a grid to retain its shape, use a dense and rigid base. If you want to make it softer, you can use a silicone base.
As for the hook, it should be large enough so that you can easily cope with the process of knitting on a warp with large holes for the threads.

Pay attention to the following features of crocheting a rug on a grid:

One example of such a knitting pattern is in the photo below:


Using this method, you can get a lot of interesting carpet products for the home. To make your rug neat, prepare the threads in advance. They must be the same size.
Advice: the easiest way is to adjust the parameters of the strand to each other by winding the roll on a cardboard with a width of up to eight centimeters. After removing the yarn, you will have to cut the threads at the top and bottom side in a similar way to the process of creating pompoms.
After choosing an ornament, it is important to correctly calculate the dimensions of the canvas or grid. Considering that part of the material chosen for the base may go to the hem, calculate the length and width of the carpet: the number of holes should correspond to the number of cells in the selected patterns.
When the composition on the rug is completely ready, we advise you to add the finishing touches - and slightly trim the height of the threads. To do this, use special device or level the height of the carpet with scissors.
note that with a decrease in the height of the pile, the clarity of the pattern will increase.

Idea 3: pom-pom rug
The original pattern for the rug on the grid can be done using pompoms. Such a product will definitely surprise your loved ones, as carpets with pom-poms are not only very soft, but also interesting in appearance: you can give them an unusual shape or make them in the form of some animal.
Start cooking by cutting out the desired mesh shape, as well as creating the pompoms themselves. Pompoms are made according to different schemes: without a base, as well as with a base, as in the photo example.

Next, you need to sew all the pompoms to the grid in a predetermined order. At the same time, it is important to keep the same distance between the individual elements: it should be minimal so that the mesh does not shine through the threads.

If you do this job carefully, you will get a nice rug that will keep you warm in the cold. It is desirable to close the bottom of such a product with a purl fabric with a dense texture. Then it will serve you longer.
Idea 4: voluminous rugs on a loin mesh
One of the most common techniques is crocheting rugs on a sirloin net. It is quite simple and allows you to implement many bright ideas. You can also use ready-made schemes crochet rugs on a sirloin mesh and even make your product voluminous (this effect is achieved by correctly placing the “second row” of yarn columns).
Such carpets can be made plain and colored, made of different types yarn. As a rule, fillet mesh is used to create rectangular rugs, as this is the least complicated way of needlework.
If you decide to implement patterns of rugs from threads on a grid, then you will first need to prepare the net itself, which is easy to knit by hand. Knit the base by alternating columns and air loops. Only after completing the grid proceed directly to the ornament. For example, you can create a geometric pattern, as in the photo.
 Rug on fillet mesh
 To make the carpet not too thin, knit rows of double crochets, connecting with the warp using a single method.
The nature of the drawing is not important: here you can show your imagination. And the following pattern of such knitting can be of help to you in your work.
 The scheme of knitting rugs crochet on loin mesh
 How to make a knitted mesh for a carpet
It remains to figure out how to make a grid for weaving rugs. We will describe the process of its creation using the example of detailed knitting of a mesh for a pom-pom rug: to implement other ideas described above, you can use similar techniques.To begin, make a set of four air loops connected by a column. Knit the network in a circle: each point is a new row of the product:
- single crochet eight times from the center of the chain;
- work two single crochets through each of the loops in the first row;
- knit one column on the first loop without a crochet, two on the second, then alternate their number;
- knit one column in the same way as the previous paragraph already on two loops - and repeat the procedure again, increasing the gap in each next row by three, four, five columns or more.
After creating nineteen rows, you will get a round mesh for knitting rugs with a diameter of 32 centimeters. Now do the same for another round element.
After it is ready, proceed to fixing the pompoms by threading the threads that remained after bandaging them through the holes. From the inside, tie the pompoms with strong knots. Cut off the protruding threads and sew a second knitted base to the bottom of the rug so that it lies flat on the floor surface.
See schemes for rugs on the grid, photos with examples of designing home-made carpets for home interiors - and implement your ideas to make your houses and apartments even more positive and brighter!
Video
A simpler version of a rubber mesh rug for those who collect the leftovers of multi-colored yarn in the hope that they will come in handy for some purpose. Time to put them to good use! In this case, you won’t have to knit anything, and the hook is only needed to pull the threads and fasten them to the mesh base.
Watch a video from MK on making such a simple fluffy rug from the remnants of threads with your own hands:
Do you have too many things in your closet that you can’t wear and feel sorry for throwing away? No problem! From them you can sew an excellent designer rug for your home using the ideas and technologies described in our article.

What is needed to make a rug? Yes, anything! Open the closet and inspect things with a critical eye. The list of materials that can be used is very large:
- old knitwear - t-shirts, sweatshirts, jumpers;
- dense fabric from jeans, coats, jackets;
- the remains of knitting threads, rope or cord.

Advice! Materials can be combined, giving free rein to imagination, as a result, the house will be decorated with an original and unique carpet that keeps the warmth of your hands.


When choosing a technology, consider the features of carpets from different materials. Patchwork and fleecy are suitable for the bedroom, it is pleasant to walk on them barefoot, but they do not last long. Knitted and woven carpets are stronger, but tougher, it is better to lay them in the hallway, kitchen. Bathroom rugs should absorb water well, dry quickly and not shed.

Front door mats need to be washed and cleaned frequently, it is better to use waterproof materials for them.

Consider also the style of the new thing and its compatibility with your interior. Variegated multi-colored carpets will perfectly fit into the design of a children's room, wicker and woven rugs will decorate a kitchen or a country house.

A strict openwork carpet or a product with a classic ornament will take pride of place in the living room, giving it charm and comfort.

Types and methods of manufacturing
A colorful homespun rug or a patchwork rug - what should a beginner craftswoman choose? Techniques for making carpets for the home are very diverse. If you exclude completely unique ideas, they can be combined into several groups.
Sewn- a decorative coating sewn to a dense base, or individual elements sewn together. This group includes shaggy bathroom rugs and "grandmother's" braided rugs, as well as pompom rugs for children.


knitted– rugs of rectangular, round or oval shape, crocheted or knitting needles. To give them volume, not only threads are used as a material, but also strips from any non-loose fabric.


nodular- a lot of flaps of soft tissue, rope or thread, imitating a long pile-grass. As a basis, take a polypropylene mesh from a hardware store.


Woven- they use the traditional weaving technique with longitudinal and transverse threads and a simple home-made weaving "mill". The basis of such rugs can be flaps of any fabric and thread. Strong weaving will not allow the fabric to crumble.

Wicker- they are mainly made of durable cord. Such rugs resemble a mat, they are extremely strong and durable, but not very pleasant for the feet, so they are usually used in the hallway.

glued- carpets from original materials glued to the base with a suitable adhesive. Any elements are suitable for their manufacture: leather, dense fabric, cork, pebbles. The main condition is that they should be pleasant to walk on.

The tool necessary for making a rug with your own hands is in the arsenal of any needlewoman: knitting needles and a hook, needles of different thicknesses, a sewing machine, as well as skillful hands and imagination.
Advice! Do not be afraid to try new tricks unknown to you - on the rugs you can perfectly practice and hone your skills.
Shaggy knotted rug
The basis for such a rug is a construction polypropylene mesh or mesh for needlework. Pile can be made from any soft, non-flowing material - knitwear, fleece, terry cloth or thick knitting threads. Craftswomen often use old T-shirts to make it - such a rug is soft and does not require extra costs.

Table 1. Knotted rug from old T-shirts - a master class.
| Steps, photo | Description of actions |
|---|---|
| Prepare strips of knitted fabric: tear off the sleeves and neck of the T-shirts, open the seams. Cut them with sharp tailor's scissors into strips 3-4 cm wide. The length of the strips depends on how long the pile you want to get, 10-25 cm is enough, taking into account tying a knot and further alignment. |
| Scroll the resulting knitted strips in the washing machine without detergents in the shortest mode, for example, “rinse”. This is enough for them to curl into tubes. If you are using multiple jerseys bright colors, make sure it does not shed, or wash the blanks different color separately. |
| The resulting blanks after pressing will be almost dry, they must be completely dried in the dryer or scattered on a large terry towel - it will quickly absorb the remaining moisture. |
| While the knitted blanks are drying, prepare the mesh. Cut it to the size of the rug, give the base the desired shape. If the edges of the mesh are unraveling, glue them on both sides with duct tape. |
| To thread the blanks through the mesh, you will need a crochet hook. It is brought from above into one of the cells of the grid and taken out to the next cell. They grab a loop from a knitted tube folded in half and pull it into the first cell. The ends of the workpiece are threaded into the resulting knitted loop and the knot is slightly tightened. It is more convenient to do this with the help of the same crochet hook. The ends are straightened, if necessary, their length is equalized, and only after that the knot is tightly tightened. When making a plain rug, it is more convenient to start from one edge and, moving in rows, fill in the grid. If you want to make a rug with a pattern, it is better to create a template in advance and color the grid with multi-colored markers - this will make it easier for you to fill in the pattern with patches of the desired color. |
| The rows are filled in a checkerboard pattern - this will achieve a uniform thickness and density of the pile. From time to time, check the wrong side of the rug and, if necessary, align the knots. |
| The pile of the finished rug can be trimmed with scissors, and the edges trimmed with cloth to give it a finished look. To extend the life of the rug, you can sew a dense fabric to it from below. |


A similar rug can be made without a mesh; instead, a dense base fabric is required. Knitwear blanks are made according to the above method.
The base fabric is cut to the size of the rug. A strip of narrow double-sided tape is glued on, knitted tubes are attached to it with the middle part, close to each other. They are sewn on a typewriter directly on top of the adhesive tape.

The first row of shreds is bent, at some distance the second strip of adhesive tape and knitted blanks are glued, sewn. So continue to the opposite edge of the base.
Advice! Rugs made of knitted patches can have any shape: in the form of a heart, an asterisk, a fluffy cloud. This will not complicate their manufacture - it is enough to prepare the base of the desired shape.


Rug from fabric braids
It differs from patchwork rugs in its dense wicker structure and original variegated coloring, which is achieved by interweaving knitted stripes of different colors.

For such a rug you will need knitted ribbons of different colors. The thickness of the finished product depends on their width, for a dense thick rug it is better to take ribbons about 5 cm wide. How to get a long ribbon without knots from a T-shirt is shown in the video.
Video - How to make a ribbon without knots from a T-shirt
Table 2. Carpet of knitted braids - a master class.
| Steps, photo | Description of actions |
|---|---|
| Cut old t-shirts of different colors into strips 4-5 cm wide as described in the video, this will avoid unnecessary knots. To make the strips twist into bundles, you can moisten and dry them. |
| Fasten three strips of different colors at the ends with a strong thread. Start weaving a regular pigtail out of them, tightening it not very tight. Gradually roll the pigtail into a spiral. |
| After laying the next turn, it is necessary to fix it from the inside with a needle and a strong thread - at least No. 20. |
| Gradually adding ribbons of a different shade, you can achieve the desired colors. It is convenient to connect the ends of the tapes without knots using a needle and thread. The coils can be temporarily fixed with clerical clips. |
| After laying the last turn, the end of the pigtail is carefully turned inside out and secured with threads. |


To achieve the strength of the carpet, you can use a sewing machine. In this case, weave first long braid, and the winding is carried out directly under the foot of the machine. They start the end of the pigtail, lower the needle to its beginning and, turning the product, lay the next coil. Sew in a zigzag at the junction of the turns.

Braid rug - manufacturing steps
A rug stitched on a typewriter is more durable and tougher, lasts longer and looks neater, besides, this method saves time.
Advice! When making a rug, it is better to use needles for sewing machine With H-S marking or H-SUK - these are needles for knitwear, they easily push the knitted loops apart and do not tear the fabric.
Video - Rug from old socks
Knitted rugs and rugs
Very popular in the days of our grandmothers, knitted rugs are back in fashion. And this is not surprising - the knitting technique allows you to create unique beauty things that fit into any interior.

Simple round crochet rug
The easiest option that even a novice craftswoman can handle is a two-color round rug, bollarded with a crochet. It will require knitted or thick woolen yarn and hook No. 10.
Row 1. For the first row, you need to tie a chain of 6 air loops and close it into a ring. Passing a loop into the resulting ring, knit 2 air loops for lifting a row and 11 loops with a crochet.

Row 2. The second row is knitted with a thread of a different color: 2 air loops and 2 loops with a crochet in each loop of the first row.

Row 3. Change thread again. Two air loops are knitted, then a double crochet and two double crochets alternate in one loop according to the scheme.
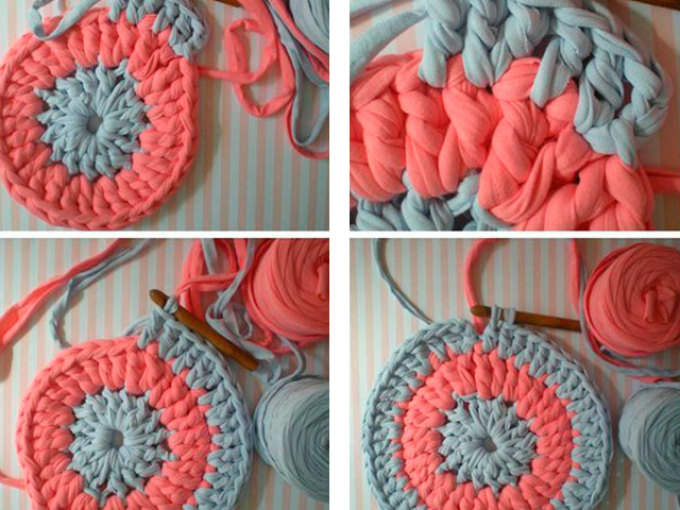
Row 4 onwards to desired rug size. Work 2 chain stitches, then double crochet stitches in each stitch and two double crochet stitches in one stitch at the end of each sector. The color of the threads is alternated to obtain an ornament.

The last row is tied with a contrasting thread with single crochets and the last loop is tightly tightened. Cut the thread at a distance of 5 cm and hide the tail with a hook from the wrong side of knitting.

Knit rugs can be both crochet and knitting. Mainly used are the most simple tricks and loops, but experienced craftswomen also surprise with complex openwork products. Scheme knitted rugs are listed below.


Video - Oval rug made of plastic bags
Homespun rugs and rugs
Classic homespun carpets and rugs have excellent thermal insulation and create a special atmosphere of comfort. In addition, for their manufacture, you can use scraps of any fabric - knitwear, chintz, calico. The more varied the color scheme, the more fun the rug will turn out to be.

Woven rugs and rugs are made rectangular, their width is limited by the width of the loom. How to make a simple woven rug is described below.
Table 3. Do-it-yourself woven rug from fabric scraps - a master class.
| Steps, photo | Description of actions |
|---|---|
| To make a rug, you need a wooden frame according to the size of the product. It can be made from a board or a bar with a section of 20x40 mm, connecting it to the corners and self-tapping screws on the reverse side. Small carnations are attached to the upper and lower bar of the frame - warp threads are attached to them. Carnations can be replaced with push pins. Two removable wire rods are attached to the sides of the frame - weft threads will be attached to them, they are needed to keep the rug in shape. The frame can be mounted on a stand or placed on a table. |
| As warp threads, strong threads or strips of fabric in a neutral color are taken. They are hooked onto the studs on the upper and lower bar with a snake. Fasten to the knot at the start and end points. |
| For duck, the fabric is cut into strips 1.5-2 cm wide. You can immediately tie individual strips into a common thread and wind them into small balls. The weft thread is attached to the corner nail and weaving begins. Wefts are threaded through the threads of the warp with a snake, then from above, then from below the warp, alternating the position of the weft in each subsequent row. The edges are looped through the spokes on the side slats to ensure even edges. |
| It is convenient to weave on both sides from the edges to the middle. In this case, it is necessary to observe the pattern and the same tension of the threads so that the rug is even. The duck is pressed tightly against the previous row. |
| By gradually changing the color of the fabric stripes, you can create ornaments and smooth transitions. Optimal solution- use fabric of different colors, but the same structure. |
| At the final stage of weaving in the middle of the rug, it will be difficult to thread the balls between the warp threads, it is easier to use separate strips of fabric and a crochet hook. |
| The ends of the fabric strips are carefully tucked into already woven rows of 10-15 cm, this will allow them to be well fixed. After that, the free ends are cut off. Remove the base from the studs, remove the removable knitting needles and remove the mat from the frame. |


Video - Master class. Homespun rugs
Children's pom-pom play mats
Bright soft rugs on which to sit and lie even the smallest - great idea for the kids room! To make such a carpet, you will need multi-colored pompoms made of thread or fabric.
A pompom rug made of threads can be made literally in one evening. For it you will need multi-colored knitting threads and a base fabric. To make pompoms, a skein of thread is stretched between two supports and firmly tied at a distance of 5 cm with a thread of the same color, leaving ends 10 cm long. It is cut between constrictions and scissors to give the pompons a round shape.

The ends of the tightening threads are pulled through the base fabric or mesh and tightly knotted. Lay the pompoms quite tightly so that there are no holes in the rug.

A developing rug made of soft knitted pompoms is a more complex product, but it is simply indispensable for a children's room, because even babies can be laid on it.
Table 4. Pompom rug - master class.
| Steps, photo | Description of actions |
|---|---|
| 1.Hot glue gun 2. Tailor's scissors 3. Strong thread and large eye needle 4. Cardboard pattern 5. Old T-shirts or knitted fabric different colors 6. Thick fabric or non-woven fabric 7. Furniture foam 8. Sintepon 9. Oilcloth for a mattress 10. Bright fabric for a mattress cover 11. Zipper for mattress topper |
| A round pattern-pattern with a diameter of 12-15 cm is cut out of cardboard. Blanks for pompons are drawn around it and cut out from multi-colored knitwear. Their number and colors depend on your imagination. |
| With a “forward needle” seam, a circle is sewn along the edge with an indent of 0.5 cm, the edges are slightly pulled together. Scraps of furniture foam rubber are wrapped with synthetic winterizer so that there are no protrusions. |
| Pompoms are formed from fabric and filler, the edges are finally pulled together and sewn up. |
| Prepare pompoms of different colors in the required quantity. They are laid out in packages so that later it is convenient to create a drawing. |
| The base of the rug is cut out of dense fabric in the form of a circle with a diameter of 1.5-1.6 m. Pompoms are glued to the base with a hot-melt glue gun, observing the selected pattern, in this case, a rainbow. |
| Having fully fixed the drawing, you can begin to manufacture the mattress. It is made of furniture foam rubber with a thickness of 50-100 mm. A circle with a diameter of 1 m is cut out, covered with oilcloth, fixing it on hot glue. |
| A mattress cover is sewn from a soft bright fabric: two circles with a diameter of 1.1 m are sewn from the wrong side to 2/3 of the circumference, turned inside out and sewn in with a zipper. Put the cover on the mattress and lay it on the rug. Velcro can be provided on its underside for fastening. |


Braided rope rug
A very practical and durable rug can be made from a thick rope - nylon, jute or cotton. For a rug measuring 0.85x0.6 m, you will need about 60 m of rope 1.2 mm thick.

For convenience, it is better to weave on a flat surface, on which the dimensions of the rug are indicated - it is easier to keep its proportions. The ends of the nylon rope must first be burned so that it does not unravel. The ends of a jute or cotton rope can be fixed by wrapping it with a strong thread.
The weaving pattern is shown in the figure. First, weave the first row of the pattern, then repeat it several more times until the rug is completely filled.

Prices for bath mats
bath mat
Video - Do-it-yourself jute rug
Homemade rug - it's not easy new life old things. Small handmade details give the home a unique flavor, create a positive mood and an atmosphere of comfort.


