Quilling for grandfather's birthday. Do-it-yourself quilling cards for jam day - a step-by-step master class
It will be the perfect solution for any occasion. Next, a master class will be presented that will help everyone complete a simple and very original postcard with your own hands.
To complete the work, you will need to prepare a list of materials presented below. Some materials can be replaced at your own discretion, and in the same way, you can take an idea from this work and make your own unique postcard, which will be an exclusive product.
List of materials for making a postcard:
- A sheet of paper for pastels or cardboard in dark purple color A4;
- White cardboard or thick paper;
- Design paper purple with a pattern;
- Foam tape double-sided;
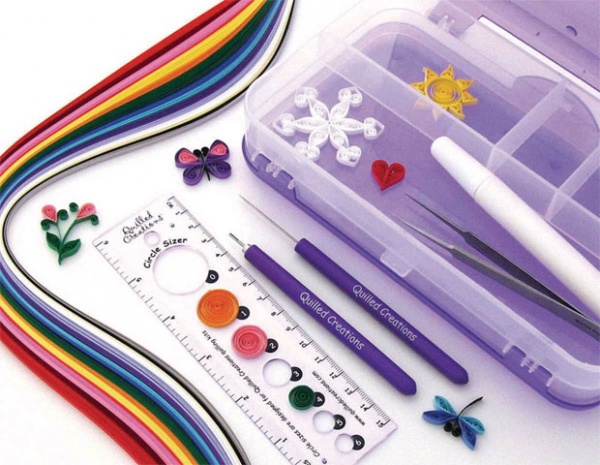
- Quilling paper - yellow, pale purple, white;
- Rhinestones white and purple of different sizes;
- Comb tool;
- Quilling tool, scissors, glue, tweezers.
We cut out a 12x17 cm part from white cardboard, glue squares of foam tape on the reverse side.

We attach white cardboard to the base.

We take design paper. It is desirable that it is also dense enough, since a three-dimensional flower will be attached to it.

The dimensions of purple design paper are 10x15 cm. We also glue it on the reverse side with double-sided foam tape and fasten it on top of a white rectangle on the base.


We take yellow paper for quilling 20 cm and using the comb tool, we begin to form the part. We fasten the end of the strip of paper to the scallop.

Next, we make loops, each time increasing the size of the element being performed.


At the point of contact of the paper loops, they should be lubricated with a little glue so that the element does not fall apart, but holds securely.
It turns out such a detail. They will need to make 16 pieces.

From white paper 20 cm white color perform the same eight elements.

We connect two yellow and one white parts together with glue so that the white is in the middle.

Now we take a pale purple strip of paper 20 cm long and wrap these three parts with it.

We cut the edge and fasten it with glue. The first petal is ready.

We carry out such 8 petals for our flower.

We take yellow paper for quilling and form a tight roll. The length of the strip should be about 100 cm depending on the weight of the paper. The roll diameter should be about 2.5 mm.

Now the finished roll is gently pressed inward so that a three-dimensional detail is obtained.

From the inside, the part must be well lubricated with glue so that it retains its shape.

We fasten the flower petals together with glue at the points of contact. In the center we fix the middle of the flower, which should dry completely.

The flower is voluminous.

We smear the finished flower on the reverse side with glue, after which we fix it on the basis of the postcard at the top right.

From purple and white paper for quilling, we perform the following detail, making the loops alternately: a small purple loop, a little more white loop, an even larger purple loop. At the base, the ends of the part are fastened with glue.
We smear the part with glue, glue it to the base.

Next, take a strip of purple paper 20 cm long, bend in half. We fix the edges of the strip with glue, then we begin to wind it with a tool. Lubricate the resulting part with a small layer of glue, fix it on the base.
At the Masters Fair theme week"Violet". I decided to take part in it. And we have prepared a master class for you.
The card will be a wonderful gift for the holiday and will make a great impression. And in the future it can be inserted into a frame and it will delight more than one day.
We will need:
- Quilling paper (2 mm - yellow).
- Quilling paper (3 mm - three shades of purple).
- Quilling paper (3 mm - green).
- PVA glue.
- Scissors.
- Quilling tool.
- Thick paper - (white and purple). You can use pastel paper.
- Double sided tape.
Let's get started:
1. We twist the petals of the flowers.
For the petals, we take purple quilling strips 3 mm wide (three shades).
We take a strip and with the help of an awl we make 1-2 turns. We remove the awl and get a strip with a wrapped end, it is already ready to start twisting itself.


Then we begin to twist the strip into a roll with our hands.


When the roll is twisted, carefully let it unwind, holding the shape with your thumb and forefinger. right hand. Then with two fingers of the left hand, index and thumb, we pull the middle to the side. On the opposite side, we squeeze the spiral with two fingers of the right hand. Then you need to compress along the entire length.


We apply PVA glue to the end of the strip and glue it. We get such a “droplet” module.

We twist the required number of “droplet” modules. We need to twist 3 “droplets” of dark purple color, 3 “droplets” of light purple color and 3 “droplets” of purple color on one flower. Total: for one flower we will need 9 “droplets”. We will have three flowers on the postcard, which means we need to wind 27 “droplet” modules.

2. Twist the centers of the flowers.
For the middle we take strips for quilling 2 mm wide yellow color. Glue the two strips together.
We take a strip and with the help of an awl we make 1-2 turns. We remove the awl and get a strip with a wrapped end and begin to twist the strip into a tight roll with our hands.
When the strip is twisted into a tight roll, apply glue to the edge of the strips and fix it.
And so we twist the three middle ones.

 3.
Collection of flowers.
3.
Collection of flowers.
We collect flowers from petals. We alternate colors. If we like everything, we begin to glue the petals. We pull out the petal from the flower, coat the sharp part of the “droplet” with glue on both sides and insert it back. It turns out that other petals are glued to this petal on both sides. And so we alternate.


When all the flowers are glued, glue the middle.

Here are our flowers ready.
 4.
Preparation for a postcard.
4.
Preparation for a postcard.
Cut out two rectangles from pastel paper. The first rectangle of white pastel paper - size 29.0 * 14.5 cm. The second rectangle of purple pastel paper - size 30.0 * 15.0 cm. Fold each rectangle in half.


We glue double-sided tape on the inside of the white base of the postcard. Glue the purple part on top. We get a blank for a future postcard.


We draw a barely noticeable circle with a diameter of 9 cm on the top of the postcard.

We apply glue from the bottom of the flower and glue it, evenly distributing the flowers around the circumference.


5. We twist and collect leaves.
For leaves we take strips for quilling 3 mm wide Green colour. Cut the strips in half. We twist the leaves in the same way as the petals for the flower (see above).


When we have wound up a sufficient number of “droplet” modules, we proceed to the assembly of the leaflets. Fold the green strip in half and glue it with glue. When the stalk dries, we begin to glue the “droplet” modules on both sides. We will have a sheet.


We need to collect these three leaves.

Let's move on to the final moment. We cut off three green strips 4 cm long. Apply glue to the edge of the strip and glue it along the contour of the circle. So glue all the branches to the flowers.


Glue the leaves to the stems.

There is a space between the colors, if you like, you can leave it like that. And I wanted to fill this empty space. From green stripes we twist loose spirals “curls” 6-8 pcs.

We apply glue to the edge of the “curls” and glue it, filling the empty space.

And now the card is ready. Congratulate your friends and family beautifully!

I wish you good luck and creative success!
Report to moderator
It is often difficult to choose one or another postcard for a particular holiday. Either the drawing does not fit, then the color of the postcard, then the shape is not the same, and if they were chosen, then congratulations and wishes do not correspond to the moment. However, instead of wasting time choosing a postcard, it is much easier to make it yourself. Yes, and the donee will be very pleased to receive an individual gift, made with all his heart and love. In the article, we will consider a master class on creating postcards using the quilling technique for such holidays as New Year, Birthday, February 23 and wedding.
In this case, the quilling technique will be an indispensable assistant, since with the help of patterns and paper rolling elements, you can create almost any drawings and decor for a future postcard. And you will need very few materials, besides, paper and cardboard are available to everyone. Examples of postcards in quilling style are shown in the photo:


What is necessary
In order to make postcards using the quilling technique, the following materials and tools are required:
- white and colored cardboard, double-sided colored cardboard, glossy, matte, corrugated, etc. can be used;
- colored double-sided paper or ready-made cut strips of quilling paper;
- glue;
- scissors or stationery knife;
- ruler and pencil;
- quilling tools - a rod or needle, tweezers.

Before you get started, you need to remember what elements can be made using twisted paper.

A strip of paper is simply twisted into a spiral, unraveled a little, and then with the help of tools or fingers we give it the desired shape.
jam day
This postcard will a wonderful gift birthday not only for relatives - mother, grandmother or sister, but also for friends, teacher or colleagues.

- Let's prepare the base of the postcard - we bend a sheet of colored cardboard in half and paste textured material on the front side. In the latter case, you can use a piece of wallpaper.

- We decorate the inside of the card with a cut out colored piece of cardboard.

- We begin to twist the quilling details for the flowers.

- The diameter of the roll should be 19 mm, do not forget to fix the end of the strip with glue.

- Let's prepare 5 such details.

- Now you need to give the details the shape of the eye.

- We glue the flower.

- We collect 5 such flowers.

- We make the middle of the flowers from paper strip, chopped fringe.

- We twist it, fix it with glue and straighten the fringe.

- Let's collect the cores by the number of flowers.

- We form the leaves in the same way as the flower petals.

- We will decorate the postcard with multi-layered curls, for which we will connect several colored strips of paper from one edge.

- We twist into a spiral.

- Gently straighten the resulting curl.

- We begin to make out a card, impose and glue flowers.

- Then glue the cores.

- We lay out the leaves and the composition with a curl.

- The free corner of the card can be decorated with tight rolls.

- Prepare the inscription - Happy Birthday! - draw on your own or print on a printer.

- We glue the congratulations on the card.

The gift card is ready, it remains only to add a wish inside.

By the New Year
Come up with New Year cards and how to decorate them will not be difficult. After all, the theme of the New Year always remains the same - snowflakes, Christmas decorations, Santa Claus and, of course, Christmas tree. Next, we will learn how to make a postcard with a green beauty.

- Let's make some free rolls green and one black or brown.

- We form twisted spirals into "droplets".

- The basis of the postcard will be white cardboard, we bend it in half and on the front side on top of each other, starting from the bottom row, we glue the green petals-needles.

- We glue each row of the Christmas tree, reducing the top one by one detail.

- At the bottom we glue the trunk of the Christmas tree.

- The tree should look like this.

- We are preparing tight multi-colored rolls - these will be New Year's balls.

- We decorate the Christmas tree with them.

- Next, we decorate the card with painted snowflakes, you can use silver beads or sparkles.

Postcard for the New Year is ready! It is very easy to perform, so even a child will cope with its manufacture.
For February 23
Postcards for men can be made less bright and colorful, but any man, especially dad or grandfather, will be pleased with a gift made by himself, and even his beloved children or grandchildren.

- To make such a postcard, we will prepare the base in the form of a bent sheet of cardboard on which numbers are outlined and cut out, with the number 2 located on the first turn, and the number 3 on the second.

- Let's prepare several parts from free rolls of any color. In this case, we use green strips of paper.

- We collect the prepared elements in different forms - drops, eyes, waves, etc., glue them on the traced schemes of numbers.

- We give them a neat shape.

- We decorate the card with red stars formed from free twisted rolls.

- We make a congratulatory inscription and the card is ready.
For the wedding
A wedding is a special day for a future family. Usually the bride and groom receive many gifts and congratulations on this day. However, you can stand out among the guests and together wedding gift attach a handmade postcard. wedding card always looks solemn and elegant

- We fold a sheet of cardboard in half and glue a square of bright cardboard or paper on the front side.

- Cut out strips with curly scissors and glue them along the edges of the square.

- Next, we apply in advance and fix the congratulations for the newlyweds.

- We form rolls for petals and leaves - 6 green and 6 yellow in the form of a drop, 12 pieces in the form of a crescent.

- There are roses in the card, they need to be folded a little differently. First, we also start twisting into a roll.

- Then we bend the free edge inward and continue twisting.

- And so on we twist and bend about every 1.5 cm.

- We collect 3 roses, not forgetting to glue the edges.

- We form leaves by gluing 2 crescents together.

- We begin to decorate the card with flowers - we paste the leaves, and on top of the rose.

- The remaining parts are glued in any order.

- Add colored elements - roses, petals and leaves.


- Top card can be decorated with sparkles or shimmery glue.
Video on the topic of the article
You can see even more ideas for creating postcards using the quilling technique in the following videos.
Content
Do-it-yourself needlework, paper crafts and postcards continue to be popular not only among schoolchildren, but also attract adult craftsmen. Especially when behind the seeming simplicity and attractiveness lies a complex painstaking process of creating a masterpiece. Quilling has long been one of the favorite types of home crafts for many needlewomen, because it allows you to create unusual and original paintings with your own hands.
In addition, most people involved in quilling claim that the process itself is captivating and soothing. nervous system. Thus, creating pictures and postcards with your own hands in the style of quilling, you can combine business with pleasure. A postcard made by oneself and presented to relatives and friends is of much greater value than one bought in a store.
If a beginner needlewoman decided to try for the first time the new kind creativity, you need to try to find out as much information as possible, disassemble the diagrams and the constituent stages of creating a quilling masterpiece and prepare everything necessary tools. To date, many master classes have been developed and compiled that allow you to understand the intricacies of the process, learn how to make products in the quilling style and delight yourself and those around you with hand-made masterpieces.
Tools that will be needed
 In order to start making postcards or do-it-yourself quilling crafts, just buy colored paper and learn. Although for this type of needlework there are many devices and tools that facilitate the work of the master. Later it will be possible to purchase those that will be convenient if the process of creating paintings and postcards using the quilling technique is pleasant, captivating and does not end with the first product.
Necessary fixtures, materials and tools
- First of all, paper is needed for quilling needlework. To date, special strips are sold, equally cut. Although for starters, you can take a sheet of plain colored paper and cut the strips yourself. It is convenient to do this with a clerical knife under the ruler, then the strips of paper are even and the same.
- Rod for twisting rolls. The tool has a forked tip, which allows you to fix the edge of the strip, and then simple in a circular motion form a spiral. To begin with, in order not to buy a rod, you can use a wooden stick or even a match forked at the end.
- Glue for paper bonding. Apply only to the tip of the strip to secure the finished roll. PVA does an excellent job with this task.
- Template with different holes. The template is similar to a school ruler for geometry, but inside it there are only circles of different diameters. This tool allows you to make the same spirals, if necessary, to create a DIY quilling pattern.
- Pencil, compasses, tweezers are auxiliary tools that can be added to the work process as the skill is mastered. Each craftswoman will select the necessary tools for herself when she understands which tools make the work much easier, and which of them can be replaced with the available tools at hand.
Varieties of figures and techniques
At the heart of almost any quilling figure is a spiral, which is formed by twisting a strip of paper. Depending on the density of winding and the length of the strip, the circle can be of any size.
The usual spiral has many varieties and derivatives from it. The main ones can be called:

In quilling, there are many other simple and complex shapes that allow you to create intricate designs, patterns and combinations of elements with your own hands. Perhaps in the process of work it will be possible to create some of your original figures.
Color range of products
A variety of colored paper for creating masterpieces with your own hands using the quilling technique allows you to realize almost any idea. For the manufacture of paintings, colored strips are most often used, each of which performs its own functions. If this is a flower, then the stem is made green, and the middle and petals have different shades.
 Quilling looks beautiful in the game of contrasts, when only black curls and patterns are on a white background, or, conversely, white or light pink spirals are laid out on a dark background. However, in this case, it is unlikely that it will be possible to assemble a whole picture; rather, it will be an image of abstraction.
Another use case colors in postcards and pictures using the quilling technique is the use of the same color, but different shades. For example, if you make elements and patterns from dark green paper, turning into a lighter one, up to olive. The originality and uniqueness of a handmade product depends on the imagination and skill of the needlewoman.
Handmade quilling cards will be a great addition to a gift for any occasion. Many variations of the use of paper strips allow you to make both a summer landscape with flowers and butterflies, and winter patterns.
Master class on making flowers
Having learned how to make simple figures with your own hands and own quilling tools, you can start creating full-fledged paintings or postcards. It can be any theme, although trees and flowers made by hand from multi-colored strips of paper look the most beautiful. At first, you can use ready-made master classes for making handmade masterpieces.

In order to create such a bouquet with your own hands using the quilling technique, you need to prepare many different elements and spend a lot of time on the process. However, the final result is worth the effort, because the flowers look bright, unusual and attract attention.
The petals are made from two different colors paper. To make it easier to turn the rolls, the strips can be immediately glued together.

From such strips, two-color circles with a diameter of about 1 cm are obtained with a center of one color and a border of another.

From the circle you need to make the petals of an oblong shape.

In addition to two-color petals, one-color petals will also be needed, for another row in a flower.

Both those and other petals will be glued to the cardboard base. This will make it possible to fasten them together and make several levels near the future flower.

The next step will be the manufacture of the middle. To make it "velvet", you can use one tricky, but simple trick. To do this, you need to take strips of black paper of the same width as all the others. And separately cut out wide strips of orange, which are cut with scissors along one edge. Both strips are glued together, and then wound onto a rod or wooden stick.

The result is a beautiful fluffy flower with a black center.


Leaves for a flower can be oval and thick, and are thin and oblong.

When the constituent elements of the quilling flower are ready, you can put them together to get a complete picture.
Such flowers can be made in several different colors and sizes. The main thing is that they all harmonize with each other. To do this, the color scheme of each bud should be approximately the same and match each other.

All elements of the future picture using the quilling technique must be placed on thick cardboard. They are glued in turn, observing the logic of the overall picture. When the flowers and leaves are fixed on the canvas, you can add other quilling elements to them.

If desired, ready-made flowers can be decorated with sparkles, rhinestones or beads.
Thus, do-it-yourself postcards and quilling paintings are a special type of needlework that captivates and captivates with its unusualness. You can involve children in the process, create small compositions.
Post Views: 523
Small gifts made with love are always more expensive and desirable than standard ones.
This master class on creating DIY quilling cards is suitable for beginners, as there are no complex elements. The finished craft can be used as a congratulation on March 8, Mother's Day, birthday, on any other holiday, or for no reason at all, to please someone. Arm yourself with everything you need and follow the step-by-step instructions with a photo.
Preparation of materials for creativity
To create a postcard, prepare the following materials and tools:
- double-sided blue cardboard A4 - 1 pc.;
- blue satin ribbon 2.5-3 cm wide, 30 cm long;
- milky lace 3 cm wide, 30 cm long;
- double-sided adhesive tape 1-2.5 cm wide;
- double-sided milky paper A4 - 1 pc.;
- double-sided paper of a light blue shade of A4 format - 1 pc.;
- paper strips for quilling of arbitrary width in brown, milky, light blue and blue;
- PVA glue;
- scissors;
- ruler;
- pencil;
- a match, a toothpick or a special winding tool.

If you are the first to try yourself in this needlework, check out the nuances in our other article.
Step-by-step instructions and nuances of needlework
Double-sided blue cardboard fold in half. Using double-sided tape, stick a satin blue ribbon on top and bottom of the front side.

Glue the lace onto the ribbon with double-sided tape. It turned out a blank for a postcard using the quilling technique.


Now we need to make flowers. Wrap a brown strip of quilling paper tightly around a match, toothpick, or special tool. Fix the end with PVA glue. The middle of the flower is ready.

From milk paper across the sheet, cut three strips 1, 1.5, 2 cm wide and cut them with scissors as in the photo.

A milk-colored blank 1 cm wide on the side where there are no cuts, spread with PVA glue and wind it around the middle of the brown flower. It should turn out like in the photo.

Also spread a milky-colored strip 2 cm wide with PVA glue and wind it over the previous one.

Repeat the same operation with milk paper 2 cm wide.

Bend all cuts of dairy preparations to the outside. You should get a flower, as in the photo.

Follow this principle to make two more flowers.

Cut a strip of milky quilling paper into two pieces 6 cm long, two pieces - 8 cm, and one - 10 cm. Do the same with brown, only the size of the pieces should be 5.5, 7.5 and 9.5 cm, respectively. Next, glue the brown and milk blanks into loops, and the loops together into leaves.


Make another one like this.

Strips of paper for quilling milk and brown cut into segments of 12 cm. Each shade - two. Fold in half and glue them together at the fold. Twist the ends a little.

Light blue paper cut into three pieces of 10 cm, bend them in half and glue at the fold. The ends do not need to be twisted.

Wrap the blue strip tightly around a match, toothpick or quilling tool and use PVA glue to fix the end. Repeat this operation two more times.

Fold in half a light blue strip 30 cm long, and insert a blue one 15 cm long in the middle. One end of all strips together (on the side where the light blue is bent) with a match, toothpick or quilling tool, wind almost to the end, leaving a 2 cm segment and release without fixing with glue. Do the same two more times. You should get three spirals.

Fold 30 cm long blue quilling paper in half, and between them - two strips of a light blue shade of the same size. Wind the end (on the side where the fold is) of all the strips together almost to the end, leaving 2 cm free and release without fixing with glue. Do the same again. There should be two such spirals.

From light blue paper across the sheet, cut two parts 1.5 cm wide and cut them with scissors, not cutting to the end by 0.5 cm. Twist each tightly and fix with glue. Move the notches to the sides. There should be two flowers.

Glue three quilling flowers onto the blank for the postcard with PVA glue.

Glue a milky brown branch.


Place a light blue branch on top, and blue circles on it.

Attach three spirals between the flowers, as in photo 16.

Glue the flower on both sides, pointing up, and two spirals, made as in photo 17.

Glue two light blue flowers on both sides of the composition.

We hope that you figured out how to make a postcard with your own hands from quilling, and now your loved ones will receive Original gifts made with soul. Read more about how and from what you can for every taste. Don't be afraid to add something of your own, experiment and combine different materials and technology.
Be sure to take a look at ours, which contains instructions for various types needlework.


