Paper rug weaving scheme in stages. Weaving from paper tubes for beginners
ABC OF WEAVING
YOU DONT KNOW THE PAPER WEAVING TECHNIQUE YET?MAYBE, AND DO YOU HEAR FOR THE FIRST TIME?
YOU HAVE COME TO THE ADDRESS!
Stay on this page and you won't regret your time.
Having studied this small, collected from various sources Master Class You will EASILY and QUICKLY master the technique paper weaving and you can safely move on to a new, more complex and exciting level, spinning really professional things.
Preparation paper vine
First you need to prepare the material. It may be clean paper, but practice shows that it is quite difficult to weave from it because of its density. Of course, if there is newsprint that is used in printing houses, then this will be an ideal option, since the absence of printed text on it greatly facilitates the painting of the product. But more on that later. So, prepare newspapers in large quantities. Using a sharp knife, cut strips no more than 10 centimeters wide. To begin with, you can practice on shorter strips and only after gaining some experience move on to long ones. At the same time, it is much easier to make a product from long strips than from short ones.
Put a piece of paper in front of you. We apply a knitting needle to it at an acute angle. Next, we fill the corner of the newspaper under the knitting needle and begin to twist the sheet as tightly as possible.

Don't be alarmed if one end is slightly thicker than the other. It's ok though big difference should not be. In order for our tube not to unravel, you should use glue and fix the corner of the sheet. Thus, you need to prepare at least 50 tubes. Quantity depends on the size and complexity of the item.
Further actions depend on how exactly you are going to paint the finished product. You can paint over the sticks before weaving. But there are some nuances here. Improperly selected varnish will make them hard and brittle, causing the vase or box to become rough. It is recommended to use acrylic lacquer for artwork.

A basket of tubes also looks beautiful, on which the text is clearly visible. You can also paint the product after manufacturing, especially if it is not of a particularly complex shape.
Bottom making
The base of the product can be absolutely anything. First, let's try to make a vase with a solid bottom. To do this, it is enough to pick up a dense material, for example, cardboard, and cut out two circles from it. Why two? And in order to hide the ends of the tubes in the bottom, which will be uprights. Next, we put one circle and with the help of a pencil we make marks where the racks will be fixed. If this is a future vase, then you can make racks at a wide distance from each other. Some types of weaving, for example, oblique, allows weaving on 5-6 racks. Glue the ends of the sticks and immediately apply the second circle. A solid square bottom is made in the same way. But still, the wicker bottom looks especially attractive. It is with him that the weaving of a basket or box most often begins. In this case, you need to cross several tubes, for example 5-7. Next, we take one tube and begin to braid from the center in a circle, alternating the position of the main sticks either above the working one or below it. We increase the tube as necessary. How to do this will be described in the next section. Thus, we create a circle of the desired diameter. In order to understand how to weave a round bottom in other techniques, it is enough to watch the video lesson once.
Rarely, but still sometimes a square bottom is woven. This is a rather complicated process and you need to master it only after you make a couple of products in a lighter technique.
Tube extensions and weaving
Some crafts, such as a vase, can be quite tall, requiring frequent growth of paper vines. To facilitate this process and in order for the finished product to have the most attractive appearance, you should learn how to connect the tubes correctly. As already mentioned, the paper vine blank has ends of different thicknesses. This is what allows you to imperceptibly connect them. We take a stick with a thin end and the second with a thick one. Now just insert with gentle movements one into the other and scroll a little. To fix the joint, you can lubricate the thin end with glue. Often there is a recommendation to cut off the thick end before connecting the vine. But at the same time, you will get a sharper transition, since the wall thickness of the stick will be much larger than if it was not cut. That is, in our case, the transition will be smoother, and after painting it will become completely invisible.
Next, let's try to weave the most simple weaving, that is, one stripe. To do this, we take our bottom and fix a stick near one of the racks. Before that, you need to choose the shape that you will braid. It can be a jar, a bottle or a box, in the event that a basket is woven. We lift each end of the racks up and, if possible, we fix it with a clothespin. Next, with a free vine, we begin to braid our racks. Alternatively, a basket is woven in the same way using two sticks. In the future, you will be able to experiment and alternate weaving with one or two tubes.
The rope is more difficult to weave. This uses two tubes. They are located on opposite sides of the rack and at the same time intertwined with each other in the gap between the racks. But in the photo, such weaving looks especially interesting, and the basket made using this technique is durable and keeps its shape perfectly.
Almost all types of weaving are continuous, that is, each previous row goes into the next.
Some products include a lid. It is woven in exactly the same way, only with a lower height.
After the product is ready, it must be painted and, if desired, applied with a pattern. It can be painting, ribbons or decoupage. Each technique has a detailed manual that will allow you to master it. Next, the product is varnished.
What can be made from paper vines
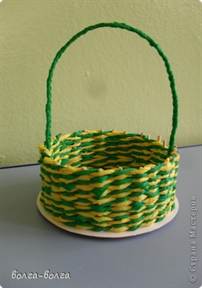
At first glance, it seems that a limited number of products can be made from newspaper tubes. But as soon as you master this technique, and you no longer need instructions during work, you can create your own weaving methods and, accordingly, new crafts. We can only give advice on how to weave this or that product. In order to create a basket, it is enough to weave the shape with a classic weave. Further, a pair of tubes is woven from both sides, on the basis of which a handle is woven. For practice, you can weave a laundry basket or a chest for sewing supplies.

First bigger size, but the second one can make internal partitions. Especially often a vase is woven from newspaper tubes. To create a unique image, you can make an openwork edge. To do this, you can simply weave a pigtail or master a more complex way of weaving openwork, but for this you will need a diagram.
For the decor of the room, planters made of tubes are used, as well as all kinds of coasters, coasters for pots and hot dishes. But that's not all. Looks great paper bell, prams, hearts and balloons, photo frames and even animals and birds. 
Having looked once at an example of products from newspaper tubes, you simply cannot pass by this technique and be sure to master it, creating many useful and beautiful things.
Master class weaving from a newspaper for beginners
We have been weaving from the newspaper for a long time, we put it on display. And when they ask how to do it, we send it to other sites using links. Here, at the next weaving of a pot for flowers, I decided that we should have our own master class on weaving baskets.

The sticks are twisted, then I connect them two at a time, so that they are immediately longer.

I roll it out with a rolling pin to make it easier to slip under each other.


There must be an odd number of sticks.

I start to braid with that stick, which are more in a row, we have 5 pcs.

Like this. Holding with your hand and leveling to gradually get a circle.

I also gradually align the rays, like the sun.

The size of the circle must strictly correspond to the bottom of the shape that we will braid. Otherwise, there will either be a gap or an ugly transition.

Then I insert the form (I have a jar of washing powder) and lift the sticks up, and so that it does not move, you need to put a load inside (I have a pot of earth). I fix the sticks with a linen elastic band (I used to do it with adhesive tape) it is more convenient for her. I align them all through the same distance. Yes, before that I build up all the sticks with denser and thicker sticks.

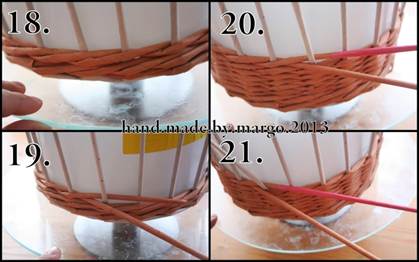
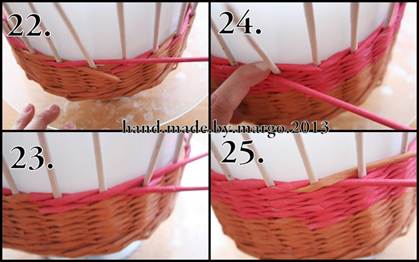
And I braid it. It’s better to choose a form that has a little protrusion at the top so that the sticks touch this protrusion and you can freely and quickly stick the sticks in. (But this is for the first 5-7 rows) And then you can remove the gum.

Here's what happened

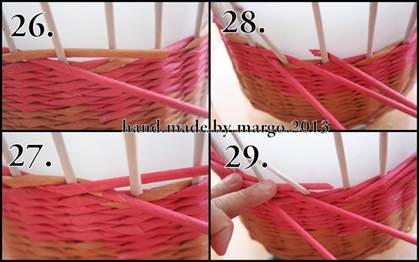
We close the edges. Alternately, we bend the sticks for each other inwards.

Here you can see.

Then, with a crochet or knitting needle, we take several rows from the inside and stick a stick behind them


Then cut off the excess.

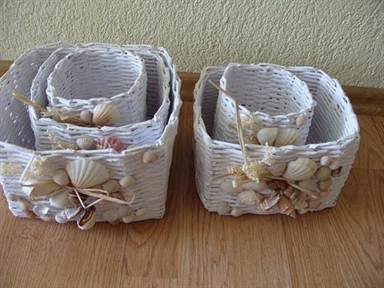
To get curly braids, you need to alternately change the forms that we braid and also fasten with either an elastic band or tape.

Well, then we paint at our discretion. Whoever likes it.

When I did MK, I thought, maybe I’m doing it in vain, why “reinvent the wheel”, so I omitted such details as making tubes and their size. I am correcting now. The size of the sheet I have is half of the sheet of the magazine.

Here I can see it. 27 cm by 9 cm. This sheet is from the "Book World" catalog, I have accumulated a lot of them. Sheets from the cover or tabs that are thicker go the same size to the tubes, with which I build up the tubes of the sides, which are vertically tied with an elastic band. Here's how I put it, sort of understandable.

I twist on such a knitting needle, size 1.5 mm (on which socks are knitted)

The process of twisting.

Put a drop of PVA glue on the corner and scroll between your fingers.

Here on the white tubes you can see that the ends of the tube should not be the same (one is thinner, the other is thicker), so that it is convenient and quick to connect them. I drip 1-2 drops of glue into the thick end (it is better to have glue in a bottle with a tip) and connect it to the thin end (no need to feel sorry here, push 3 cm or more and therefore you can not wait when it sticks together, but continue to weave, the tube will not detach.

Here is the finished product, which was number 18.

In the comments, many write that the tubes are either very hard and do not bend, or soft and tear. Therefore, I decided to supplement the photo on twisting the sticks. This picture shows how to twist correctly (at an angle of 45 degrees). Such a stick turns out to be both strong and flexible. And the ends are one narrow and the other wide.

This twist is not correct either. Low strength, breaks when stretched.

Now we have our own master class and we will not send beginners to other sites. Here's what I added missing details. I paint with acrylic varnish, immediately already colored in three layers. It doesn’t smell, you can paint it right on the kitchen table (covered with newspaper) I came across colors (oak, maple, walnut, pine (the lightest), you can mix them. Someone paints first with water-based emulsion or acrylic paint so that the letters are invisible, and then with colorless varnish. But I like it so naturally. Yes, more.
“Today we will talk about how to use an old newspaper. Indeed, many do not even know that very nice souvenirs in the form of vases and pots are obtained from the newspaper.
If this is the first time you hear about this, then I will tell you about weaving from newspaper tubes for beginners step by step.
In order to create beautiful vase from a newspaper vine, we need the following tools:
- stack of old newspapers
- bottle or jar
- PVA glue,
- tassel,
- knitting needle,
- thick cardboard,
- ruler,
- acrylic paints (you can use one, for example, white),
- scissors,
- as well as a hot gun, but you can do without it.
In the course of work, we will use the simple technique.
We take a ruler and with its help we divide the newspaper spreads into long strips, each of which should be about 10 centimeters wide.
Now we take a knitting needle (you can also use wire).
We begin to wrap our stripes around the knitting needle, while the knitting needle should lie a little obliquely relative to the paper.
The remaining edge of the newspaper must be smeared with glue and fixed. We'll have a tube. About thirty of these tubes need to be made - they will be the material for weaving our product.
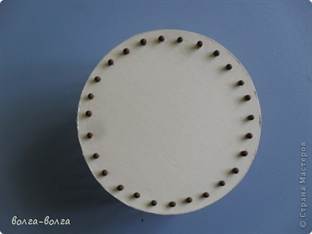
After all the tubes are ready, we take a bottle or jar of the right size (this is up to you) and put it on cardboard. We circle the bottom with a pencil and cut out two identical circles.
Now you need to prepare the tubes for the frame. To do this, one end of the tube needs to be slightly flattened (about 3 centimeters from the edge).
Now you need to apply glue to one of the cardboard circles and glue newspaper tubes to it with flattened edges. The newspaper vine must be distributed so that it is at the same distance from each other. To do this, you can make approximate measurements in advance and mark them with a pencil on cardboard. Glue can be applied to cardboard with a hot gun. If there is none, then we smear the bottom with ordinary PVA and at the same time use a press.
The glued newspaper vine must be lifted up and secured with an elastic band. Now we have the basis for weaving ready.
Now you need to take one newspaper tube, flatten its end, estimate it to the bottom first, and then glue it.
We will lead this tube behind the nearby frame tube on the right side, it should wrap around the frame tube from the outside.
Now we will alternate - clasp the frame tubes from the outside, then from the inside and, thus, we will complete the first row.
If you run out of weaving vines, you need to attach another prepared one to it. This is done simply - another is inserted into one newspaper vine (the one that ends) (as if we are screwing it in).
Attention, when we start weaving the second row, we need to insert a jar or bottle (what you took as a basis) and continue weaving.
Thus, we must weave all the rows. That is, weave until we get the required height.
After the last row is woven, you need to cut the edge of the newspaper tube obliquely and bring it inside the basket to the limit.
The edge of the newspaper tube must be fixed with glue.
The first frame tube on the right side must be cut off, but at the same time leave a tail (3-4 centimeters), spread with glue and bring it inside the braid.
The second tube, which is located on the frame, will also be cut, smeared with glue and tucked inward.
Next, decorate the basket. To do this, you need to apply acrylic paint to the inside of the basket with a brush, then paint the outer part with paint. Let's wait until the paint dries a little, and paint over the product a second time.
The bottom of the basket can be painted over three times, let dry.
decorative basket ready!
Now you know how to weave newspaper tubes for beginners and you can safely start making such decorative products. For example, you can weave a vase, a pot or a bottle shape, which will bring a little variety to your interior.
Weaving a basket from newspapers. The final master class.

We cut the working tubes obliquely and lubricate with glue.


We fix it with a clothespin for better fixation, you can lay a glossy cardboard between the tubes and the clothespin so that there is no trace of the clothespin.

We complete the edge, the easiest way.
We bend the vertical rack towards the next one, make the second fold so that the distance between the folds is equal to the distance between adjacent racks.

We cut off the rest of the rack obliquely, grease the cut end with glue and insert it with a knitting needle next to the next rack. We continue to perform in a circle.


It is difficult to imagine an interior in a country or ecological style without an object woven from a wicker. But where is the vine, and where are we, residents of megacities? Fortunately for the townspeople, designer Peter Clark figured out how to weave from newspaper tubes everything that is woven from vines and straw.
Weaving from newspaper tubes for beginners is not difficult. You will not need any expensive materials or special tools, and weaving skills are developed very quickly. One has only to start, and very soon you can become the owner of an elegant coffee table woven from newspapers.
How to twist tubes from newspapers?
In order to twist the tubes, you will need:
-
PVA glue.
The newspaper sheet must be cut lengthwise into 4 parts. Take 1 strip, dip your finger lightly in glue and from the corner, start rolling at an angle of approximately 30° relative to the long side of the strip. Each weaver rolls in her own way. Someone rolls up the tubes like cigarettes - on weight, others roll away from themselves on the smooth surface of the table. Many craftsmen twist tubes on knitting needles. Find the way that suits you best. Glue the end of the finished tube with PVA.

What should the tubes look like?
For beginners, weaving from newspaper tubes may seem difficult, because the tubes do not immediately turn out to be even and the same. Do not be upset if the tube expands towards the end. It is even more convenient to weave with such tubes, and it is easy to build them up by inserting one into the other. Uniformly twisted tubes are needed only for small panels and frames.
How to paint tubes?
Before weaving newsprint tubes can be painted with wood stain or food coloring. It is necessary to dry by laying the tubes on a flat surface. It is better to paint an already finished product with paints that are not completely absorbed into the paper, otherwise it will crumble during weaving.
Weaving from newspaper tubes for beginners
To understand how to weave from newspaper tubes, try starting with a tray, vase, or box. In order not to suffer with weaving the bottom, take a sheet of thick cardboard and cut out 2 bottoms of the desired shape. On one bottom in a circle at a distance of 2-3 cm, glue the tubes of the base, like divergent rays. Glue the second bottom on top.

When the glue dries, bend the tubes of the base up. Lay the working tube across, then behind, then in front of the base tubes. Continue until the height of the rim suits you.

You can try to make "windows"-handles. It is not difficult.

Tuck the ends of the warp tubes into the weave. This is enough to finish it off, but if you want, you can also braid the newspaper tubes to decorate the sides of the basket.

The pigtail can be glued, the joint can be closed with a strip of newsprint. The finished product must be thickly covered with PVA glue and let it dry. Be careful, when wet, the product softens and may squint. To give greater strength, repeat this treatment several times. A completely dried product can be painted and varnished.

If you are a beginner, learn how to twist tubes well first and try to make something very simple - for example, from magazines.
Wicker things have been popular at all times. Only before they used birch bark, vine, willow twigs, and now they are being replaced with an ordinary newspaper, magazine and office sheets. Such products are covered with stain, varnish, due to which they create an imitation of the structure of a tree.
This is the popular Master class for beginners will be devoted to the basics of this needlework, as the information on it is scattered in pieces from various sources, and all the available lessons on weaving crafts are designed for people with basic knowledge.
Material
For weaving, you will need paper, knitting needles, paint, stain, varnish, cardboard, glue. Newspapers, magazines, office and fax paper are suitable for work. Softer tubes are obtained from a newspaper, and thinner, more elastic tubes are obtained from magazines and office paper.
Please note: four tubes should be obtained from one newspaper spread (the width of the segment is no more than 7-12 centimeters). From office paper, cut narrow strips 2-3 centimeters wide.
Experiment with different type material, then get an extraordinary paper weaving. You can create a wide variety of crafts using this technique - from trays and panels to animal figurines and dishes.
Masters use knitting needles of different thicknesses. The selection depends on the craft: for example, a newspaper needs a No. 2-3 knitting needle, and a stocking needle for office paper. For the base of the craft, twist the thick tubes, and for the braid - soft ones.
Choose paint, stain on a water-based basis (on alcohol, the product dries quickly, but makes the tube brittle). Dilute the paint with PVA glue (2:1 or 3:1). They paint either the product after work, or the workpiece before the start of the creative process. But the finished craft is always smeared with glue, left to dry. Only at the last stage it is varnished. Cardboard is used to create a finished bottom or container of the desired shape.
Paper weaving: a master class for beginners
How tubes are made:
The tubes should not be soft or hard; ideally, a “medium” paper weave is obtained. For beginners, a bunch of video tutorials on twisting have been created, but without practice they are useless. For example, for blinds and panels, craftsmen specially twist hard sticks, for decorative miniature items they prepare thin tubes, where the width of the strip can be less than the traditional seven centimeters. You need to experiment to find your own thickness of the tubes.
Please note that when cutting with a knife, notches are formed that interfere with proper twisting. Therefore, before work, spend research work: try cutting two sheets of newspaper into transverse and longitudinal strips, determining which way you get fewer chipping. It is from a segment with smaller notches that the tube rolls off without problems.
Paper weaving: step by step instructions for twisting and painting
When twisting the sticks, one end should be wider, and the other narrower. So when weaving crafts due to the insertion, an extension occurs, that is, a narrow corner is inserted into a wide one. If the ends are the same, then one edge is flattened, compressed and inserted.
Many masters do without glue when building, they simply insert a stick three centimeters deep into another. Other pros drop a drop of glue into a tube with a wide end, and advance it three centimeters with a narrow stick.
There is also a secret how to make the twisting faster and the weaving soft. Before work, newspaper tubes are laid out in a row and walked over them with a rolling pin. It turns out that each master has “his own” paper weaving.

Master class for beginners in painting tubes
- First way. Paint the sheets before work, then dry, cut into strips and twist into tubes.
- The second way. Twist the sticks, then paint each one individually with a brush. Suitable for products if you need an unusual pattern.
- The third way. You make crafts, then decorate by weaving or randomly with a brush.
Methods of mass painting

For paint, you can use a water-based emulsion, pigments, for eggs. If you get an unsuccessful color, still continue weaving from paper. A basket, for example, can have any color, just complicate the weaving or resort to decoupage.
Tube secrets
Please note that the color becomes lighter after drying. By combining with other sticks, you create the desired pattern or draw the finished product with the desired shade. Drying is not necessary until completely dry. Wrap slightly damp sticks in a bag so that both ends are outside. In winter, they can be stored in the cold.
The sticks must be flexible in work, and after painting they become hard and brittle. Ideally, immediately after painting the tubes, paper weaving should begin. A basket, boxes, dishes can be obtained from dry colored tubes if you spray the middle of the sticks with ordinary water using a sprayer from all sides before work.

Wrap them in a wet cloth (ends outside) or put in a bag. Harvest immediately a large number of tubes, so that in the process of work not to be distracted by twisting.
When weaving, an even and odd number of tubes is taken. It is in the direction where there is an odd number of sticks that work begins. The “odd” tube braids all the others. As soon as its length ends, build up a new stick.
Types of weaving
We have finished the material blanks, now we will consider paper weaving. A master class for beginners on his technique is given below.
- Simple plain weave. With a braiding tube, like a snake, go around each stick of the base. That is, it either covers the base, or hides behind it. If you need to return, then weaving goes the same way, but in the opposite direction.
- Simple weaving in rows. The pattern changes after several rows. That is, take one stick, go through simple weaving. The next tube lays down in the same way as the first. So continue the drawing several times. Then you shift the pattern, that is, where the base was braided, it remains free, and the next one is braided the same number of times as in the first pattern.
- Simple diagonal weave. Each tube begins with a new base stick diagonally. It turns out an oblique (oblique) pattern.
- Simple diagonal weaving in rows. Just as in a horizontal pattern, weave with several sticks, and new circle move across the drawing.
Varieties of weaving
We continue to consider paper weaving (a master class on creating patterns):

Technique and secrets of weaving
To keep any pattern, it is braided with a rope or a pigtail. Let us consider in more detail the “protective” paper weaving (we will describe it step by step using the example of a basket).

Please note that the weaving of the tubes begins with thick ends from left to right. To get the desired shape, the racks are pinched to the right subject(vase, bucket, box, etc.). The finished product is abundantly lubricated with PVA glue (with or without paint), “put on” on the object of the desired shape, and dried. Then, when painting and varnishing, the product from the tubes will be beautiful and durable.
Basket making
For beginners, it is better to start with something simple (for example, blinds, frames, panels) to train your hand in twisting the tubes and simply interweaving them. Then you can move on to complex paper weaving (horseshoe, heart, box, bell). Consider a master class on weaving a simple basket without a lid and a handle.
To save the labor of weaving baskets, use a cardboard bottom. To do this, take an object of the desired shape, circle the bottom on thick cardboard. Cut out two pieces. Decorate them immediately (paste with wallpaper, paint or apply decoupage).
Attach to the bottom half along the edge. Now glue newspaper tubes on it. The distance between them should not be more than 2-3 centimeters. This is the basic rule of such needlework (meaning paper weaving).
Pen holder, photo frame, hat - any craft should have a distance between the racks of no more than three centimeters. The fact is that a larger gap between them leads to friability and fragility of the product.
Continuation of basket weaving
Next, apply PVA glue to the bottom with tubes, cover with a second bottom, put a load on top and leave it overnight. Now go through two rows with a “string”, a simple interlacing of racks. After that, put the form on the bottom on which you will weave, with a load (the load is needed to fix the bottom when weaving). If you immediately start weaving the walls from the cardboard bottom, then you will get holes in the basket that will need to be decorated.
Raise the tubes up, continue working until you reach the desired height. Next, braid up or separately weave a pigtail, gluing it to the base. By the same principle, paper boxes with a lid are weaved from paper.
There is another way to weave a rectangular bottom using ribbons and newspaper tubes. This view is reminiscent of working with a rug made of paper strips. Only in this case, take not one tube, but two or three for one unit. For example, below are four groups of sticks. Then put three sticks across them on them.

Lay four groups of tubes on top so that their ends are between the bottom ones. Now you braid all the rows with a ribbon or a soft stick. Then lay the transverse group of sticks again, braiding them with tape. Using colored tubes, you can get an original pattern.
The bottom in this case turns out to be voluminous, as if double. Then you lift all the joints, braid them with a “rope”, smoothly moving to the walls of the product. For trays, this is the optimal paper weave. step by step photo weaving square basket clearly shows the essence of the work. Prepare tubes and create.
If you have never worked with newspaper tubes, start with simple views. For example, blinds. To do this, simply twist the thick sticks along the length of one half of the window. Tie a double knot on both sides of each stick, retreating from the edges by 3-4 centimeters. In the process of work, you coat the “seams” with glue.
From above, fasten along the ring for the curtains (blinds will be attached to them) and a loop where you can put a twisted roll if necessary. Paint the finished product, varnish it. Now you can try simple weaving on small souvenirs and move on to baskets.
Technology lesson in the 2nd grade according to the EMC "School of Russia".
Lesson topic: “Working with paper. Weaving. Product "Rug"
Target: to acquaint students with the structure of the fabric, with a new type of work - weaving strips of paper, with the basics of marking along a ruler, preparing parts with a slotted base, cutting from the fold line; to cultivate diligence, patience, perseverance, necessary when weaving strips of paper.To cultivate respect for the historical past, spiritual and moral education of students through the study historical facts to cultivate a love for work.
Planned results: students will learn how to create a rug by interlacing strips of paper, mark on a ruler, extract information from a textbook, analyze their work, evaluate the results of activities, and carry out cognitive and personal reflection.
Lesson equipment and materials : textbook, weaving pattern of longitudinal and transverse threads (warp and weft), images of carpets from different countries, scissors, colored paper, pencil, ruler, tables of the sequence of work, drawings and handicrafts, a model of a loom. Presentation "Weaving".( Presentation ).
During the classes
1. Class organization. Checking readiness for the lesson restoring the working order. Motivation and positive attitude to work.
Sl. 1. Read the proverb. How do you understand its meaning?
"The more science, the smarter the hands."
2. Self-determination to activity.
Sl.2. Guess the riddles and you will find out what kind of product we will do in the lesson.
No feather, no wing
And faster than an eagle.
Just release the tail -
Rush to the stars. (Rocket)
Two ends, two rings
And in the middle are carnations. (Scissors)
red dairy,
Day chews and two chews
After all, the grass is not so easy
Convert to milk. (Cow)
The master sewed a fur coat for himself,
I forgot to take out the needles. (Hedgehog)
On one finger
Bucket upside down. (Thimble)
Keyword "Carpet".
Guys, based on our keyword, can someone already guess what we will do in the lesson? ( Probably a carpet.)
- We will weave a rug with you. (The topic of the lesson is “Weaving. The product“ Rug ”is posted”)
3. Work on the topic of the lesson.
Conversation.
In the old days, rugs were an integral part of the interior decoration of the house. Does anyone know what a rug is? ( children's answers.)
So, according to Ozhegov's dictionary, Rug is a narrow long rug woven or sewn from multi-colored scraps of fabric, laid on the floor. Mistresses not only decorated their houses with them, but also weaved them for sale. Later, carpets began to appear on the floors in Russian houses. Slide 3.
- Sl. 4. On a manual carpet weaving machine, craftswomen wove thick woolen and linen threads into a mesh base, securing them with knots. The more knots, the more expensive the carpet was. In general, carpets are woven in different countries, there are Persian, Moldavian, Uzbek, Indian carpets and many, many others.
Another old “carpet” legend has survived to this day. Once, robbers attacked a caravan with which a Persian prince was traveling. He was captured, robbed and wanted to be killed. But the prince persuaded him to save his life, promising the robbers to weave beautiful carpets. He kept his promise. The robbers kept him in a cave high in the mountains, away from prying eyes, and the carpets were sold at a profit. They didn't know that people could "read" patterns. With the help of the ornament, the prince told about his misadventures, and soon the prisoner was found and rescued.
By the way, carpets are often found in fairy tales.
Do you remember what these fabulous carpets are? ( Magic carpets-planes.)
What fairy tale or fairy tales can you remember where the characters fly on such carpets? ( Old man Hotabych - Lagin, Aladdin and Jean (on a magic carpet).
Open your textbooks to p. 54. Look how cozy it is in a rustic hut with a rug.
Where else can we get information about rugs, how they were woven? (From the encyclopedia, the Internet, ask adults, etc.) That is, if we need to get some information, we can turn to several sources.
Tell me, what are real carpets weaved from? (Children's answers.)
- The material from which carpets and fabrics can be woven was correctly named - these are threads. It was very difficult to obtain such threads. And we will decorate the peasants' room with our own woven colored paper carpet.
But before we get to work, we'll have a little rest.
PHYSMINUTE. (Up, down, sideways, straight ahead.)
4. The main part of the lesson. Practical work.
And now we will repeat the Safety Technique when working with scissors, without it we cannot get to work. Slide 5.
Look at my rug, at the rug that you have in the textbook and tell me what shape are these rugs? ( rectangular).
Us. 55 has a work plan, read it yourself.
Prepare the base . slide 6.
Fold the base in half. Mark the base, outlining the cut lines from the fold axis.
Prepare strips - as many as necessary for weaving. Slide 7. To cut strips 1 cm wide, place a sheet of colored paper vertically in front of you, color side down. Place the ruler against the top edge of the sheet so that the "0" mark is at the top left corner of the sheet. After each cm, put a notch on the sheet with a pencil.
Which numbers should be marked opposite?
Now we do the same operation with the bottom edge of the sheet. Lower the ruler to the bottom edge first. How should the line be positioned? (For division "0" to be at the bottom left corner of the sheet.)
What do you think should be done now? (Connect the top and bottom serifs together.)
To do this, turn the sheet so that it lies horizontally in front of you, and draw connecting lines with a pencil between serifs that are on the same level. Do this operation with sheets of those colors that you have chosen to work with.
Independent, creative work of students. Additional instruction. Help teacher.
5. Reflection.
Tell me, did you like working as weavers and weavers at the lesson?
What was difficult for you and what was easy for you?
You have papers on the tables. Take them in your hands, read and evaluate your product. Check the box next to the box for which you are evaluating your work. And in turn, we come up to me with the product and your piece of paper for marking.
FI_______________________________________
More work to be done on the product.
The product is well made
Product well made
Larisa Kudryavtseva
Paper- the most accessible material for creative work with children. At making paper crafts with your own hands, the child learns to work with scissors, develops fine motor skills, accuracy, patience. I offer you master class on making woven rugs from paper strips. Of course, I will not reveal anything new to you, but nevertheless. But what if.
For this it is necessary.
Since our rug in finished form it will look like a picture, you need to pick up cardboard (the basis of the picture) and the basis of rug so that they match. On the reverse side of the cardboard, we circle the selected template. Let's cut it out.

Laying down the base rug in half and for the convenience of the child, we draw lines along which in the future he will make cuts. Line layout based on rug you can do it straight or oblique, as this will play a role on the finished craft.

We cut the base rug and cut into strips the second part rug.

Weave our rug.

We take the base of the picture, coat it on the reverse side with glue around the perimeter of the cut out area and paste the finished rug. Rug can be placed in different directions.

So that the reverse side of our picture is not visible, we will glue it with an album sheet. If you suddenly want to give someone as a gift, then you can make an inscription.

We complement our work with small details.

Here's what we got.


Related publications:
"Shrovetide has come to us!" Workshop on making paper crafts with middle and older children preschool age Came to us.
"Ask me about the meaning of life, I may not answer you right away. I will not look for a catchphrase And talk about everyday life. We each have it.
Description: given master- the class is intended for children from 4-5 years old, teachers additional education, educators, parents. Purpose:.
Weaving is an ancient craft that has not lost its popularity at the present time. Now the method of weaving paper crafts is widespread. This method is remarkable in that it does not require any special devices. For creativity, paper of any quality is suitable, for example, newspaper or magazine. The weaving technique allows you to make beautiful and varied products, such as boxes, baskets, bookmarks and rugs. The master class presented in this article will help you master paper weaving for beginners!
If you've never done wickerwork before, now is the time to start!
Weave paper bookmarks
Bookmarks for books are a beautiful and very useful accessory for book lovers and students. Making it with your own hands is quite easy.
It is better to make such a bookmark from colored paper, however, if there is none, you can use any. First, cut out a wide strip of paper and fold it in half. At the place of the fold, draw even triangles, placing them after 1 cm so that their tops do not reach the opposite edge of the strip.
Next, cut the strip without affecting the triangles. Expand the resulting blank, and then make another strip of paper of a different color. Weave it into the gaps on the workpiece. At the end of the work, glue the ends of the strips.

There is another way to weave a bookmark. How to weave it step by step, you can see in the diagram.
Weaving a rug from colored paper
From the same paper strips, you can weave not only bookmarks, but also a multi-colored fun rug. By interlacing the stripes in a checkerboard pattern, you can get a variety of patterns, or pictures with a specific plot.

To make a rug, you will need the following: several sheets of colored paper, glue, scissors, a ruler, and a pencil. Before starting work, decide what size your craft will be and what the pattern will be on it. It depends on how wide the strips are required for its assembly. A piece of paper in a cage will help you come up with an interesting picture.
So, the plot for the rug was invented. Prepare the basis for the product by marking a sheet of paper into cells. Make vertical cuts with a clerical knife, not reaching the edge of the sheet by 1 cm.
Cut strips of the required width from colored paper. You can start weaving. Weave the strips into the base, starting from the middle, and slide them up, pressing them tightly together. Attach the ends of the strips to the back of the base using glue.
How to weave a newspaper basket
Take an unwanted newspaper and a sharp knife. Fold the sheets of newsprint in half twice and cut into strips along the fold line. Next you will need a knitting needle 2 mm in diameter. Make a "vine" of paper strips by winding them on a knitting needle, starting from the corner of the sheet.
When enough tubes are ready, take an even number of tubes and lay them out as shown in the photo.

Weave three rows, braiding two tubes, and then each separately. Continue until the bottom of the basket has grown to the desired size.

Now you need to make a transition to the walls of the basket. Bend the tube to the side so that it is under the next tube, and point it up. Those tubes from which the bottom was woven should be on the inside of the product. Weave the walls of the basket in the same way as the “eight” as its base. To make the craft even, insert some container in size inside.
When the height of the product is sufficient, you will need to close it. If the weaving turned out to be tight, take a screwdriver - it is more convenient to push the tubes into the weaving gaps with it. Bend the tube down and cut off the excess. Push the tip inside the structure. Do the same with all protruding tubes.
Finished work can be painted acrylic paints, or cover with stain, and then with varnish.
Boxes from newspaper tubes
The manufacturing technology of the box is almost no different from the previous technique of weaving baskets from tubules. You need to make more blanks from strips of newspapers, prepare glue and be patient.

Look for cardboard box the right size - it will come in handy as a basis for a future jewelry box. Attach paper blanks to its base, putting them on glue. Bend the tubes up and attach to the box with clothespins so that they do not fall apart.
Now start unhooking one blank tube at a time, weaving them horizontally and covering the entire side surface of the box.
Weaving ends by wrapping one of the blanks around the adjacent tube, and its edge is tucked inward. The cover for crafts is braided in the same way.
The resulting box can be painted in any color, decorated with beads and beads. Velvet or silk fabric is glued inside.
The video section presents the weaving of various paper products that may be of interest to you.
Video
Remember those woven colored paper rugs?
The craft is simple, but very effective! Rugs can be made in any shape, combined different colors! And now I’ll tell you how to make a woven rug from strips of paper.
We need:
- Double-sided colored cardboard or paper of different colors. A cardboard rug will be denser and stronger.
- Simple pencil;
- Ruler;
- Scissors;
- Glue.
How to weave a rug out of paper:
We choose the main color of the cardboard and cut out the base for the rug from it. It can be of different shapes: round, oval, square, rectangular, in the form of a heart; you can make wicker fruits - apples, pears and plums, houses ... The main thing is to choose a not too intricate shape: for example, it will be quite difficult to make a wicker blot or an asterisk.
Having cut the workpiece, we clearly mark it with a ruler and a pencil into longitudinal strips - vertically, 1 cm wide.
Now we will make cuts along the marked strips, without cutting about 1.5 cm to the end so that the workpiece remains intact.

And now - the most exciting! We take one strip and weave it with the workpiece, according to the same principle as a loom weaves a fabric. The longitudinal strips are intertwined with the transverse ones in a checkerboard pattern. We cut the edges of the strips and fix them with a drop of glue.


Thus we weave the entire rug. And when it is ready, you can attach a loop on the back. From woven paper rugs of various shapes and colors, you will get wonderful for the Christmas tree, or decor for another holiday - Valentine's Day or March 6!

And just like that, kids will like to weave paper rugs - it's interesting, and besides, it develops perseverance, artistic taste and fine motor skills (this note is already for parents) 😀
(Read 1 times, 1 visits today)
Weaving rugs and pictures from paper strips helps the child develop the ability to use scissors, a ruler, develops imagination if the child comes up with patterns and plots himself. A child can do such crafts on his own from about 6-7 years old. With the help of adults - from 4-5 years.
You can weave rugs from paper strips, interlacing the strips in a checkerboard pattern, with a diagonal or with any other pattern.

Or pictures with some kind of plot.
To make woven rugs and pictures from paper strips, you will need:
- colored paper
- scissors
- Ruler and pencil
How to make braided pictures from paper strips
The size of the picture, the width and the number of stripes must be determined in advance, depending on what the picture will be used for.
My daughter and I made pictures from strips 1 cm wide.
1. Choose a story or pattern. You can choose from the schemes given in this article or come up with your own patterns and plots. To do this, it is convenient to draw on paper in a box or draw a grid in the Microsoft Paint program (it is included in all operating systems). Windows systems), and then use the fill tool.
The program is more convenient than paper in that you can easily recolor any cells in a different color, correct an erroneous fill, etc. My daughter and I drew diagrams in this program, and some of them my daughter (she is 5 years old) came up with and drew completely on her own.
It is necessary to color the cells in such a way that no more than 2 colors are used in any horizontal row - the background and some other color.
Let's analyze the manufacture of a wicker picture from paper using the example of the craft "Amanita". Scheme: 
2. From paper of the same color, make the basis for the rug. In this case, the scheme is 8x10 cells. We add cells for the frame along the edges, as a result we get a picture of 10x12 cells (the size of the cell can be taken for convenience 1 cm, then the width of each strip will also be 1 cm, and the base will be 10x12 cm).

3. Make vertical cuts. Adults can use a clerical knife for this. It is safer for children to fold the base in half, make the required number of cuts with scissors at a distance of 1 cm from each other, not reaching the edge of 1 cm, and then gently straighten the base.
4. From paper of other colors, cut the required number of strips. For the picture "Amanita" you will need 5 red and 5 gray strips 1 cm wide and 10 cm long.
5.
It is more convenient to weave strips into the base, starting from the top, according to this principle: 
It is more convenient to start from the middle. For example, for the "Amanita" picture, find the two middle stripes and weave a red stripe through them, and so on. according to the scheme.
6. Glue the ends of the strips to the base on the reverse side so that they do not move.
7. Paste the picture on a bright background.
Here's what should happen:

A few more schemes invented by me and Rita for weaving pictures from paper strips:

You can decorate a postcard, notebook, lid of a box or box with a wicker picture, use it as a panel, etc.
Enjoy your creativity!
Especially for blog readers, with sincere respect, Julia Sherstyuk
All the best! If the article was useful to you, please share a link to it on social networks.
Placing site materials (images and text) on other resources without the written permission of the author is prohibited and punishable by law.
Basket made of paper strips. Weaving. Master ClassIf you don’t know what to do with yourself on the weekend, I suggest you weave a little thing in the household - a basket. The theme is from the paper weaving series, but you don't have to twist the tubes here, the basket is woven from stripes. For work, you can use rice, wrapping, packaging, office paper, newspapers or magazines. In this example, thin wrapping paper, the sheets were 75 by 30 cm in size. The author of the work and the master class Blanka PE
A woven basket can be painted with any wood paint, gouache, stain. After staining and varnishing, it will hold its shape, be strong, like wood, and waterproof. It will be easy to put wet fruits in it. Such a basket will fit in and decorate any interior. By the way, about the interior) If you are planning to start repairing your home, I suggest that you look at the pages of the site of the company of the city of Yaroslavl "Axioma" 918747.ru/natyazhnye_potolki/. The company has its own production modern element design - stretch ceilings. On the site you can view a gallery of the company's work, as well as order the installation and installation of stretch ceilings made from the best European materials.
So, for work, we take any paper that is at hand. We also need: scissors, paper glue, clothespins and tweezers for easy weaving, wood paint and varnish, braiding form

We cut the paper into strips, fold them 4 times. The width of the strip can be taken at 4 cm, centimeter strips will be obtained, you can make them wider

Fold so that the edges of the paper are inside the fold

We take canton. We begin to weave a regular checkerboard, fixing the strips with clothespins

We attach all the strips to the cardboard

This is what the bent ends of the strips look like on the back of the cardboard


Now we need a form for braiding - a box


We bend the braid


We hide the excess ends of the strips with tweezers.

And cut


Bend vertical strips and glue
Wicker items will never go out of style. Beautiful baskets will help decorate your home and put it in order, because you can put anything in them. If you want to learn how to weave paper baskets, for beginners, this article will provide three master classes with various techniques their manufacture.
A little about weaving
One of the oldest types of needlework is weaving. Household items made in this way have been found in excavations all over the world. People used materials given to them by nature to make various baskets, cups, and furniture. Even the walls of houses were woven from branches and coated with clay for strength. Small toys made for children with their own hands had a sacred meaning. People weaved a piece of their soul, which protected the owner from evil spirits and diseases. For this technique, we took natural material- cane, vine, rattan, corn leaves. Over time, new materials began to appear and weaving changed. Not so long ago, paper weaving replaced the vine. Due to the cheapness of the material and its fairly simple preparation for work, this type of weaving has received universal recognition. Even a novice master can create a paper basket with his own hands. And there is definitely a use for it.

small basket
Small baskets can be used to store small things, they will help to clean up the house. Or create a small arrangement with flowers that will decorate the interior.
A master class will help you create such crafts. To make a basket you will need:
- Cardboard sheet;
- corrugated paper;
- Compass;
- Scissors;
- Matches;
- Glue gun.
At corrugated paper there are advantages and disadvantages. Its main good quality is plasticity, it is very easy to stretch. But the disadvantage is that it fades over time. Besides, bright paper accurately color your fingers when working. So take care of protecting your hands by applying special cream or wearing gloves.
First, cut the paper into long strips, about two centimeters wide. Carefully, so as not to tear it, twist the strips with your fingers. The process is similar to spinning threads.

Cardboard is used for the bottom of this craft, and matches are used for the bearing pegs on which weaving is performed. Draw two circles on cardboard with a radius of 4 and 5 cm. The bottom template is ready.

Cut out in a wide circle. In the distance between the large and small circles, you need to strengthen the matches by first piercing small holes at a distance of 1 cm. If you made wide holes, additionally put the matches on hot glue for strength. It should turn out like this.

Tie the prepared "threads" of corrugated paper in a knot and put on the first match post. Start braiding the basket, circling the posts with a pigtail. You can use any type of weaving.


To finish the product you need to hide the ponytails inside the weave. Use a crochet hook. Pull the thread through the top few rows, cut and glue with a glue gun.
Do not use PVA glue for this work, as the paper is very thin and will simply spread from liquid glue.
Make a pen by twisting paper threads with a pigtail. Hide the ponytails inside and glue. The basket is ready! You can decorate it with flowers as in the photo.
paper strip product
The technique for making such crafts is also quite simple. Using colored office paper will save you from the process of coloring the finished product. Just pick your favorite colors and start creating.
To create a paper basket, take:
- Colored paper for office equipment;
- Scissors;
- Paperclips.
This craft is made using the checkerboard weaving method. Prepare strips of paper 2 cm wide. Take as many horizontal strips as you need to get the bottom of the desired width. Weave vertical stripes into them in a checkerboard pattern. How to do it can be seen in the photo.


When the bottom is ready, you need to raise the remaining strips up and strengthen the initial strip of weaving.

Continue weaving checkerboard pattern until the correct size is obtained. Bend the remaining ponytails inward and fix with glue.

It remains only to attach the handle and the craft is ready.

From paper tubes
Weaving of various products from paper tubes- a very exciting activity. And it will bring many benefits. Because from this simple material you can create a flower basket or a huge laundry basket. It just takes a little practice and you will definitely succeed. Especially this type of weaving was chosen by the masters of suite design. Wicker containers are often required to decorate sweet compositions. Their cost in stores is quite high, so needlewomen prefer to weave them themselves. How to weave such a product, and there will be this master class.
First you need to prepare paper tubes. It is best to make them from newsprint. You can see the process of their manufacture and coloring in the video tutorial.
To make a paper vine basket, take:
- Corrugated board;
- Newspaper tubes;
- Clothespins;
- Scissors;
- PVA glue;
- A small container that you will braid (bowl, glass, box).
Cut out the bottom of the future basket from cardboard. Strengthen the racks of tubes on it with glue. Further, the entire weaving process is shown step by step in the photo.