Knitting on a fork ready. Knitting on a fork of scarves and other products: diagrams and descriptions, a master class for beginners
A knitting fork is a U-shaped device. Knitting on a fork was invented in Victorian times, and an ordinary hairpin was used as a tool. This technique has gained popularity. Forks became larger, they were made of thick wire or knitting needles. Now they are easy to find in stores. Knitting forks are of two types:
- stationary with a certain distance between the teeth;
- universal, where the teeth are moved apart by different width and secured with holders.
Features of knitting technique
Crochet on a fork uses classic techniques. It turns out an openwork strip with two rows air loops along the edges and patterned middle. The finished strips are connected with a hook, assembled into a product, you can pre-tie them different ways. There is room for creativity here: tie the middle with simple half-columns or tie flowers, use beads, come up with a strapping option - each new job will be unique.
What can be tied on a fork
The easiest way to knit products rectangular shape: shawls, stoles, bedspreads. To do this, you need to connect strips of the same length in a selected way, the finished product can be decorated with a border. Having a skill in knitting stripes, you can knit things of complex shape - hats, tunics, dresses, skirts. Here you will already need a pattern to calculate the length of individual strips.
A strip knitted on a fork can serve as a decorative braid for finishing things, and with some experience you can knit fringe and tassels.
Knitting materials
Any yarn is suitable, its choice depends on the desired product: wool or mohair for warm shawls, thin cotton for elegant openwork items.
Is it hard to learn
Basic crochet techniques are enough to learn how to knit with a fork. It remains only to master the principle of work, which consists in alternately throwing a thread on the prongs of the fork and crocheting the middle. From simple options you can move on to more complex ones.
Owning this simple technique, you can create interesting and original things.
What can be crocheted on a fork
Blue tippet, knitting on a fork
The tippet weighing 500g and measuring 130x65 cm (with a border and tassels 190x65cm) is assembled from 8 ribbons 48 loops long x 16 rapports = 768 loops each. The ribbons are crocheted on a fork 6cm wide 2.5 of
Black tippet, knitting on a fork from Marina Mikhailovna

Beautiful black stole. Crochet on a fork 2.5 mm. Fork width 6 - 7 cm. Yarn Semenovskaya "Carolina". Yarn consumption 250 gr. Product size 50 x 230 cm. How to knit stripes: Connecting stripes in
Knitted stoles, the work of Marina Mikhailovna

Scarf stole openwork, snow-white, knitting on a fork. Hook 2.5 mm. The width of the fork is 7-8 cm. 5-7 stripes are knitted, depending on the desired width of the stole, 203 loops on each side.

Tippet knitting on a fork! The tippet consists of 5 strips of 468 loops. Band: tie 1 air. p., wrap the thread around the fork, passing it from left to right and around the right prong of the fork, and tie 1 air. n. in
Crochet blouse, knitting on a fork

Blouse size: 36/38. For knitting you will need: 110 g of Silke FLASH white yarn (60% cotton, 40% viscose, 105 m / 50 g); 50 g DISCO blue yarn; 25 g each of blue and blue Vita Cotton ROSE yarn (100%
Blue tippet, knitting

Stole - a fur or fur-trimmed women's cape of a rectangular shape and of various lengths - from the size of a collar to a very large scarf. In Western Europe, these clothes appeared after 676, when the palatine (princess) Palatine was the first
Red tippet, knitting on a fork

Stole size: 50*180 cm. The model is tied on a "fork". For knitting you will need: 400 g of fluffy yarn with angora, “fork” No. 4 (6 cm), hooks No. 2.5 and 3. The stole is assembled from six openwork ribbons, crocheted and connected
Fluffy jumper, knitting on a fork

Jumper size: 36. For knitting you will need: 100 g of brown yarn (70% angora, 30% acrylic, 100 g / 550 m), 50 g of brown yarn for tying elements (100% viscose), hook No. 1.5, fork No. 4, hook for lifting loops
Knitted red tippet

For knitting you will need: 125 g of Pichenette yarn (80% mohair, 20% polyamide: 25 g / 245 m) raspberry color. Fork for knitting lace. Hook number 3. Stole size: 50 x 200 cm Patterns and types of loops Lacy
Children's plaid, knitting on a fork

To knit a plaid, you will need: 400 g of cotton melange yarn and 150 g of beige cotton yarn. Recommended yarn: iris melange 100% cotton (10g/87m), iris 100% cotton (10g/87m). HOOK No. 4 and universal
Pink scarf, crochet on a fork

For knitting you will need: 450 g of semi-woolen yarn of medium thickness; hook No. 6, fork 8 cm wide. Crochet 7 strips of various lengths in accordance with the diagram. When you knit the first strip, then repeat the rapport 7.5 times, the second
Black and white jumper, knitting on a fork

Size: OG 90. For knitting you will need: 75 g each of thin white and black mohair threads, hook No. 2.5, fork 5 cm wide. Crochet strips of 36 loops so that a strip of low columns (single crochet)
Summer poncho, crochet on a fork

Poncho sizes: 36-42. For knitting you will need: 90 each of blue and green FUSION yarn, 50 g each of lettuce and blue, 20 g of white Vita Cotton ROSE yarn (100% double mercerized cotton, 150 m / 50 g), 40 g
White vest, crochet on a fork

Vest size: for chest 85. The vest is crocheted on a fork, the trim and neck are made on knitting needles. For knitting you will need: 300 g of white thread, hook N. 5, knitting needles N. 4, fork 8 cm wide. Description of work: Make a pattern out of paper

On the fork, you can connect elements of different shapes. We present a small master class on crocheting a round element on a fork. Photo 1 Make 23 turns of thread around the fork, the ends of the thread are at the bottom. Photo 2 Gather all the turns of the thread together, holding the ends of the thread with your fingers. Photo
Knitting on a fork, techniques and models from the Internet
Summer pullover "Pletenka" for mother and daughter, knitting on a fork
Pullover, crochet using ribbons on the fork.
The author uses Limageda Lithuanian bobbin linen 600 m / 100 gr, color Milk chocolate, hook for the main pattern 2.3 mm.
For the Braid pattern, it is better to take thin yarn that holds its shape well - cotton, linen. Flowing soft threads, such as pure bamboo and silk, will definitely not work.
Hat and snood, knitting on a fork from Svetlana Zayets
Snood
Width 120 cm
Height 23 cm
Weight 120 gr
Beanie
Half circumference 23-26 cm
Height 25 cm
Weight 45 gr
First of all, I’ll tell you about the choice of threads and the main tool fork. I knitted from ribbon yarn YarnArt Scarlet 100% polyester 90g/165m. When I bought a package on sale and she was waiting in the wings for a long time, but she bought it specifically for a fork. And for finishing Cable 5 100% cotton 50gr/165m.
You can say a lot about the fork, a lot of its varieties. You can use whichever you have. In this model, I used a plug from Aliexpress.
Crocheting on a fork is not only fashionable, but also a very practical hobby. With this help, you can quickly link fashionable wardrobe items and decor.
Knitting on a fork - returned from the past original look needlework, with which you can get beautiful openwork patterns. Things knitted in this way are light and plastic, while the process is much faster than when knitting or crocheting in the traditional technique. Today we will talk in detail about this type of needlework and its features, show what is needed for it, and help you master the creation of a basic fragment.
The principle of technology and the necessary tools
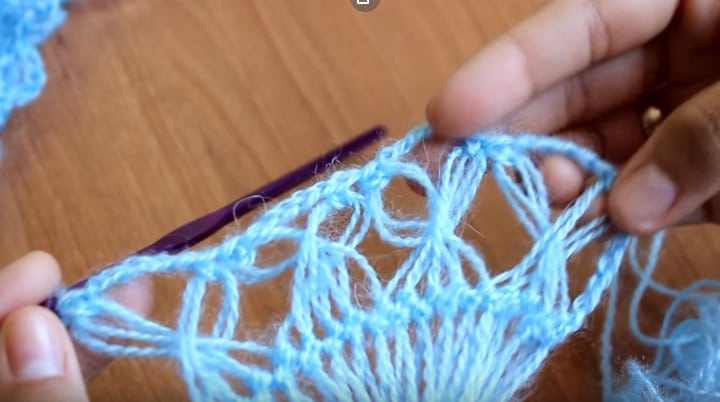
With an experienced eye, it is impossible to confuse products made using this technique with other knitting methods. This type of knitting is based on knitting fragments, often rectangular, from long loops. The thread is wrapped around the rods of the fork and crocheted into loops. The British call this type of needlework hairpin lace, which translates as lace on a hairpin.
Knitting on a fork for beginners is usually not difficult, but first you will need to buy a special device - a U-shaped fork. The factory tool is a base on which the pins and spacer are located.
Forks are stationary and universal. The former are convenient for craftswomen working with fixed sizes. In universal width can be changed.

The second important tool is the hook. If you are already, then you already have this tool. The main rule is the thickness of the hook and the pins on the plug must be the same. The diameter of the hook should be chosen depending on the thickness of the yarn used for work.

For thin threads, needlewomen use hairpins. A homemade fork is easy to make from a knitting needle by bending it to the desired width.
The principle of crocheting on a fork is somewhat different from other techniques and is somewhat reminiscent of patchwork. First you need to prepare the ribbons - elements of the future product, and then combine them into a whole panel.
Fragments connect various types loops, for example, single crochet, air or others suitable for the pattern. You can make tight joints, or you can beat individual fragments with openwork joints. In many cases, the connection is part of the pattern.
You can knit on a fork not only rectangular, but also rounded elements. To do this, the tapes are gathered on one side, and expanded on the other.
Practical lesson for beginners
You can talk about the theory as much as you like, but it’s better not to waste time talking, but go to a practical knitting lesson on a fork.

To weave such a beautiful ornament, take:
- knitting fork;
- hook (1-3 mm), depending on the density of the threads;
- threads.

Make a loop, loosen it. Put on the right side of the fork. 
Turn the fork clockwise so that the thread wraps around the other part of the tool. 
Pull on the index finger of the left hand working thread(the one located from the skein of thread). Insert the hook under the loop you made first. It is now on your left. 
Grab the working thread behind the loop and pull it into this loop, knit a regular knot. Turn the plug clockwise. 

Also, hook the loop on the left side of the fork by the front thread, pull the working thread into it, knit a regular knot. 


Do not forget to turn the fork clockwise every time after knitting the loop, the thread itself will braid the parts of the tool, forming loose loops. 
At first, it will not be very convenient to hold a fork in your hands and crochet at the same time, but after 10-15 loops, you will get used to it. The main thing in this weaving is to knit a knot clearly in the middle of the “horns”. If you knotted it to the left or right, you will have uneven side loops when you remove it from the fork, which will affect further knitting.
Knit 30 loops, count, there should be 30 loops on each pin. Fix the last loop and remove the entire piece of knitting.

Compiling a panel from blanks
You can use this knitting option as the basis of the product, or as an original insert into any item from the wardrobe. The easiest way to connect fragments is a loop into a loop. Practice joining two ribbons to get the idea.
Weave another piece of 30 loops for each part of the fork. Fix the last loop and remove from the horn.
Take a piece of styrofoam and pins. Put on the foam, next to each other, two knitted fragments. Use pins to attach them to the styrofoam. 
Lay out these fragments so that the side loops do not touch each other by 3-5 mm. Straighten all the loops. Take the hook and insert it into the bottommost loop in the right fragment. 
Now, having a loop from the right fragment on the hook, insert the hook into the bottommost loop of the left fragment and pull this loop into the one that was first on the hook. That is, you pull the left loop into the right. 
Next, holding the knitted left loop on the hook, grab the right one and stretch it into the left loop. That is, stretch the loops in turn: left to right, right to left. And so to the very top. The main thing is not to skip the loops on either side.

Practical application of fork technology
The stripes can be used as a finishing piece on the shoulder, on the back, in any place that your fantasy tells you. The density and openwork knitting depends on the thickness of the thread and how the fragments are connected.
The knitting technique on a fork is useful for making napkins, bags, bedspreads, capes, stoles. Having mastered the skill, feel free to move on to more complex things - sweaters, dresses, skirts.
Having bought a 30 mm fork, thin mohair (angora goat fluff) and hook No. 2 in a needlework store, you first need to prepare five strips of equal length. Let's start with the basics of knitting in a new way. This stole in the photo is knitted from the down of an angora goat strained by hand
Wrapping the thread around the fork, we connect it with a knot in the middle. We make sure that the two loops are of equal size on each of the teeth.
We insert the hook into the right loop with the base up, pull out the loop, throwing the thread on the hook, pull it out again. We throw the thread on the left tooth, go to the left loop, pull out the loop, knit 1 air loop. We twist the plug clockwise, and work only with the left loop. We continue according to the scheme: winding the hook under the upper left loop, knit the loop, then 1 air loop, turn the plug clockwise again. Please note that the thread is always thrown over the left prong. Having filled the fork to the end, we will finish the first strip of lace, carefully remove it. Got one lane.
We reduce the upper loop to the standard size of the air loop, we collect 8 more air loops.
We knit each of the strips according to the scheme: * we knit 20 large loops together, 6 air loops, we knit the next 20 large loops as follows: we knit 2 large loops together, 6 air loops *.
Having tied the lace, we connect the strips with each other with chains of air loops. To do this, we lay lace stripes parallel to each other, fastening the thread in the outermost of the arches of the strip located below, knit 5 air loops, fasten it to the nearest arch of the upper strip, knit 5 air loops again, fasten it to the bottom arch and so on until the end.
The tippet can be decorated with tassels if desired.
Knitting on a fork consider general concepts and examples. Progress never stands still, something is constantly being improved. Knitting on a fork is a new way of knitting that arose not so long ago in needlework. Related things in this technique are considered an exclusive and author's work. In the usual way, a product of the same color is usually knitted, but things filled with multi-colored shades look especially unique. Having mastered knitting on a fork, you can easily combine colors in a tippet, scarves, shawls.

The process is quite simple to perform, and with our master class, even a needlewoman with no experience can easily master this technique and knit wonderful cozy things for herself and loved ones.


Preparation for work
Let's take a look at a few knitting master classes from a simple ribbon to creating a wonderful lightweight scarf with your own hands. To create a pattern with a hook and fork, we will need the following materials:
|
  |
Video review of an example of knitting tapeon a fork
Master class on knitting a simple fork tape
Now let's learn to knit central part fork tape, knitting two loops without a crochet under each long turn.
- We make a regular loop with a prepared hook, pull it out a little and put it on the right side of our fork.

2. We turn the future product clockwise, and insert the hook itself under one thread and knit the first loop.


Important! Be sure to rotate the product in the same direction (clockwise) each time.
4. Having knitted the second single crochet, again we transfer the hook to the other side of the tool and turn the tape around its axis.


6. We knit the track to the length that will be on the product, whether it be a scarf, cape, stole or even a cardigan. After that, we count the turns on both sides. It must be the same. If somewhere there is a smaller amount, we tie it as necessary, as described above.

7. Finished strips can be removed from the fork. At this stage, the knitting of the central part of the fork tape is completed.


After we have learned this art, we will proceed to the connection in beautiful pattern, from which in the future you can create original things.
We knit a pattern for models from a fork tape
Tie a ribbon 15 long turns on the fork as described earlier in the lesson. Now the element must be removed and connected into a pattern that can be used to create a very beautiful and delicate cardigan.

Video MK crocheton a fork
Knitting patterns
Scheme No. 2 shows a connection of five turns with a single crochet, five arches are knitted between them.


1. So, we pick up an already connected element and a crochet hook. We knit an air loop into the initial coil to secure the beginning of the future pattern. 
2. Insert the hook into the first five long loops, as indicated in the diagram, and knit them with a single crochet. Next, you need to make five air and repeat the previous step. 
3. Thus, until the end of the row, we will get three repeating sections (rapport). We tie both sides in this way. As a result of our efforts, we get such a wonderful pattern. 
In the previous two lessons we learned to knit plain tape with a hook and a fork and connect into a beautiful pattern. Undoubtedly, having learned to knit with a fork method, you will want to knit a similar cardigan. How to do this, the following model instruction will help, but for plump ones.
You will need the following materials:
- four skeins of yarn 100 gr. (165 m);
- fork 9.5 cm wide;
- hook number 4;
Since the principle of knitting is clear, it remains to learn in detail the intricacies of the design of the connected strips and how many turns are drawn for the cardigan.
Instructions for connecting parts from strips and their strapping
Knitted stripes are connected using patterns and arches, guided by knitting pattern No. 2 above.
Next, you now need to properly connect and tie them.
- We take three strips with 130 loops, connect for the back and front.
2. Next, on a separate shelf for the neck and sleeves, one strip is combined, which consist of 80 and one tape with 75 turns - a decrease should occur from the neckline.
3. The completion of the cardigan includes connecting the remaining two strips with 160 loops on the back to the sleeves, namely, connecting the turns of the lower sleeve tape to the sleeve loops on the front.
4. We tie the sleeves with single crochets, and then according to the schematic image No. 1.
5. Tying the throat, shelves and bottom is done as follows: one row with single crochets and two rows with double crochets.
Thus, the work will be completed and a wonderful cardigan will become a favorite thing in your wardrobe.

Crochet an air scarf on a fork
We will create a wonderful scarf 120 cm long with our own hands.

Needlework will require the following materials:
- universal fork - it adjusts the width of the tool;
- hook number 4;
- yarn with a composition of 40% mohair, 60% acrylic;
- thick thread 40 cm long;
- one long needle.
Video for beginners knitting a scarf
The width of the device should be seven centimeters.

For the finished product, you will need to knit two identical strips of yarn, which then need to be connected together.

We knit a ribbon with a length of about two hundred turns on each side. In which way you have already learned, do not forget to turn the tool over after each loop.


This is what the strip will look like when you knit the required number of identical loops. Then the finished thing will be symmetrical and sit well.

In order to start combining the finished ribbon into a pattern and connect it into a scarf, you need to remove it from the fork. We take a thread with a length of about 40 cm and thread it with a hook through all the loops on one side.

Then we remove the tape from the fork and tie the ends of the threads into a knot, preventing it from disintegrating. On the other hand, we need to stretch long needle which was prepared in advance.


You do not have to worry that the ribbon you have knitted will begin to unravel, because its creation is completed. After completing all preparatory work, we start knitting a pattern. Insert a crochet hook inside the last loop and make seven air loops.

We count the first four turns, crochet the third and fourth under the knitting needle and knit a single crochet. Then we remove them from the knitting needle, stretching past the first two that should remain.


We continue to make five air loops, then grab the first two under the knitting needle - a single crochet. After these manipulations, we get a cross pattern.

Following this simple scheme, you should knit two sides of the track. When you knit one, make seven air loops and attach them to the middle of the ribbon where you knitted the loops without a crochet. To do this, insert the hook into the first column and knit a new single crochet.

Having completed knitting one side, turn the half of the scarf over, string the loose loops on a long knitting needle and repeat the previous steps. Having knitted three of the four sides, we proceed to their connection and the formation of our scarf.
Connection of parts
At the beginning, we will do, repeating the air loops, through (3 and 4) we knit loops without a crochet and make a couple of air loops. Taking a tied tape, find the first chain of five air chains from one end. We crochet under the found chain and knit with two air loops, then we return to our product and knit under the loops (1 and 2) a single crochet. It turns out that we repeat the process of the last side in exactly the same way as the previous ones, but we connect them together with chains of air loops.


We tie the ribbon and combine it with another.


Important advice! During the manufacture of the product, make sure that the first strip is located on the working surface - so you will not get confused when you knit the connections.
At the end of the work, we get the original and airy scarf.

Such an easy-to-make product will help complement your vivid image or give pleasant emotions and warmth to your loved ones. Good luck in developing your creative talents and further inspiration for creating masterpieces of needlework!


In the ready-to-wear shows of the new season, a special place is occupied by dresses, blouses trimmed with lace or knitted from large airy loops. Many on the catwalks and stoles. If you want to repeat the pattern of such graceful and elegant gizmos, then it's time to master the technology of knitting on a fork. We will consider models and schemes for them in the master class.
Not the fork that eats, but the one that knits...
A knitting fork only remotely resembles a cutlery. These are two pieces of wire - knitting needles, which are connected by a thin rail with small holes. Depending on how thick you want to make the canvas, you can rearrange the needles along the crossbar further or closer.
Another version of the fork is with a rounded end. It is usually used for knitting lace. The instrument is so named because the bent right and left parts of a thin tube resemble a fork that we eat, but only with the first and last links. In a knitting tool, they hold a fabric, which can later become:
- scarf;
- tippet;
- shawl
- dress;
- blouse;
- bedspread.
Threads of medium thickness of any texture are suitable for this type of needlework: acrylic, wool, mixed fibers. In the process of knitting, you will need the fork itself, as well as a crochet hook in a size suitable for the thickness of the threads. The working thread should always be behind the fork in the left hand, and the hook in right hand- in front of her.
Pros and cons of knitting

The advantages of working on a craftswoman's fork are:
- beautiful air loops in the product (just imagine that there are more than a hundred options for knitting scarves on a fork!);
- speed of knitting (it takes only a couple of hours to knit a stole);
- compactness of the tool (it is convenient to take the plug with you to work on a trip or while waiting in line).
There is, however, one drawback: you will have to constantly recount the loops, as they very easily “run away” from the tool.
5 patterns
Products knitted on a fork have one thing in common: they consist of stripes. The fact is that on this tool you can only knit a canvas in the form of a tape, which then have to be connected to each other. A master class for beginners knitting on a fork, let's start with a simple pattern.

Instruction:

Read also:

Instruction:

Such a pattern will look very original on a shawl or stole.

Instruction:

macrame pattern
Instruction:


Instruction:
- We make one loop around the fork, throwing a thread on the right.
- We form a loop.
- From the center we stretch the thread and wrap it around the left tooth.
- We bring the hook to the front of the work.
- Hooking on the back thread, we knit 1 crochet stitch.
- We repeat steps No. 3, 4 until about 465 loops are knitted.
- We make 4 more strips according to the sample.
- We put them together, align and sew.
How to fix elements?
In any video diagrams and descriptions of knitting on a fork of strip connections, individual tapes, it is stipulated that you first need to determine the order of the parts. The fork is no longer needed - only the hook.
Instruction:
- Lay out the strips in parallel lines.
- We crochet 3 loops on each side.
- Repeat to desired length.
- Grabbing the loops left on the fork, we tie the ribbons with single crochets. We grab the edges into the loop, bring the working thread through it, and then we knit it together with the loop that remained on the hook.


