Pattern of baby pants for 12-18 months. Pattern of children's trousers from knitted fabric
We build a pattern of children's trousers for children from 3 to 16.
This is a very simple and easy to use technique. Such it will seem to those who have previously encountered other methods. And for beginners, to simplify the building process, we suggest step by step instructions . Step by step, following the instructions, you will easily cope with the task and in the end you will come to the conclusion that everything is really very simple.
This technique can be used to build a pattern of trousers for both boys and girls (up to size 42). For older girls, the technique for constructing a pattern of trousers for women is used.
To build a pattern of trousers for children preschool age You can use another method, which is
First, we take measurements from the child. All measurements are important, you need to take this process seriously. The more accurately the measurements are taken, the better the pattern will turn out. The main parameters that you can’t do without are the semi-circumferences of the waist, hips and the length of the trousers. If measurements of seat height and (or) knee length cannot be taken, then these values \u200b\u200bcan be calculated using the formula. You also need to decide on the width of the trousers along the bottom line. For a guide, you can take old trousers (from which the child grew up), measure the bottom of the leg and add a few centimeters. You can do the same when determining the length of the trousers.
To build a drawing of a pattern of children's trousers, the following measurements will be required:
| Name | Designation | Size cm | Options |
| Length trousers | dB | 88 | Measure from the side vertically from the waistline to the desired length of the trousers. The measure is recorded in full. |
| Pants length to the knee |
dbk | 50* | Measure at the same time as measuring the length of the trousers. From the waist line to the middle of the kneecap. The measure is recorded in full. |
| Half waist | St | 30 | Measure at the narrowest point of the waist. The measurement is recorded in half size. |
| Semi circumference of the hips |
Sat | 38 | Measure horizontally at the most protruding points of the buttocks, taking into account the bulge of the abdomen. The measurement is recorded in half size. |
| seat height | Sun | 23* | Measured from a person sitting on a chair. On the side from the waist line to the plane of the chair. The measure is recorded in full. |
| Pants Hem Width |
Shbn | 18 | Finished pants width. It is determined independently depending on the style. |
| *This value can be determined by calculation (according to the formula) | |||
The front half of the pants.
In the upper left corner of the prepared sheet of paper, draw a right angle with a vertex at point T.
Length trousers.
From the point T down, we set aside the measurement of the length of the trousers (db), set the point H and draw a horizontal line of arbitrary length to the right.
In our example, the length of the trousers is Db \u003d 88 cm, and you are postponing your measurement.
TN \u003d Db \u003d 88 cm.
Step line.
The step line is determined by measuring the height of the seat (Vs). From the point T down, we postpone the measurement of the height of the seat and put the point I.
If there is no seat height measurement, we use the calculated method for determining the position of the step line: 1/2 measurements of the half-circumference of the hips (Sb) plus a value that ranges from 2 to 4 cm and depends on the style of the trousers, on the physique and age of the child.
In our example, it will look like this:
TY \u003d 1/2 Sat + (from 2 to 4 cm) \u003d Sat: 2 + 4 cm \u003d 38: 2 + 4 cm \u003d 23 cm.
Choose a way that is convenient for you to determine the step line, put this value down from point T, put the letter I and draw a horizontal line of arbitrary length from it to the right.

Hip line.
In this technique, the hip line is not used to build a pattern drawing, but I would advise you to draw it so that, upon completion of work, compare the width of the pattern in this area with the measurement of the half-circumference of the hips and, if necessary, correct the pattern.
Divide the segment TJ into 3 equal parts, lower the division point is denoted by the letter B. Draw a horizontal line from point B to the right ( hip line).
YB \u003d TU: 3 \u003d 23: 3 \u003d 7.7 cm

Knee line.
The position of the knee line can also be determined in several ways. You can divide the BN distance in half - this will be the approximate position of the knee line. Depending on the style, it can move up or down a few centimeters.
We are now using the simplest and most accurate:
From the point T down we postpone measure the length of the trousers to the knee (Dbk), put the point K and draw a horizontal line to the right.
In our example, TC \u003d Dbk \u003d 50 cm.
Other methods will be discussed in future articles.

The width of the front half along the waist line.
Set aside 2 cm from the T point to the right (for all sizes) and set the T1 point.
We calculate the width of the front half of the trousers along the waist line: 1/2 of the semicircle of the waist (St) plus 3 cm.
St: 2 + 3 cm = 30: 2 + 3 = 18 cm
Set aside 18 cm from point T1 to the right and set point T2, from which we lower the perpendicular down to the intersection with the step line and set point Ya1.

Bow line.(line of the middle cut of the front half of the trousers)
From the point R1 upwards, set aside a value equal to 1/10 of the half-circumference of the hips (Cb) and set the point R2.
Once again from the same point (R1) we set aside the same value to the right (1/10 of the half-girth of the hips) and set the point R3.
In our example, it looks like this:
I1I2 \u003d I1I3 \u003d Sat: 10 \u003d 38: 10 \u003d 3.8 cm.
We make out the middle line of the front half. See fig.6.

Curling line.
We divide the distance RJ3 in half, put the point R4. Draw a vertical line (perpendicular) through this point up and down until it intersects with the waist line and the bottom line. The points of intersection with horizontal lines are denoted by the letters T3, R4 K1, H1, respectively. See fig.7.
The T3H1 line is called ironing line.

Pants bottom width.
The width of the bottom of the trousers depends on the style of the trousers, i.e. you determine this value yourself. In our example, the width of the bottom of the trousers in finished form is 18 cm (for small sizes, you can take 14-16 cm). The total width of the trousers between the front and back halves is distributed as follows:
18 - 2 = 16 cm -
18 + 2 = 20 cm - back half width
From the point H1 to the left and right, set aside 8 cm each (half the width of the front half: 16: 2 \u003d 8 cm) and set the points H2 and H3.
H1H2 = H1H3 = 8cm.

The bottom line of the front half of the trousers.
To finalize the line of the bottom of the front half of the trousers, from the point H1 we set aside 0.5-1 cm upwards and set the point H4. We connect the points H2, H4 and H3, we get the bottom line of the front half.
In very tight trousers and in trousers of small sizes, the bottom line can be left even.
Side cut line.
To design the line of the side cut, we need one more additional point: from point T we set aside 17 cm down (for small sizes 15 cm), set point B.
The upper section of the side cut from point T1, through point B, to point I is drawn with a smooth line, as shown in the drawing.
Configuration lower the section of the side cut, as well as the step cut, depends on the style and width of the trousers along the knee line.

Pants width at the knee. Lateral and walking lines.
The width of the trousers along the knee line can be different and depends on the style (fashion, purpose), but should not be less than the measurement of the circumference of the knee plus an increase of 2 cm for a free fit.
Consider two examples:
1st example: When constructing a pattern of trousers for small children and (or) older children, but with a free cut, drawing out the lines of the side and step cuts, you can connect the points I H2 and R3 H3 straight lines.
2nd example:
For example, the width of the trousers in the knee area should be 20cm.
20 - 2 = 18 cm - the width of the front half of the trousers;
20 + 2 = 22 cm - back half width(We will need this value when building the back half of the trousers).
From the point K1 to the left and right we set aside 9 cm each (18: 2 \u003d 9 cm), we denote the points with the letters K2 and K3.
We connect the points I, K2, smooth line, further from K2 to H2 straight line.
For line stepper the cut is similar: section R3K3 - with a smooth, slightly concave line in the middle, then a straight line to the point H3.
Look at the drawing.

The darts in the front half of the trousers.
Two darts are marked on the front half of the trousers along the waist line. From the point T3 to the right, set aside 1.5 cm, from middle of this segment we draw down a vertical line 5-7 cm long (depending on the size of the trousers) and draw the first tuck, connecting the points with straight lines.
The second tuck: we divide the T1T3 segment in half, from this point to the right we set aside 1.5 cm, from the middle of this segment we draw down a vertical line 5-7 cm long and make out the second tuck.
Instead of darts, you can lay folds(tucks).

Clasp, pocket.
The main construction of the front half of the trousers is completed.
Additionally, if necessary (if provided for by the model), a pocket, codpiece (fastener in the middle of the front), etc.
Let's outline the location of the pocket: from the point T1 along the side cut down, set aside 14-16cm (for small sizes 10-12cm). From the same point T1, set aside 4 cm to the right and connect the points obtained with a straight line.
This pocket entry line.
To make a fastener in the middle of the front, from the points T2 and R2 to the right, horizontally set aside 3-4 cm and connect the points obtained with a straight line.
Look at the drawing. Construction lines are marked in red.
If the trousers are elasticated, this is not necessary.

Building front half pants finished.
Construction of the back half of the trousers
And you will be the first to know about the release of the second part " Step by step building back half of trousers for children from 3 to 16" and will always be up to date.
A centuries-old tradition says that a gentleman should have in his wardrobe classic pants. Sometimes it is very difficult to find suitable trousers for a growing gentleman in all respects. We offer you to sew classic trousers. Here is Pasynkova Yulia for tailoring such trousers.
The first thing to do is to build the pants pattern. It is, of course, better to build it yourself measured standards. Can be found in the magazine.
In our example, the pattern was built by Julia Pasynkova, and in the process the necessary details are finished, which will be described and shown in detail.

We take the trouser fabric, lay it flat on the table. We have costume fabric on fleece.
We fold the fabric in half, apply the pattern of the front half. We outline with chalk, while making allowances for the seams. Allowances 1.5 cm along the side seams, 3 cm along the bottom of the trousers, 4 cm allowance along the codpiece seam. We round it, as shown in the photo. We outline the line of the pocket and knee.

Cut out two pieces of the front panel of the trousers. All marks from the pattern are symmetrically transferred to both parts. Be sure to follow the direction of the shared thread.

On the right panel, cut off the allowance for the codpiece, leaving 1.5 cm along the seam. It's on boys' trousers. If the trousers are sewn for a girl, then the codpiece is cut off on the left side.

We cut out the back panel in the same way as the front. Seam allowances along the side sections are 1.5 cm, along the bottom of the trousers 3 cm, along the middle seam to the top we expand the allowance to 2.5 cm, follow the direction of the shared thread, it should match. Cut out.

We transfer the marks from the pattern to both halves of the blanks. We outline the location of the pocket.

We cut out small details for the codpiece. As a basis, we take the allowance for the codpiece cut off from the right half.
We apply it to the fabric and cut out the gap cut in the other direction.

For pockets to the front panels of trousers, we cut gaps (from the main fabric) and burlap (from the lining fabric).

We cut two rectangles, their size depends on the size of the palm. In our example, their size is 25 x 27 cm.
Steam with an iron and iron in half.

With sewing pins we pin the burlap to the front panel, as shown in the photo. Excess should peek out of the cuts.

Turn over and cut off excess burlap.

We cut out the pocket valance from the main fabric. We transfer the pocket marks to it.

Compare, it should look like this.

The second gap is cut symmetrically. Tags are transferred.

For the back pocket, we cut a valance, leaflet and burlap.

Leaf from the main fabric, rectangular shape with dimensions:
The length is 5 cm longer than the entrance to the pocket.
The width is twice the width of the pocket + 2 cm seam allowance. Ours is 17 x 4 cm.
The valance is cut out from the main fabric in the form of a rectangle with dimensions:
The length is equal to the length of the leaf + 2 cm.
Width 6-8 cm.
In our example, it is 19x6 cm.

We cut out the burlap from the wrong side of the fabric. This is a rectangle, the length of which is 35-40 cm, the width is equal to the length of the gap. Ours is 35 x 19 cm.

We plan a belt for trousers with a corsage, it will consist of two parts. Cut out two pieces from the main fabric. Their size is equal to: length - half the circumference of the waist plus 10 cm; width - the desired width of the belt + 2 cm seam allowance. For us it is 42 x 7 cm. Two parts.
And a small strip from which we will sew belt loops. You need six of them. Width - 3 cm, length about 60 cm.
Another small detail from the main fabric measuring 8 x 10 cm.

Before stitching the details of the trousers, they must be subjected to wet heat treatment. It is not necessary to neglect this. Details that are subjected to such processing sit much better, the seams do not shrink. The purpose of this procedure is to give the legs the shape of the legs. If the legs are crooked, you need to bend the legs as much as possible. Before this procedure, it is desirable to grind the undercuts on the back panels and make the cut marks clearly visible.
The result should be something like this.

We glue the entrances to the pockets, the leaflet and the slope with non-woven fabric. The leaflet needs to be strengthened to the middle and ironed in half.

We place the sewing tape along the pocket entrances on the front panel. See photo.

We glue the place of entry into the pocket on the back panel with interlining.

It is necessary to process slices of valances and leaves.

We overlock the sections on the side, step and middle seams of the front and rear panels.

With chalk we outline the entrance to the pocket on the back panel.

We put the front side of the burlap on the wrong side of the back panel. We pin with pins. The top cut goes beyond the cut of the belt.

We draw a straight line on the valance, at a distance of 1 cm from the raw edge and pin the valance and pin it to the top marking on the pocket, so that the lines are aligned. We make a machine line along the line, we fix the line at the ends.

We pin stronger so that the basting does not disperse.

We draw a straight line on the leaflet, retreat the fold 1 cm. We pin the leaflet along this line and sew it on. Make sure the lines are parallel.

This is how these lines look from the inside, their ends are fixed.

We cut the fabric in the frame, as shown in the photo.

We twist and steam with an iron. Already a nice pocket, right?

Sew the corners to the leaf.

We process the upper cut of the burlap with an overlock. We lay a line along the leaflet so that it does not turn out.

We make a loop for a button on the back panel.

The end of the burlap should be above the waist.

Bend the top of the burlap down. Lay another line along the allowances, sewing the allowances to the burlap.

Sew the free edge of the valance to the burlap, this is a bit complicated process. Finish the pocket edges with bias tape.

It will be more beautiful to place a button and an eyelet opposite the undercut.

We sew pockets on the front panels like jeans. We prick the burlap on the front panel and combine the sections.

The ironed fold "looks" up.

On the wrong side, we lay a line along the threaded sizing without reaching the edge.

We impose valances on burlap, pin.

We open the burlap. We steam. We lay a line from the edge by 0.7 cm along the front side of the front panel.

We fold the pocket, combine the marks.

We check the wrong side, cut off the excess.

We sew a pocket.

We turn it inside out and make another seam on the pocket.
Similarly, we do all the operations with the second pocket.

We process the codpiece. Checking the intended point of the bow. This is the point where the lightning ends. All marks are transferred to the review.

If necessary, shorten the zipper.

Pin the zipper on the marks to the gap at a distance of 1 cm from the cuts. Sew along the zipper teeth. Pin the front panels with the right sides.

Lay the line up from the step cuts. At the bow we fix the line and sew further to the waist. Steam the seam with an iron.

Cut the thread in the area of the bow and pull out the thread.

On the right rug of the front panel, we “release” the fabric on an allowance of 3 mm from the fold. We take note.

On the left half of the front panel, draw a line of stitching in small pieces.

Under the right half we put a valance with a stitched zipper. We combine labels. Baste along the zipper and sew.

We cut off the front halves.

We turn inside out.

We pin the lightning to the slope.

We turn it over to the front side, check everything and make a line along the intended line.

View from the inside.

We pin the folds on the front panel, pin the burlap.

On the upper cut, lay the seam along the very edge.

Slices of burlap and gaps need to be overcast. The side seams need to be chipped, swept, stitched and ironed.

We make fasteners at the entrances to the pocket.

We take the belt and iron the allowance on one side inward. We iron the strips for the belt loops, smoothing them three times.

We lay a machine seam and cut the strip into loops.

We pin loops along the belt.

We draw a fine line for attaching the belt well.

We pin the belt along the entire line of attaching the belt. On the left half, the belt should be longer.

Sew on the belt. The line does not affect the adhesive base.

View from the front.

Sew a small piece of the main fabric to the corsage ribbon on one side. Align the cuts at the top and bottom. At the top, the fabric should be 1.5 cm wider than the tape. This is the seam allowance.
We pin the corsage to the belt. To the zautyuzhenny allowance. We retreat a little from the bend of the allowance, about 2-3 mm. Then the corsage will not peek out from behind the belt.
On the left side, the seam on the tape is almost flush with the slope fold.
The proposed construction was carried out according to the unified method TsOTSHL.
Initial data
To build a drawing of the base of the trousers, you need to know the measurements of the figure and the additions to the main measurements:
About g- chest girth (auxiliary measure, necessary only for children of the teenage group);
C t- semi-circumference of the waist (for toddlers, the waist line is indicated at the level of the umbilical point);
C b- semicircumference of the hips;
D shopping mall- the distance from the waist line to the knee line, measured along the side from the waist line to the center of the patella;
D b- the length of the trousers, measured along the side from the waistline to the desired length of the trousers;
Sh n- the width of the trousers along the bottom line, is determined based on the desire of the customer or according to the fashion trend.
It is also necessary to know the increments P t And P b, which we select, according to the desired silhouette, from the table presented.
Classification of children by age
Yaselnaya age group includes children aged 0 to 3 years.
Preschool age group - children aged 3 to 7 years.
The junior school age group includes girls aged 7 to 11 and boys aged 7 to 12.
The senior school age group includes girls aged 11 to 14.5 and boys aged 12 to 15.5.
Drawing base grid construction
The construction of a drawing of the construction of trousers begins with the construction of a base grid (see the figure on the left).
Draw a vertical line and put a point T 0 on it. From the point T 0 down lay segments that determine: the position of the seat height line T 0 I 1; knee lines T 0 K 0; bottom line T 0 H 0 . Wherein:
T 0 I 1 \u003d 0.5 C b+ 2 cm for toddlers and up school groups;
T 0 I 1 \u003d 0.5 C b+ 1 cm for children of junior and senior school groups;
T 0 I 1 \u003d 0.5 C b for children of the teenage group;
T 0 K 0 = D shopping mall;
T 0 H 0 = D b;
From the point I 1, the segment I 1 B 1 is laid upwards, which determines the position of the line of the hips:
I 1 B 1 \u003d 1/3 T 0 I 1.
Through the points T 0, I 1, B 1, K 0, H 0, basic horizontal lines are drawn.
The width of the front of the trousers along the hip line is determined by the segment B 1 B 2, which is laid to the right of point B 1:
B 1 B 2 = 0.5( C b + P b) - 1.0...1.5 cm,
(1 cm - for children of nursery, preschool and elementary school groups; 1.5 cm - for children of senior school and teenage groups).
A vertical is drawn through point B 2, the intersection of which with the horizontal T 0 is designated T 2, and with the horizontal from the point I 1 - the point I 2.
The width of the step of the front part and the direction of the step line is determined by the segment B 2 B 3:
B 2 B 3 = 0.1 C b+ 0.5 cm.
The fold line of the trousers is located in the middle of the segment B 1 B 3:
B 1 B \u003d BB 3 \u003d 0.5 B 1 B 3.
A vertical is drawn through point B, the points of intersection of which with the basic horizontals are denoted by T, I, K, N.
The width of the trousers along the bottom line in the finished form W n is determined based on the desire of the customer or according to the fashion trend. As in men's trousers, the width of the bottom of the front is 4 cm less than the back:
H 1 H 2 \u003d W n - 2 cm.
The width of the trousers along the line of the bottom of the front part in the drawing
HH 1 \u003d HH 2 \u003d 0.5 N 1 H 2.
The width of the trousers of the front part along the line of the knees is either determined by the model, or the points H 1 and B 1 are connected and at the intersection of the resulting straight line with the horizontal K, the point K 01 is placed. From this point, a segment 1–1.5 cm long is laid horizontally to the right and a point K 1 is obtained, and the smaller the width of the trousers, the greater the length of this segment.
Front width at knee level
KK 2 \u003d KK 1.
Connect points B 3 and H 2 and at the intersection of the resulting straight line with the horizontal from point I get point I 3 - the top of the step line of the front of the trousers.
Building the front of the trousers

In the picture on the left you see a drawing of the front and back of the trousers for boys.
(To view an enlarged drawing in a separate window, click on the drawing with the mouse).
The position of the top of the midline of the front of the trousers for children of the nursery and preschool groups (having figures with a protruding belly) determines the segment T 2 T 3, which is laid vertically upwards from the point T 2 (not shown in the figure).
T 2 T 3 \u003d 0.5 cm.
For children of other groups, the position of the top of the midline of the front of the trousers determines the segment T 2 T 21, which is laid to the left along the horizontal line drawn from the point T 2:
T 2 T 21 \u003d 0.5 cm.
To build the midline, an auxiliary point 1 is found. From the point I 2 on the bisector of the angle B 2 I 2 I 3 lay the segment I 2 1:
I 2 1 \u003d 0.4 I 2 B 2.
The middle line is drawn through the points T 21 (T 3), B 2, 1, I 3.
Calculate the width of the front of the trousers along the waistline:
T 21 T 4 (T 3 T 4) = 0.5 ( C t + P t) + c + c,
where in is a tuck solution equal to 2 - 2.5 cm; c - the depth of the fold, equal to 3 - 5 cm.
Point T 3 is not shown in the figure.
In trousers for boys, both the tuck and the pleat are rarely designed, usually one or the other. Very often two small folds are made. In products for children of nursery and preschool groups, waist darts are not designed at all. The segment T 21 T 4 is laid horizontally drawn from the point T 0. In products for children of nursery and preschool groups, the point T 4 is obtained as the intersection of the horizontal line drawn from the point T 0 and the segment T 3 T 4, while T 4 is the top of the side line. In products for children of other groups, the top of the side line will be the point T 41, which is obtained by postponing the segment T 4 T 41 vertically from the point T 4:
T 4 T 41 \u003d 0.5 - 0.7 cm.
Point T 41 (T 4) is connected to point T 21 (T 3) of a smooth curve and a front waist line is obtained.
The tuck is usually placed along the center line, setting aside half of the solution to the right and left of it (not shown in the figure). The length of the tuck is 5 - 7.5 cm (depending on the model). The depth of the fold is usually set aside to the left of the center line. In the case of designing two folds, the depth of the first is equal to 0.6 of the value of the total solution c, the second, respectively, 0.4 s, while the distance between the folds is 4–6 cm.
The line of the lateral edge is drawn up by connecting the points T 41 (T 4), B 1, K 1 with a smooth curve and drawing a straight line to the point H 1.
The line of the front edge is drawn up by connecting the points I 3, K 2 with a smooth curve and drawing a straight line to the point H 2.
The bottom line passes through the points H 1 and H 2.
Building the back of the pants
The width of the trousers along the bottom line H 3 H 4:
HH 3 \u003d HH 4 \u003d 0.5 (W n + 2 cm).
The width of the trousers along the knee line is determined by setting aside from the point K 1 to the left, and from the point K 2 to the right, the segments K 1 K 3 \u003d K 2 K 4 \u003d 2 - 2.5 cm.
The width of the back along the hip line B 4 B 5:
B 4 B 5 = 0.5( C b + P b) + 1 cm in products for children of nursery, preschool and primary school groups;
B 4 B 5 = 0.5( C b + P b) + 1.5 cm in products for children of the senior school and teenage groups.
The width of the step of the back along the line of the hips B 5 B 6:
B 5 B 6 = 0.2 C b+ 1.5 cm.
The position of point B 4 is determined by postponing to the left along the horizontal line drawn from point B, the segment BB 4::
BB 4 \u003d 0.5 (B 4 B 5 + B 5 B 6).
From point B 4 to the right, lay the width of the back along the line of the hips - segment B 4 B 5 and get point B 5. From point B 5 also to the right lay the width of the step along the line of the hips - segment B 5 B 6 and get point B 6.
To determine the direction of the midline, the segment T 21 T 5 (T 3 T 5) is laid off from the point T 21 (T 3) to the left horizontally.
T 3 T 5 \u003d 2 cm in products for children of nursery and preschool groups;
T 21 T 5 \u003d 3 cm in products for children of primary and secondary school groups;
T 21 T 5 \u003d 4 cm in products for children of the teenage group with a chest circumference of 84 - 92 cm;
T 21 T 5 = 5 cm; the same for children with a chest circumference of 96 - 104 cm.
A straight line is drawn through the points T 5 and B 5, at the intersection of which with a horizontal line drawn from the point I 1, the point I 4 is obtained; point I 4 can be located both to the right and to the left of the point I 2.
Waist width T 5 T 6:
T 5 T 6 \u003d 0.5 ( C t + P t) + in 1 ,
where in 1 is a tuck solution equal to 1.5 - 2.5 cm.
The segment T 5 T 6 is laid to the left of the point T 5 along the horizontal line drawn through the point T 0 .
The line of the lateral edge is drawn up by smoothly connecting the points T 6, B 4, K 3 and then drawing a straight line to the point H 3.
Equalize the side lines of the front and back. At the same time, a segment equal to K 1 B 1 T 41 is laid off from the point K 3 on the line K 3 B 4 T 6 and the point T 61 is obtained.
The top of the middle line - point T 7 is obtained by making a notch on the continuation of the straight line B 5 T 5 from point K with a radius of CT 61 . Connect the points T 7 and T 61 and get the waist line of the back. The tuck along the waist line is placed in the middle of the segment T 61 T 7. Dart length 6 - 7.5 cm.
Connect the points K 4 and B 6 and on the line received from the point K 4 lay the segment K 4 I 5:
K 4 I 5 \u003d K 2 I 3 - 0.5 cm, where 0.5 is the value of the pull line of the step edge;
I 5 - the top of the step line.
The step line is drawn up by smoothly connecting the points I 5, K 4 and then drawing a straight line to the point H 4.
For the design of the middle line, an auxiliary point 2 is found:
I 4 2 \u003d 1.5 - 2.5 cm.
The segment I 4 2 is laid on the bisector of the angle B 5 I 4 I 5.
The middle line is drawn up by smoothly connecting the points I 5, 2, B 5 and then drawing a straight line to the point T 7.
The bottom line passes through the points H 3 and H 4 .
Pockets in trousers for boys are located in the same way as in men's trousers -.
Checking the quality of the completed drawing
After constructing a drawing of the design of trousers, the following work is carried out:
Measure the front and back along the lines of the waist, hips, knees, bottom, the length of the trousers and compare the results with the given values. Check the correctness of the calculation of the height of the seat line.
Make sure that the lengths of the step and side lines of the front and back parts correspond to each other.
They check whether the front and back of the trousers match along the side line at the level of the waist and bottom lines, along the step edge at the level of the seat height line and the bottom.
Check if the two front pieces match at the level of the waist line and the crotch line.
Check if the two back pieces match at the level of the waist line and the crotch line.
Check the design of the waist line with closed tucks and folds.
Topic of this article "Pants for preschool children". Our children grow very quickly, so a mother-needlewoman should master several techniques for constructing patterns for children. In the previous article, we learned how to build a pattern for a little fashionista, today on the agenda are trousers for the smallest. This will be the base pattern, from which you can model different styles trousers, overalls, shorts…
Pre-take measurements from your naughty (however, these trousers fit perfectly on girls), arm yourself with paper, a pencil, a ruler and get to work.
Exists a large number of methods of designing clothes of varying degrees of complexity. There are more difficult to execute, there are simpler. We offer one of them. In the following articles, we will bring to your attention a few more different methods so that each of you can choose what he likes.
We build a pattern of children's trousers (for preschool children).
You can use this pattern when sewing trousers for boys and girls of preschool age.
To build a pattern drawing, you will need the following measurements:
Pants length Dbr |
Measure from the side vertically from the waistline to the desired length of the trousers. The measure is recorded in full. |
|
Pants length to the knee Dbrk |
Measure at the same time as pants length. From the waist line to the middle of the kneecap. The measure is recorded in full. |
|
Half waist St |
Measure at the narrowest point of the waist. The measurement is recorded in half size. |
|
Half hip Sat |
Measure horizontally at the most protruding points of the buttocks, taking into account the bulge of the abdomen. The measurement is recorded in half size. |
The front half of the pants.
In the upper left corner of the prepared sheet of paper, draw a right angle with a vertex at point A.
Length trousers.
From point A down, we postpone the measurement of the length of the trousers Dbr and set the point H. In our example, it is 60 cm, and you postpone your measurement.
From point A down, we postpone the measurement of the length of the trousers to the knee Dbrk and set the point K. In our example, it is 34 cm, and you postpone your measurement.
From points A, K and H we draw to the right horizontal lines arbitrary length.

Rice. 2
From point A to the right, set aside 1/2 measurements of the half-girth of the hips Sat plus 1 cm and set point A1.
AA1=Sat:2+1cm=32:2+1=17 cm.

Rice. 3
From point A down, we set aside 1/2 measurements of the half-girth of the hips plus 2 cm and set point C.
AC=Sat:2+2cm=32:2+2=18 cm.
From point C to the right, set aside a distance equal to segment AA1, and set point C1. We connect points A1 and C1.

Fig.4
Segment AC is divided into 3 equal parts. We denote the lower point of the division with the letter B. From point B to the right, we draw a line to the intersection with the segment A1C1, and set point B1.
We will denote the upper point of the division with the letter B, we will need it when making the line of the side seam.

Rice. 5
From point C1 to the right, we set aside 1/10 measurements of the half-girth of the hips Sb and set point C2: C1C2 \u003d 1/10 Sb \u003d 32:10 \u003d 3.2 cm.
Divide the angle at point C1 in half, set aside 1.5-2 cm along the bisector of the angle and mark the point with the number 1.5 From point C1, set aside 4 cm upwards and mark the point with the number 4.
Points 4; 1.5; We connect C2 with a smooth curve. The bow line passes through points A1; B1; 4; 1.5; C2.

Rice. 6
Fold line.
We divide the segment CC2 in half and draw a fold line through the division point parallel to the line AH. The point of intersection with the waist line is denoted by the letter A2, with the knee line - K1, with the bottom line - H1

Rice. 7
Set aside 2.5 cm from point K to the right and set point K2. From the point K1 to the right, set aside a distance equal to the segment K1K2 and set the point K3.

Rice. 8
From the point H1 to the right and to the left, we set aside a distance equal to the segment K1K2, and set the points H2 and H3.
Note: The width of the bottom of the trousers can be wider or narrower than the width of the trousers at the knee level. You yourself determine this value, based on your own considerations.

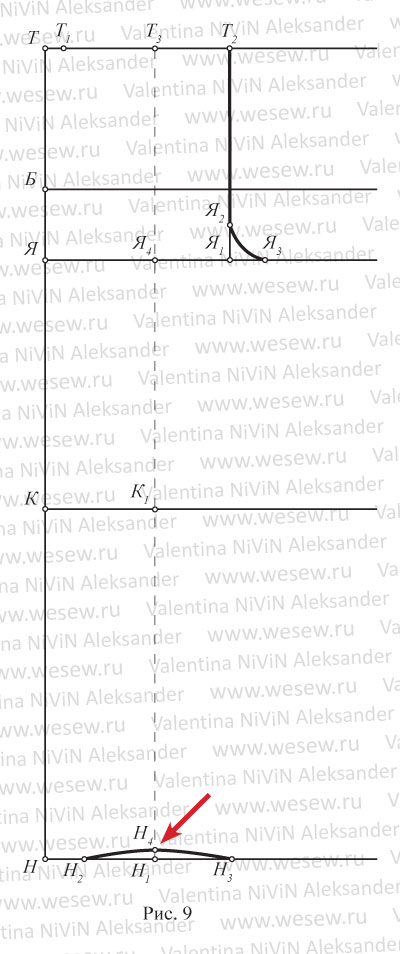
Rice. 9
We connect point B with point K2, divide this segment in half. At the division point to the right, set aside 0.5 cm.
Set aside 1 cm from point A to the right, designate this point with the number 1 and connect it with points B; B; 0.5; K2; H2. The distance from point 1 to K2 is drawn by a smooth curve, and from K2 to H2 by a straight line, thereby making out the line of the side cut of the trousers.

Rice. 10
We connect the points C2 and K3, divide this segment in half and set aside 0.5 cm to the left. We draw up a step cut by connecting the points C2; 0.5; K3 is a smooth curve, and points K3; H3 is a straight line.

Rice. eleven
From the point H1 we set aside 0.5 cm upwards. Points H2; We connect 0.5 and H3 with a smooth line.

Rice. 12
From point A2 we set aside 6-8 cm down and this point is denoted by the number 8. The size of the solution of the tuck of the front half is 2 cm. From point A2 to the right and left we set aside 1 cm and connect these points with point 8 (the top of the tuck). Instead of a tuck, you can lay a fold.

Rice. 13
NOTE. Set aside 2-3 cm from point A1 to the right and draw a fastener line parallel to the A1B1 line. If you plan to sew pants with an elastic band, this is not necessary.

Rice. 14
Back half trousers.
The back half of the trousers is built on the basis of the front half. You can build on the same sheet of paper, and after completion, copy each half of the trousers separately. Or transfer (copy) to a separate sheet of paper the construction grid and the contour of the front half of the trousers without darts and continue building the back half. In this case, each half of the trousers will be on a separate sheet of paper.

Rice. 15
Divide the distance A2A1 in half, mark the division point with the number 3. Draw a straight line from point C1 upwards through point 3, continuing it upwards beyond the waistline by 3 cm and set point A3. The point of intersection with the line BB1 is denoted by the letter B2. From B2 upward along this line, set aside 2.5-3 cm and put the letter B3.

Rice. 16
Set aside 4 cm from point C2 to the right, put point C3. Set aside from point C3 down 1 cm and set point C4. On the bisector of the angle from point C1, set aside 2-2.5 cm. We make out the seating line by connecting points A3; B3; 2; C2; C4.

Rice. 17
Segment A1A is extended to the left by an arbitrary length. On this segment, we make a mark with a compass from point A3 with a radius equal to 1/2 of the half-circumference of the waist plus 3 cm (for tucks) and set point A4.
A3A4 \u003d St: 2 + 3 cm \u003d 28: 2 + 3 \u003d 17 cm.
Width at the knee line.
From point K2 to the left, and from point K3 to the right, set aside 1 cm and put points K4 on the left, and K5 on the right.
Bottom line width.
From the point H2 to the left, and from the point H3 to the right, we also set aside 1 cm each, and set the points, respectively, H4 and H5.

Rice. 18
We connect point A4 with point K4. From points B; B; and C we draw horizontal lines to the left until they intersect with the straight line A4K4 and denote them respectively by the letters B1; B4 and C5. Divide the distance C5K4 in half and set aside 0.5 cm from the division point to the right.
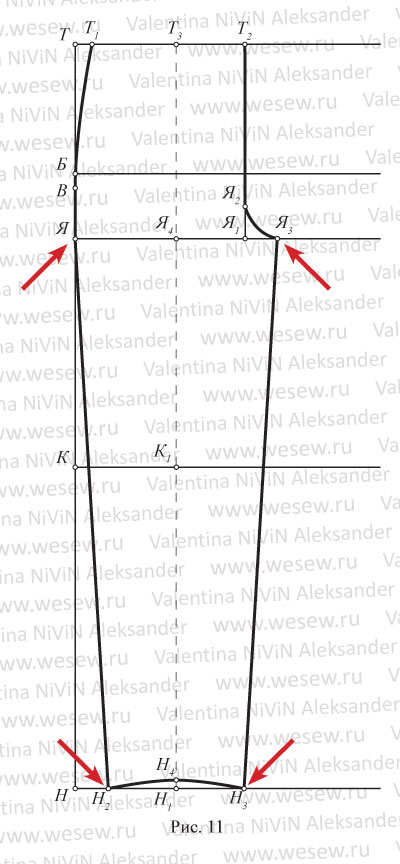
Set aside 1 cm from point A4 to the right, denote it by the number 1. Connect points 1; IN 1; B4; 0.5; K4; H4. We draw the section from point 1 to K4 with a smooth curve, and the section from point K4 to H4 with a straight line.

Rice. 19
We connect the points C4 and K5, divide this segment in half and set aside 0.7-1 cm from the division point to the left at a right angle. We connect the points C4; 1; K5 is a smooth curve, and points K5 and H5 are a straight line.

Rice. 20
From the point H1 we set aside 0.5 cm down and draw the line of the bottom of the back half of the trousers, connecting the points H4; 0.5; H5.

Rice. 21
Divide segment A4A3 in half and draw a perpendicular 8-10 cm long from the division point down at right angles to this line. The tuck solution is 2 cm. From the division point to the right and left, set aside 1 cm and connect these points with the top of the tuck.

Rice. 22
That's all. Now you have the so-called base. You can sew trousers on it for both boys and girls.
There are options in the width of the trousers and in the length. The types of pockets can also be different. Experiment.
You can sew pajama pants, then the side and step sections can be drawn in straight lines without deflections, do not make tucks along the waist line, slightly expand the trousers and give an allowance for elastic.
You can sew shorts, bermudas, "bananas", breeches, overalls, having previously made the appropriate changes in the pattern.
Before you start cutting, as always, you need to check the pattern along the waist line, along the hip line, as well as the height of the seat and the length of the trousers. Do not be lazy to take a centimeter and compare the measurements you took with the dimensions of the drawing. And don't forget to add seam allowances.

Rice. 23
I wish you all creative inspiration!
Download in one file | turbobit | | |
Don't forget to add to your bookmarks. The bookmark buttons are below.
The rights to this article belong exclusively to the author. Full or partial use of the materials of this article in electronic publications on the Internet is possible only if the following conditions are met:
Author information must be saved. In the title or at the end of the published reprint, the source www.website of the Internet resource "Sewing Master" with a direct, active, visible to the user, not closed from indexing search engines hyperlink to this article.
The publication of texts by newspapers, magazines or other replication outside the Internet is possible only with the written consent of the author.
Children's pants are a must for both boys and girls. This is the most comfortable clothing for walks, games, trips, and just for everyday wear. And modern styling makes the trousers also very elegant. But which ones to choose to be both comfortable and practical at the same time? From my own experience, I can say that trousers should be at least an average waist and with an elastic band at the waist, the last detail is especially important for small children. Thanks to the rubber band on the waist, the panties fit snugly to the baby's body, do not bulge, do not slip and do not press.Well, for older children, you can already sew pants with zippers and pockets, like real jeans.
Pattern of children's trousers for the age from 2 to 10 years
The simplest and most comfortable trousers are the model in sports style on rubber. Children are very comfortable in such clothes, and mother, in turn, can easily and simply cope with tailoring.
In MK for this pattern, it is proposed to sew panties from double fabrics, the top is a mesh, and the bottom is elastic synthetic fabric. But you can sew from any other fabric and not necessarily in two layers.


Details of panties: orange - lining, dark - faces. side
Download the PDF pattern, print and glue the sheets. Choose the appropriate size (table below) and cut. Transfer the details to the fabric. Cut and sew the pieces.

Tuck the top cut and sew, insert the elastic. Finish the bottom of the trousers. stripes can be sewn on the sides if desired.

Download patterns of children's sports trousers for the age from 2 to 10 years:

Master class: how to sew panties for a child

Step 1. Print out the pattern and transfer it to the fabric. Cut out, leaving 2 cm around the edges for allowances.

Step 2. Complete all seams.

Step 3. Measure the width of the waistband of one leg. From stretch fabric, make a waistband and cuffs of the appropriate width. Sew and fold in half.

Step 4. Sew the details to the panties.

Pattern of children's trousers with an elastic band
This pattern of children's trousers is designed for babies 2-3 years old. Below you can download it and watch a master class on sewing these panties. The required amount of fabric is 90 cm.

Download patterns of children's trousers with an elastic band (size for 2-3 years):
Master class: trousers with an elastic band

Step 1. Print the pattern and transfer the details to the fabric. Cut out.


Step 2. Sew all the seams one by one.

Step 3 Overlock the cuts.
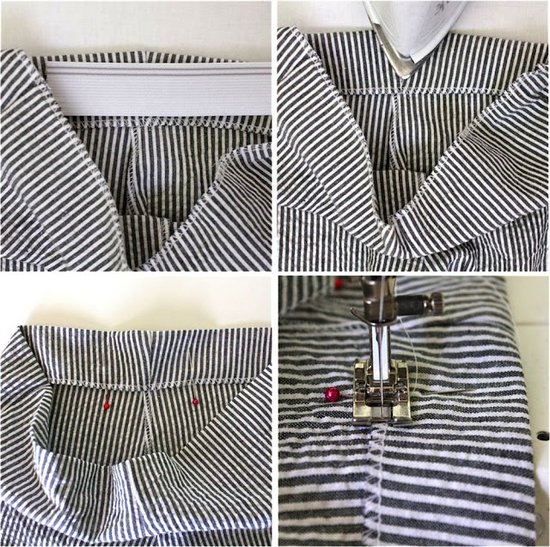
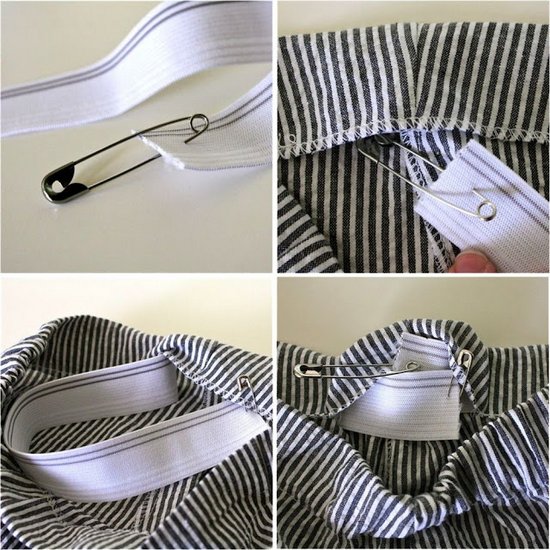

Step 4. Tuck the upper cut along the width of the elastic band. Sew, leaving a small section open. Insert the rubber and sew up the left area. Sew the belt along with the elastic.

Step 5. Overlay the bottom sections. Turn and sew.

How to sew baby pants from a sweater: a master class
And one more master class with a good example of how to sew warm pants for a baby from an unnecessary sweater.


