Crocheted decorative hair bands: instructions. A few tips on how to use a hair tie with hooks Openwork hair ties
Beautiful lace scrunchie crocheted. You can complete your look by knitting a hair accessory in the color of your favorite outfit or play with your favorite color contrasts. All you need is a regular hair tie, 30g of your favorite thread and a crochet hook.
Description of knitting gum:
The basis of our hair ornament is an elastic band that should stretch well and hold the hair comfortably, with a diameter of about 5 cm. as the elastic stretches, your harness should also stretch.

To make the elastic band lush, we knit two lace borders according to scheme A and B, one on the back walls of the strapping loops, the second on the front. We knit first lace border starting from 4 air. lifting loops + 3 air loops of a row, then in each loop of the strapping we make * a column with two crochets and an arch of 3 air. loops, so we alternate from *, knitting st s / 2n into the last loop of the strapping, we make one air. loop and st s / n in the 4th lifting loop. We start knitting second row: * make a "picot" (3 air loops are connected to the first), then an arch of 5 air loops and st b / n in the middle of the arch of the first row, then repeat from *. Having knitted st b / n in the last arch of the row, we make "picot", 1 air. loop and st s / n in the center of the trace of the arch. Third row vyyaetsya simple arches of 5 air. loops fixed art. b / n in the center of the arches of the previous row. Fourth row we start knitting with a thread of a different color from the center of any arch, we make 3 air loops, then a magnificent column at the end of the arch (3 unfinished sts s / n knitted together) and 3 air loops we fix the st b / n from the center of the next arch. 
First row we also start the second lace border with 4 air loops + 1 air. loop of the row, then in each loop of the strapping * st s / 2n, 1 air. loop, repeat from *. Second row:* 2 st b / n for the loop between the columns and "pico", repeat from *. Third row we start with 4 air lifting loops + 3 air loops of the arch, then we knit embossed columns with two crochets, fixing them to the legs of the columns of the previous row and arches from 3 air loops, we finish the row with a loop in the 4th air. lifting loop. Next, we make 2 connections. loops to the center of the arch and start knitting fourth row: 1 air loop, 1st s / 2n in the center of the trace of the arch, 1 air. loop, 1 st s / 2n to the same point as the previous column, so we knit * 4 st s / 2n from the center of one arch, alternating from air. loops, fasten st b / n in the center of the next arch and continue from *. Fifth row we make a strapping with a thread of a different color, tying st b / n and making a "picot" on the columns of the previous row.
A universal selection of gift ideas for every occasion and occasion. Surprise your friends and loved ones! ;)
Hi all! My friends, although it is not spring yet on the street, the time is not far off when we will all walk around without hats. It is worth taking care in advance of how your little head will look, especially if you have a very long hair. That is why today we will make hair ties with our own hands!
We will move, so to speak, from the most elementary to something more complicated. In any case, you will definitely cope with all types of these rubber bands, because I will describe in detail how to make each of them.
In fact, there is simply incredible great amount ideas for creating rubber bands (and not only). And almost every one of them can be realized with the help of simple manipulations. In general, I will show you a lot of hair accessories. Sit back, I'll open the door for you to the amazing (actually!) world of hair accessories (no matter how strange it may sound :))
Before you get started, take a look here. Come back when inspired :)
Scrunchie base or the simplest model
In order to make the base, you will need first of all:
- underwear or just a thin elastic band (15-20 cm);
- a piece of fabric (the length is about 2-3 times greater than the length of the elastic band, the width is arbitrary);
- threads in the color of the fabric;
- needle;
- pin;
- scissors.
Take the prepared piece of fabric, fold it in half lengthwise, sew along the edge. Then fold the stitched piece with the holes facing each other and sew along the edge, leaving an opening to turn inside out. Turn out the workpiece.
Now insert the rubber band. Tie it up, sew up the hole. That's all. Such a model can be used as an independent product or as a basis for a more sophisticated elastic band.

DIY hair bands: master classes and photos
How many rubber bands can be made, you simply cannot imagine! Now let's look at the options for elastic bands that can be made without even having serious knowledge in the art of sewing.
Four Variations
To plunge into creativity right away, I suggest you look at these four options for rubber bands. One way or another, you can find each of them in my articles about homemade gifts. At the end of the article, I just give links to those master classes.
In short: bows are made with multiple folds. In the first case, several ribbons are folded, and in the second, the folds are formed from one strip. The flowers are assembled from a heavily gathered ribbon glued to a base circle. In the latter case, a bow is also placed on top.

Here is another version of the bow:
Beautiful and fashionable
I see this model very often now. Want to be the center of attention? Then make this beautiful and catchy hair band. Prepare a piece of fabric, wire, warp and thread with scissors.
Cut out two ovals from the fabric, which are sewn together along the edge, leaving a hole. Put a wire in there. Place the future bow in an elastic band and tie.

elegant
It is not a shame to wear such an accessory for the evening. For it, prepare the base, shiny (optional) yarn, various kinds of beads and a crochet hook (although if the yarn is thick enough, you can handle it with your hands).
The most important thing here is how to tie the base. I don’t know what this type of strapping is called correctly, but it reminded me of a voluminous buttonhole stitch. In the course of weaving, gradually add beads (this can be done later by pulling a thread through the elastic band, gradually stringing them on it).

Children's rubber bands for little girls
A five-leaf flower can be created by a simple operation: take a circle, sweep it along the edge, pull it together and stuff it. At the end, sew up and make a few tightenings from the center. 
Such flowers are very fond of attaching to bandages for newborns and, in general, for small children. Take some laps different sizes, make cuts along the edge of them and burn them. It remains only to fasten in the center with a bead.

Button happiness
Are there a few original buttons that are definitely not useful for clothes, but do not give rest to your creativity? Then let them go! Everything is as easy as shelling pears: take an elastic band, a button and sew one to the other. If the buttons are small and the base is wide, then you can simply make a button decoration.
All sorts of additional decorations are welcome: ribbons, rhinestones, etc.

Lace elastic
An elastic band can be sewn in the same way as the basis for an elastic band, but with one difference: after stitching, the woven blank does not turn out. With the help of lace, a very light and playful look is obtained.

The second option is with lace: this time only a flower is made from this wonderful material, and not the entire elastic band. To do this, it is enough to pick up the lace and sew it in the center, the rest is a matter of decor.

Elastic band "Bow"
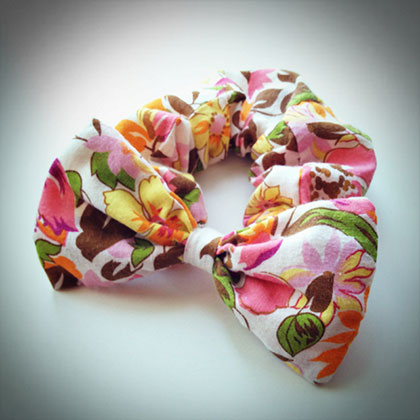
An elastic band with a bow can be sewn from absolutely any fabric! I decided to experiment with fur
Below I decided to show you on the diagram how I made the bow. First, you make the base for the elastic band, and then for the bow, take a wide strip of fabric, sew it in half (as well as for the base).
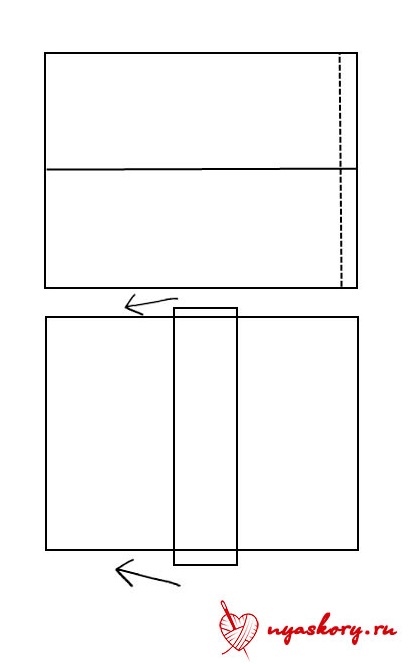
Then sew the ends of the bow, folding the workpiece in half again. Turn the elastic inside out and tie it in the center with a strip of fabric.
It turns out this cuteness:
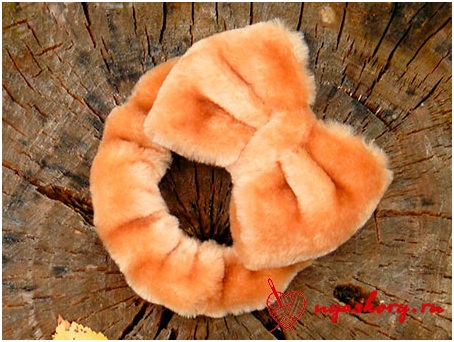
From the usual cotton fabric will result in the following:
Elastic band "Hare ears"
Somehow I wandered into free master class within the framework of the BiblioTime project (told about it). The topic of the handicraft meeting was rubber bands. But if everyone decorated the cut with beads, then I decided to excel, remembering the “eared” specimens.
Unfortunately, I don’t have photos of that product, but I can tell you about the creation of an elastic band with ears
To make such an elastic band, you will need a pattern:

Again, you need a base for the gum. The ears are tied with a knot around her and a romantic and girlishly gentle image is obtained. What you need for spring

Elastic band "Jack" ("Halloween")
I think many watched the cartoon "The Nightmare Before Christmas" by Tim Burton. As for me, the work is specific, but very bright and memorable.
Especially main character— Jack Skellington, whom you see below.
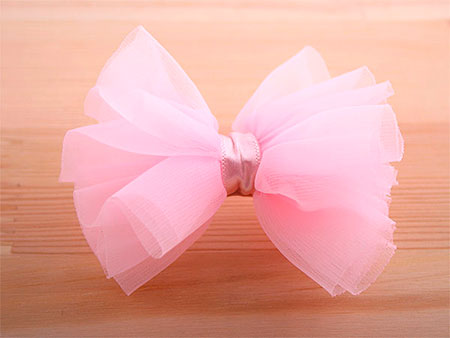
Scrunchy. Master Class.
Description of knitting gum:
The basis of our hair ornament is an elastic band that should stretch well and hold the hair comfortably, with a diameter of about 5 cm. as the elastic stretches, your harness should also stretch.
To make the elastic band lush, we knit two lace borders according to scheme A and B, one on the back walls of the strapping loops, the second on the front. We knitfirst lace borderstarting from 4 air. lifting loops + 3 air loops of a row, then in each loop of the strapping we make * a column with two crochets and an arch of 3 air. loops, so we alternate from *, knitting st s / 2n into the last loop of the strapping, we make one air. loop and st s / n in the 4th lifting loop. We start knittingsecond row: * make a "picot" (3 air loops are connected to the first), then an arch of 5 air loops and st b / n in the middle of the arch of the first row, then repeat from *. Having knitted st b / n in the last arch of the row, we make "picot", 1 air. loop and st s / n in the center of the trace of the arch.Third rowvyyaetsya simple arches of 5 air. loops fixed art. b / n in the center of the arches of the previous row.Fourth rowwe start knitting with a thread of a different color from the center of any arch, we make 3 air loops, then a magnificent column at the end of the arch (3 unfinished sts s / n knitted together) and 3 air loops we fix the st b / n from the center of the next arch.
First rowwe also start the second lace border with 4 air loops + 1 air. loop of the row, then in each loop of the strapping * st s / 2n, 1 air. loop, repeat from *.Second row:* 2 st b / n for the loop between the columns and "pico", repeat from *.Third rowwe start with 4 air lifting loops + 3 air loops of the arch, then we knit embossed columns with two crochets, fixing them to the legs of the columns of the previous row and arches from 3 air loops, we finish the row with a loop in the 4th air. lifting loop. Next, we make 2 connections. loops to the center of the arch and start knittingfourth row:1 air loop, 1st s / 2n in the center of the trace of the arch, 1 air. loop, 1 st s / 2n to the same point as the previous column, so we knit * 4 st s / 2n from the center of one arch, alternating from air. loops, fasten st b / n in the center of the next arch and continue from *.Fifth rowwe make a strapping with a thread of a different color, tying st b / n and making a "picot" on the columns of the previous row.
In the modern world, it is very difficult to imagine a woman without the original scrunchie, which has already become very popular.
There is a large selection of various rubber bands on sale, but it is best to tie it yourself. Indeed, from yarn of various colors and textures, you can create many interesting decorations that would fit any outfit.
You can easily afford to complement your image with an accessory that will be in harmony with the color of your hair and clothes, and will also give you the opportunity to experiment with your favorite shades.
I suggest you crochet a lace elastic band.
materials
We will need:
1. ordinary rubber band;
2. approximately 30 g of thread;
3. hook;
4. some free time, imagination and perseverance.
Progress
I hope that step by step description makes things a little easier for beginners. And more experienced craftswomen will be able to use the scheme.
I bring to your attention a very convenient and understandable scheme, because. each row in it is highlighted in a different color. This will help you not get confused.

I will use a 3 cm hair tie, cheap YarnArt Etamin yarn (30g/125m, 100% acrylic), thin hook No. 1.25 mm.

1 row: you need to make the initial loop on the hook

Next, we tie our gum with single crochets. The number of columns must be a multiple of 4.

Tie very tightly, taking into account the fact that the elastic will stretch.

2 row: knit 4 ch. lifting and, skipping 1 loop from the first row, we knit 1 column of s / n.

Next, we knit in the same way, but without lifting loops and continue to the end of the row.
We will complete all rows with a connecting column.

3 row: tie 6 in. loops and fasten them with one b / n column (we insert the hook into the center of the next arch, between the columns from the second row).

We continue, * we knit an arch of 5 air loops and fix it with the 1st column b / n (also in the middle of the next arch, which was formed between the columns from the second row) * We knit like this until the end of the row.

Now we proceed to the 4th row: tie 3 lifting in. Loops, and then 4 columns of s / n (introduce a hook under an arch of 5 air loops).

Next, we knit as follows: * an arch of 2 air loops and 1 column b / n (drive the hook into the middle of the arch from the air loops of the third, previous row), again 2 ch, 5 columns of s / n. *. We knit from * to the end of the row. Do not forget that at the end is a connecting column.
5 row: knit 4 ch. and fix them with the 1st column b / n in the next loop of the column from the fourth row (repeat 3 times).

We continue to knit identically to the previous, 4th row - 2 ch. fasten with the 1st column b / n in a column from the fourth row. We knit a row to the end: * 2 ch, again 1 column b / n (knit in each column s / n from the previous row), 2 ch *. We finish the row, cut the thread and carefully hide it.
 Here, our work is finished, and you can please yourself with an inexpensive DIY decoration. After all, you will agree that this is done quickly and easily!
Show a little imagination - try to tie the last row with beads or yarn of a different color.
The master class was prepared by Tatyana Burdun for the site Creative mothers


