New Year's toy in modular origami technique. Master Class
Hello dear masters and craftswomen. I present to your attention a master class on making such an origami swan, and I called it “Swan in Pink”. How to make an origami swan? We will make a pink drawing, highlight the swan with pink modules around the perimeter and put it on a round stand, and also glue small eyes. Please watch this video on making an origami swan. IN […]
Hello dear masters and craftswomen! Today I bring to your attention a master class on making a tricolor Swan from triangular modules. It would seem, what else can you think of, what other options are there for making Swans using the modular origami technique. But it turns out that there are still options and this is not the last thing in my arsenal. The tricolor swan is so simple […]
Hello dear masters and craftswomen! I bring to your attention new master class for making a Swan in black from 3D modules. In the last lesson, we made a Swan in red, and now I decided to change the style a bit and make a Swan in black. The scheme is not complicated and will suit anyone, even a beginner in modular origami. Specially […]
Hello dear masters and craftswomen! I bring to your attention a new master class on making a Swan in red shades. On the Internet you can meet great amount various schemes and workshops for making Swans using the modular origami technique. I am sure that you have never seen such a swan. This scheme is quite simple and even […]
Swan in blue. Video tutorials and diagram. Part 3. In the third part of the master class, I offer you two video lessons and detailed diagram origami how to make a swan. The first video shows how to make a swan neck and how to make a small stand. The second video talks about how to glue a swan better and faster. Lesson 6 (neck and […]
Swan in blue. Video tutorials and diagram. Part 2. In the second part of the "Swans in Blue" mater class, we complete the torso. I have prepared for you two video tutorials and a detailed origami swan diagram from modules. To assemble the swan, you will need 1438 1/16 size modules, of which: 317 - purple modules 471 - blue modules 552 - blue […]
Swan in blue. Video tutorials and diagram. Part 1. I bring to your attention a new master class on making an origami paper swan from 3D origami modules. The scheme is rather unusual and the appearance of the wing is not quite classic. In the photo you can see small through holes and a mesh pattern. Frankly, the scheme is quite complicated! Especially for this scheme, I […]
“Rainbow Swan” scheme and video tutorials (part 3). The third part of the "Rainbow Swan" master class consists of three video tutorials on assembling the stand. And I also decided that a video tutorial on gluing the "Rainbow Swan" would be very useful to you. Lesson 5 (stand part 1) Lesson 6 (stand part 2) Lesson 7 (stand part 3) […]
Winter and new year holidays‒ a special time when even adults begin to believe a little in a miracle, a fairy tale, make wishes and sincerely expect them to come true. And there is no need to talk about the mood of the kids.
Every family tries to decorate the house for the holiday and, of course, decorate the Christmas tree. And if you want the toys on your Christmas tree to be the most beautiful and original, try to make various New Year's crafts with your own hands with your family. Especially since new year origami- this is one of the best extraordinary ways to decorate an evergreen beauty.


Gift from the Land of the Rising Sun
Origami became known to the whole world only in the middle of the last century, but in Japan, in its historical homeland, this art has been known and loved since time immemorial. By the way, origami was a favorite pastime of noble people of the state, so they often practiced it, and if someone from the upper strata of society did not own the artistic technique of folding volumetric figures from paper, he could be very ashamed of this, because he would be considered ill-bred .
Today, both children and adults are fond of origami, because it's so cool, interesting and easy to create beautiful crafts from paper with your own hands. Today you can make toys according to the classical traditions of technology (only one sheet of paper is plain and square, without the use of auxiliary tools such as scissors or glue), or you can slightly break the ancient rules, giving free rein to fantasy and creativity. 
Japanese kusudamas are perfect as New Year's toys. This was the name of the balls that were once sewn from fabric to be used as a kind of container for collecting and storing medicinal herbs or for incense. However, today kusudamas are made like a modular origami ball - they simply glue it from several separate paper modules. In this decor, you can embody any interesting fantasy and make it wonderful decoration for the Christmas tree.
Balls-balls…. Magic and miracle from nothing
Despite the apparent complexity, even a child can make kusudama. For those who doubt their abilities, there are many master classes with diagrams, as well as video tutorials, in which you can take a closer look at the entire process of creating crafts with your own hands.
So, if you are ready to get started, then you will need to prepare some materials and tools so that you will not be distracted by anything:
- Of course, you will need the paper itself - keep in mind that you need to take square sheets. In order to make one ball of kusudama, you need 60 sheets of paper. Diameter future toy will depend on the diameter of the sheets (for example, if you take standard A4 sheets and make squares out of them, then you will end up with an approximately 30-diameter ball, but from small stationery sheets - a very miniature ball);
- also prepare a pencil and a ruler;
- do not forget about scissors and glue;
- decor - at your discretion - a ribbon to hang a toy, beads, sparkles, foil, etc.
Choose the color of paper depending on what kind of DIY craft you want to make.

- First you need to take your square and fold it. This must be done strictly diagonally.

- You will get a triangle, the side corners of which will need to be bent to the top. Just make sure you get it symmetrical.

- Next, try to carefully straighten each of these bent corners. As a result of your efforts, it should turn out that the longitudinal fold will pass in the middle.

- Now you will be dealing with diamonds. Their corners also need to be bent.

- After that, in your hands you will get a figure, on the sides of which there will be two small triangular envelopes. Each of them will have to be alternately folded in half, bending the outer edges.

- It's time to use glue. You need to carefully glue those narrow triangles that you got so that the petal comes out.

- Model other petals in the same way. different color, because in each individual flower there are five of them.

- Kusudama balls are complex designs related to modular or 3D origami, because the whole figure will consist of many identical parts or modules. For your craft, you need to make twelve flowers.
The finished product can be sprinkled with sparkles, decorated with small foil stamens, glued beads on it and attached a ribbon. Voila - a do-it-yourself origami magic ball is ready and will delight you, giving you a festive mood and a smile. 
You can also make any other christmas toys using the origami technique. For example, it is very easy to cut eleven strips from a multi-colored sheet (width with an A4 sheet of paper is approximately 19 mm). All the stripes will need to be collected in a pile, firmly connecting them in the center (use thread or tape for this). Next, the inner edge of each strip must be bent to the center and glued. So you get a beautiful voluminous toy.
Once you look at the diagram, you can easily collect a star with six or nine rays, and flowers, and snowflakes, and Christmas trees. The main thing is just to start. Let the flight of your imagination allow you to embody the most beautiful and original ideas in New Year's toys created by one's own hands.
- Module - DIY brick
- Christmas tree
- Swallow and crane
Origami
What is origami?
Origami is the name of the Japanese art of paper folding, derived from the Japanese "oru" (to fold) and "kami" (paper). Despite the fact that paper itself appeared in China, it was in Japan that they guessed to put figures of amazing beauty out of it. And the first such figurines appeared in Japanese monasteries, because in Japanese the concepts of the word “God” and “Paper” sound the same, although they are written in different hieroglyphs. Paper figurines had a symbolic meaning and were used in various rituals. In the Middle Ages, when the cost of paper fell, the art of folding penetrated the life of the nobility - it penetrated the life of the samurai. In the old days, the ability of a nobleman to entertain his lady by folding paper figures was considered a sign of good upbringing.
In our time, origami is used by different groups of people: artists use origami as a way to express themselves creatively, scientists, architects and mathematicians explore origami geometry for beauty or for practical applications, doctors and teachers use origami to help their patients recover from illness or for educational purposes. But a huge number of people fold paper just because it's fun.
Occupation of origami does not require special devices, an equipped workplace. Origami requires only a piece of paper, which makes it one of the most accessible arts - anyone can fold origami figures anywhere and in any situation: at home, in the hospital, on the train, while traveling, in the office and so on!
Positive aspects of origami art
As already mentioned, to practice classic origami, you do not need any devices, you only need a sheet of paper.
Origami is a unique opportunity to develop fine motor skills (motor functions of the human body, combining biochemical, physiological and psychological systems), which is especially important when raising children for the development of intelligence.
Origami is one of the areas of art therapy - the possibility of providing psychological assistance to the patient through art.
Origami is perfect didactic game, developing imagination and ingenuity, logic and spatial thinking, imagination and intelligence. The spatial transformation of a flat sheet makes it easy to master complex mathematical concepts, solve geometry problems in the form of a game.
Origami is able to influence the emotional sphere of a person. This is especially important for those who have various communication problems, who are shy or, on the contrary, overly aggressive. In other words, for people who find it difficult to start communicating, group origami is suitable - each person in the group collects a certain part of the figure, after which the group connects all the parts together. Naturally, without interaction between group members, the craft will turn out to be ugly, or the parts simply simply won’t fit together. For quick-tempered people, on the contrary, an individual origami is suitable - it will help a person to escape from problems and plunge into the world of creativity, calm their nerves. The finished craft will delight not only the one who assembled it, but also colleagues!
How to start collecting origami crafts?
Many origamists like to fold animal models, as well as all kinds of wildlife. In addition to animal models, models of almost all physical objects have been created, including people, faces, plants, vehicles, buildings, and others. Some origami makers build abstract or mathematical shapes, others specialize in modular origami, where many simple pieces are assembled into large, complex structures.
There are several varieties of origami, but two of them are most suitable for short breaks of an office worker: folding according to the scheme and modular origami.
Folding according to the scheme is one of the types of origami diagrams, which is a step-by-step instruction that displays each stage of converting a sheet of paper.
Modular origami is a style of origami in which a whole figure is assembled from many identical parts - modules. Sometimes this style of origami is called 3D origami. Each module is folded according to the rules of classical origami from one sheet of paper, and then the modules are connected by inserting them into each other, the friction force that appears in this case does not allow the structure to fall apart.
In order to try your hand at origami, ordinary office paper with a density of 70-90 g / m² is suitable. For your experiments, you can even take drafts - working copies of documents that are thrown away.
modular origami
Module - DIY brick
As mentioned above, modular origami (3D origami) is an origami style in which the craft is assembled from many identical parts - modules. So, let's start assembling the module itself!
A 3D origami blank is assembled from a sheet with an aspect ratio of 2:1, for example, with dimensions of 8cm x 4cm. The module is a triangle with a double pocket and two tails. The order of assembly of the workpiece is shown in the diagram.
The blanks are interconnected according to the schemes for assembling crafts. Usually, the ends of one blank are inserted into the pockets of neighboring modules - this is how all parts are fastened, but other types of fastening are sometimes used. Conventions used in the diagrams are shown in the figure. And the video shows the assembly process of one module.

Christmas tree
To collect Christmas tree shown in the figure, 325 modules are required. The craft consists of 6 tiers, put on a paper tube. For greater strength, the modules are glued together (glue is dripped onto the wings of the blanks, after which they are inserted into the pockets of neighboring modules).

Swallow and crane


To assemble the swallow or crane shown in the figure, 85 modules are required.


External links
Section of external links, that is, links to other sites to which this resource has nothing to do. These links are provided for the convenience of users and do not mean that the owner of the site SysEngineering.ru approves the content of the sites listed below. In addition, the owner of the site SysEngineering.ru is not responsible for the availability of these resources and for their content.
The easiest way to decorate your home for the New Year holidays is to decorate it with DIY decor. Affordable, but no less spectacular New Year's paper toys can be made by the whole family. The process of their creation is so exciting and diverse that no one will be bored, and everyone will be satisfied with the result.
There are many techniques for making original paper decorations, and everyone can find a suitable one using ready-made schemes and templates.
Origami and kirigami
origami stars

You can make modular origami, such decorations are more difficult to manufacture, but also more effective. The principle is as follows: from paper of a small format, optionally in different colors, the same parts are folded in the right amount. Modular elements are interconnected and form various forms. From the same modules, completely different decorations are obtained.
Having mastered modular origami, you can try your hand at creating kusuda - original volumetric balls from paper.

Modular elements, each of which is already an ornament in itself, are added according to the following scheme:

Modular origami can be the basis for creating flowers, snowflakes and other decorations, as in the diagram below.

From modular elements it will be possible to make a New Year's wreath, which is then decorated with sparkles, ribbons or bells.
Kirigami schemes
For work you will need:
The scheme is transferred to paper with a pencil. With a sharp knife or nail scissors, carefully cut through all the necessary details, removing excess.


By analogy with the previous decorations, snowflakes are made, only the sheet is pre-folded several times, and the stencil is superimposed on one part.
Exclusive paper decorations
Ice cream
To make cups, you need to cut out even circles from craft paper and cut each in half. Roll a semicircle into a cone shape and glue along the seam.
bells
It is better to cut out from whatman paper or cardboard. Glue the bell along the side seam and from below. If white paper was used, then painting the toy would be appropriate, and colored cardboard can be decorated with paillettes, sparkles or appliqués. Pass a ribbon through the loop or decorative cord, decorated with beads.
diamonds
Along the fold lines (indicated by a dotted line), using a ruler, walk with a needle to avoid further creases. After that, you can begin to fold the diamonds, gluing the side seam at the end.

Fairy lights
From colored cardboard we cut out many circles of different sizes. For this, both ordinary and curly scissors are suitable. Elements are best done in different colors.
From the finished strips, single or multi-level garlands will come out.
Tips for choosing and working with material
- whatman paper and thin cardboard - for modular products;
- ordinary stationery of varying degrees of density is suitable for almost every type of toy;
- colored cardboard;
- kraft paper;
- design and packaging paper;
- corrugated colored paper.
For decor ready paper toys any paints are suitable: watercolor, acrylic, gouache.
Another one New Year's craft in the technique of modular origami from Lyudmila Prishchenko. This work embodies an amazing combination of an element from the classic triangular modules and elements from the basic modules of the Sakura kusudama. The result is a fantastic blooming paper snowflake.

Christmas toy "Snow flowers"
This master class designed for the leaders of the circle "Origami" and all lovers of modular origami. Such a toy can be hung on a Christmas tree, decorate the interior of a room, class, and also give it to relatives and friends.
Purpose: to teach how to fold a snowflake from triangular modules and simple flowers in origami technique.
This work can be done by children 9-10 years old.
Modular origami is a type of origami in which products are made up of individual triangles (modules). Modules are connected by nesting them into each other. And when folding, the friction force does not allow them to fall apart, but glue can also be used.
To make a snowflake, we need to prepare 444 modules white color.
We begin to collect 1 and 2 rows. We take two triangles (hereinafter we will say modules) and put one triangle (module) on adjacent corners. This is clearly visible in the photo:

We collect the same number of modules in the 1st and 2nd row.
1 row - 6 modules 2 row - 6 modules

In the next row you need to add 6 modules. We put on a module for each corner of the module. In total, in the 3rd row you get 12 modules. This is also clearly visible in the photo.

In the 4th row we put on the modules in the same way as in the 2nd row: we put on 1 module on 2 adjacent corners.

In the 5th row we add 12 modules, as in the 3rd row, and we get 24 modules in the row.

In the 6th row we put on 24 modules.
In the 7th row we add 24 modules, and we get 48 modules.

We won't add more. Let's just enlarge our snowflake. To do this, we will collect 3 rows of 48 modules, that is, row 8 - 48 modules, row 9 - 48 modules, row 10 - 48 modules.

The basis for the snowflake is ready. Now we make the rays of the snowflake. There will be 8 of them. Each ray starts with 6 modules. And the ray is assembled according to the following principle: 6 - 5 - 4 - 3 - 2 - 1.
Got 1 beam.

We also collect the remaining 7 rays. And the snowflake is ready.

Now let's start making flowers. For 3 flowers we need 15 squares 9×9 cm blue color.
Take a square and fold it diagonally.

Raise the lower corners to the upper corner.
Another New Year's craft in the modular origami technique from Lyudmila Prishchenko. This work embodies an amazing combination of an element from the classic triangular modules and elements from the basic modules of the Sakura kusudama. The result is a fantastic blooming paper snowflake.
Christmas toy "Snow flowers"
This master class is intended for the leaders of the Origami circle and all lovers of modular origami. Such a toy can be hung on a Christmas tree, decorate the interior of a room, class, and also give it to relatives and friends.
Purpose: to teach how to fold a snowflake from triangular modules and simple flowers using the origami technique.
This work can be done by children 9-10 years old.
Modular origami is a type of origami in which products are made up of separate triangles (modules). Modules are connected by nesting them into each other. And when folding, the friction force does not allow them to fall apart, but glue can also be used.
To make a snowflake, we need to prepare 444 white modules.
We begin to collect 1 and 2 rows. We take two triangles (hereinafter we will say modules) and put one triangle (module) on adjacent corners. This is clearly visible in the photo:

We collect the same number of modules in the 1st and 2nd row.
1 row - 6 modules
2 row - 6 modules

In the next row you need to add 6 modules. We put on a module for each corner of the module. In total, in the 3rd row you get 12 modules. This is also clearly visible in the photo.

In the 4th row we put on the modules in the same way as in the 2nd row: we put on 1 module on 2 adjacent corners.

In the 5th row we add 12 modules, as in the 3rd row, and we get 24 modules in the row.

In the 6th row we put on 24 modules.
In the 7th row we add 24 modules, and we get 48 modules.

We won't add more. Let's just enlarge our snowflake. To do this, we will collect 3 rows of 48 modules, that is, row 8 - 48 modules, row 9 - 48 modules, row 10 - 48 modules.

The basis for the snowflake is ready. Now we make the rays of the snowflake. There will be 8 of them. Each ray starts with 6 modules. And the ray is assembled according to the following principle: 6 - 5 - 4 - 3 - 2 - 1.
Got 1 beam.

We also collect the remaining 7 rays. And the snowflake is ready.

Now let's start making flowers. For 3 flowers we need 15 squares 9x9 cm blue.
Take a square and fold it diagonally.

Raise the lower corners to the upper corner.
We take the right triangle and fold it in half (flatten it), then we take the left triangle and also fold it in half.
We bend the upper corners of the flattened triangles towards ourselves.
Fold the left and right triangles in half.

We connect and glue.

We make 4 more such modules and connect them together. It turns out such a wonderful flower:

We make 2 more flowers and glue it on our finished snowflake. Decorate with strips of paper wrapped around a pencil.
Our snow flowers are ready.

I wish you success in making the New Year's toy "Snow Flowers".
In enough early age we launched paper planes and made boats. But in fact, they are origami toys.
Important! With the help of this type of needlework, you can please the child new toy, as well as to diversify not only it, but also your leisure time.

Many sites show videos on how to create origami toys or show a master class on how to make an origami toy. In this article we will show you best crafts that can be done by an inexperienced adult and a child of any age.
Let's figure out how to make an airplane first.

cartoon origami toys
You need to have a sheet of white paper for work. By the way, you can use colored paper.

paper airplane
First, fold the top corners of the sheet to the center of the paper. Then we bend the resulting triangle down. We repeat the action: we bend the upper corners to the middle, but so that the triangle remains at the bottom. We grab the bent corners and turn the craft over. Let's bend in the opposite direction and bend down the wings of the aircraft. Let's take off the wings. The plane is ready!

Origami - airplane
Ship from childhood
You need a sheet of white paper. Fold the leaf in half. Then fold it vertically. The upper corners are bent towards the middle. We bend the lapels on opposite sides of the sheet. Then we turn them back to their original position. We bend the bottom corners up. We pull the points of the central bend and rotate the craft. Lapels also need to be bent. Then pull the edges and stretch. Ready!

paper boat
A lot of paper origami toys can be made with your own hands. In most cases, these are animals.
horse
The scheme by which we will make an origami toy will be as follows. We will need:
- black and brown paper;
- scissors;
- glue;
- ruler.
Cut out strips 30 * 3cm.
Fold one strip in half, stepping back 3 cm from the edge, and bend on both sides.

Preparing and folding the strips
We also fold the second strip in half, stepping back 7 cm from the edge.

Folding the second strip
Then take one strip and insert it into another. We glue them.

Bonding strips
If the craft does not have stability, then the hind legs are equal.

Rear leg trim

Mane preparation
Your origami horse is ready!

Ready horse
Rose
The flower can also be an origami toy. It is done quite easily. The very process of its creation is incredibly exciting. You only need a piece of red color, which will be painted on both sides.
First, fold the sheet in half. Then we bend again. Open the top layer. We flip the piece. Let's flip the square. Fold 2 corners up. We bend the triangles and outline the lines. Opening triangles. We bend the pockets that we have turned down. The second side of the craft is also performed. Bend the top corner. The lower part of the craft should open up. We pull the triangles and turn the craft over. Then turn the craft over and raise the triangles again. Bend the bottom square diagonally. Turn the product over and repeat the previous step. Next is the most interesting. We put the workpiece on our hand and turn it clockwise so as to get a rose.
Advice! Petals can be twisted with a pen or felt-tip pen.
Rose is ready!

Origami craft - rose
How to combine origami and appliqué?
To make a house, you will need to purchase:
- colored paper;
- scissors;
- glue.

Origami applique
Cut out a square from colored paper. Fold it in half. The result is a rectangle. We bend it in half. We mark the center. We bend the resulting rectangles into the center of the craft. Got a square. Then we unfold the craft. First, carefully unfold one part of the house, and then the other part of it. In order for the house to have a stable position, we will expand the side walls. Now the fun begins for the child!
Advice! You can glue windows from other paper, you can paint it in flowers, shade the roof.
In general, the house will turn out the way the child wants. It will turn out a good origami toy!
Butterfly
Another origami paper toy that we will tell you about in this article will be a butterfly.
We make a square from a sheet of paper. Then fold it in half to make a triangle.
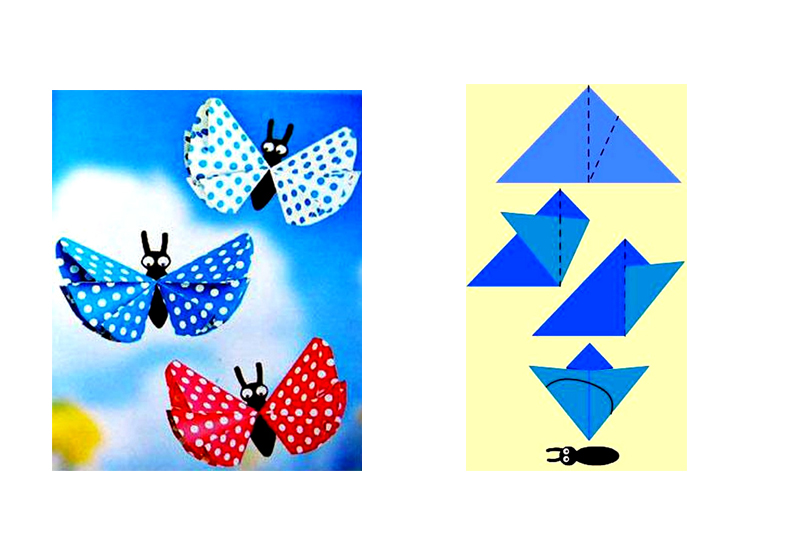
Scheme for making paper butterflies
The beauty of this craft is that it can be made in any color, hung on a string, put on a flower, decorate a Christmas tree with it, and much more.
Cut out the butterfly wing as shown in the photo above. The body of the butterfly is cut out of black cardboard. So the origami toy will look more realistic. We make butterfly eyes out of paper or glue ready-made ones. We collect all the parts to get a full-fledged butterfly.

Origami - butterflies
modular origami
Assembling a modular origami toy is an activity that requires patience, perseverance and attentiveness from you. However, the efforts spent will not disappoint you, but will give you another reason to be proud of yourself. This origami toy is proof of that.
Chinese dragon
Modular origami is also difficult to perform because it requires a huge number of small figures to be prepared. Their numbers range from a few hundred to a thousand. Then these elements are folded like a designer, forming a craft. Toys from origami modules are a rather difficult task that requires certain skills.
In order to make a beautiful and stable craft, you need to choose high-quality paper that can bend well and hold its shape. Think over the color of the future crafts right away, so that you don’t just waste time later.


