How to make a paper wallet for boys. How to make a paper wallet with your own hands
Today in the master class we will tell you how to make a paper wallet with your own hands. The creation of this craft will take quite a bit of your time, and step-by-step instruction with a photo and a diagram will allow you to do everything correctly the first time.
Tools and materials Time: 30 minutes Difficulty: 4/10
- 2 sheets of A4 design paper;
- pencil;
- ruler;
- scissors;
- Double-sided tape;
- self-adhesive film.
Everyone needs wallets, right? We made this beautiful paper wallet using leftovers from brightly colored gift wrapping. Of course, you can make it from any design paper you like, but just keep in mind that to create 1 wallet you will need 2 standard A4 sheets.

This wallet took us about 30 minutes to make. In any case, before starting work, we recommend practicing on plain paper. Let's be honest - we have no idea how durable it is, but it's possibly the most beautiful wallet we've ever seen. If you are worried that the paper may tear, seal the joints with additional self-adhesive tape. This will make it more durable.

Step by step instructions with photo
So, if you have already practiced folding paper beautifully, then you will make a wallet out of paper without much difficulty! Let's get started.
Step 1: fold the paper
- Take your design paper and turn it over. If your paper is double-sided, place it with the desired pattern facing down.
- Starting from the bottom, divide the sheet into 3 pieces of 9 cm. Fold the bottom of the paper up to the first mark.
- Fold the top of the paper down, using the second mark as a guide. Make sure your paper is folded as close to the edge of the paper as possible.

Step 2: cut off the excess
- When you turn the craft over, you should have a slight overlap on top. Turn the paper over and fold this piece overlapping down. Don't worry, this part shouldn't be too precise. Cut off a piece of overlap.
- Open the paper back and place it in front of you as a whole sheet. Now it should be divided into thirds. Fold the edges of the 2 long sides along the sides by about ½ centimeter.
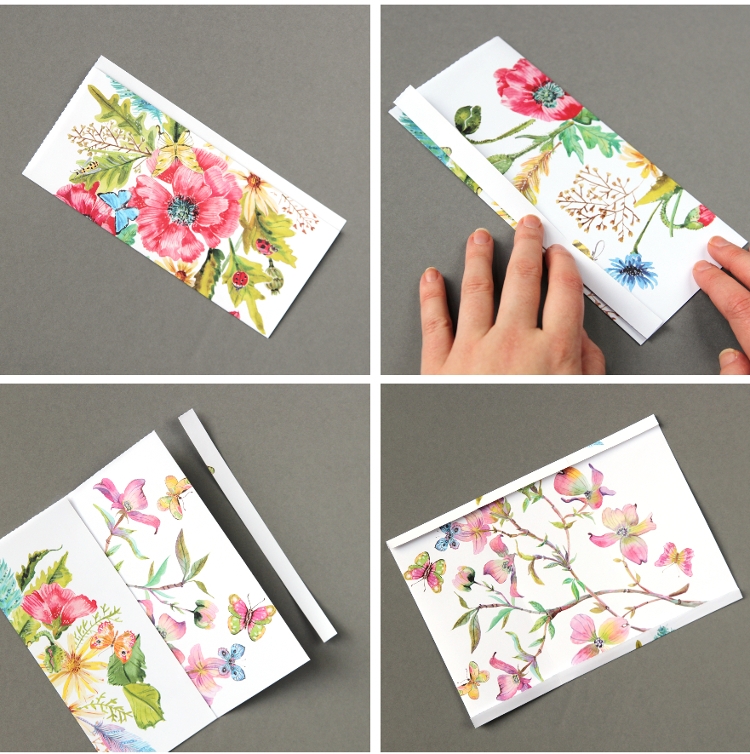
Step 3: Glue the Flaps
- Make cuts on the sides at the folded sections of 0.5 cm on the first leaf from the underside. Do this on both sides.
- Stick strips of double-sided tape on the middle third of the side ½ cm flaps. Remove the protective film from the tape and fold the top third to the second. Press down and hold firmly.
- Add some more double sided tape to the last 2 flaps. Remove the protective film from only 1 flap. Fold from bottom to top and glue so that your document is open to one side. This will help you make a nice neat fold in the next step.

Step 4: make a base
- On the unglued side, align the edges and fold the paper in half.
- Remove the last piece of tape from the paper wallet and glue the craft by folding it in half. You should now have a basic wallet with a pocket in hand.

Step 5: Make Creases for the Card Holder
- Take another piece of design paper, fold it and cut it into half a sheet.
- Take any of your plastic cards. Put her on paper strip and fold the bottom of the paper so that it covers about ¾ of the card.
- Fold the top of the craft down and back, leaving a small piece of paper above the card.

Step 6: Glue the Holders
- Fold the paper back on itself, leaving a small flap for the gap. From the outside, it will look like lightning.
- Trim off the excess paper, leaving only a small flap on the wrong side. Using double-sided tape, glue the shield to the craft from the inside.
- Place your cards inside the folded sheet of paper and fold both sides of the craft inside out.
- Glue to the edges bent to the wrong side along a strip of double-sided tape. Glue inside basic foundation holder for plastic cards.
- Repeat steps 5 and 6 to make a second holder and glue it on top of the previous one.

Children of any age will enjoy creating crafts from various materials. A special place is occupied paper crafts, because they are easy enough to make, and they do not require special skills. An older child can be offered as a wallet. Such a simple and uncomplicated work will not take much time, but it will captivate him. If, after creating such a paper wallet, color it original way, then your child will be able to show off to friends not only the ability to make origami, but also creativity. And most importantly, it will be unique designer thing, which only he has, which will distinguish him among his friends.
How to make a paper wallet with your own hands?
Before folding a paper wallet, not much preparation is required. It is enough to take the following materials:
- scissors;
- a sheet of plain white A4 paper;
- simple pencil;
- stapler.
It is necessary to follow a certain sequence of actions to create a paper wallet. A diagram of how to create an origami paper wallet is shown below.
- Take a sheet of white paper and fold it in half.
- Then again you need to fold the sheet in half.
- Fold the sheet in half again.
- We open the sheet.
- For convenience, you can write numbers with a simple pencil, as shown in the figure above.
- We cut the paper sheet along the lines according to the diagram.
- Now we proceed directly to folding the wallet:
- add 2 and 3;
- reverse side 8 with reverse side 1;
- 4, 5, 6 with reverse side 2;
- reverse sides 6 and 7;
- reverse side 5 with 1.
We fasten the edges of the wallet with a stapler. The wallet is ready. Now you can put not only money into it, but also plastic cards in a separate compartment. The main thing is not to put too much, so that the wallet does not tear.

If the child later wants to color it, then he can additionally take at his discretion:
- gouache;
- acrylic paints;
- colour pencils;
- markers;
- pastel;
- wax crayons.
Colored paper wallet
If you immediately take a sheet of colored paper, then such a wallet will not have to be painted. You can use another way to create a paper wallet, focusing on the scheme:


Such a paper craft - a wallet - can captivate a child, for example, if he plays with his peers in a store where you need to put toy money somewhere.
If to create a wallet you take not ordinary, but textured paper, then such a wallet will look even more original and elegant. Also, plasticine, stickers, sparkles, etc. can be used as additional decorations.
When such a paper wallet becomes unusable over time, it will not be difficult for you to make exactly the same one, but with a different color. And due to the fact that the process of its creation takes only a few minutes, the child will be able to continue the game with a new “house” for money.
This paper wallet is easy and quick to make. Therefore, not only an adult, but also a child himself can make it in a short period of time.
Children always copy adults and want to be like them in everything. And even such an accessory as a wallet they definitely need. paper wallet- what could be more interesting, especially if you do craftsmanship together with a child.
The main thing in the article
How to fold an origami wallet from plain A4 white paper for money without glue in stages: diagram, description
Wallet - one might say exotic. And the process itself is inspiration and creativity. Making origami with your own hands, you will plunge into the world of creativity, fantasy and tranquility, because nothing relaxes more than creating something unusual with your own hands. And if you connect your child to the creative process, then later he will always have something to entertain himself with.

How to make a wallet out of paper for paper money: diagram, description
The described wallet can be used in Everyday life, it is fashionable and roomy, and in shape it resembles Wallets. It even has card slots. Show your imagination and make it more interesting in color.

How to make a paper wallet for change: a diagram
To make a wallet for a trifle, it is better to use thick paper, a good option- 2 liter juice box.

How to make a paper wallet with two compartments: diagram

How to make a colored paper wallet for kids?

A children's wallet should be different from the rest, so it needs to be made colorful and bright. Try to diversify an ordinary A4 sheet with color or print funny picture with your child's favorite character.
- Fold the sheet in half and mark.
- On each side, bring the edges to the mark, and make folds.
- Fold the resulting rectangle into three equal parts.
- Expand the entire structure.
- Cut along the fold line the resulting squares located at the corners.
- Fold the narrow sides first, then the wide ones.
- Mark a point in the center along the ruler, bring the corner of the ruler to it and circle it - this will be the valve.
- Carefully cut through this valve, bend it.
- Assemble the structure and make a mark on the sheet below it.
- Cut the mark - this will be the mount for the latch.
- Fold the narrow sides in half, then in half again and each half in half.
- You get an accordion, do it with the other narrow side.
- Glue the accordion side to the side with the retainer mount.
- Comfortable and capacious children's wallet is ready to use.
How to make a paper wallet for dolls?

- Fold an even square diagonally.
- Fold the bottom left corner over to the opposite side so that the top line is horizontal.
- Bend the opposite corner in the same way, make a crease and unbend.
- Flip the design.
- Connect the edge and pleat.
- Step back 0.5 cm from the top edge and cut to the line of the adjoining side.
- Assemble the workpiece, and bend the resulting corners on different sides for fixation.
- Open design and fold .
Wallet - great idea for storing and carrying important little things. You can make such a creative little thing as a gift or pack a surprise for your loved one. Make the most variety of options miniature and full size wallets.
Surely small bags for money were invented a long time ago, almost immediately after the invention of money itself. The purses of antiquity corresponded to the contents: for metal coins, a pouch was needed rather than a modern purse. It is clear that with the introduction of paper banknotes, treasury notes and plastic cards appearance"handbags" for carrying and storing money has changed dramatically.
The classic wallet now is a bag a little larger than a bill with several pockets. Male models most often folding from the desire for minimalism, but women are presented in all versions. On sale there are many models of varying quality, but often not the best. Therefore, the question arises: how to make a leather wallet with your own hands so that it is durable and emphasizes your individuality?
leather for wallets
First we need a suitable piece of material. Dimensions depend on the model and future dimensions of the product. To make your own wallet for a man, it is better to choose bovine leather, which has serious stiffness even after tanning and keeps its shape perfectly for many years. It is better to make inner pockets from cow or calfskin, but for female model wallet, you can pick up the skin softer.
It is better to choose the thickness of the material yourself. It is important to choose vegetable tanned leather - such leather dressing makes the material more elastic. A significant disadvantage of such dressing is the fear of moisture, under the influence of which the skin swells, and after drying it shrinks and becomes brittle. This is critical for shoes, but not so important for a wallet. In contrast, vegetable-tanned leather is easier to process by embossing, pyrrography and even carving. The more expensive leather options are not suitable for beginners due to their price and processing requirements.
If necessary, it is necessary to color the material according to the instructions indicated on the dye package, and only after that proceed with cutting the workpiece. This will allow you to get desired color on the surface of the whole product is much better than the color of the cut out form.
Wallet without strings
Leather as a material for accessories such as small handbags is traditional. There are some processing difficulties. The wallet requires wearable, durable and rather thick material, which not everyone can flash sewing machine. It is not always possible to create even stitches with your hands, so first consider the option of how to make a leather wallet for women without using threads. Let's turn to the photo.
The picture shows just one metal fastener. This model is suitable for storing cards, bills and small papers, and by making the model larger, you can get a small cosmetic bag.

with card slots
If you feel enough strength and patience in yourself, you can try to sew a classic model of a men's folding wallet with one compartment for banknotes and 6 pockets for cards.

This model of 4 leather parts is called "Milan collector". It is highly durable and popular among men. Having made such a wallet, you can use it for almost a lifetime. The question of how to make a wallet that will last a lifetime is decided by the simplicity of design and the interchangeability of parts.
Material and tools
To make such a wallet, you will need a rather rough, durable leather so that the wallet can retain its shape for a long time. For internal parts, you can take the material a little thinner, but not too much, otherwise the seams will be uneven, which will lead to additional wear on these parts. To work, you will need the following tools:
Scissors - choose a tool for durable and convenient.
Sharp knife - a construction or durable knife with replaceable blades is suitable.
A metal ruler or just a straight plate for cutting with a knife.
Awl or special piercers.
Needles - choose according to the thickness of the thread, but remember that the holes for the needle should be slightly smaller in diameter so that the needle walks tightly in the skin and does not hang out.
It is worth taking nylon threads - they have sufficient strength and melt at the ends to prevent the seam from unraveling. Choose the color yourself, based on personal preferences, but it is worth remembering that the thread, a little more dark shade than leather, will favorably emphasize the color of the material.
Manufacturing nuances

The most difficult thing in the manufacture of this model, perhaps, is piercing the holes for the threads, here you need to be careful. It is necessary to combine the parts to be sewn when piercing or measure the holes exactly along the ruler. The seam will be visible from the outside as an additional finishing element, so the distance between the holes must be maintained as accurately as possible. The end threads will need to be pulled out from the inside, tied and melted with a lighter. The drawings show templates with hole locations - you can simply print them on paper and transfer them to the material.

If you are thinking about how to make a wallet for yourself or as a gift to a friend, approach work with accuracy and patience, and you will definitely succeed.
She took a piece of paper and tried to fold her wallet. Yes, I had to suffer a little, until I got what I needed.
Recently I remembered how we made paper wallets in childhood. In them we kept sets of wrappers for games, decals, some little thing received from our parents.
She took a piece of paper and tried to fold her wallet. Yes, I had to suffer a little, until I got what I needed. Of course, in our time it is not so relevant. You can buy different bright beautiful wallets for both girls and boys. But it's also fun to do it yourself.
Try and you make a wallet out of paper.
|
1. We take a regular piece of paper. In childhood, we pulled out a double leaf from the middle of a notebook. It made excellent deep wallets. Well, now I took a regular piece of colored A4 paper. Fold the paper in half and then unfold. |
 |
|
2. We bend the corners on both sides. |
 |
|
3. We bend the "spouts". |
 |
|
4. Once again, bend the edges on the left and right. |
 |
|
By popular demand, I add a photo with explanations of point 5. 1. Preparation after point 4. 2. Turn over the workpiece. 3. Bend the edges
|
|
|
5. We turn the workpiece over and bend the edges from above and below. |
 |
|
6. Fold in half. Almost done. | |


