How to make a hair band out of leather. How to make beautiful hair bands with your own hands
Tackle called " rubber» is widely used by anglers for catching various kinds fish. Its device is quite simple and does not require large expenditures of money and time. It is not only simple, but also quite compact. It can be placed in a backpack and safely go fishing. If you wish, you can collect several "gum bands", they will also take up some space.
If you have a boat, setting " rubber bands"does not require any effort at all, and the fishing range will increase several times, which can seriously affect its effectiveness, towards an increase.

Such fishing rods can have various design solutions, but the classic "gum" includes:
- Main line.
- Leads with hooks.
- Rubber shock absorbers.
- A piece of nylon cord with a load.
- Bite alarms.
- Ropes with a float.
- Reeler or short rod with reel.

And now about everything in more detail
- main line, with a diameter of 0.2 to 0.4 mm and a length of about 10-15 meters, is selected depending on what kind of fish is supposed to be caught. If it is crucian or perch, then you can take a thinner fishing line, and if it is carp or pike perch, then the fishing line should be more powerful. As a rule, monofilament fishing line is used.
- Leashes are performed with a less thick fishing line than the main one. This is done so that in the event of a hook, you do not have to tear the main fishing line. The length of the leashes can be different, even on the same "elastic band". The length of the leashes can vary from 10cm to 70cm. This is done in order to make the tackle more versatile, but, as a rule, fishermen install leashes of the same length on an elastic band. In this case, hooks of various sizes can be used. This is done so that you can quickly change from maggot fishing to worm fishing.
- For rigging "gum" better fit rubber shock absorber round in cross section. Its length is selected depending on the fishing conditions, while it should be borne in mind that the elastic increases in size by 3-5 times.
- So that you can throw the tackle without problems and far, it is attached to the end of the gum cargo on a nylon cord, about 1 meter long. The load can be factory-made, cast from lead, or home-made, for example, from a piece of brick. As a rule, its weight is within 1kg. This is necessary so that he can keep the tackle in one place.
- To see the moment of bite, you should install on the tackle signaling device. The simplest signaling device is made from a segment of a thin willow branch, which is what almost all fishermen do. But you can also use an "advanced", electronic signaling device. In any case, it is necessary to make cuttings at the right time.
- Float with rope It is applied in the event that the gear is installed from the boat. The float will serve as a kind of beacon, indicating the place of lowering the load. The presence of a boat makes it possible not only to increase the fishing distance, which is important, but also simplifies the process of removing gear.
- "Elastic band" is stored and transported on a small winder, about 50 cm long, made of wood or foam. best material for this, plywood is used, with a thickness of 5 mm or more, since it makes a very durable reel. Alternatively, you can use a short rod with a reel. Few people use this method, since it is difficult to wind a fishing line with an elastic band around the reel, but it is even more difficult to unwind it, since the elastic band is stretched.
How to make a rubber band for fishing with your own hands

It can be easily assembled at home, but you should not do it directly on a fishing trip. Although the tackle is simple, it requires a certain amount of time for installation, and there is not enough time for fishing anyway.
To assemble the "elastic band", you need to do the following:
- First you need to take piece of monofilament line with a diameter of 0.25-0.5 mm and a length of 15-50 mm, at the end of which a loop is made for attaching a rubber shock absorber. Then, having measured 20-30 cm from the loop, 5 more loops are made (maybe more), at a distance of 40-50 cm from one another.
- A load is taken and tied to a nylon cord. A loop is also made at the end of the cord. The length of the cord can be different, but not more than 1m. The main thing is that with its help it is convenient to throw the load.
- After that, you can connect the load with a rubber shock absorber, and a rubber shock absorber with the main line. I must say that the tackle is ready. Leashes are installed on the "elastic band" when it is thrown into the pond. The easiest way to fasten the leashes is with the loop-in-loop method, but even easier if each leash is equipped with a small carabiner. Then the installation and removal of leashes from tackle can take quite a bit of time.
- For storage and transportation, "gum" must be cut with a jigsaw, from plywood reel, which has a sharp point at one end. It allows you to stick the reel into the ground near the reservoir, which makes it possible to keep the tackle in one place and not look for ways to secure it.
- Determine bites you can visually or put your hand on the fishing line, but this is not very convenient. You can use a bell or a split thin branch. Such a signaling device, very simple, but at the same time, quite reliable.
- If there is a boat, then the cargo can not be thrown, but delivered to a certain distance. In this case, you can use a float with a rope, which is tied to the cargo and shows its location. After the end of fishing, with the help of a boat, the load is very quickly pulled out of the water, after which the “elastic band” is also quickly wound onto a reel. It takes very little time.
What types of fish can be caught
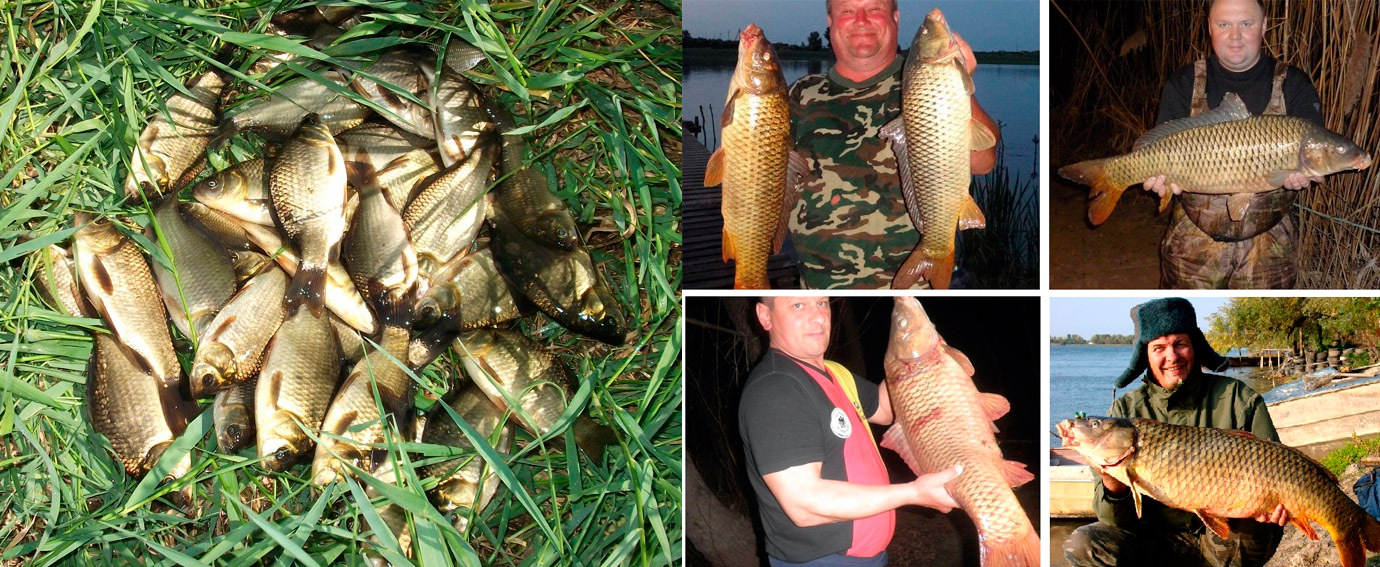
This type of this tackle is capable of catching any fish, depending on the type of nozzle. "Rubber" can catch:
- Chekhon.
The only thing is that for each type of fish it is necessary to modify the equipment. "Elastic band" is widely used for catching crucian carp. To do this, it is enough to have a fishing line, 0.2 mm thick and leashes, 0.15-0.18 mm thick. If the "elastic band" is completed for pike perch, then the thickness of the fishing line is selected at least 0.3-0.4 mm with leashes 0.25-0.35 mm. Hooks, in this case, are selected depending on the size of the live bait.
When choosing the diameter of the main line, one should take into account the fact that after the end of fishing, you will have to pull the load from the reservoir, and if it is far away, then the load on the main line can be significant. Therefore, many anglers use a fishing line with a diameter of at least 0.5 mm to equip the “gum”, and adjust to the fishing conditions by replacing the leashes. And if suddenly, there was a hook, then a thin fishing line is unlikely to help with it, but with the help of a fishing line with a diameter of 0.5 mm, you can also pull out a good log.

The process of fishing on the "gum"
"Rubber" can be attributed to one of the most effective gear. In the midst of a good bite, you can pull out several fish at a time. The fishing technique is quite simple and includes the following steps:
- Upon arrival at the reservoir, the tackle is unwound on the shore and a load is attached to the elastic band with the help of a nylon cord. After that, using the dexterity of their hands, the load is thrown as far as possible into the reservoir. At the same time, you should hold on to the cord, but not to the rubber shock absorber.
- At the next stage, leashes are attached to the main fishing line. Then, in turn, bait and tackle are put on each hook of the leash, and under the action of a rubber shock absorber it is sent into the water column.
- After that, a small tightness of the fishing line is made and a bite signaling device is installed.
- As soon as the fish starts to peck, which will be indicated by the signaling device, you need to cut.
The original decoration for the hair are rubber bands, which are made by hand. They will favorably emphasize your hairstyle and allow you to quickly collect curls in a ponytail or braid. Thanks to detailed master classes In this article, you will learn how to create beautiful hair ornaments.
How to make a hair band out of fabric
New is well forgotten old. Rubber bands are becoming more and more popular. It turns out that sewing them is very simple, you just need to carefully follow each step in the instructions.
Prepare the following materials:
- a blank in the form of a simple rubber band;
- a strip of fabric measuring 90 cm by 10 cm;
- needle and thread to match the material.
Progress:
- Fold the piece of fabric lengthwise, right side inward. Take the rubber band in your hands. Grasp the workpiece from the inside with the ends of the material.
- Attach the thread to one of the corners of the strip. Start sewing two opposite cuts, making small stitches at the same time.

- Sew the entire piece of fabric in this way.


- For convenience, wrap the strip in folds along the inside of the elastic band.

- When you have completely sewn the edges of the fabric, secure the thread with a knot.


- Thread through thumb under the material.


- Gradually turn the fabric right side out. At the same time, help yourself with your fingers, but do not pull the workpiece sharply, as the seam may disperse.


- You will get such a base for gum.

- Wrap the edges of the cuts inward and sew with a blind seam.


- That's all, the rubber band for hair from the material is ready!


How to make a satin ribbon hair tie
Another easy material to work with is tape. They have processed edges, which means that the fabric will not disperse along the threads.

Prepare:
- satin ribbons of different widths;
- scissors and thick thread;
- decor in the form of a button;
- candle or lighter;
- glue gun;
- regular gum.
Stages of work:
- Cut the widest ribbon to a length of 45 cm. Cut the ribbon at an oblique angle. Now cut each next tape 2 cm shorter. In total, you need to prepare 5 elastic bands.


Advice. To prevent the cuts of the tapes from fraying, process them with a fire or a soldering iron.
- Gather the ribbons together. Arrange them as the width of the fabric decreases. So you will have the widest at the bottom, and the narrowest at the top. Visually mark the middle along the longest strip and put the thread.


Advice. If there is no twine in the color of the ribbons, then use the narrowest ribbon.
- Pull the tapes tight. Tie the thread tightly into several knots.


- Turn the workpiece over to the back, pull the thread and tie the elastic to the central part of the ribbons.


- Glue decor on top. Don't use it too much big size, as it will look out of place on hanging ribbons.


How to make an elastic band from threads
Volumetric hair bands will turn out if they are knitted from thick threads. To create such an original elastic band, you only need a hook and yarn.


- Make the first loop on the thread. To do this, thread the thread through the loop and tighten it.


- Dial 12 air loops. They will serve as the basis for the entire knitting.


- Pass a braid of thread through the elastic and connect its ends with a simple column.

- Dial three air loops, then connect to the main part. Continue tying the elastic with columns. You can choose any other crochet pattern that is convenient for you.

- The first row of work should be done in a circle. In this case, tie the last column together with the first.


- Tie an elastic band along the entire length in a similar way.

- Finish work when knit to the first row. Tie the edges together, make a knot and cut the thread.

- No one will have such a rubber band!

How to make a scrunchie out of fluffy wire
If you do not know how to knit or sew, then the following instructions for creating hair ties are just for you. The basis for decoration will be chenille wire. It is often used to decorate bouquets.
Materials:
- fluffy pink and green wire;
- workpiece - gum.
Master Class:
- Take six pink blanks. Pass them through the elastic, gather them together.

- In the central part of the wire, make one turn around the axis. So you fix the decor on the elastic.


Thanks to such detailed master classes, you can make your own hair jewelry. Most importantly, follow each step in the instructions.
Another option for creating elastic bands for hair from buttons, see the video:
Hello dear readers! It would be quite difficult to do without hair ties, because sometimes you just need to put your hair in a ponytail so that it does not get in the way. And also it is necessary to note the fact that beautifully collected hair in a high ponytail or other modifications of it allow you to wonderfully and not time-consuming transform the image. Do you want to learn how to make rubber bands yourself? Then get comfortable in your chairs, and study this review, which will tell you how to sew an elastic band for your hair.
A high ponytail with a stylish elastic band to match the clothes will look not just good, but really stylish! Well, since you yourself can make such elastic bands, your image will always look just perfect, because all you need to do is select the fabric for the elastic band in accordance with the material and color of the clothes.
Elastic band for hair with your own hands.
- A piece of matching fabric.
- Scissors.
- Sewing pins.
- Threads.
- Rubber.
- Sewing machine.
How to sew an elastic band for hair from fabric (stages of creation).
From the fabric we cut out a segment 20-25 cm long, 6 cm wide. Fold it along, and pin it along the edge with pins.

We sew on a typewriter a strip along the edge. But we do not reach the end of about 1.5 cm.

We turn the resulting tube out of the fabric. We pin and hem the two ends together.


Inside we pass an elastic band 10 cm long, and sew it by hand.


After that, you need to manually overcast the hole into which the elastic was inserted. But you can also flash this hole from the outside on a typewriter, as shown in the video below.

How to make an elastic band for hair? This is a question girls often ask themselves. long hair. A variety of elastic bands are able to modify the hairstyle, they can be chosen both for everyday outfit and for an evening out. There are options for little girls and schoolgirls, and there are original products for adult ladies.
Our article is about do-it-yourself hair. The basis of any product is a purchased simple elastic band without any decorations and decorate it depending on the wishes, the chosen color and style. You can wrap the elastic completely with fabric, or you can only add a central decorative element made of fabric, ribbons or lace. Often a bright brooch or button, beads or rhinestones are sewn into the middle. Consider a few interesting ideas how to make hair tie different ways.
Elastic band on a felt basis
This option is suitable for beginner craftsmen, since making such a craft is quite simple. As a basis, take a small circle cut out of felt. In this case, we see that in the sample in the photo below, we used yellow. To decorate the gum, you need to prepare many identical pieces of pink ribbon, a package of small decorative lace flowers, beads to decorate the middle and a fluffy pompom white color.
The decoration of the product begins with the attachment of pieces of tape bent with loops. First, the edges of the tape must be melted with a candle or a lighter so that the threads at the edges do not subsequently fall off. You can grab the loops with stitches to the base of felt or glue with a glue gun. The next step is to place the flowers close to each other along the inner circumference so that the ends of the ribbon are not visible. It remains to glue half beads at an equal distance or sew on round beads (you can use rhinestones or pebbles, beads or other decorative material) and set a fluffy ball in the very middle. When everything is ready, sew the craft on an elastic band from the back.
Contrasting bow
Before you make your own scrunchie, think about what color ribbons you will need so that the product is in harmony with clothes and accessories. To make such a beautiful bow, as in the photo below, you need to buy a wide and narrow ribbon of light chocolate color and white organza. To connect all the layers of the craft, a beige button was used, on which you can glue a bright crown with rhinestones.

Start work on wide ribbon. Do not cut off the segment immediately, so as not to be mistaken. It is better to first fold the bow, consisting of several turns, leaving small beveled edges at the beginning of the work and at the end. Melt them immediately so that the cut sides look neat and the threads do not fall off when using an elastic band. At the central point, make a few stitches with threads matched to match, thereby fixing the bow.
The next step is to pick up a wide strip of organza, folded in half. To do this, stepping back a little from the edge, stitch the entire length of the fabric with stitches, tighten the thread and sew to the bottom tape. Lastly, a thin ribbon bent with eyelets is attached, and all layers are connected with a decorated button.
Three-layer bows with beads
Before you make a beautiful scrunchie as in the photo below, pick up a wide and thin ribbon in white and medium width with a contrasting pattern. The central holder of all layers is red bright heart.

Long ends are left only for thin tape located on top of two bows. 3 beads are strung on each hanging edge, matched in the same color scheme as the tapes. The edges are tied into tight knots so that the beads do not fall off when moving.
Kanzashi flowers
How to make small hair ties so that they look spectacular? The kanzashi technique will help. This is the manufacture of beautiful floral elements from simple satin ribbons. Flowers consist of 5 identical petals (two white and three red) and two green ribbon leaves. Let's see how to make such elements.

To create a petal, you need to cut squares of white and red. Then each folds in half diagonally. Then a couple of folds are made on each side, collecting the edges in the center. It is most convenient to use tweezers to hold the tissue together. Then trim the lower edge with scissors and melt with a lighter, pressing all the layers with tweezers. One petal is ready! All other details are made in the same way and glued to each other with a glue gun, attaching a small pebble for beauty in the center.
How to make leaves
After making the main flower for the elastic bands for the girl, get to work on the leaves. To do this, you need to fold a green ribbon 10 cm long in half. We leave the bent edge intact, but from one of its corners we draw straight line to the opposite on the other side and cut with scissors as planned. Get a triangle. Again, the cut edges are melted and pressed against each other with tweezers or fingers. Hold a little and they are securely glued together without glue.
It remains only to turn the blank to the other side and attach the leaves under the previously made flower. Here you can use a glue gun to glue the parts together and attach the decoration to the elastic itself.
Bow of kanzashi petals
Now let's look at how to make bow-shaped hair ties from a ribbon. You will need a base to place the finished petals. It is most convenient to cut it out of a sheet of felt, matched to the color of the satin ribbon. You already know how to make petals using the kanzashi technique. To make this hair band, you will need to make 12 identical elements and attach them to the felt base in the form of two connected triangles.

Between them, place a central brooch with shiny rhinestones and a beautiful bow can be installed on an elastic band.
Craft for a beam
A beautiful elastic band for a daughter to put on a hair bun is made from different elements combined in one composition. These are white flowers in kanzashi technique, and large multi-layered details of contrasting colors. Arrange the assembled elements symmetrically, leaving room for a large bow.

The elastic band looks very impressive due to the combination of different types of petals and fabrics, but all the details look harmoniously together. Beads are selected as additional elements of blue color and large rhinestones.
As you can see, it is not difficult to make a hair band with your own hands from ribbons and fabric. The photographs presented in the article will make it easier to bring the described work to life. Can be mixed and matched different types parts in one product. The main thing is to choose fabrics and decorative elements that look harmonious together, then the finished elastic will turn out beautiful and tasteful. Good luck!
Hello my dear friends and blog readers. Today I want to tell you how easy and simple it is to sew elastic bands for hair out of fabric. I made mine as a gift for my daughter's eighth birthday.
Dasha has been asking me for rubber bands for a long time, but with work, a dacha and a business, finding time for even minimal tailoring turned out to be not at all easy. Be that as it may, now my daughter is glad that her wish list has become a little bit shorter, and I am glad that I learned a new way to sew an elastic band.
In my youth, I often sewed such elastic bands for myself from different fabrics: velor, velvet, denim, silk. I especially remember one: from knitwear natural colors, which I crocheted around the edge. To her in the kit I sewed a fabric headband and a top, also crocheted. Since then, the sewing method has been forgotten and I had to surf the Internet to remember how such rubber bands are sewn.
materials:
- a rectangle of fabric (I have cotton) measuring 35 cm long and 12 cm wide
- narrow elastic band 18 cm long (I like to use underwear for this purpose)
- sewing thread
Preparation method:
And another angle:

Now one by one:


Do you use fabric hair ties?


