Winter flowers from satin ribbons. Do-it-yourself ribbon flowers - the best schemes, methods and secrets for making flowers from ribbons (70 photos)
With bright flowers made of ribbons, you can decorate a gift, a hairpin, a brooch. You can even make a whole bunch of them. They will not cause allergies and will not lose their appearance even after a whole day of wearing. Therefore, such flowers are often decorated with wedding accessories. Making your own jewelry is very easy. Even an inexperienced needlewoman will spend no more than twenty minutes on one flower. In the article, read how to make flowers from ribbons. The master class in each section is designed for beginners and does not require special skills and tools. And the presence of a photo will make the procedure even more understandable.
Single Ribbon Rose
The most popular flower satin ribbons- rose. There are many different types: twisted, in bud, with separate petals. With your own hands, the easiest way is to make a flower from a single ribbon. Here are two simple and beautiful options.
For the first, you need a piece of tape 2 cm wide and at least half a meter long.
Instruction:
The flower is ready. From several of these decorations you can make a whole bouquet. Put it in a vase or use it as an understudy for a wedding. 
The second option - a twisted rose - is very similar to the first. They have the same manufacturing principle, but the tape needs to be folded a little differently.
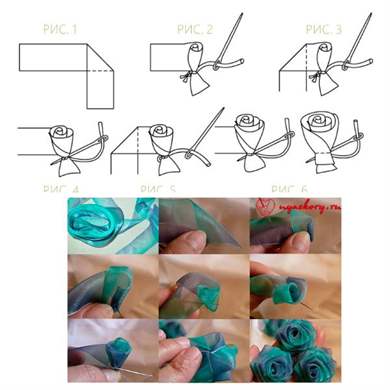
The longer the piece of tape, the more magnificent the flower will turn out. Experiment with different colors, and you will definitely get the most unusual decoration.
Video instruction:
Rose from individual petals
For its manufacture, you need a tape five centimeters wide and at least one and a half meters long. The more petals, the more magnificent the flower. We will tell you step by step how to make a rose.
Solid ribbon aster
The easiest flower to make.

Kanzashi flower from ribbons
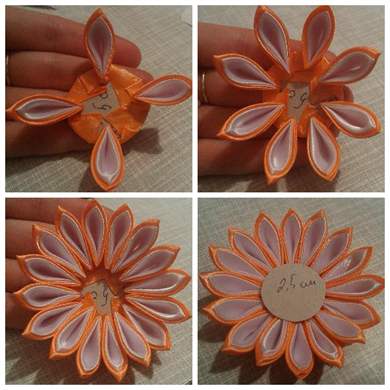
Kanzashi is the ancient Japanese art of making jewelry from cloth. Today, this technique has been successfully mastered by craftswomen around the world. The old recipes have been supplemented, and we can only successfully use the ready-made instructions. We will describe one of them below. It will be a flower of sharp petals.
For manufacturing you will need:
- Satin ribbons in orange and white flowers:
Orange ribbon 5 cm wide - 1 m.
White ribbon 5 cm wide - 80 cm.
Orange ribbon 2.5 cm wide - 30 cm;
- Bead to decorate the middle;
- Cardboard mugs with a diameter of 3.5 cm and 2.5 cm;
- Adhesive on fabric: hot glue or instant crystal;
- Candle or lighter;
- Barrette.
Progress:


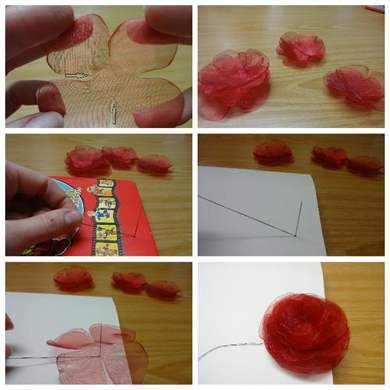
organza flower
From a piece of organza or nylon tape easy to make a big lush flower. Use it as a bow on a hairpin or decoration on a hoop. The decoration will suit both little girls and brides for their own wedding. Step by step description:


The use of satin ribbons in needlework allows you to create beautiful and spectacular crafts. Original floral satin arrangements will delight with a magnificent view, with proper care they will not lose their attractiveness and, unlike freshly cut ones, they will never wither.
Making different types of flowers does not require a lot of material. The consumption is very economical. You just need to master a few simple techniques to create original and beautiful jewelry from ordinary satin ribbons.
To create a snow-white spectacular flower take:
- green and white ribbons;
- sequins;
- half beads;
- felt;
- scissors;
- glue gun;
- lighter.
Step-by-step instruction
green ribbon cut into strips about 6-7 cm long. Oblong leaves are cut out of the resulting segments. Wavy edges and high extensibility are given to the atlas by “burning” over the fire. Each leaf is taken with tweezers and burned with a flame from a lighter.
To give the leaves a natural look, they are folded in half to obtain a characteristic bend. When they are ready, each is held over the flame of a lighter.
white satin ribbon cut into 10 strips. One half is made by 7, and the second by 5 cm. Five larger and five smaller petals are cut out of the segments. As in the case of leaves, the edges are burned.
The basis for the decoration is a circle of felt. Leaves are fixed on it with a glue gun, and petals are glued on top. The middle of the composition is decorated with sequins, half beads. You can use any other decoration.
The poinsettia is ready!
The technique for making roses is similar to the previous one. The materials are similar, except that the rose can be made in different shades, and not just white.
Step-by-step instruction
Create a template
Work on a flower begins with a sketch for the petals. It is drawn on a piece of paper in a box. There are two templates. One should be half a centimeter larger than the other.
petal pattern
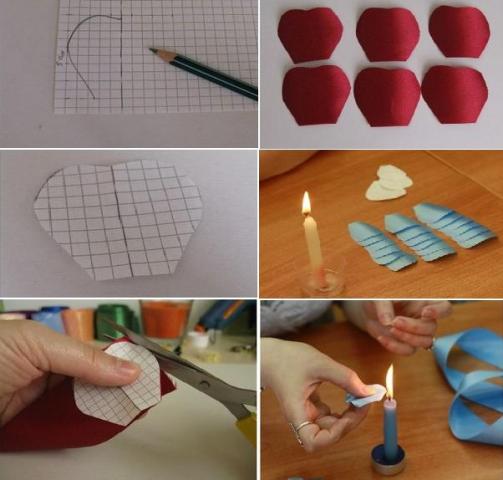
The result should be six large, medium and small petals.
If the edges of the satin elements are uneven, do not worry. These shortcomings can easily be corrected by firing. You can use both a lighter and a candle.
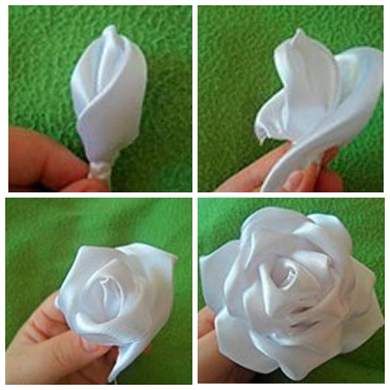
The satin petals are held over the flame until the edges begin to melt. To make them wavy, the tape is slightly pulled, while giving the necessary shape.
The petals are arranged both round and in a checkerboard pattern. It all depends on the idea and the craftswoman's own preferences. The folded elements are sewn together. When the first row of petals is sewn, stamens are inserted and fixed in the middle. The remaining petals are sewn together and a fully formed flower is obtained.
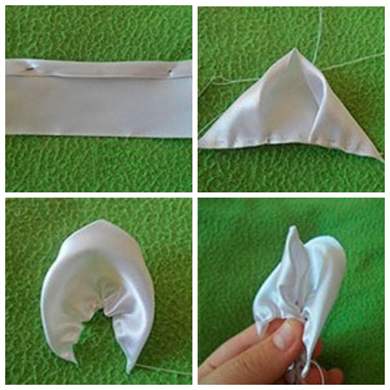
Formed from a green satin ribbon. It is enough to take 10 cm. The ends of the strip are burned. This avoids material breakdown. The corners of the segment are folded to the center, getting a kind of “triangle” rounded from above, stitched at the bottom with a basting seam.
The thread is pulled together until the ends are connected together. The protruding edges of the tape are sewn with a hidden seam. It turns out a lush and beautiful leaf. The number of leaves depends on the overall composition. Most often, a pair is made for a rose.
On a round felt base, first glue the sheets with hot glue, and then the rose. This rose could be a great brooch. For this purpose, you only need to glue a pin to the back of the felt.
There are many variations of creating spectacular and beautiful flowers from ribbons of various widths. In the decor of hats and bags, large crafts look best.
They are made from strips cut to about 12 cm, which are ground together and then folded in half. The strip obtained from the sewn pieces is wound around. To keep the composition, each turn is quilted. You can also twist a rose from a narrow ribbon. One edge of the segment is sewn with basting stitches, and then pulled together. The tape is wound in a circle, fixed with stitches.
Flowers, in the creation of which more than one technique was used, look especially impressive. It can be a combination of roses made in different ways. Scorched petals make it possible to get a rosehip-like rose, which is perfectly complemented by a small rose glued to the center on a cone. A bunch of great ideas you can emphasize from the video, show your imagination and create something of your own.
Original and gorgeous kanzashi- These are spectacular decorative flowers, which until recently were used exclusively as decorations for Japanese women's kimonos. Today they have become a popular decor for clothes, bags, used as an accessory for wedding hairstyles or to prom.
The kanzashi technique is a method of obtaining flowers, reminiscent of modular origami. Thanks to this, the flowers can be given a wide variety of shapes and sizes. The basic modules of technology include rounded and pointed petals.
Initially, kanzashi was made from natural silk, and the elements were glued together with rice glue. Today, these materials have been replaced by others. Atlas is especially popular. Modules can be connected using hot glue or Moment.
Creating a hyacinth using the kanzashi technique
- Using a blue ribbon, five to six petals are made using the kanzashi technique. They are strung on a needle to pull a thread through the petals. The knot at the end is not tied. It will serve to insert into the center of the stamens.

By folding the ribbons in a certain way, you can create petals, from which beautiful and original decorations are subsequently obtained.
In that step by step lesson shows how to do it simple flowers from satin ribbons for beginner craftswomen. From finished products you can get hairpins or hair bands, decor for clothes or bags. You can take various colors as a basis, we offer a delicate and relevant for any season white-pink range.
Materials and tools for creativity
For work you will need:
- satin pink ribbon (5 cm wide);
- white ribbon (2.5 cm);
- glue gun;
- lighter;
- scissors;
- tweezers;
- ruler;
- a circle of felt;
- decorative element for the middle of the flower.

The kanzashi technique was used to create the decoration, if this is the first time you come across this type of needlework and do not quite understand the meaning of the described actions, get acquainted with the basic techniques and terms.
Pay attention to the safety precautions when working with a flame! Do not leave children unattended. You can use a candle instead of a lighter.
Making elements and assembling a flower
The petals will be pink and white. From the pink ribbon, cut 6 elements 5 cm long, from the white one you will also need to cut 6 pieces of 5 cm each.

Proceed to the formation of white flower petals from satin ribbons. To do this, first fold the satin ribbon lengthwise.

Then, on the same side, make a small fold inward.

Burn the edge with a lighter. This is necessary to prevent shedding of the material.


Repeat the same for the other end of the white stripe. This is what the petal looks like.

Fold it in half and gently melt the edge again.

The finished white petal should look like this.

Make five more of these details for a flower from a satin ribbon.

Now move on to creating rose petals. To do this, fold the square blank diagonally.

Bend the edges of the resulting triangle down.

Fold the workpiece in half.

Melt the edge, then grab the petal at the bottom (at an angle).

Cut off this part and carefully singe the bottom of the pink element again.

This is what the petal looks like.

Make five more of these elements.

Start shaping the flower. To do this, using a hot gun, first connect the white petals, applying glue to their tips.

Consistently connect all six blanks.

Now between them you need to fix the pink details. This is also done with a glue gun.

Fix all six petals.

Glue a circle of felt (about 3 cm in diameter) on the back of the flower.

Decorate the middle with a decorative element.

A simple but very beautiful white and pink kanzashi flower is ready.

It can be a wonderful decoration for a hairstyle (if you fasten an elastic band or a hairpin on its back), a brooch or decor for children's clothes.
In the same technique, you can create beautiful headbands for hair, see our master classes - and with in the autumn range.
When people hear about flowers from ribbons, everyone imagines a different picture: someone is a parody of real flowers, someone is a simple gerbera. The truth is that very few people make imitations of natural flowers, since they are made for quite a long time and require great attention and skill. But the process of making beautiful and eye-catching flowers from ribbons is very exciting. It will help to distract from the pressing problems of any person.
kanzashi art
Kanzashi is the art of decorating women's hairpins that originated in Japan. The thinnest shreds of silk are folded in the form of petals of chrysanthemums and other flowers, they are used as decorations for women's hairstyles.
The passion for creating artificial flowers from satin ribbons has gained immense popularity in our country. The advantage of this whole lesson is that at the end of this action you will get satisfaction, because after 30 - 40 minutes you will definitely get a more or less decent flower. Yes, the first time you will get ridiculous flowers, but over time you gain experience, and the following instances will be more acceptable.
The advantage of the lesson is that it does not take you a large number of time and does not require talent. All you need is to gain more experience and watch a couple of training videos on the Internet.
All flowers from ribbons are made quite durable, but if you are making a one-time decoration, then naturally the special strength of the product is useless. Agree, everyone can have a situation in which the strength of this product is necessary. For example, if a flower serves as a decoration for a child's gift, strength will not hurt here, otherwise your flower will last a maximum of two days.

Types of Kazan
There are about nine types of kanzashi. The most common - Hana kanzashi. Usually they are created by Japanese craftsmen from small squares of silk by folding. This folding technique is called tsumami in Japan. A small square of fabric is folded with tweezers or tongs and, thus, turns into a petal of a flower. Then, such petals are interconnected with a thread and a needle or attached to some kind of base to make a full-fledged flower.
Geisha kanzashi are worn depending on the month, season or holiday. Each month can have its own specific color. So, for example, in January kanzashi there are green, red, white colors. The autumn months are characterized by colors such as yellow, red, orange.
Kanzashi needlework is now becoming very popular not only in Japan and China, but throughout the world. In Russia, there are already many sites and forums describing the tsumami technique. Anyone, even a child, can master this simple technique.
In the creation of kanzashi, there are two main types of petals - sharp and round. And each of them can have countless options for execution. Some craftswomen come up with new forms of petals. For example, a small curl is made in a sharp petal or the petal is completely turned inside out.
Each master of kanzashi appears in the form of an artist, since the composition of the flower itself from the various forms of the petal is a real art. Unlike Chinese and Japanese craftsmen, many Russian craftswomen create kanzashi from ordinary satin ribbons. Sometimes any other fabric can be used, starting from chintz and ending even denim. Usually, the resulting compositions of petals are attached to hair ties, thereby obtaining a very elegant bow, suitable for any holiday. In addition, many craftsmen attach them to a blank for a brooch, making and selecting colors for a suit or dress.
Also, kanzashi began to be used to make whole bouquets of ribbons. Such bouquets are now gaining very great popularity, as they will never wither and, no doubt, will delight anyone even on the most cloudy day.

Ribbon roses
After reading this article, you will know how to make a flower from ribbons, which will be in no way inferior in beauty to store ones, will serve as a wonderful decoration, both for a gift and for a dress. If you are interested in this lesson, then do not stop there, but experiment and improve.
You should know that there are several basic manufacturing techniques on which, in principle, all these products are based. Let's say right away, do not try to make an exact copy of fresh flowers, give free rein to your imagination. Only in this way you can feel more deeply all the subtleties of this art.
Before you start making, you must prepare the following props: good scissors, thread with needles, a so-called glue gun and a few sticks of glue, and the most basic material is, of course, satin ribbons. You will also need a few tongs, beads, fishing line, and a lot of other things that an avid needlewoman will definitely have. For convenience, your workplace should be free from all unnecessary and well lit. Because the quality of your work depends on it.

melted petals
Now let's talk about a method that is ideal for people who want to do voluminous work. But that technique has its drawbacks:
- First. Petals that have undergone a melting process do not look as perfect as flowers made using other methods. So it is undesirable to use flowers of this origin with other works. Since the difference in the accuracy of the works will be too obvious.
- Second. You must be patient and clearly understand that the first time such bulk work it won't work for everyone.
- Third. Choose your material carefully. Since not every tape is suitable for this method. And to find out which material is most suitable for this method can only be through trial and error. It is advisable to use satin or nylon ribbons.

Flower in the technique of "melted petals"
Learning to craft with our own hands
If you make roses from ribbons yourself, and not buy them in stores, then you will significantly reduce your costs for these products. We will not go into step-by-step instructions for making this product, but will briefly talk about the variations of this type of ribbon jewelry.
There are several of these variations. One option is to glue the triangles together. This method is performed quite quickly and is not very difficult.

The second variation is the so-called twisted rose. The beginning of this method is somewhat reminiscent of the previous one, but after the formation of the center is completed, it is necessary to turn the ribbon, thereby twisting it layer by layer. When the work is completed, the finished product must be fixed.
Also, do not forget that the aesthetics of the finished product also depends on the quality of the material from which the tapes are made. It will look good if you combine a couple of different colors in one composition. It is advisable to choose tones of a more delicate shade.
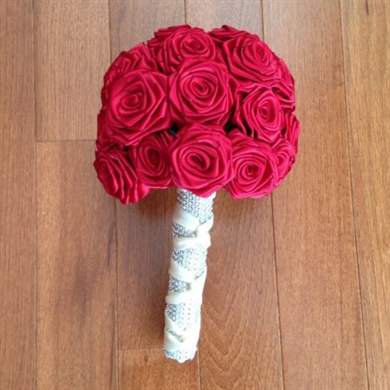
If you want to make a bouquet of flowers, then it is not necessary to make a bunch of simple flowers and combine them into a bouquet. Although you can go this way, but if you want to make a bouquet, then there is a much easier way. Let us explain in general terms how this product is made.
So, for starters, the main part (base) is assembled. It consists of a ball of a suitable size and a pen. We fasten this design and then decorate it with ribbons and ribbon flowers.

Ribbon roses various equipment executions have become a real boom in modern design art. They began to decorate not only gift boxes, but also clothes, accessories, hats and everything that catches your eye.
Making roses without stitching
There is a mass various options making roses from fabric. Weaving, stitching, twisting, and many other simple movements are based on techniques. In this article we will offer you a couple of options for a simple, but very beautiful and neat rose. After studying the material, you yourself choose which method you will use.
- For creative work You will need a ribbon that is 5 cm wide and 75 cm long.
- First of all, it is necessary to singe the edges of the ribbon so that they do not bloom. Take the edge and fold it to the opposite side so that you get a triangle.
- Now this corner needs to be twisted and then fixed. Here, the middle of our rose is ready.
- Now bend the tape to the edge on the other side. Then we fold the tape as if we want to make paper boat. We fix these actions with a “needle forward” seam, which has been known since the school curriculum.
- We continue to bend the tape and secure it with a thread, using this principle until the very end of the ribbon. As a result, you should get a spiral.
- Pull the spiral a little with a thread and evenly distribute the folds, which will later become the petals of our rose.
- Now we begin to form a bud, twist the ribbon, stitching it with a thread from time to time so that our beautiful rose does not fall apart and bloom.
- To make the flower more like a natural one, we need a leaf. Making it is just as easy. We fold a small piece of tape, 5 cm wide, with the edges inward, then again in half lengthwise, after that we wrap it according to the principle of a paper bag.
- We fix it, collect the rose with petals, glue it and you're done.
Rose sewn from satin ribbons
- For this option, you will also need a tape, the width of which is 5 cm. This time we cut this tape into equal squares. Each square, later, will become an independent petal.
- Make about 25 elements and singe them around the edges with a lighter so that they do not bloom. You can use tweezers for convenience, but you can do without it.
- We bend the square in half, now we bend each corner to the middle.
- Now let's move on to the most jewelry action in our work, cut off the bottom edge and melt it over the lighter. The same work must be done with the rest of the squares that we have prepared for the petals.
- We take the blank for the petal and twist it and sew it with a thread. We apply the second petal, wrap the first one with it and sew it in the same way. We do exactly the same work with the rest of the petals, we try to make the petals shift along the axis, so that the bud looks like a real one.
- The level of the petals is also important; if done correctly, the bottom of the bud should turn out flat. After the bud is ready, proceed to the leaflet.
- You will need a tape measuring 8 cm long and 4 wide, bend them as if we want to twist. Now fold it in half, putting one part on top of the other. After that, you should bend all the corners into one and cut off the corner or tail, which will turn out from behind. We solder the cut lines with a lighter. The leaf is ready.
- It remains the case for small - to collect the whole flower. We glue the bud to the leaves and our decoration is ready to use.

Openwork tricolor flower
We will tell you how to make light, airy and delicate flower on an elastic band of satin ribbons.
We will need:
- satin ribbons of three shades. Tape width 4 cm,
- narrow rep tape 9 mm wide,
- to decorate a flower, you will need artificial pearls on a string,
- felt circle, elastic band and for the middle of the flower you need three milky beads (their diameter is about 8 mm),
- lighter, thread with a needle, pins, foam bobbin as an auxiliary material, glue gun, candle.
Let's start our work with the darkest tape. We need 7 segments of 8 cm. Fold the segments in half, cut them off with a pin, and cut off the corners and edges. It turns out the shape of an oval. Now in the upper part of the petal we make a notch with scissors about a centimeter and a half. Now we make blanks from a pink ribbon. From this tape, you need to make 4 pieces of 8 cm. We make a cut at the fold.
We get 4 segments of 8 cm. Fold them in half again, fix with a pin, cut off the corners and edges. We do not make a notch on this petal. Now you need to make 6 pieces of 7.5 cm from the milky-colored ribbon. Cut it at the fold, add one more of the same strip, now fold the three strips in half, and cut it at the fold. In total, you will get 6 segments. Peel off with a pin and cut off the corners and edges of the tape.
Now let's make the petals. To do this, you need a candle or a lighter. Also use tweezers to protect your hands from burns. Here you need to bring the petal high to the fire, because the atlas melts very quickly, we turn the petal 180 degrees, add two - one to one, clamp the fold with tweezers and melt it with fire, we get a double petal. All petals should be airy and light. Then we melt the petals of the lower tier, it has a notch. You need to catch a stream of hot air, then the atlas will curl up as it should, the ends will bend beautifully.

We continue to work
After we have prepared the petals, we begin to work with the babina. We take a needle and thread, stick the blunt end with an eye into the foam plastic with a sharp movement, it is very easy to do this, and now we string the darkest petals with a twist on the needle. We place them so that the inversion looks down. You can do it in a checkerboard pattern. Then we place the other two colors with the folds up.
After all the petals are strung, we take out the needle from the foam, pull the thread and make a few stitches to secure the petals. This method is more reliable than gluing with glue.
Let's start making a flower. To do this, take three beads and string them on an ordinary fishing line, pull it tightly so that they fit in the form of a triangle. The center for the flower is ready. It needs to be glued to a felt mug.

Pink satin peonies
We will need: pink satin ribbon 2.8 cm wide, lilac a little narrower - 2.7 cm, we also need a ribbon 5 cm wide. You can take milky and golden ribbons, and to finish the rim, take an imitation of a pearl thread, rhinestones on a thread . Also take a metal rim pasted over with a film, a lighter, tweezers, a glue gun.
- From the tape we make segments 14 cm long. Folds the tape in the form of a tongue along in half, combine the edges, then remove the finger, pinch, and melt with fire, not reaching the satin edge now.
- In this way, we process a petal from a pink ribbon, then proceed to a lilac ribbon.
- We fold the front side, go diagonally to the upper corner, fuse the edges so that later the ribbons do not disperse.
- You should get a beautiful corner with folds, you can pinch it with tweezers if it’s more convenient for you, and cut off the corner.
- To give a leaf a bend, it must be heated.
- We fold the blanks in pairs, glue them in three pairs, leave the rest of the leaves not glued.
- Now you need to measure a segment of the chain with rhinestones, apply glue with a toothpick. We glue the rhinestones very carefully, distributing evenly along the desired length, and apply a chain with rhinestones.
- Thus, we prepare a bunch of beautiful leaves of 5 pieces, there should be 10 bunches in total. They need to be glued on the fold and clamped with tweezers for a few seconds so that the glue hardens.
- We glue the prepared stamens of the name and stamens. We apply three drops of glue at the base and glue the decorative stamens.
- Such a flower is a bit like a peony bud. You can make several opened flowers and two or three buds.

layered rose
We will need:
- Scarlet satin ribbon 4 centimeters wide, we need it 42 cm.
- We also need a finishing tape (the edges are organza, and the center is satin).
- Gradient ribbon - width 4 cm, we need it 96 cm.
- Felt circle with a diameter of 3 cm, and the middle for a flower.
- Lighter, scissors, needle and thread.
Work process:
- Let's start with a satin ribbon. Cut off a 14 cm strip, fold it in half. Then put the front side inward, now step back from the fold 3 cm and cut off the corner, but do not cut off the upper corner.
- We clamp the cut with tweezers, melt it with fire.
- The remaining 3 millimeters will melt, they will not be visible on the tape, but when you make a leaf in this way, this corner will never tear, the leaves will keep their shape well.
- We bend the sheet, make it convex. Now just cut off the corners. The cut is treated with fire.
- We sew with wide stitches along the entire length of the cut. We tighten the thread, fasten it. You will have a beautiful petal. We need three of them.


- Now let's start making the flower itself. We need 8 pieces of 12 cm.
- We fold the segment, combining the corners, turn it inside out, process it with fire, fold it in half, turn it back to the center. Align the ribs in height, cut off the corner. We pay the cut. The cut makes it possible to put the petal at an angle of 45 degrees. Most importantly, combine the corners and melt the material well. The corners can be lowered down, align the folds, cut off the corner, melt with fire.
- You need to make 8 such petals, they will never turn out the same, this is not necessary, such a flower looks more alive, like a real one.
- Glue the leaves on a felt circle.

- Glue the petals directly onto the workpiece. We apply glue to the cut and attach the leaf to the workpiece so that it looks up.
- We glue the petals at a distance of 1 cm to get a neat middle.
- We glue the four petals first, and then place the rest of the petals between them.
Satin Ribbon Narcissus
- For work, we need a ribbon of two colors.
- We cut from it 6 segments 14 cm long (tape width 4 cm).
- We use yellow and cream color.
- Felt circles with a diameter of 3 cm, beads on a thread with a diameter of 4 mm, stationery clip, thread with a needle, glue gun.
- Let's start by processing the tape sections.
- Then we begin to collect the petal. We fold the segment in half with the front side inward, cut off the right corner, stepping back from the edge of 1 cm. We melt the cut with fire.

- Now we turn it inside out, fold the cuts and ends so that the corners are aligned. We make an envelope and along the edge of the edge of the front side, we put the part on a needle and thread in small folds.
- Then we do it with a ribbon of a different color. Don't forget to melt the cuts. Turn inside out, fold edges in.
- We collect the petal on a needle and thread. It turned out a yellow petal.
- Thus, alternating color, collect all the petals - yellow and cream. Pull the thread, tie the edges. We turn the product inside out, making sure that all corners are on top.
- You can pull the flower together by inserting the needle into the loop. Cream petals should be on top.
- This flower resembles a daffodil. The top tier is a cup of narcissus.

Daffodils with a yellow center
Girls, do you like flowers and decorations? Every woman wants to look at 100. But it is not at all necessary to buy expensive trinkets. You can perfectly complement any outfit with interesting floral motifs. I propose to consider some options for colors from satin ribbons. They are so unusual. And most importantly, it is quite possible to make them yourself!
What is required to make flowers from satin ribbons?
- Satin ribbon (color should be chosen according to your idea)
If you make for yourself or as a gift, it is better to choose bright colors: orange, yellow, burgundy, scarlet. The combination of different colors in the basket looks very good. The size of the product can be quite large.

A present for a younger representative will require delicate shades: pink, purple.

A wedding work may contain white or very pale shades of blue, yellow, green.

In the manufacture of flowers we use silk ribbons of various widths.
It all depends on the shape and size of the future work.
- Scissors
- Threads, and not necessarily in the color of the tape
- sewing needle
- baskets
If you want to make more than just a hair ornament or an accessory that complements the costume, use straw braids or very thin willow twigs in your work. But nowadays you can pick up from multi-colored sisal, paper tubes. The main thing is that the container looks harmonious .

- Filling material
They can serve as a simple foam. It is convenient to stick flowers into it when composing a composition. Also in floristry, a special material in the form of a hard sponge is used. She better fit for professional products.
- Hairpins or rubber bands
Kanzashi flowers look great on little girls' hairstyles.
- Wire
The material is used to fix the flower in the bouquet. Also available different kinds. At home, the most common will do. I use copper thin thread. But, if desired, you can use a specialized wire, stem.
- decorative elements
Small flowers (for example, for wedding hairstyles), beads, butterflies, bird figurines.
- Lighter or candle
- Tweezers
Required for safer fire treatment of petals and greenery.
- glue gun
This item can be purchased at many craft stores. There are affordable options. The main thing is to choose a representative with a narrow nose. You will need to get used to working with the tool. But it really makes the process easier.
- Photo frame

What flowers can be made from satin ribbons with your own hands?
Roses made by twisting
Mysterious bright, passionate, and sometimes delicate creamy buds. The twisting technique is used. For manufacturing, one long tape is taken. The bottom line is the gradual formation of a bud by turning the tape over.
Roses from individual petals
The buds come out just like they are alive.

Petals can be cut in groups. I burn each one and add waviness, slightly stretching the edge in different directions. I fold the first sheet tightly, and fix the subsequent ones with glue from different sides. At the end I give the desired shape.
Kanzashi flowers
The name came to us from Japan. So they called jewelry on the head of women. Exists great amount representatives, varied in appearance.
The execution technique is quite simple. The flower is assembled from individual elements.

For example, representatives of dahlias, peonies with fluffy hats. The bottom layer is made of large petals. Subsequent tiers decrease in diameter. A certain number of elements are strung sequentially on one thread. The group shrinks and closes in a circle. The form of an inflorescence is given. Layers of blanks are glued to each other with a glue gun.
Moreover, petals in such colors can be processed in different ways.
- I just burn on both sides
One side - until the tape is folded (we do what a real petal looks like). I burn the second end, folding it in half. From this side they will be strung on a needle. Or the petals will fold and stitch differently.
Using thin tape you can tie knots in the middle of each petal. I found this method interesting. Each leaf was sequentially sewn onto a round blank, and in the middle - decoration, beads. Looks unusual. I glued the pin to the base. It turned out a decoration for the daughter of a friend.

- Another way
Each petal folds in a certain way, representing a pointed figure.

The module can consist of 2 or even three colors.
- And you can make a magnificent plant without using a needle and glue
The details of the work are squares. We turn with tweezers from the corners to the center. We assemble it into a whole with a thread, simply winding one to the other.
We make flowers from satin ribbons ourselves - step by step instructions for beginners
If for the first time you wanted to put your hands on the manufacture of an interesting representative of the flora, then I recommend that you first make the following compositions.
Single Ribbon Roses
We will need the following materials and tools:
- satin tape;
- threads;
- sewing needle.
Step 1
We take a tape 5 cm wide. Bend the edge to make a corner.

Step 1. Bend the edge of the tape
Step 2
We twist the triangle to form a small bud. Grab the needle.

Step 2. We twist the resulting triangle
Step 3
We begin to turn the long edge of the tape to the outside.

Step 3. Turn the other edge of the tape to the outside
Step 4
Gradually wind the tape around central part flower. We fix each turn with a thread with a needle.

Step 4. We wind the ribbon around the central part of the flower
Step 5
At the end, the petal is simply lowered down and sewn.

Step 5. Fix the petals
Leaflets to complement the decoration are also made easily.
Step 7-8
We take a tape 2.5 cm wide. about 6 cm long. Fold in half

Step 7-8. Fold a piece of ribbon in half
Step 9
Cut out the triangle with scissors.

Step 9: Cut Out the Triangle
Step 10
We process the tape (without unfolding) with a lighter or a candle. Press the layers together while they are still hot. So we glue the middle of the green. We turn out the leaflet.

Step 10. Burn the edges with fire

Step 10-1. Glue the middle while it's hot
Flower without glue and needle
We need 4 squares 5 x 5cm.
Step 1
With the help of tweezers, we turn the tape to the center from the corner.

Step 1. Fold the tape with tweezers
Step 2
We keep one side. We turn the second corner. It turns out a strip with two flagella on the sides.

Step 2. We fold the second side in the same way
Step 3
We fold our twist in half and tie with a thread.

Step 3. We turn the twist and fix it with a thread
Step 4
We take a decorative element for the central part of the bud. We attach the first petal to it. And so we add all the others.
Step 5
We connect the parts. Petals can be complicated by adding a ribbon of contrasting color.

Step 5: Add Contrasting Ribbon
From such little ones you will get a delicate bouquet. A wire wrapped in a green thin ribbon will act as a stem.
simple kanzashi
Step 1
Preparing squares. 8 pieces. I cut. I burn.

Step 1. Cut the squares
Step 2
I fold the square in half diagonally.

Step 2. Fold the square diagonally
Step 3
I fold the resulting triangle again along the midline.

Step 3. Fold the triangle again
Step 4
The last time I fold the figure. Again in the middle. I burn the edge.

Step 4. Roll again and burn the edges
Step 5
I cut the bottom corner and process it with a lighter (candles).
Step 6
I create a product.

Step 6. I collect a flower

Step 6_1. Another version of the flower
If you want, you can put in each petal a square of a different color, smaller or the same, at a slight angle.


