Schemes category. Christmas decorations
Another New Year's craft in the modular origami technique from Lyudmila Prishchenko. This work embodies an amazing combination of an element from the classic triangular modules and elements from the basic modules of the Sakura kusudama. The result is a fantastic blooming paper snowflake.
Christmas toy "Snow flowers"
This master class designed for the leaders of the circle "Origami" and all lovers of modular origami. Such a toy can be hung on a Christmas tree, decorate the interior of a room, class, and also give it to relatives and friends.
Purpose: to teach how to fold a snowflake from triangular modules and simple flowers in origami technique.
This work can be done by children 9-10 years old.
modular origami- This is a kind of origami in which products are made up of separate triangles (modules). Modules are connected by nesting them into each other. And when folding, the friction force does not allow them to fall apart, but glue can also be used.
To make a snowflake, we need to prepare 444 modules white color.
We begin to collect 1 and 2 rows. We take two triangles (hereinafter we will say modules) and put one triangle (module) on adjacent corners. This is clearly visible in the photo:

We collect the same number of modules in the 1st and 2nd row.
1 row - 6 modules
2 row - 6 modules

In the next row you need to add 6 modules. We put on a module for each corner of the module. In total, in the 3rd row you get 12 modules. This is also clearly visible in the photo.

In the 4th row we put on the modules in the same way as in the 2nd row: we put on 1 module on 2 adjacent corners.

In the 5th row we add 12 modules, as in the 3rd row, and we get 24 modules in the row.

In the 6th row we put on 24 modules.
In the 7th row we add 24 modules, and we get 48 modules.

We won't add more. Let's just enlarge our snowflake. To do this, we will collect 3 rows of 48 modules, that is, row 8 - 48 modules, row 9 - 48 modules, row 10 - 48 modules.

The basis for the snowflake is ready. Now we make the rays of the snowflake. There will be 8 of them. Each ray starts with 6 modules. And the ray is assembled according to the following principle: 6 - 5 - 4 - 3 - 2 - 1.
Got 1 beam.

We also collect the remaining 7 rays. And the snowflake is ready.

Now let's start making flowers. For 3 flowers we need 15 squares 9×9 cm blue color.
Take a square and fold it diagonally.

Raise the lower corners to the upper corner.
We take the right triangle and fold it in half (flatten it), then we take the left triangle and also fold it in half.
We bend the upper corners of the flattened triangles towards ourselves.
Fold the left and right triangles in half.

We connect and glue.

We make 4 more such modules and connect them together. It turns out such a wonderful flower:

We make 2 more flowers and glue on our finished snowflake. Decorate with strips of paper wrapped around a pencil.
Our snow flowers are ready.

I wish you success in making the New Year's toy "Snow Flowers".
New Year crafts from modular origamihttp://stranamasterov.ru
This fascinating technique is the creation volumetric figures from triangular origami modules - invented in China. The whole figure is assembled from many identical parts (modules). Each module is folded according to the rules of classic origami from one sheet of paper, and then the modules are connected by nesting them into each other. The friction force that appears in this case does not allow the structure to fall apart; you can assemble it without glue (if you are not going to use it as a toy).
Christmas tree from modules
For the Christmas tree, you can take modules of one or two colors. Here, modules from rectangles measuring 38x60 mm were used. But there may be other sizes. For this Christmas tree, 637 modules were needed (391 dark green, 246 light green). Fold the triangular modules according to the scheme.  http://stranamasterov.ru
Santa Claus from modules
Prepare for work 242 white modules, 181 blue, 19 pink and 1 red.
 http://stranamasterov.ru
Do-it-yourself New Year's Goby from modules
Bullock will need 372 white modules, 238 red and 74 black. The module is assembled according to the scheme Triangular origami module.  http://stranamasterov.ru
Snowman from modules
Prepare triangular modules. In our snowman, we used 946 white and 176 colored modules, it turned out to be quite large. But you can make a snowman and smaller sizes.
Hello dear masters and craftswomen. I present to your attention a master class on making such an origami swan, and I called it “Swan in Pink”. How to make an origami swan? We will make a pink drawing, highlight the swan with pink modules around the perimeter and put it on a round stand, and also glue small eyes. Please watch this video on making an origami swan. IN […]
Hello dear masters and craftswomen! Today I bring to your attention a master class on making a tricolor Swan from triangular modules. It would seem, what else can you think of, what other options are there for making Swans using the modular origami technique. But it turns out that there are still options and this is not the last thing in my arsenal. The tricolor swan is so simple […]
Hello dear masters and craftswomen! I bring to your attention new master class for making a Swan in black from 3D modules. In the last lesson, we made a Swan in red, and now I decided to change the style a bit and make a Swan in black. The scheme is not complicated and will suit anyone, even a beginner in modular origami. Specially […]
Hello dear masters and craftswomen! I bring to your attention a new master class on making a Swan in red shades. On the Internet you can meet great amount various schemes and workshops for making Swans using the modular origami technique. I am sure that you have never seen such a swan. This scheme is quite simple and even […]
Swan in blue. Video tutorials and diagram. Part 3. In the third part of the master class, I offer you two video lessons and detailed diagram origami how to make a swan. The first video shows how to make a swan neck and how to make a small stand. The second video talks about how to glue a swan better and faster. Lesson 6 (neck and […]
Swan in blue. Video tutorials and diagram. Part 2. In the second part of the "Swans in Blue" mater class, we complete the torso. I have prepared for you two video tutorials and a detailed origami swan diagram from modules. To assemble the swan, you will need 1438 1/16 size modules, of which: 317 - purple modules 471 - blue modules 552 - blue […]
Swan in blue. Video tutorials and diagram. Part 1. I bring to your attention a new master class on making an origami paper swan from 3D origami modules. The scheme is rather unusual and the appearance of the wing is not quite classic. In the photo you can see small through holes and a mesh pattern. Frankly, the scheme is quite complicated! Especially for this scheme, I […]
“Rainbow Swan” scheme and video tutorials (part 3). The third part of the "Rainbow Swan" master class consists of three video tutorials on assembling the stand. And I also decided that a video tutorial on gluing the "Rainbow Swan" would be very useful to you. Lesson 5 (stand part 1) Lesson 6 (stand part 2) Lesson 7 (stand part 3) […]
We will send the material to you by e-mail
How to revive paper? This may not work for the wizard, but for ordinary people through the ability to fold and bend a sheet of plain paper. This technique, which breathes life into paper, is called origami. The editors of the online magazine site offers to make origami on New Year with your own hands and decorate the festive decor with these voluminous products.
What interesting origami crafts of varying complexity can be made from paper for the New Year
New Year's decor implies that all handmade products will bring a festive mood to the interior. For this to happen, they are determined using origami models. You can put a colorful postcard with a voluminous folding Christmas tree on the table, or you can decorate the walls with interesting garlands. Origami Christmas decorations also look beautiful and unusual.
Origami in the form of a postcard
This task should be given to the child. The technique of work is not particularly difficult, but you will have to supervise the process. These will be positive emotions that must be shared with each other.


Related article:
DIY New Year's cards: scrapbooking, quilling, origami, fingerprints; postcards for the New Year from improvised materials: buttons, threads, felt, corrugated paper, colored tape, sequins - in our publication.
Classic and modular origami for New Year's decor
If you definitely want to try your hand and make a catchy craft for the holiday, then you should learn how to make origami modules according to a simple scheme. From small modules different color crafts are created big size and any form.
Apart from modular crafts there are many interesting ways fold paper and get memorable voluminous products.
Figures of New Year's origami
Assembling modular origami is a simple task, whether it is a flower, a Christmas tree or a New Year's toy. The most important thing is to prepare a large number of multi-colored modules.

Festive garlands set the perfect backdrop for any celebration. The choice of color is determined by the expected style of decoration: it will not be difficult to find suitable color combinations, fortunately, the market provides a rich color palette of paper. The ability to beautifully fold paper is easy to apply in the manufacture of Christmas wreaths. The process consists in making identically shaped modules that are connected to each other with or without glue. What do you need to have an invasion of various paper figures in the apartment for the New Year? A sea of colored paper, a ruler, PVA glue and scissors. It's good that there is no need to reinvent the wheel here: we take ready-made schemes, tips, and with the help of a photo we make any figure. The main guest of the celebration can come to life under the careful movements of the hands. There are several ways to make a beautiful Santa Claus out of paper. In a couple of Santa Claus, you must definitely put a cute Snow Maiden. Offered interesting scheme assembly of a young beauty. The process of making a Christmas tree consists in the manufacture of several modules and their imposition on each other or in the preparation of a single structure. To make the product beautiful, you need to carefully iron all the folds with a ruler. In this case, the figure will develop without difficulty. bright beautiful stars it is worth decorating the walls, ceiling or hanging them on a Christmas tree. If the assembly of such stars seems somewhat complicated, then this is only at first glance. Consistently follow the photo instructions, and everything will work out! The ancient art of origami is also applicable to making snowflakes. Glue is used to connect the elements to each other. The assembly is simple, any child can handle it if an attentive adult shows how to work. Since we are all waiting for a visit, which is a symbol of 2019, it makes sense to make a cute pig as a decoration. And here is a video of a somewhat complicated scheme of an even more beautiful piglet: According to tradition, the forest animal brings Santa Claus and the Snow Maiden to us, therefore it is also considered a symbol of the New Year. There are complex manufacturing options, confirming the status of origami as an art. It is strictly not recommended to make a penguin alone: he will be bored without his penguin family! We offer a diagram of two different penguins, which are assembled easily and quickly.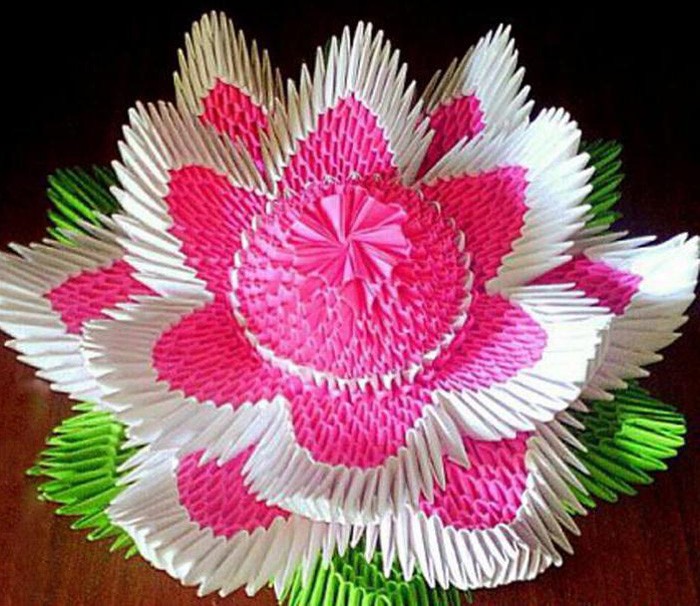
Origami in the form of a garland
Origami wreaths
Let's do origami for the New Year with our own hands
Origami "Santa Claus"
Origami "Snow Maiden"
Origami "herringbone"
Origami "star"
Origami "snowflake"
Video: how to make a special snowflake
Origami pig
Origami "deer"
Origami penguin
Decorating your home for the New Year is a wonderful tradition that has come to us from time immemorial. We transform houses and apartments in different ways, but in general, everything is the same: the same rains and garlands from specialized stores. Have you ever wanted to make your rooms for the New Year holidays not look like friends' houses? Everything is not so difficult, and literally everyone can do it. There are tons of options beautiful products, made by yourself at home, which are quite able to compete with the brightest toys from the supermarket. So, our article will provide you with 49 photos of ideas for easy origami crafts for the New Year 2020 with your own hands, which will enchant you and your guests with their unusualness and subtlety of execution. Do not worry, our master classes will explain in detail to you how to work in this direction. Even if you have never encountered such work, you will learn without problems and this activity will become your way of life.
Christmas toy "Star"
For the New Year 2020, the main decoration of the house, of course, is the Christmas tree. Therefore, all the attention of your coming guests will be riveted to her. Considering this important point, it is worth working on her holiday outfit. Beautiful colorful toys can, of course, be purchased at the nearest store, which are on the threshold of new year holidays will simply be overflowing with similar products. But it's still better to create an image of a Christmas tree using original toys made with your own hands from any materials you like, especially paper. It is so malleable that people have learned to make wonderful crafts in the technique of origami, even for new year's eve. Let's create something interesting and simple, for example, a star on a Christmas tree, which is perfect for beginners.
For work you will need:
- colored thick paper or A4 cardboard - 8 sheets;
- simple pencil;
- scissors;
- decorative thread.
Progress:
- We take a dense colored paper or cardboard and fold it in half. We have a rectangle.
- We bend the corner of its small left side, pulling it to the center of the folded paper, then you need to straighten it. Now we pull the larger side of our rectangle to its second parallel side. We spread the sheet of paper again and in this way we got the intersection of the lines, which will be our center of the star. Mark it with a simple pencil.
- Next, we take the corner of its right side and pull it to our marked center. Carefully iron.
- The right corner, which we connected to the center, is attached to its opposite side and fixed with a finger, pressing the resulting line. We have a kind of quadrilateral.
- We connect the right side of the paper, on which we marked the center, with the resulting quadrangle, tightly pressing the straight butt lines to each other. We also have a triangle in this way.
- Two geometric figures fold in half along the butt line, arching them as if inside out and carefully stroking all sides with your finger.
- Then we take scissors and cut off the extra edge of the figure so that we get a small triangle.
- After that, we open our paper product, completely straightening it. As a result, we have formed a five-pointed box, on which we draw all the fold lines with a simple pencil. Now it will be easier for us to orient ourselves and assemble this New Year's crafts with your own hands.
- At the end of the origami work, do not forget to attach a shiny thread to our five-pointed star, as this is a Christmas tree decor.
So, having tried hard, you can create for the New Year 2020 lovely decoration for your tree. And so that you quickly understand this delicate matter, we provide our training video.
Master class on manufacturing five pointed star in origami technique
Browse our selection of photo ideas on this topic to make a lot of charming New Year's gizmos.


Snowflake from origami modules

Very beautiful handicraft for the New Year 2020, there will certainly be a snowflake created from origami modules. Naturally, to make such a miracle with your own hands, it will take a significant amount of time, and, especially, effort. But this should not scare you, because the end result is a fragile and elegant product made from plain paper. Let's see how all this is done at home.
For work you will need:
- white paper, A4 format - 5 sheets;
- blue paper, A4 format - 4 sheets;
- pencil;
- ruler;
- scissors;
- glue.
Progress:
To create this craft, you need to create 150 white and 120 blue modules.
- Let's start making origami modules with our own hands. To do this, we take all sheets of A4 format and divide them into 32 rectangular parts, after which we cut them out.
- Next, take one resulting rectangle and fold it in half horizontally, and then vertically, outlining the center line.
- We bend the upper right and left corners to the center, after which we turn the workpiece over and bend the lower right and left corners.
- We raise the lower part, fold it in half and get the first module. In the same way, we manufacture subsequent modules.
- Having completed the work on creating modules, we immediately proceed to their assembly. In order to securely fix all the details of our product, we use glue. We combine 2 rows of 6 white elements into a ring, inserting into each other.
- Be careful, as the number of modules is doubled on the third row. This is achieved by dressing two on one, resulting in 12 modules.
- To make our decoration look more elegant for the New Year 2020, we decorate it with blue modules, starting to introduce them from the fourth row. It is identical to the previous one, so 12 modules are also released at this stage.
- In the next row, we must double the number of elements in the row twice. This means that in the fifth row you will get 24 modules. We do the next sixth row in the same way as the fifth.
- Here is some of the work we have done. Now we proceed to the seventh row, in which we collect 24 modules, alternating the combination in a circle: 3 blue, 1 white module. There are 6 sharp blue corners.
- Further we work only with blue rays. To each of the three blue modules we add two more, and then one detail. Narrowing occurs.
- Now we carry out white arches, which consist of 17 modules. White modules remained in the seventh row - this is the basis of the arches. One module is taken, another pocket is put on it, thus framing the blue beam. It remains to collect 5 more white arches.
- And the last stage of assembling a snowflake with your own hands using the modular origami technique is the compilation of small rays. They are made of 5 modules inserted like a column and 3 modules on top that make the tips fluffy. We attach them to our craft. That's it! For everyone, it will definitely be the most beautiful holiday decoration, especially, it will seem interesting for your children.
Check out our interesting selection of photo ideas to enrich your imagination and thereby expand your possibilities.


For those people who are doing this for the first time, it will not seem so - it's easy, but after watching our video, you will quickly learn how to make such beauty.
Master class on making snowflakes from origami modules
Christmas tree toy "Ball"

Even simple colored paper products will help to perfectly decorate the room for any holidays, especially winter ones. So create origami crafts for the New Year 2020 with your own hands in a rather interesting way, using a simple master class for this. You will see, you get a wonderful Christmas tree toy in the form of a ball consisting of stars.
This will require:
- colored paper;
- Scissors;
- Glue;
- Rope.
Progress:
- From small squares of colored paper, you need to make envelopes with your own hands.
- Then, from the resulting envelopes, you need to make triangles, which are then folded in half.
- It takes 14 parts to make one star. They need to be collected in a circle and glued together.
- A rope should be threaded onto one of the details of our craft. Here is the wonderful Christmas tree decoration for the New Year 2020, made in the technique of origami. Your family will definitely like it, and for children it will become an incentive to create something of their own, but less complicated.
Browse through our selection of photo ideas and you can create the perfect Christmas decorations for the New Year holidays.


To understand this in more detail creative work, you should familiarize yourself with our video tutorial.
Master class on manufacturing Christmas ball on the Christmas tree
Herringbone

Craft in the form volumetric Christmas tree from colored paper for the New Year 2020 can turn out very well if you use the origami technique. This handmade paper product is perfect as a decoration for a Christmas tree or just for the room.
This will require:
- Green and red colored paper;
- Scissors;
- Glue.
Progress:
- On colored green paper, you need to draw a Christmas tree, subsequently cutting out five such details.
- Then they should be carefully glued together, after which you get a voluminous craft.
- To decorate our Christmas tree, for its top you will need to cut a star out of paper. Ready!
Thanks to the origami technique, we got an excellent home decoration made of colored paper, made by ourselves for the New Year 2020. We recommend our training video, after watching which you will get acquainted with all the intricacies of this work in stages.
Master class on making Christmas trees from colored paper
There are a huge number of Christmas trees made in this way. They are so diverse and quite original that one cannot take one's eyes off such an excellent christmas decoration. Our photo ideas will prove it to you.


Volumetric snowflakes

You can wonderfully decorate your interior with the help of origami crafts for the New Year 2020 with your own hands, thus making a voluminous snowflake from colored paper. This is a fairly traditional method, which is probably used in every home. Given Christmas decoration it is very easy and fast, you just have to pick up the material at hand in the color and texture you like, because your festive mood and a pleasant atmosphere in the house depend on it, which is very important for your children.
This will require:
- colored paper;
- Scissors;
- Glue;
- Thread.
Progress:
- To get volumetric snowflake, created using the origami technique, you need to create two parts of this craft and connect them together. First you need to cut out a small square and fold it in half, and then again in the same way.
- To make the snowflake round, the edges of the part must be rounded. And over the entire surface of the snowflakes you need to cut various patterns. When it is deployed, it will turn out beautiful drawing made by hand. And after the two parts are connected, an unusual volumetric snowflake will come out. It can be hung on a Christmas tree for the New Year 2020, but at the same time making not one copy, but several, and, preferably, of different shapes and colors. So you achieve liveliness and a dazzling effect. Of course, snowflakes can be created in other ways, but this craft instruction is considered the easiest and most accessible, especially for beginners. Watch our video tutorial to understand this work.
Master class on making volumetric snowflakes
Be sure to check out our photo ideas that will amaze you with their unusualness.


Christmas garland made of colored paper

Quite original and beautiful, you can transform your home for the New Year 2020 with a garland consisting of voluminous figures made with your own hands from plain paper of any color. Such interesting craft using the origami technique is quite easy. It is only necessary to prepare the necessary improvised materials, such as:
- colored paper;
- scissors;
- glue;
- stapler;
- threads.
Progress:
- First you need to make the base of the garland. To do this, strips 5 cm long and 1 cm wide should be cut out of colored paper. Then these parts should be fastened into a ring, connecting to each other.
- After that, you need to start working on creating decorations for our paper craft. To do this, you need to cut the same strips as for the garland. For one toy, you need to use 2 parts. They need to be folded with an accordion and fastened in the middle with a stapler. Then the resulting decoration must be unfolded, and the disconnected edges must also be connected using a stapler. It is these decorative elements that are attached to the garland. If you hang such a product around the room for the New Year 2020, it will look great. And considering that this work was done by hand, and even using the origami technique, which, at first glance, seems difficult and inaccessible to many due to the abundance of small details in it, requiring maximum perseverance and patience for its creation, it acquires a great value in the eyes of your environment.
Photo ideas on how to decorate your house in an original way for the New Year holidays.


