Crafts from sea shells. DIY shell crafts
How much can you make from shells with your own hands! Candlesticks, paintings, planters, decorate the cake with a mastic shell, sew a toy of the same shape.
DIY shell crafts for a stylish home
See how to make beautiful candle holders from old ones.

For such stylish things you need:
- old candlestick;
- glue "Moment";
- various seashells.
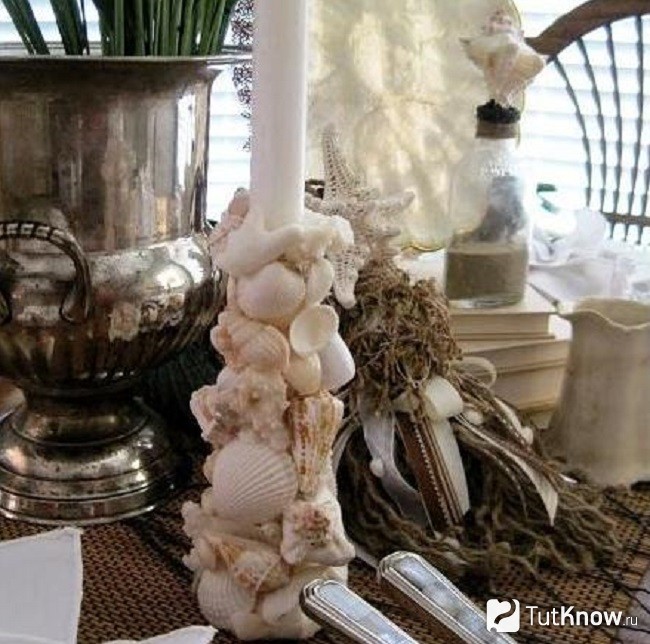
Such a candlestick, made with your own hands, will become an exquisite table decoration, like the next one.

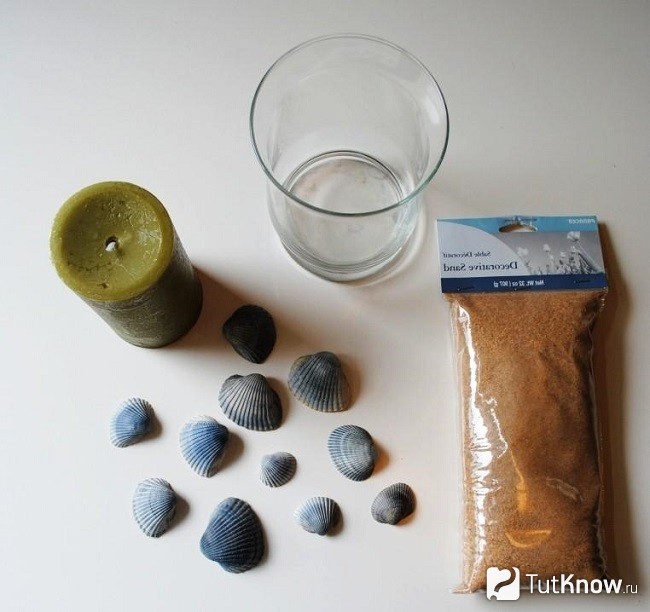
It will be a nice addition to a romantic evening. Here's what the exclusive accessory is made of:
- wide glass;
- sand;
- shells;
- candles.
If you do not have a suitable glass, you can replace it with a glass vase, another transparent fireproof vessel.
Place a candle in the center of the glass so that it holds well and for decoration, pour a layer of sand on the bottom of the vessel. Place a starfish shell next to the candles. Sprinkle small shells on the sand.
Almost by the same principle, you can make crafts from shells with your own hands. For the next one you will need:
- gypsum or sand and cement;
- water;
- shells;
- glass vase;
- wooden box;
- candle.
As a box, you can use a children's cube. Removing one of its sides.
Place the vase in the wooden cube. Make a cement mass consisting of 1 part cement and 3 parts sand and water or gypsum by mixing gypsum with water until creamy. Fill the gap between the cube and the vase with this mass. Wait until the mortar sets, holds its shape, but does not solidify completely.
Then take the cube out of the mold, frame the cement or plaster candlestick with shells. It remains to wait for the mass to dry completely and then you can put a candle inside and admire how the shell stone turned simple things into an elegant creation.

And here's another candle you can make with your own hands. For her you will need:
- vase;
- shells;
- sand;
- candle.
Place a candle inside the vase. Pour sand around the candle. Place beautiful shells on it.

Looking at such shell crafts, you will think of the sea. To make pleasant dreams brighter, place a photo inside that will remind you of a great vacation. But first, pour sand into a jar with a wide mouth, and a few shells on it.
You can decorate this imitation of the seashore by cutting algae out of green paper.

How to make souvenirs from shells with your own hands
They will also help you make shells; photos will allow you to see interesting ideas. Such a network will be an excellent attribute, decoration of the house.

Take for her:
- wooden sticks - 2 pcs.;
- strong rope;
- shells;
- drill with a thin drill.
Before you tie the end of the thread on the stick, thread it through the shell, and then fasten it to the knot. Finish the ends of all ropes in the same way.
Cut several identical ropes. Thread the first one first into the shell, then twist this horizontal thread with the vertical one. Also decorate the entire decorative network.

For him, take:
- dish or plate;
- flat seashells - halves of valves;
- sponge
- hammer;
- bowl
- white acrylic paint;
- water.

To see how the shells will arrange on a dish, place them on this container. Some larger shells can be smashed with a hammer to fit between the shells and fill in the gaps in the mosaic.
- If the putty is in powder, dilute it according to the instructions with water. If you have ready to use, then put it on a plate, and place the shells on top.
- Dampen a sponge in water, wipe the surface of the shells to remove the solution that has got on them.
- Let the putty dry. To prevent cracks on it, sometimes lubricate these places with water.
- It remains to cover the putty acrylic paint. When it dries, you can hand original gift to the addressee or put in your apartment in the most visible place, like the following crafts from shells.

To make such an amazing ball of shells, take:
- shells of different sizes;
- ball blank;
- PVA glue or for ceramic tiles;
- putty knife;
- sand;
- soft cloth;
- sponge.
- Mix some sand and tile adhesive. Take this solution with a spatula, generously lubricate the ball with it.
- Walk on the solution with a soft cloth, aligning the edges of the adhesive layer.
- Glue the large shells first and then the smaller ones. You can attach glass pebbles between them.
- Wait until the glue "grabs", then wipe off the excess from the shells with a slightly damp sponge.

To make the next creation, you will need:
- thick cardboard;
- scissors;
- shells;
- glue or glue gun.

But what kind of pictures of shells, a photo frame you can easily create.

If you stick the largest specimens on the wall, and nail the hooks a little lower, you will get beautiful towel racks. You can place this group in the hallway. It is convenient, when you come home, to hang a scarf, a bag on such beautiful hooks.

Do-it-yourself needle bed-shell, decor items
The marine motif is also reflected in the following textile works. They can be put on the table or used as a needle holder.

Transfer the pattern details to the fabric - there will be two of them for each product. Consider how to make a needle bed using the starfish as an example. Fold both fabrics for this pillow with the right sides, stitch to the edge, but leave a gap to turn the needle bar through it, and then fill it with padding polyester or cotton.
If this is a needle bed, fold the braid into a loop. Remove its ends into this hole on the pillow, sew. Now you can hang the necessary item of needlewomen on the wall and always have it at hand.
And here is how such a do-it-yourself needle bed is created in the form of a Monomakh's hat.

For her, take:
- white thick fabric;
- threads;
- synthetic winterizer;
- artificial pearls;
- beads;
- compass.
Now decorate the needle bed with pearls, beads, sewing them onto a large circle, which has become the top of an impromptu hat.
You can sew a pillowcase on a pillow by sewing an appliqué in the form of a shell on it. Put soft product into an armchair. A picture, the elements of which are made in the form of starfish, will look great on the wall.

If you want to sew toys from tights so that they resemble large shells, then take note of the following master class.

For work are taken:
- thin tights;
- synthetic winterizer;
- wire;
- insulating tape;
- pliers;
- pearl;
- eyes;
- needle and thread.

Connect them with electrical tape and wrap with padding polyester.

Wrap both parts of the shell with a long piece of synthetic winterizer, put one part of the tights on them.

Thread the needle. Using this tool, pull off the edges of the hole in the pantyhose.

Without breaking the thread, we make large tight stitches to designate the wings of the shell. First you need to make the main, and then the additional stitches.

After that, we sew the shell in a circle.

It remains to glue the eyes, the pearl and color the surface of the product with the help of dry shadows.
This is what a shell you got, the price of which is incomparably less than the cost of a finished, store-bought one. Such a toy is made from old tights and leftover materials.
A shell bag will add to your personal collection on nautical theme.

Handmade knitwear will also cost you very little.
For hats, sweaters, sweaters, you can use the shell pattern and the sample photo will simplify the task.

- We knit the 1st and 5th rows, as well as 2nd and 6th ones, with the knit ones, we perform the 3rd row as follows: * from 5 loops we form five, then - 1 front *, from 5 loops we form five.
- 4th and 8th row - knit purl. 5 row - knit 3, * form five out of 5 loops, knit 1 *, knit 2 loops.
- To form five loops out of 5, thread the right knitting needle through five loops, grab working thread, pull it through the same loops. For now, leave the loops on the left needle, and yarn over on the right, knit the same loops again. Yarn over again right spoke and knit these 5 loops.
Shell shaped baking decoration

If you baked a cake for a girl, decorate it with an excerpt from the Ariel cartoon using mastic. You can buy it or make it yourself from marshmallows or powdered sugar. To give desired color use food coloring.
- To make a sea, add blue food paint to a piece of mastic, knead, roll into a circle. Use a rolling pin to transfer it to the cake. It will also help to attach the mastic so that there are no air bubbles left.
- From red, yellow mastic, form starfish, shells. After wetting the areas of the "sea" with water, attach the shells here. Pictures will show how to make other elements of the sweet creation.
- Blind the body and arms of Ariel from flesh-colored mastic, and her tail from green. Attach each of its scales separately or cut them out with a knife on a strip of mastic and attach these tapes directly to the tail.
- It remains to make a shell out of white mastic. Check out this process.
- round shape with serrated edges;
- rolling pin;
- skewer;
- mastic.

Having rolled out the dough into a layer, cut it out with a mold, give it an oval shape with a rolling pin.
Using a skewer, draw a pattern in the form of straight lines on the workpiece.

Cut a triangular notch at the bottom with a knife, fold the workpiece in the form of a shell. Lay on a rolled piece of foil to dry. Also make the second half of the shell.

When the blanks are dry, fasten them with a backdrop cut out of mastic, moistening the joints with water.

Let it dry for 12 hours, after which it's time to place the shell on the cake. You can put a pearl or several inside. Then such a cake will be very appropriate for a pearl wedding.

As always, in conclusion, we suggest watching a selection of interesting videos
Evgenia Smirnova
To send light into the depths of the human heart - this is the purpose of the artist
Content
Nature gives man materials that you can use in your work. It is especially useful to involve a child in this process, which will teach him to understand natural gifts, allow him to develop his imagination and have fun. It is very exciting and interesting to create DIY crafts from shells for children. Marine materials allow you to make many products: toys New Year theme, topiaries, bracelets, candlesticks, frames for mirrors, photographs, jewelry, bouquets of flowers, vases, figurines of animals, dolls, pendants, paintings on the theme of space and much more.
How to make shell crafts
To make DIY crafts from shells for children, you can use the most simple materials, for example, river rapana. In addition, a variety of pebbles, multi-colored sand, colored paper, plasticine, beads, beads, motifs made by crocheting or knitting, wood, cones, knitted or sewn clothes for dolls and other figurines. Take advantage of the workshops below that will help you create interesting products for yourself or as a gift for a loved one.
Marine panel
In this master class, you will learn how to make a triptych on a marine theme with your own hands. The panel is made in warm colors using natural materials. It looks very interesting and beautiful, does not require the addition of artificial decor items. Required materials for a panel in a marine style:
- sand;
- eggshell;
- three boards 15x15 cm;
- PVA glue;
- colorless varnish;
- glue gun;
- shells;
- sea stars.

Step-by-step instruction:
- Lubricate the center of the board with PVA glue.
- Sprinkle with sand, press well with your hand, leave for an hour and a half to dry.
- Shake off excess sand from the board, varnish on top.
- Glue the pieces of shell along the edges of the boards. After drying, varnish.
- Using a glue gun, we attach marine materials.
- We connect the planks together with a wire or a strong thread, having previously drilled holes with a small-diameter drill.
orchid flower
The next do-it-yourself craft for children is a panel with orchids. Marine material is ideal for creating a flower. Light orchids on a black background look great. You can decorate any room with this picture. Necessary materials:
- clothespins;
- shells;
- frame with glass;
- cord or wire of a light shade;
- decorative elements for the middle of the flower;
- black velvet for the base;
- golden lacquer;
- transparent glue.

Step by step instructions:
- We glue three shells together to get an orchid. To keep the material in the desired shape, use clothespins.
- Cover the flowers with gold lacquer. Make the center of the beads.
- Pass glue along the edges of the glass, put velvet on top, press it with your hands.
- We fix the middle in the center of the flower.
- We glue a cord or wire in the form of a curving stem to the velvet.
- Glue orchids along the stem. Where necessary, add short stems.
- When the glue dries, insert the panel into the frame.
Children's applications
Children can make a variety of applications from marine materials. This master class describes how to create a butterfly with your own hands. This craft is very simple, even the smallest children can handle it. For work you will need:
- shells;
- brush for glue;
- glue;
- cardboard.

Instruction step by step:
- We make a butterfly diagram on a sheet of cardboard.
- We outline the contours with a pencil.
- We shift one wing to the side, grease the vacant place with glue.
- Put the wing on top of the glue again, press it with your hands.
- We repeat the same with the second wing.
- We remove the body, grease it with glue and lay it out again.
- We perform the described manipulations with the second half of the butterfly.
- Draw a mustache on the finished applique.
DIY souvenir ship
Using shells, you can make not only panels and paintings for children with your own hands, but also a real boat. This craft is easy to create. The ship will decorate any interior or a gift reminiscent of the sea. For manufacturing you will need:
- three medium-sized rapana shells;
- large for the base;
- small shells for sails;
- skewers;
- glue gun.

Instruction step by step:
- We glue together three rapana, which will serve as the basis. Materials must be connected in such a way that finished construction was stable.
- We take three skewers of the same length. We glue them inside a large shell, which will serve as the ship itself.
- We glue the vessel upside down. Press gently. We glue a dense thread to one side of the vessel, pass it through the masts, and fasten it at the second edge. This will serve as a reinforcement of the structure.
- We attach shells to the masts, which are intended for sails.
- If desired, we attach the flag of the ship.
Animal figurines
The next do-it-yourself craft on the theme of the animal world is a funny little mouse. Its creation will not take much effort and time, and the reward will be a charming mouse that will settle in your house. List of materials:
- two round shells;
- shell of a small rapana;
- two eyes;
- lace;
- black bead;
- glue gun;
- spray varnish;
- scissors.

Step-by-step instruction:
- We put the shell of the rapana down with a hole so that the sharp end looks forward. We fix with glue two round shells at the top, which will serve as ears.
- Glue a black bead to the sharp part that serves as a muzzle.
- We fasten the lace at the back - this is the tail of the mouse.
- We varnish the craft.
- After complete drying, we fix the eyes.
Box for young ladies
The box will be especially sweet to the heart of a young lady, because in it she will be able to store all kinds of trinkets and jewelry. In this master class, the finished jar is decorated with marine materials. Necessary components for the successful completion of the task:
- PVA glue;
- a jar with a screw cap (preferably round and low);
- different shells;
- spray gold enamel.

Step by step production:
- Lubricate the lid of the jar with glue.
- From above lay out the desired pattern of the shell.
- We are waiting for complete drying.
- We place the box on several layers of paper. Cover with an even coat of paint. We are waiting for drying.
Picture frame
With the help of sea shells and stones, you can beautifully decorate a photo frame or a mirror. DIY crafts for children are very easy to create and do not require a lot of time. For work you will need:
- frame;
- acrylic paint;
- tassel;
- shells;
- stones;
- rag, fine-grained skin.

Step-by-step instruction:
- Sand the frame. Then dry thoroughly with a cloth so that there is no dust left.
- We cover the frame with paint from all sides.
- After drying, glue marine materials with the desired pattern.
- Then we cover the craft with varnish so that it lasts for a long time and pleases the eye.
Beautiful jewelry and bijouterie
DIY jewelry will especially please the little fashionista. Involve your child in the jewelry making process. The presented version of the earrings looks very elegant and beautiful. For manufacturing you will need:
- thick needle;
- two pearls;
- fasteners;
- dye;
- two identical shells;
- glue.

Step by step production:
- With a thick needle, we make a hole in the sink with rotational movements.
- If necessary, paint in the desired color. We are waiting for drying.
- Glue a pearl inside. We are waiting for drying.
- We varnish the earrings.
- We fasten the seams.
How to prepare seashells
Making DIY crafts from shells for children is an interesting and simple process. Marine materials are diverse, and each copy is individual, not like the others. It is as if nature itself created the shells on purpose so that parents and children could make beautiful little things out of it. Before you start creating, you need to prepare the material:
- Rinse thoroughly using a brush, but do not make great efforts so as not to destroy the fragile creation of nature.
- If there are shellfish left, boil them in salted water for at least an hour. If this is not done, then the product will smell unpleasant.
- If you want the material to shine and the color to remain saturated, then cover with varnish or baby oil.
- If there are broken off sharp edges, the shells should be treated with fine-grained sandpaper. If this is not available, then use a nail file.
 Crafts from plasticine Play up and shells. Theme with mom make a butterfly. Video for children
Fine crafts made from sea shells
 Crafts from shells
Children's souvenirs
Did you find an error in the text? Select it, press Ctrl + Enter and we'll fix it!The long-awaited summer has arrived. And many have already packed their suitcases and bought tickets to the warm sea. And on the way back, almost everyone has a bag of shells in their suitcases ... I so want to keep these memories longer ...
The shells themselves are very different. In the rivers, mostly simple flat oval shells-mussels are found. They can also be found in the Baltic Sea. A much greater abundance of shapes and sizes can be found in the southern seas. Donaxes, cardiums, zebrils and many other mollusks live in shells of the most bizarre shape. These can be spiral shells, spindle-shaped or heart-shaped shells, and many other shapes.
Crafts from seashells begin with their collection. The child can handle it too. The collected shells should be washed with running water and dried. After that, for crafts from shells, they must be examined and sorted. Examining each shell, trying them on one by one, images of future crafts will be born in your head.
Ask for help sorting your child. With those who are younger, you can consolidate the knowledge of the concepts of "more-less". And older children are able to offer their own options for crafts.
The next step will be directly making the shell craft itself. Joint creativity with a child is better to start with simple things. It is best to start with a snail or turtle. If the child has never seen or does not remember these animals, then it is better to prepare a high-quality photo or drawing of the selected animal in advance.
For crafts from shells, we recommend that you use plasticine. This material allows you to fasten the shells together well, and it is also quite easy to sculpt the missing details of the animal image from it.
The right stand will help you create a complete image or a whole composition. When making crafts from shells in the form of animals, it is better to use natural coasters. Such foundations can be flat stone for a turtle, a thick branch for a snail, etc. Try to make the stand for crafts made of shells contrast with the animal, otherwise your craft will be lost against the background of the stand. If you want to save memory, then it is better to make a thematic inscription on the stand. The kid will be happy to give such a craft made of shells with an inscription to his godfathers or grandmother for the New Year or other holiday.
In general, choose an idea and create!
Animals:


Flowers:


Frames for photo or embroidery:

Little things for the interior:


After a trip to the sea, positive emotions always remain, and stylish crafts made of shells will remind you of a pleasant vacation for a long time. Collecting shells on the beach is a fun activity that adults and children enjoy, but often this natural material thrown away or stored in bags. Shells come in different shapes and sizes, so needlewomen make animal figurines, flowers, jewelry and much more from them. Find out, what can beginners make from shells with your own hands, and spend your leisure time with benefit.
DIY shell trees
Materials:
- glue gun
– cardboard
- shells
- decorative elements.
A tree made of shells will remind you of good rest on the sea. First, prepare a cone-shaped cardboard or plastic case. Spread the cone with glue and start gluing the shells. First you need to use thick shells, and then glue the medium and smallest ones. If you think over the drawing, you get a very original composition.

Small gaps between shells can be covered with sea or white sand.
Seashell ball for beginners
Today in needlework stores they sell a large number of blanks, on the basis of which original crafts. If you find foam ball, then the shells will stick well with hot glue. Another way is to take any ball and prepare a special mixture of sand and tile adhesive. This composition is applied to the ball with a spatula, so that the layer is uniform, rub it with a cloth.

Glue the shells first, large ones, and then small ones. You can pick up approximately the same size shells and start gluing in a circle. original ball can be presented as a souvenir or a gift from a sea holiday. Try it in the same way. To do this, place the ball in a special microphone and paste over shells of different sizes.
How to make a candlestick from shells

You can break or saw some shells, as long as the edges are not sharp.

A candlestick is easy to make from an ordinary cup.

If you wish, you can glue it with small shells or just pour sand into the container, fold the shells and light a candle.


Original crafts from shells for beginners
Seashells are easy to work with, so don't be discouraged if you're new to this kind of needlework. Sand in a jar along with shells is one of the most simple crafts which requires only your imagination. Print out photos from your last vacation, fill a beautiful jar with sand, shells, attach photos and other decorative elements. Tie a jar of twine and your craft is ready.

Shell pendants will complement the interior in a marine style and give the interior a creative look.

Sea, vacation, beach… Three simple words filled with positive emotions and a fresh breeze. Every summer you want to leave in memory for a whole year, or even more. I don’t know about you, but I bring back from vacation half a suitcase of shells and multi-colored sand polished by salty waves. What to do with all this goodness, the answer is simple -.

Shell trees decorate coffee table and they will keep memories not for one, or even for two years - it’s not for nothing that you wandered along the beach all day in search of interesting specimens of sea shells.
For shell topiary we need:
- cone made of cardboard or plastic;
- 5-10 cups of shells;
- glue gun.
Spread glue on the cone and glue the largest shells first, then the medium ones, and only then fill in the distance with the smallest shells. A little tip - if you are not satisfied with the small gaps between the shells, you can sprinkle them with white sand - it will also stick to the cone. Such DIY shell crafts You can safely pack and give to friends and family.

To make a ball of shells, prepare:
- ball blank;
- assorted shells different sizes;
- glue for ceramic tiles (or PVA glue);
- sand;
- spatula, sponge and soft cloth.

- Mix a small amount of sand and tile adhesive in a disposable container. And spread the spatula on the ball, rub the glue with a soft cloth to evenly align the glue over the entire surface of the ball.
- Then proceed to gluing the shells - do not forget - first use large shells, then - smaller shells.
- Wait a few minutes and smooth the surface with a slightly damp sponge.
Shell candlesticks
These two marvelous candlesticks seem to be made for romantic summer evenings. I warn you right away - their manufacture is a task of increased complexity, but, nevertheless, the game is worth the candle.
For candlesticks stock up:
- two old candlesticks
- shells of different sizes and shapes
- corals
- glue "Moment"


First, glue large shells to the candlesticks, and then corals and shells of small diameters. The more diverse your assortment of former shellfish houses is, the more unusual and beautiful the candlesticks will be.
Sea shell bowl

What do you need:
- a plate or bowl, preferably made of wood
- putty
- many sea shells
- hammer
- sponge
- white acrylic paint
- bowl and some water
Lay out the shells on a plate first so you can roughly see what the mosaic will look like. If your shells are too big, use a hammer to break a couple of shells to fill the void between the shells on the dish.
Spread the putty on the dish over the shells. Wipe the surface of the shells with a sponge dipped in water. Then wait a few minutes and cover the putty on the dish with acrylic paint.

Now leave the dish for the whole day, and then you can safely wrap it in a box and give it to your loved ones, or simply decorate a wall or a coffee table with it.
Crafts from shells with their own hands "Sea Network"
This amazing net is perfect for a country house or a nautical-themed nursery.

Prepare for her:
- two wooden sticks
- thick threads
- shells with holes
- small drill
Let's weave our network first. Use a drill to make several holes in wooden sticks and thread the threads through them, fastening them with knots. You should have eight parallel strands. Then we start weaving the transverse threads. There are exactly seven of them and they are fixed very simply - with knots. When the net is ready, tie shells to it and boldly decorate the room.
Shells and other memories in a jar
I saw hundreds of "sands and shells in a bottle" type souvenirs in all the little shops along the beach. They are all neat and uniform, and probably contain shells from China. So I decided to make my own, sandy and seashells in a beach souvenir bottle. It turned out pretty nice! Try it too.

Pour some travel sand into a jar, print your vacation photo on a printer, only on plain paper, not glossy. Glue it on the inside of the jar, put shells washed in fresh water in it and sign it.

Vase from the ocean
This vase is very easy to make. Fill a large, wide-mouthed vase 1/3 full with dry sand. Then top with clean shells, starfish and shells. Use the treasures that you have collected on a trip to the coast, or simply bought in a store. Place the vase in the center of the table or on a shelf and let it delight you every day.

Among crafts made from shells with their own hands, candlesticks stand apart. But I will not go into complexity, but simply show the lightest and most sophisticated candlestick, especially since the complex one was already at the very beginning.

Necessary materials:
- Sand
- Vase or glass
- Candle
- shells

Place the candle inside the vase. Pour sand around the candle to about a third of the vase. Place the shells around the candle pole. You may need tweezers for this.
It will be great if the candle is scented - it will make your evening even more romantic.


