Decoupage bottles design ideas. Decoupage of bottles - step by step instructions and a description of the progress of decorating with various materials (110 photos)
Today we have prepared another interesting master class titled "Wine bottle in the style of decoupage and aging." Such a bottle can be used both for interior decoration and as a gift. close person, a relative or even a colleague.
To make it, you will need an empty bottle of the original form. 
Be sure to wipe the glass with acetone (it will degrease the surface, which will allow you to make high-quality decoupage). 
For a themed bottle, choose a napkin with a suitable pattern. Useful napkin 25 * 25 cm with the image of wine, cheese, bread and grapes. 1/4 of the napkin will fit nicely into the circumference of the bottle. 
Next, paint the fat-free bottle with acrylic white paint in two layers (the paint should be with good hiding power so that the glass is evenly painted over). 
Now, unusual way sticking napkins. For the bottle decoupage technique, you can use not only special glue, but also the simplest tool - an adhesive pencil. Smear with a pencil the round flat surface of the bottle on which the decoupage will be done. 
Wait until the glue starts to dry a little, and put a napkin on top, exactly in the center, smooth it with your hand. Immediately place the napkin evenly, because if it sticks, it was impossible to tear it off. 
Tear off now from the whole napkin in a circle the fragment that has stuck. 
Now miss acrylic varnish only the circle that is outlined by the bottle itself. 
When the varnish dries, use sandpaper to remove the excess part of the napkin (which did not stick). Then, repeat gluing on the back of the bottle. 
A bottle for wine with decoupage turns out to be interesting. Let's start making aging effects. 
First, we make scuffs. Paint the entire surface of the bottle, where there is no decoupage, with burnt umber. 
It is this color that will then appear in scuffs. 
When the paint dries, arm yourself with an ordinary candle and rub the bottle with it, since the sides have a relief - most of the wax remains on the convex surfaces. 
On top of the brown paint, paint over with ivory acrylic. This color matches the tone of the napkin fragment. 
After the light paint has dried, arm yourself with a dishwashing sponge and rub the bottle with the hard side. In those places where there was wax under the light paint on the bottle, the paint is not firmly attached to the surface and it can be easily removed. 
Very gentle and natural scuffs appear on the bottle. This is the first stage in the transformation of the bottle into a rarity and its aging. 

To fix scuffs, you need to cover the entire bottle with a couple of layers of acrylic varnish. 
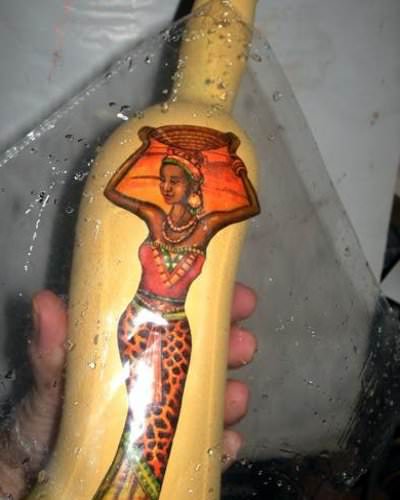
Now let's start aging the decoupage itself, since the picture is too bright and does not match the worn side of the bottle. We will make cracks using Solo Goya two-component craquelure. 
We first apply the first step of the craquelure pair - groundlak. We are waiting for its almost complete drying, depending on the air temperature in the apartment (this may take 1-1.5 hours). 
Then we mix a couple of drops of dishwashing detergent with 5 milliliters of the second step of Solo Goya craquelure and wait until it dries. 
When this layer dries, small cracks appear on the surface of the pattern. We make cracks sequentially on two sides of the bottle. 
To make the cracks look natural, you need to "show" them. Take light gold oil paint and use a cotton swab to rub the paint into the cracks. 
Immediately wipe off excess paint with a swab, the paint will remain only in cracks and the drawing becomes like an old fresco. 
Wipe the sides of the bottle with the same swab so that a little gold paint remains on them in a very thin layer. Leave the bottle overnight Oil paint dried up. 
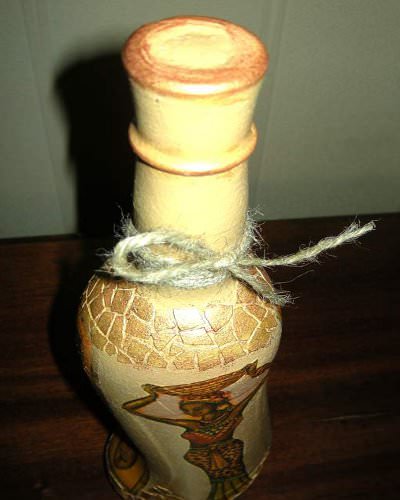
While the paint dries, take care of the lid. Lubricate it with Dragon glue and wrap it with a hemp rope. 
After the oil paint dries, gently wash off the second step of the craquelure under a stream of warm water. The golden cracks have already dried up and have not washed off, they have created the effect of an old surface. 
At the end of the work, decoupage and aging wine bottles, sprinkle with matte aerosol varnish. It will not shine on the surface and will emphasize the dullness of the old bottle. 


And so, if you liked this way to make a gift to a dear person, then you are welcome to look into the next master class on making
Recently, the technique of direct and reverse decoupage has gained particular popularity among needlework lovers. Its essence lies in gluing in a special way on various surfaces cut out of paper, leather, fabric or wood drawings, patterns. With the help of decoupage, craftswomen make amazingly beautiful, original crafts, which can decorate the interior of the house or become a gift. How to master this technique? It is easy to decoupage bottles with tights, the master class of which is given below. Try yourself in this technique, and you will get a lot of pleasant emotions!
Rules for decorating bottles using decoupage technique
Your children will be delighted if you allow them to participate with you in creating unique products with their own hands. These pleasant moments will remain in the memory of the kids and bring you both a lot of joy. Suitable for crafts different materials: fabric, women's tights, shells, seashells, toilet paper, napkins, lace, photographs and more.
And glue, primer, oil, paints, varnish will help to prepare the surface, fix and give the necessary shape and background to the decoupage elements. Using this technology, you can decorate a bottle of champagne, wine, cognac, martini, a plastic or clay flower pot, a vase, a glass jar. If you are going to make crafts for the first time using this technique, then in order to avoid some mistakes, check out a few decoupage rules.
Decorative products made using this technology should turn out to be as contrasting and bright as possible. It is important to choose a plain surface for sticking pictures and decorate it with bright, color-saturated elements. For creating original decoration any bottle is suitable for the interior. When making this craft, consider the following recommendations:
- For decoupage, take a container of a simple shape, because it will not be easy to work with a non-standard one.
- If napkins are used in decoupage, then a pattern is first cut out of them, and then the top layer is separated and then glued.
- For gluing fragments to the surface, it is best to use decoupage glue. However, instead of it, ordinary PVA, diluted with water, is suitable.
- The drawings are glued to the surface of the object smeared with glue and leveled to avoid the formation of wrinkles.
- When the bottle processed using this technique dries, it is opened with a special decoupage varnish.
- After completion of work, the craft, if desired, is tinted acrylic paint, decorate with ribbons, beads, shells, sparkles, bows.
Step-by-step master classes on decoupage bottles with nylon tights
Before starting decoupage work, the bottle is prepared. To do this, it is soaked in warm water and then cleaned of stickers, dirt, glue residue. The washed glass surface is degreased with alcohol. This step must be done, because otherwise the layers applied to the glass will not last long. Next, use acrylic varnish. They cover the surface or elements of the bottle.
Decorating a bottle of champagne "Lady in a Hat" with your own hands
It is easy to make the interior of your apartment more original with the help of an unusual, stylish decor. A hand-made craft in the house will look especially impressive, arouse admiration for family members and guests. To make your own decoupage of bottles with tights according to the Lady in a Hat master class, you will need the following tools and materials:
- a bottle of champagne, a cap from it;
- PVA glue;
- tights;
- scissors;
- glue "Titan";
- canning lid;
- peas;
- spray paint brown, golden color.
Craft manufacturing technology:
- Cut off stockings from pantyhose.
- Soak the nylon parts with PVA glue.
- Put on the stockings prepared in step 2 on a glass container from the bottom up.
- Make a beautiful drapery on tights, dressed on a decorated container, dry.
- Get a canning lid. Put on a small piece of stocking soaked in glue, tie the ends of the nylon fabric at the top of its wrapped element.
- Bend the edges of the hat-cap up, dry.
- From the remnants of the stocking, cut 6 strips, gather each on one side with a thread and a needle and form roses, soak them with glue, and dry.
- When all the blank elements dry out, then it is necessary to glue the “flowers” on the hat and the middle of the bottle with “Titanium”.
- On the top of the glass container, as well as on the “neck” of the dress, stick peas in the form of earrings, beads.
- Glue the champagne cap on the bottom of the "hat".
- Paint all elements, visible parts of the bottle with brown, and then with golden paint.
Decoration of a festive bottle with tights and napkins
If you show imagination and apply the decoupage technique, then unnecessary things can easily turn into an elegant and unusually beautiful decor. So, an ordinary glass bottle and nylon tights, napkins will simply transform into an exclusive stylish decoration of the table, interior, stunning wedding, new year gift, a present to parents for the birth of a child or a beloved man. The instructions below will help you make decoupage. The following items are needed to make it:
- glass bottle;
- PVA glue;
- kapron tights;
- acrylic paint;
- napkins with an interesting floral pattern or lace motif;
- watercolor paints or spray paint.

Instruction step by step:
- Clean and treat the surface of the bottle with alcohol.
- Soak stockings with glue.
- Put the stocking on the bottom of the glass surface and give the material a relief, turn off the upper edge of the fabric a little for a three-dimensional look on the neck, and make the window where the picture will be pasted even.
- Dry the product and cover it with acrylic paint. Dry.
- Cut out a pattern from a stencil from a napkin, separate the top layer and stick it on a glass surface. Dry.
- Paint the surface of the glass container with an aerosol can, except for its part with a picture. Dry.
- Decorate the bottle with decor (butterflies, beads, rhinestones).
How to decoupage a bottle of pleated tights
It is easy to colorfully decorate any glass bottle using the full type decoupage technique. For this fit any nylon tights. This material, dipped in glue, drapes beautifully on a glass container. What form to give to the capron depends on the ideas and imagination of the needlewoman. The surface decorated with this material is painted in any color. Decoupage of bottles with pantyhose according to the master class described below will help turn an ordinary glass container into a beautiful decor item. For its manufacture you need:
- tights;
- glue;
- dye.

Instruction:
- We prepare a glass container by washing and degreasing it.
- We cut off the stockings from pantyhose, keep it in glue, wring it out and put it in folds on the bottle.
- We dry the glued elements for several days, paint with paint.
- Decorate bright elements, varnished.
Video tutorial for beginners on decoupage on a bottle using tights
Anyone can make a beautiful decorative bottle from tights, because it is not difficult and very interesting. In order for a beginner to avoid possible mistakes when performing decoupage, you must first watch a master class on this technique from a real professional. In the video below you will see all the stages of creating an amazing decor using a bottle and ordinary women's tights. Be sure to try to do this craft yourself at home, so that later you can decorate your home with an exclusive thing.
Decoupage of bottles different options(photo)
Decoupage of bottles in different versions (photo)
Now, most needlewomen are fond of decoupage, namely, they decorate various items with paper appliqué. And, to be more precise, the decorations are made from special decoupage napkins, which are sold in a wide range on the shelves of specialized stores designed for needlework. Decoupage technique is done on many things made of wood, metal and plastic. But, the most popular is decoupage on glass, or rather decoupage of bottles.
Every housewife will always have an empty glass container, for example, jars for bulk products, intended for throwing into the trash, from the prescription of use. Do not rush to do it yourself. You can try to remake a completely unnecessary little thing into an interesting vase, which, in the future, will decorate your interior, for example, in a marine style. Especially when author's ideas are much more valued than factory decoupage on glass. 


Not only used alcohol bottles are subject to decoration, but also other glass objects that have lost their appearance. Decoupage of a vase will be very relevant.
Bottle for Women's Day
If you don’t know how to make decoupage on glass on a champagne bottle for the 8th of March holiday, then the presented master class and instructions tell you how to decorate and create decoupage bottles with your own hands.
Prepare a bottle of champagne by washing off all the labels. Then, degrease it with alcohol or window cleaner. Now, you should paint the bottle with acrylic light paint, in several layers, as shown in the photo. 

Select
, from which you can make a figure eight for the holiday of the eighth of March. Cut out the circles and make them in pairs. 

Take acrylic-based paints, mix them to get a delicate shade of salad color. Thus, we will make a non-traditional bottle background. Apply this paint with a washcloth to the entire surface of the product. The bottle will turn out a beautiful spring shade, as shown in the photo. 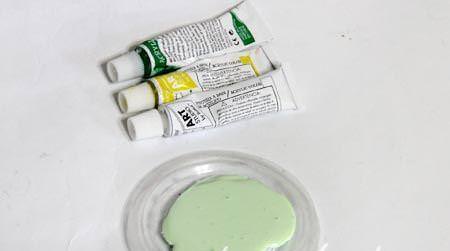


Now we do the usual decoupage for beginners. Attach the cut out circles from the napkin to the bottle and anoint them with decoupage glue. After the glue dries, we can assume that the master class is over, but that's not all. It is necessary to decorate the ornament with an acrylic outline or glitter, circling them around the picture, as shown in the photo. 


In the center of the bottle, make an inscription by the eighth of March, it will come in handy. When the green glitter dries, it will shimmer beautifully. Cover all the work done with acrylic varnish, which will give an incredible shine. Now, a festive bottle of champagne is ready to decorate the table on the eighth of March. On the video you can see how the vase is decoupage. 


Video: Decoupage glass vase
Decorate the bottle with egg shells
Decoupage technique for bottles finished eggshell, you can safely give to your friends or relatives. Since such work looks original and beautiful, having acquired three-dimensional view. For work you need the following accessories:
- wine container;
- alcohol;
- eggshell;
- napkin, decoupage glue and brush;
- priming.
Rinse the bottle well under running warm water so that the labels can be easily removed by hand. Then, the entire surface is degreased with alcohol or washing liquid. 

For primer, acrylic paint is perfect. Apply it to the bottle using a dish sponge. Leave the product for a large number of drying time as shown in the photo. 


To make the layer look more even, apply another tier of paint, as shown in the photo. Using a sponge will help get rid of streaks. This time, it will take about 30 minutes to dry. 

And at this time, it is necessary to continue the eggshell master class and start cutting out pictures from napkins in the decoupage style. Put the pictures on a stationery file and blot them with water. With meticulous movements, place it on the main part of the bottle. The following manipulations take place in the same way as for beginners, using glue and brushes. The blank remains to dry for one day. 

Decoupage with eggshells begins with the manufacture of the base material. Rinse the shell under water and dry. Lubricate the entire plane of the bottle with glue and lay out the shell in the form of a mosaic with tweezers. The eggshell ornament will be made on two sides, and in fact, the upper and lower parts of the bottle. After a break of 20 minutes, apply the background paint. This decoupage takes on a voluminous look. 


The last step is to paint the resulting eggshell areas more dark shade and open with varnish. Now, decoupage on glass, completely handmade. How to make reverse decoupage on glass, in an interesting style, you can see on the video. 


Video: Making a reverse decoupage bottle
wedding bottle of champagne
Wedding attributes are always given special attention. This applies even to wedding glasses and champagne. Decoupage bottles of champagne for a wedding, you can do it yourself. An example that presented a master class with step by step photos, great for beginners, using a postcard or picture. Prepare the following materials:
- champagne;
- pictures or postcards;
- acrylic based varnish;
- acrylic paint;
- washcloth.
Remove all labels from the glass bottle by soaking it in water. Then, degrease the surface with alcohol. Paint the product with primer. The master class involves the use of postcards. Cover it with acrylic varnish and dry. Now, peel off the top tier of paper and cut out a suitable motif. 


The bottle is smeared with glue, and the selected pictures are applied on top. Gently smooth the drawing to avoid bubbles and wrinkles.
It is necessary to dilute the paint, which, in your opinion, matches the color of the bottle. Draw a darker outline with the brush. Dip the foam washcloth into a light tone of paint and create a haze by smoothing the edges of the image. 


Now, it remains only to paint the veins in silver using an old brush and draw the details. The final touch is varnishing the entire surface of the champagne. Decoupage of a bottle of champagne for a wedding, successfully done. This craft will perfectly decorate wedding tables. A master class on how to decoupage bottles with a cloth, watch the video below. 

Video: Cloth bottle decor
Bottle decoration with tights
In order to implement such an interesting and voluminous master class, and create glass decoupage with pantyhose, you will need the following list of materials: a bottle, craquelure, alcohol, pantyhose, PVA glue, acrylic varnish and napkins, as well as
, washcloth and acrylic paint.
Take the bottle and degrease it using alcohol. Take nylon tights and dip them completely in the glue solution. Then, stretch them over the item to be decorated and form folds. Napkins are also impregnated with glue, you need to make flowers out of them. Drying time is one or two days. 

After that, the product is covered with black paint based on acrylic. Let dry for a while. Choose the picture motif you like and apply it to the bottle, covering it with several layers of glue. Don't forget to take breaks between layers. 
Wait for it to dry, and boldly apply golden acrylic paint with a washcloth, painting over black. Next, the craquelure is applied with a synthetic brush, and after four hours, the second layer is being adjusted. When another two hours pass, and you will see how the craquelure turns into cracks. Using a bituminous patina, we make the effect of aging crafts by overwriting cracks. The final touch that appears after using the craquelure is the application of acrylic varnish to secure the creative work. 

Toilet paper decoupage
Decoupage on glass with toilet paper begins with the preparation of accessories:
- bottle or jar for bulk products;
- toilet paper;
- acrylic based paints;
- napkins;
- glossy varnish;
- scissors;
- brush, PVA glue and washcloth.
Prepare a bottle, and if you want, you can use several cans, after wiping it with alcohol. Cut out suitable miniatures from the napkin. From toilet paper cut out small squares. To apply glue to paper, you need a thin brush. Now, evenly attach the cutouts to the bottle, as shown in the photo. We leave it to dry. 


Toilet paper is very thin, so paint it with acrylic paint white color. Large pictures are glued in the central part of the bottle, and small ones on the cap. 

After everything is dry, cover the entire light part of the bottle with acrylic paint. of blue color. The next step is painting. golden color, with drawing it on a washcloth. 

Twist from a napkin, thin bundles and paint them in gold. When they dry, you need to make an ornament out of them and stick them on the bottle. After that, the entire surface is varnished. Decoupage of a glass bottle, safely made with your own hands, toilet paper. 

Craquelure in decoupage bottles
The next master class for beginners will teach you how to use craquelure when working on crafts. We wash all the tags from the bottle and degrease it with alcohol or nail polish remover. We prime the container with white. 


Now, you need toilet paper, with which we will decorate the bottle. Wet the paper in glue and attach it to the bottle, making small folds. This procedure must be done very quickly. After that, the craft will take on a three-dimensional look. Tear out a suitable motif from a decoupage card and glue it on PVA glue. The photo shows the result. Leave the bottle to dry for about 6 hours. 


Take acrylic paint of the same color as shown in the photo. Apply it on the surface, but not on the whole, but in parts to make the craquelure more spectacular. Apply craquelure and wait for about two hours. Then, cover the product with light acrylic paint. Paint over those metas where the toilet paper lies, also in white. 


After drying, the bottle is covered with a finishing varnish, as shown in the photo. Volume master class on this, ended. If you want to learn how reverse decoupage on glass or decoupage of bottles with napkins is done, we suggest watching a video showing work on a nautical-style bottle. 

As you can see, the instruction and master class for decoupage of bottles, as well as jars for bulk products, is simple and interesting. It will be clear even for beginners. The variety of master classes and even voluminous ones will let your imagination fly.
Unique design elements have always been valued for their special character, inimitable appearance, exclusivity. Decoupage of bottles makes it possible to create stylish and outstanding decor items with your own hands that can demonstrate the unique sense of taste of the owner of the apartment, his creativity. How to make bottle decoupage at home, and what design options are the most popular - read the article.
Decoupage can be done by hand on absolutely any containers, regardless of their material, size and shape. Both glass bottles from alcoholic beverages and containers for the manufacture of which metal was used (for example, flasks) are suitable for decoration.
Decoupage of glass bottles has several characteristic features:
- The surface of the bottles must be prepared before registration: labels and glue are removed; irregularities, if any, are sanded; the surface is thoroughly washed, dried and degreased with alcohol, acetone, a special agent.
- For the first layer of decoupage on glass, a primer is always used, which guarantees maximum adhesion of the surface with applications, allows you to use any colors and materials in the design.
- Applications are attached to a dry surface, and the glue is applied from the center to the periphery. As applications, blanks for arts and crafts, drawings cut out from magazines, newspapers, books, etc., napkins, printed pictures, stickers, stamps, etc. can be used.
- The finished product is covered with a finishing varnish-fixer for arts and crafts.
- Sometimes the surface is polished with wax.

Decorations for decoupage of bottles can be very different: you can decorate the glass of the bottle with both traditional rhinestones, sequins, glitter, colored threads, etc., as well as non-standard materials (sea salt, pasta, dried flowers and dry grass).
Why use decoupage on bottles
Decoupage technology allows you to make a beautiful and unique decor element at home: decorated bottles can be used as a vase for flowers, a special container for storing holy water, an original vessel for olive oil.
Decorated bottles of champagne brought to the registry office for painting, in honor of the newborn's holiday, to discharge the child from the hospital, etc. create an appropriate festive atmosphere, and containers decorated in a certain theme are great gift for a professional holiday!
In addition, a decoupage bottle is perfect for congratulations on your birthday, anniversary, state and professional holiday. The main thing is to choose the right decor.

For decor gift bottle for the day of the border guard, as a decor, wood, drapery with fabric in military colors can be used. On the day of the fisherman, you can give bottles decorated with ropes, twine, applications with ships. For New Year's bottles, napkins with the image of Santa Claus and the Snow Maiden, decor with artificial cones, etc. are suitable. For the design of wedding bottles, kanzashi will be an ideal decor element.
Decoupage of bottles with your own hands: how to get growths
Often, volumetric elements are required for decoupage of a bottle. You can get growths on bottles in various ways. The best is with polymer clay. This method makes it possible to obtain a solid, convex element of any shape. Clay decorations are attached to decoupage glue, “Second”.
When working with polymer clay should be used special agent to soften, bake the material in the oven at 130 degrees.
Volumetric patterns on the bottle can be made with ordinary putty by filling an empty PVA tube and squeezing the material along the contour of the desired pattern.

After drying (about a day), the putty must be sanded: in this way, all irregularities and sharp edges are removed.
You can get voluminous details of the decor with the help of improvised means. For example, growths on a bottle can be made salt dough or pasta. The dough is kneaded from flour, glue, water, vegetable oil. Pasta is glued to the surface and painted in desired color.
Master class on decoupage bottles "houses"
With the help of growths, bottle-houses are decorated. In addition to the options described above, volumetric elements can also be made using foam (food packaging is suitable). In addition, for decoupage of "houses" you will need ice cream sticks, acrylic paint (for walls and roofs, windows and doors), metal pendants, PVA, primer, brushes.
To make a "house" you need:
- Prepare and prime the glass, paint the areas under the window and the door with black acrylic.
- Cut out foam bricks for walls, tiles, windows.
- Stick the cut out parts on the bottle using PVA (when using the “Second”, the foam shrinks), leaving room for the door.
- Install the door by gluing cut ice cream sticks to the surface (in this way, you can “install” a wooden fence by gluing sticks to foam bricks).
- Paint the elements with acrylic, not forgetting about drawing the hinges on the door, handles.
- Coat the bottle with varnish, rub the desired places with pigment and re-open the product with a fixative.
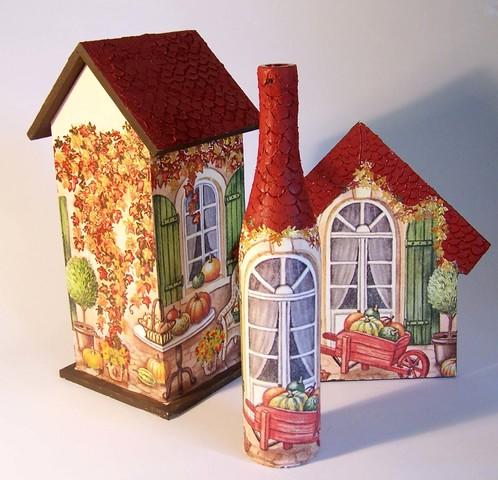
The same master class can help you make a bottle lock. Decorative elements and colors, in this case, should imitate a natural stone, which is used for laying real castles.
You can leave on the surface of the bottle areas that are not covered with a primer as "windows" through which you can "look" at the contents of the bottle.
How to decoupage bottles with leather
Leather can effectively decorate both an ordinary rectangular bottle and a “pot-bellied” jug (leather can create exquisite folds on round, large containers that are perfect for antique-style decor).

Decoupage with leather begins with standard preparation glass surface(cleaning, degreasing, priming). Then the surface is covered with leather, pre-impregnated with PVA, forming a relief with your fingers. When working with leather for the first time, it is better to cut the material into pieces and apply one by one: this method is quite simple, it will be more convenient for an inexperienced master. Working with a whole canvas is more difficult, but gives a cleaner and more accurate result. Upon completion of decoupage, the skin is tinted in the desired color, varnished.
How thinner skin, the easier it is to create a different relief on it.
How to decoupage a cognac bottle using rice paper towels
For cognac bottles, decor with rice napkins is perfect. To do this, we need a primer, a pigment to match the background of a napkin, a file, PVA, napkins, stamps or stickers, brushes, a fixative varnish.
To issue a bottle you need:
- Prepare the surface (clean, degrease and coat with a primer).
- Apply to file rice napkin image inside, lightly dampen a cloth with water and place the image on the bottle.
- Remove the file and cover with PVA napkin. In this way, completely decorate the bottle.
- If necessary, add decorative elements (stamps, stickers, etc.).
- Cover the product with scuba.
- After drying, apply the pigment to the protruding parts of the bottle.
- Cover the product with a fixative.
.JPG)
Such decoration is also suitable for small bar bottles, but for anniversary bottles of cognac, a more spectacular decoupage technique with an abundance of decorative elements is suitable.
"Lady in the Hat": decoupage of wine bottles
Wine is the favorite drink of women. Therefore, the design of a bottle of wine in the style of "Lady in a Hat" will be appropriate and outstanding.
The main element of this decor is a cap on the cork of the bottle, which is done as follows:
- Cardboard is taken, from which the crowns of the hat and a circle with a hole for the cork of the desired diameter are cut.
- Elements are glued and framed with satin ribbons different size. The tapes are applied to the surface smeared with glue.
- The hat is optionally decorated with feathers with beads, roses, etc.
.jpg)
Depending on the style of the hat, the bottle itself is also made out. Most often, decoupage is performed using a fabric: a fabric pre-soaked in a PVA solution with water (proportion 1: 1) is laid out on the prepared surface of the bottle, while forming graceful folds. After drying, the fabric is covered with glue several times and dyed in the desired color. This design looks most impressive on a round bottle.
Unusual bottle decoupage: master class
Decoupage of a violin-shaped bottle can become original and unusual. The layout can be done as classical style (brown colors“under the tree”) or in country style (pastel background, roses on the surface of the “violin”, etc.).
One way or another, for such decoupage, it is necessary to have a primer, acrylic paint of several colors (for the background and drawing elements), thin and thick synthetic brushes, aqualak (matte for country music and glossy for classics), contours for modeling protrusions on the violin. If necessary - decorative elements (napkins, pegs, neck, etc.).

Decoupage is carried out according to the standard scheme: glass preparation, priming, applying the main background, decorative elements and fixing the effect with varnish.
This bottle will perfect gift for a girl, an original copy in your own hand-made collection.
Ideas for decoupage bottles
Depending on the type and purpose of the drink, you can use different kinds decoupage. So, wedding champagne can be decorated with photographs of the newlyweds, and New Year's bottle- decorate with semolina, blue or white sea salt. For lovers of the culture of the East and adherents of ornaments, dot decoupage is suitable, and for admirers of the classics - decoupage with toilet paper and dark acrylic paint with a drawing of “marbled” protrusions.
Decoupage ideas can be gleaned from needlework forums, groups in contact.

Bottles of vodka, due to the transparency of the liquid, are perfect for decorating “with a window” (tutorials on how to make such decoupage can be found on YouTube). A bottle of wine can be decorated with artificial grapes. Decoupage of beer bottles can be done in the "Beer shop" theme (millet with millet, illustrations of beer barrels, wooden mugs, etc.).
Decoupage in a pirate theme will be ideal for decorating a bottle of rum. It will be possible to decorate such a container sea shells, coins, application on which a country or continent is depicted in the form of a map, compass, etc. The most effective will be the decoupage of a pot-bellied bottle using grout. Whiskey bottles can be decorated with red and green plaid textiles, Jack Daniels labels, illustrations for Conan Doyle's novels about a popular detective, pictures with bagpipes, the coat of arms of Scotland, etc. can act as applications.
The original bottle decoration can be bought in arts and crafts stores or online stores (such as, for example, "Crafts Fair").
Bottle decoupage master class (video)
Bottles decorated in decoupage style are a creative and unusual gift for a birthday, anniversary, professional or international holiday both man and woman. Such a present the best way will be able to emphasize the solemnity and uniqueness of the event, because the decoupage of bottles has no framework and restrictions. The main thing here is the originality and originality of the idea!
The direction of Decoupage is somewhere in the middle between Hand-made and art. The word decoupage came to us from French and literally means "cut", but in fact is a kind of application. It is based on the technique of sticking various patterns on paper, napkins, fabrics on hard surfaces. Decoupage is actively used in decorating art, techniques are actively developing, the list of materials used and objects that are used for decoration is expanding.
Passion for this technique has become rampant in recent years, more and more people are addicted to this type of creativity, bring their ideas. On this moment there are entire schools that, on the Internet, and not only, are engaged in promotion and education.
Decoupage bottles photo
During the formation of decoupage in Russia, one of the first items that literally all masters began to decorate was bottles of wine and champagne. Particular attention was paid to bottles with a non-standard shape and three-dimensional texture. They were not thrown away, but turned into real interior decor.
They use various materials and techniques for decoupage bottles - napkins, putty, decorative elements, or in general, everything that was at hand.


What you need for decoupage, a list for beginners
As mentioned above, there are a lot of performance techniques in decoupage, while they are actively developing - new materials, techniques and directions appear.
But still, there are main directions that we will give:
Classic decoupage - sticking a napkin, decoupage cards, rice paper on a flat hard surface;

Artistic decoupage - differs from the classical one in that artistic techniques, drawings, painting, aging and more are added to the main image;

Reverse decoupage - sticking a picture on the back surface of a transparent base;

Volumetric decoupage - when decorating, various volumetric pastes, putty and decorative elements are used.

In order to work in certain techniques, a set of materials is required - different in each specific case, but there is a necessary set that any novice craftswoman should have:
Napkins, rice paper, decoupage card- the necessary components for almost any technique, the basis of any composition. You can now buy these materials at any art store, stationery store, or online. You can use regular table napkins if you find interesting and good quality images with a suitable subject.

Sandpaper- should always be in the arsenal for polishing surfaces, as a rule, there should be several types of granular - medium and fine, since there are several stages of polishing.

Alcohol or any alcohol-based surface degreaser, nail polish remover can also be used.

Primer- a special acrylic material, applied as a base for decoupage for good adhesion to the surface.

Acrylic paints- in decoupage, only acrylic materials are used, this is due to the fact that they dry quickly and are easy to apply. It is better to have a range of colors in the arsenal, as they are often used for painting.

Glue for decoupage- as a rule, it is acrylic, but ordinary PVA household glue is widely used.

Acrylic lacquer- there are many varieties of acrylic varnish - matte, glossy and chameleon. Many needlewomen use ordinary high-quality acrylic lacquer, but for beginner craftswomen it is recommended to use professional decoupage lacquer.

brushes- Synthetic brushes, mostly flat, have the greatest use in decoupage. Sizes may vary as they are used for different purposes.

stationery file- in some cases it is used for gluing a napkin.
Scissors- are used when cutting out images, many craftswomen use manicure.
Roller- a small construction roller is quite suitable, it is used to smooth the pasted image.

Stack- This is an artistic tool, very good for mixing paints.

What varnish is needed for decoupage
One of the most important materials is decoupage varnish; the overall result often depends on it. As a rule, varnish is applied at the very end to secure the image. The quality and composition of the varnish also affects the final appearance.

Varnishes are divided into several types according to composition and purpose (decorative and finishing).
Acrylic lacquer- the most popular, it is non-toxic, odorless and non-flammable, as it is water-based. Due to its composition, it dries quickly and does not turn yellow over time.
Acrylic lacquer used not only as a finish, but also as an intermediate - to fix the next layer. Intermediate varnish is further used as a basis for further decor.
Due to its wide compositional possibilities, there is a line of varnishes with decorative effects.
In order to be fully equipped, take care of the availability of several types of varnish in your workshop - ordinary acrylic (matte and glossy) and finish.
What glue is needed for decoupage
For decoupage, acrylic glue is mainly used. Art stores sell special glue for decoupage, it is sold in small jars and is quite expensive.

Most brands specializing in the production of goods for applied arts have glue in their lines. In addition, most professional craftswomen actively use PVA construction glue of various brands.

If you are a novice crafter, it is better to use professional glue, but if you do not have the opportunity to purchase glue in an art store, we will talk about the most important characteristics of the glue that are necessary so that it can be used in decoupage work:
- Colorless on drying;
- Medium consistency;
- Should not dry out quickly;
- Should not turn yellow over time;
- Should not have an odor.
Decoupage of bottles with napkins step by step, master class
If you have a desire to diversify your interior, we suggest decorating an ordinary glass bottle. It can be used as a decorative piece of furniture, or as a vase.

To decorate the bottle with napkins, you will need:
- The bottle is glass.
- Decoupage napkin or card, rice paper is also suitable, the pattern can be any.
- Alcohol, vodka or solvent for degreasing the surface.
- Acrylic paint.
- Decoupage glue or PVA glue.
- Acrylic varnish.
- Brushes, sponges (you can use a dish sponge), scissors.
The bottle must first be prepared - cleaned of labels and degreased the surface.


Before gluing the napkin, we will make the background with acrylic paint. Make the background color at your discretion, as long as it matches the pattern on the napkin. Dilute the paint for the background with water so that it turns out to be translucent like a haze. For relief, make several layers. Leave the space for the drawing unfilled.

You need to cut a pattern out of a napkin, but you can simply tear it out with your hands. Separate the bottom two layers of tissue paper.

We apply a napkin to the surface remaining under the drawing and coat it with a layer of glue on top. Try to expel the bubbles and gently straighten the folds. Let the glue dry. Try to work carefully as the napkin is very thin and can easily tear.

Now you need to fix the picture, for this you need to cover the bottle with a thin layer of acrylic varnish.

After the first layer of varnish dries, you can give the bottle an aged look. To do this, dilute black or other dark paint with water and splatter with an old toothbrush. It is better to practice on an unnecessary surface first. It must be borne in mind that when sprayed, the paint can scatter in all directions, so it is better to do this over a basin or bucket, no matter how dirty everything around.

After the paint dries, apply two more coats of varnish.

As a result, we got a full-fledged piece of furniture from an unnecessary bottle.
Decoupage of bottles with do-it-yourself tights step by step with a photo
Volumetric decoupage- one of the most popular techniques, for its implementation various auxiliary materials are used to create volume. Texture is achieved by decorative staining with contrasting colors.
We offer a master class in which ordinary women's tights act as a material for creating volume.
Materials used:
- Glass bottle with screw cap.
- PVA glue.
- Nylon tights.
- Glue thermogun.
- Peas.

Cut off the stocking part from the tights.

In a deep container, fill with glue and soak.

Put on the bottle and form a drapery, leave to dry.

For a hat, use a metal cap. Put a small piece of stocking soaked in glue on the lid. Connect the ends and twist on top of the lid. Curve the edges of the cap to create the shape of a hat and leave to dry.

Cut strips from the stocking part of the tights.

Collect on a thread each strip.

Form roses.

Saturate the roses with glue and also send to dry.

Glue dried roses on the dress and on the bottle.

Glue the bottle cap to the bottom of the hat.

Glue decorative elements in the form of beads and earrings.

Paint the finished composition with spray paint, first brown and then gold, while painting only protruding parts with gold paint.

Decoupage of bottles with paper master class
Another available material for decorating a bottle using decoupage technique is toilet paper. With its help, you can create any volumetric elements.
You will need:
- The bottle is glass.
- Degreasing liquid - alcohol, solvent, etc.
- Any PVA glue.
- Foam sponge.
- Stationery clip.
- Synthetic brush.
- Sponge with large pores.
- Toilet paper.
- Napkins.
- Acrylic paints.
- Acrylic varnish.
Clean the bottle of labels and degrease with an alcohol-based compound or a tissue.

Prime the surface with white paint or a special primer, do not paint over the neck yet. Let dry.

Attach a napkin to the bottle and cover with glue, try to gently smooth out all the wrinkles from the center to the edges with a brush.

Cover the rest of the bottle liberally with glue.

Lay pieces of toilet paper textured on the surface covered with glue. Leave the bottle to dry.


After the paper dries well, cover the entire surface of the bottle with varnish.

Paint the bottle with a color that matches the color of the napkin.

Draw a picture where necessary.

Dip a dry sponge into the paint, carefully beat it off and walk through the convex places - this will add extra volume.

Dry the bottle thoroughly again and coat with varnish, you can in two layers.


The original decorative bottle is ready.

Decoupage of eggshell bottles master class
Decoupage with eggshells in the final result is similar to the craquelure effect - aging by simulating cracks in the painting. The difference is that the surface becomes more embossed.

The advantage is that not expensive art material is used as a material, but an ordinary eggshell.
Another plus is that with the help of the shell we can hide various minor flaws in the decorated surface, for example, chips.
Many may have a question - what to do first: stick the shell or stick the napkin. In principle, there is not much difference, act according to the situation. The main thing is if you have already pasted the napkin, before you start sticking the shell - varnish the drawing, because when you stick it, there is a high probability that the glue will get on the napkin - it will get wet from this.
Start by covering a small area of the surface with glue and, as shown in the figure, glue the pieces of the shell. Work on small areas.
Below are step-by-step detailed photos.


Decorating with eggshells helps a lot to hide various inscriptions and therefore I often use it to decorate bottles. If you already have an idea how the bottle or object will be decorated - you can start by gluing the shell, if not - first decoupage, then stick the shell.
After covering the entire surface according to the plan, leave the bottle to dry. This may take a long time, but be patient.

Decoupage bottles by February 23
With a huge number of options for gifts for men by February 23, a decorated bottle is probably one of the most advantageous. You can use the contents and leave the packaging as a keepsake.
We offer several ideas for decorating bottles with holiday symbols.


Decoupage bottles for March 8


Decoupage bottles with cloth and lace master class
Decoupage using textile materials - fabrics, lace - gives a wonderful decorative result. The relief is voluminous and unpredictable. With the help of paints, you can give the effect of aging and antiquity.

Decoupage using fabric is done by analogy with the decor of tights. The material is impregnated with glue and laid out on a bottle in the form of a drapery. See what a great result you can get.
No less beautiful bottles are obtained using lace.
We offer a master class on bottle decoupage.

You will need:
- The bottle is glass.
- Liquid for degreasing of a surface.
- Napkin or decoupage card.
- Acrylic primer.
- Acrylic paints.
- Lace.
- White outline.
- Brushes.
- PVA glue.
Apply primer to the surface of the bottle with tomping movements, having previously degreased it. Dry, a layer of acrylic paint can be applied over the primer.


Glue the lace on the PVA glue.

Cut out additional decorative elements and stick on too.

Cover the lace with acrylic paint.

With an acrylic contour, you need to apply points at the base and on the neck of the bottle.

Paint the top of the bottle in a suitable color.

You can use white paint to tone down the color a bit if it's too bright.

Peel off the top layer of the patterned napkin, tear out the picture with your hands along the edges of the image.

Glue the picture on the bottle with a brush and glue, apply the glue on top of the picture.

On the reverse side, also stick a picture, you can the same.

In order to merge the images, make drawings.

To fix the result, the bottle can be coated with acrylic varnish in several layers.


Decoupage of wedding bottles
Decoupage is widely used in the preparation of wedding accessories, including wedding bottles and glasses.


Decoupage bottles of champagne
When we go to visit friends to celebrate an important event or just to chat, an elegant bottle of champagne is quite suitable as a present, try decorating it yourself.


Material for decoupage with Aliexpress
Materials for decoupage can now be bought freely, there are a lot of offers in retail stores. There are a large number of specialized sellers on the Internet - you can buy any materials in one place - from paints to molds. However, the prices are quite high these days.
Many experienced buyers have long chosen the online store. This is a Chinese store that has combined on its resource great amount Chinese manufacturers.
Napkins
 /category/202001947/rhinestones.html?spm=a2g0v.search0302.109.10.3d5f76fbdxFa27&g=y
https://www.aliexpress.com/wholesale?catId=0&initiative_id=SB_20180506034116&SearchText=%D0%BA%D0%B8%D1%81%D1%82%D0%B8+%D0%B4%D0%BB%D1%8F+ %D1%80%D0%B8%D1%81%D0%BE%D0%B2%D0%B0%D0%BD%D0%B8%D1%8F
engraving on cups cues


