Do-it-yourself postcards for the new year, photo ideas. An original New Year's gift for a guy with his own hands: ideas, descriptions and reviews An original postcard with a Christmas tree with your own hands
2019 is coming New Year and Christmas complete with all the rest winter holidays. During this period, everyone wants something fabulous and unusual. And of course, it is nice to please relatives and friends with original and creative gifts, which will display all the warmth and tenderness with which you treat them.
But when on the eve of New Year's Eve you start counting how many gifts you need to buy, you understand that it will result in a pretty decent amount, and this can spoil the festive mood. How to organize everything in such a way as to please everyone (from the closest to colleagues at work) and at the same time not be left with an empty wallet? What can you give your beloved boyfriend or husband on New Year's Eve? What to give mom and parents, and how to be a friend? 26 ideas and master classes how to do it right here!
The answer is simple - we will make gifts with our own hands!
Homemade gifts and crafts for the New Year are not only saving money, but also additional opportunity Get in the holiday spirit. Yes, and receiving such souvenirs is much more pleasant, because they feel love and care.
So forget about Chinese consumer goods and think about what you would like to do. There are many collected here interesting ideas gifts and crafts with your own hands, pick up your taste and go! And almost under each photo there is a link to a master class on how to make such a souvenir!

I've broken down Christmas gift ideas into several categories to make it easier to figure out what and to whom you can give. Of course, the division is rather conditional, because a gift for a sister may also be suitable for an employee, but you will already decide for yourself.
I have grouped mom, sister and friend into one category, which contains gift ideas for girls and women, which will have to be worked on a little more than gifts for just acquaintances. What to give - see here!
No. 1: DIY Christmas candlestick for 2019


No. 2: Painted plate or cup
Food served on a plate of your exclusive design will surely taste even tastier to mom, right? But to make a painting is not difficult at all and does not take much time. A white plate, paints and a desire to make it pleasant will help you achieve the desired result and great gift friend or mother for the New Year. 


No. 3: DIY New Year's vases
A vase is not only a flower stand, even without them it can decorate a room as a decorative element. Behind beautiful vase in the store you will have to pay quite a lot, and in the master classes at the link below, 6 ways are described how to turn ordinary banks (which everyone will surely find at home) into original handmade vases.


No. 4: Champagne decor for the New Year
What is New Year without champagne? So why not add a bottle as a decorative element? Paint your champagne bottles and get interesting gift for friends, the link is described :


No. 5: Christmas decorations
Each toy on the Christmas tree has its own story, some have been left since childhood, another was bought at the New Year's fair, the third was brought as a souvenir ... Make a toy with your own hands and replenish the history of the Christmas tree for loved one. There are many options, one of them is to decorate the cones and attach threads to them.


TIP: To make such a ball: take a stencil, fix it with tape on the ball and paint it with spray paint
2019 is the year of the pig, so any symbolism with pigs will be appropriate. Like an idea simple toys for a Christmas tree in the shape of a pig!


No. 6: New Year'skitchen potholder
New Year and Christmas is a period of not only celebrations, but also preparations for them, including kitchen ones. Everyone wants to force the table as much as possible big amount delicious meals. Many hours are spent near the stove to make sure everything is perfect. And even such a small detail as Christmas tack for hot instead of regular, can make the cooking process much more enjoyable.

Of course, he sits down and completely sews a potholder from beginning to end, especially if there is no sewing machine, not everyone will want to. But when stealing a ready-made one is quite simple.
How to do:
- Select in shop usual tack and in addition, buy a few colored ribbons, and wash the ribbons at home, making beautiful assemblies.
- It does not take a lot of time, but will save money, because by the New Year the prices for all things "gift" and "ordinary" may differ even several times. Yes, and getting such a potholder is more pleasant than a ready-made store.
#7: Mom's Painted Kitchenware
Make the process of cooking more vivid and enjoyable. Buy a regular wooden kitchen utensil set and paint it with a special permanent paint - your mom will be delighted with such a gift.

No. 8: Photomagnets
Family photos can be viewed not only in an album or frame, put them on the refrigerator! Instead of doing it to order in a photo studio, buy magnets yourself, print photos and glue them together. 
#9: Coffee scrub for a friend
During the winter and New Year holidays, there is additional time for yourself, you can take care of your body and help it move away from working days. Make a scrub for yourself and your girlfriends, the quality and naturalness of which you will definitely be sure of - it's just great new year gift for a girlfriend.


Ingredients:
- 1 cup ground coffee
- 1/2 cup brown sugar
- 1/4-1/2 cup almond oil (the more, the thicker the scrub will be)
- 1/4 teaspoon vitamin E (oil)
- 10 drops essential oil orange (optional)
Mix the ingredients in a small bowl and the scrub is ready. Store in an airtight container and use within 2-4 weeks.
No. 10: Sewing kit
Every girl in the household should have a sewing kit: either sew on a button, or sew something up. Probably, this activity does not cause much enthusiasm, but it can be made more enjoyable.
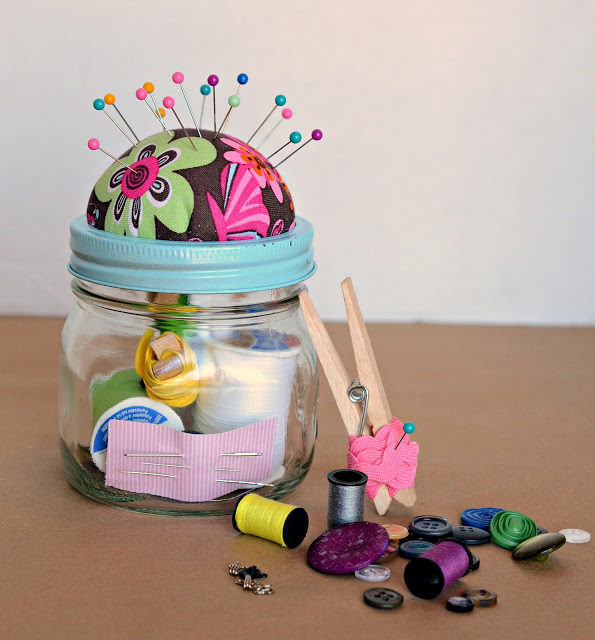
Put the necessary sewing accessories in a beautifully designed box and sewing will not be such a boring process with it.
#11: Handmade soap
Make soap in exactly the scent, size, and color you like. Surprise your friends and make them happy.

house key holder
A key holder or small key hanger is a great gift for family or friends. It is not necessary to buy it -!


Gifts for friends/employees and colleagues for the New Year 2019
What to give colleagues and friends for the New Year holidays? The answer is simple: sweets, postcards, Christmas decorations and small crafts - all this you can do quickly yourself. See ideas!
No. 12: Sweet New Year Gifts
Since childhood, we have become accustomed to sweets under the Christmas tree. This is probably the most versatile gift you can think of, because both children and adults love sweets. And if you present them to interesting packaging, will be even more pleasant. 

You can make a jar of sweets as follows:
- Take small jar(preferably some non-standard shape) and paint it to your taste. You can paint the glass or the lid, tie it with ribbons.
- Fill with jellies, marshmallows, small meringues, chocolate chips, whatever you like. Put it all in a jar in layers.
As an option, you can make a “jar of healthy goodies”, instead of sweets, place different types nuts, dried fruits, candied fruits - why not great present for colleagues at work for the New Year.

No. 13 New Year's bouquet of sweets or sweets
It is always a pleasure to receive a bouquet even for the new year, and it is also edible! The financial costs for such a bouquet are small:
- a dozen candies
- wrapping paper
- box or jar for the base of the composition.
Design options New Year's bouquet mass - see the photo and choose what you like! 


No. 13: Potholder for a cup / glass
For those who like to take coffee or tea with them, give a small homemade tack. With it, they will be able to run about their business with a hot drink in their hands, without burning them at the same time.

Idea 14: Christmas Bottles - Reindeer
Fluffy wire, decorative eyes and spout - and ordinary bottles turn into real ones Christmas reindeer! This gift is perfect for a large number people at once, for example, colleagues at work, when it is unprofitable to give something to everyone, and treat it with a bottle.


No. 15: Knitted cell phone case
A phone is a thing that is constantly in front of our eyes. So even such a detail as what kind of case he is in can affect our mood. And if donate homemade knitted case , the recipient will remember you every time they use it.

No. 16: Linen candy bag
An important role is played not only by the gift, but also by how it will be packaged. Small homemade bags are perfect for showing that although the gift is small, your efforts and time have been invested in it.

No. 17: New Year's sweets - gingerbread
At New Year's time, it's time to drink an hour with gingerbread. Perhaps you have your own special family recipe, if not, then there are many detailed cooking options on the Internet.
If you make them in the form of snowmen, man or gingerbread men, then you get small delicious New Year's gifts. You can pack each in a small gift bag and please your friends.
Another option is to attach a ribbon on top of the gingerbread to hang on the Christmas tree as a toy.


No. 18: Postcard Happy New Year
To show how sincere and warm your wishes are, write them on a handmade postcard. Fold the card in half and decorate it drawings, applications, ribbons as fantasy dictates.


You can make a small format with a hole in the corner so that you can hang it on the Christmas tree.
Gifts for boyfriend or husband
There is a stereotype that men are given socks, shorts, shampoo and everything for shaving for all holidays. Destroy it and make something interesting with your own hands, show your love and care.
What to give your beloved boyfriend or man in new year's eve? Certainly useful and practical gift made by you, for example, a cover, a pillow notebook - more ideas below.
Idea 19: "Snowball"
Snow globes are especially popular among small souvenir gifts; they are scattered from shop windows.

To do this at home you will need:
- jar,
- artificial snow,
- small artificial Christmas tree (or snowman figurine, house)
- glue gun.
How to do it: Attach the figurine to the lid of the jar (or to the bottom, but this is harder, since you have to drag your hand into the jar), artificial snow to the lid and to the bottom.
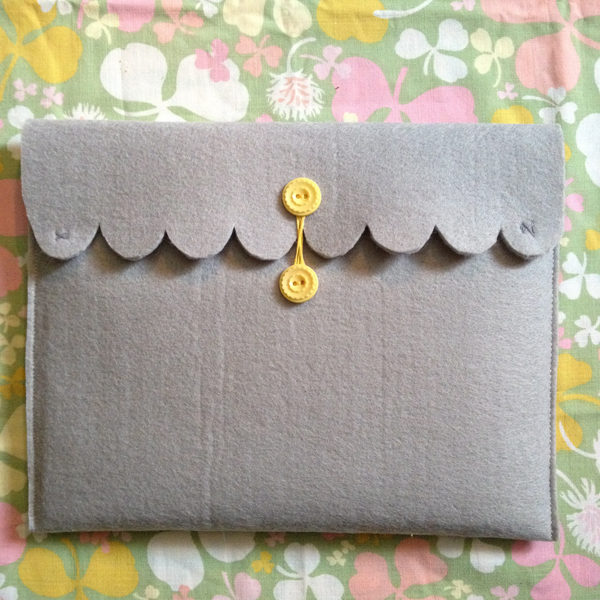
No. 20: Tablet Case
If you buy felt or felt and sew a tablet case yourself, you get good gift with great savings. You can do this as sewing machine, and manually, since there is little work.
No. 21: Floppy Notebook
Diskettes have long lost their value as information carriers, they have ceased to be used, replacing flash drives.

But, probably, at home in boxes or boxes that you have been planning to clean for a long time, you can find a few pieces. And finally, they can find a use.
- From two floppy disks and about 50 sheets of 9x9 cm, you can make an original notebook, almost certainly no one else will have this.
- All you need is pierce the leaves with a hole punch and connect with floppy disks with a ribbon.
No. 22: Hand-painted pillow
A very simple, pleasant and cute gift that will definitely impress your husband or boyfriend. Required:
- ordinary pillowcase
- fabric marker
How to do: We take a stencil with a picture, transfer it with a pencil to a pillowcase. And paint with a special marker on the fabric. We iron through the fabric - your New Year's gift is ready.

Idea 23:Picture frame
To make family photos look even better, place them in a beautiful and original frame. self made. Buy the most ordinary and cheap picture frame and decorate it to your taste. This will require a glue gun.
Second option: just hang the photo on a twig. In this case, it is better to attach the photo to the tape with silicone glue.


No. 24: Chocolate tree
Almost everyone has a real or faux Christmas tree. It creates a mood, spreads the spirit of a fairy tale. But sweets also do all this, so I think a gift in the form of a chocolate Christmas tree would be a good addition to it.

Christmas gifts for children
If you have a child or are going to visit friends who have children, you should definitely have a gift for them too. Indeed, at this age, the New Year is not just a weekend, but a real fairy tale, the expectation of miracles. And so what can you do with your own hands.
No. 25: Chalkboard
Such a board is a wonderful alternative to notes - reminders, which are so difficult to find at the right time. It can be used not only by children, but also by adults!

- On it you can write shop shopping list or things for tomorrow.
- Also she can be part of the interior, for example, make a drawing and periodically change it, depending on your mood.
- For children, this is an opportunity to develop their Creative skills, without spoiling the wallpaper in the apartment (which is very important for their parents).
You can make a board yourself.
No. 26: Chocolate Snowman
Such a chocolate bar as a gift for the New Year will be twice as tasty as usual, that's for sure!

How to do:
- Wrap a chocolate bar (or a small rectangular box sweets) white paper You can attach it with glue or double sided tape.
- top of the package, about a quarter, wrap knitted fabric cheerful colors. Easily attached with a glue gun.
- Tie the ends of the jersey protruding above the package, thin ribbon from the same fabric, trim, make a fringe - the hat is ready. Tie another thin piece like a scarf.
Pre-New Year's mood is quite simple to create, because everything lies in the little things. Try to make wonderful cards for the New Year with your own hands, it's very fun and easy, such an original gift will be appreciated by friends and relatives. We invite you to familiarize yourself with several master classes on creating postcards, turn the proposed ideas into reality.
Master classes
Mini-album-postcard "Herringbone"

What is necessary:
- Pastel paper;
- Corrugated cardboard with an image;
- Double-sided tape;
- Spray paint;
- Cutter;
- Rhinestones;
- Lace decorative (golden);
- Pigment pillow;
- Glue "Moment" and for attaching rhinestones (transparent);
- Ruler;
- Rug mock-up;
- Creasing tools;
- Pencil.

Origami Christmas tree for postcard
Today, scrapbooking postcards have become very popular, the finished product looks bright and very beautiful. We recommend that you familiarize yourself with the scrapbooking master class for beginners.Necessary materials: 5 squares of colored paper measuring 10 cm; 9 cm; 7.5 cm; 6.5 cm; 5.5 cm.
How to do:

- So, you need to take the largest square and add it in such a way that you get a triangle.
- Unfold the square and make exactly the same triangle, bending opposite sides of the cardboard.
- Place an unfolded sheet of cardboard in front of you.
- Fold the sheet along the folds so that you get a three-dimensional triangle.
- Now one of the sides of the figure will need to be bent inward, as shown in the photo.
- In the same way, bend the cardboard on the second side - this is the first module of our Christmas tree.
- In the same way, we add the remaining modules, respectively, their size should be different - from larger to smaller.
- A small piece of tape must be glued to the top of the first module. We place the largest module inside the smaller one and do the same with the rest.
Christmas tree from decorative tape for a postcard
Create wonderful postcards for the New Year 2019 with your own hands is very entertaining, so involve the kids in this process. With children, preparation for the holiday will be more fun.
Requires a minimum of material to work - decorative tape, as well as strips of colored paper.

Manufacturing features:
- Glue a piece of adhesive tape vertically onto a cardboard blank (preferably one-color), the top of the strip should be slightly narrower than the bottom - this is the trunk of the future Christmas tree.
- After that, you will need to cut the tape into strips of various sizes. The ends of the strips should be cut obliquely, imitating spruce branches.
- Stick the strips like a pyramid (from largest to smallest).
Manufacturing instructions:

- Take green colored paper, cut out a circle, cut into two halves.
- Bend the edge of the paper as shown in the photo.
- Now make the next fold in the opposite direction, so bend the edge again and decorate the Christmas tree. Paper craft looks original.
- Glue the "twigs" to the base with a glue stick and you can start decorating New Year's cards with your own hands.
3D postcard for the New Year
Making voluminous New Year's cards with your own hands is not at all difficult, see this on the example of the proposed master class.It is necessary to prepare:
- Double-sided adhesive tape;
- Multi-colored cardboard;
- Glue;
- Scissors;
- Figured hole punch.


Postcard "Christmas balls"
You can make an unusual New Year's card with your own hands in just a few minutes, prepare an excellent gift for your loved ones for 2019.You need to prepare:
- Colored paper in two colors;
- Scissors;
- Stationery glue;
- Pen for writing.

- Before you start making a postcard for the New Year with your own hands, as in the photo, you will need to prepare everything necessary materials and tools.
- Fold the paper of blue color in half for the base, the background made in this way will contrast perfectly with the light blue “balls”.
- Cut out circles from light-colored paper.
- Bend each of them in half.
- Now you need to attach these circles to each other, thus forming three-dimensional balls.
- Glue them on the outside of our postcard.
- Using a pen, draw the threads that "hold" the balls. Now the New Year's card with your own hands is completely ready, you just need to sign it.
Festive quilling card
You can even create beautiful children's cards from quilling, try it, you will like it.You will need to prepare:
- Colored cardboard;
- Colored stripes;
- Glue;
- Toothpicks;
- Scissors;
- Corrugated light paper.

- Take quilling (green stripes), make cuts at the same distance using nail scissors.
- Wrap the prepared ribbons on a toothpick, so you get several hanks, as in the photo.
- Now you need to fix the bottom of the skein with glue and straighten the fringe, you will get voluminous balls.
- Next, we proceed to the final stage of making a postcard for the New Year with our own hands. You should glue the balls on a sheet of cardboard in the form of a pyramid, you get a Christmas tree. Now you can "decorate" it as you wish.
Bright "Christmas tree"
Required:- Paper various colors and invoices;
- Double-sided adhesive tape;
- PVA glue;
- Hole puncher decorative;
- Rope.

- A sheet of colored paper will need to be folded in half, stick a triangle of green paper and a small rectangle brown shade, it turned out a tree.
- Cut out circles of various sizes, then use a hole puncher to make snowflakes.
- Glue all the figures on the Christmas tree, decorate it with beads, then decorate the lower part with an openwork paper ribbon. You can also come up with your own postcard design.
- Wrap the string around the card, then tie a bow. At the bottom you can stick white paper for text.
Volumetric Christmas tree with beads
Necessary tools and materials:- Paper colored with ornaments for scrapbooking;
- Postcard white without drawing;
- Scissors;
- Glue stationery;
- Double-sided adhesive tape;
- Ruler;
- Decorative pins with carnations.

- It is necessary to cut out 12 rectangles from paper, their length should be 10 cm. The width of the smallest is 9 cm, all the rest are 6 mm wider.
- Wrap each of the rectangles on a pencil, so you get tubes.
- Now you need to glue them, the longest one will be at the base, and the short one should be located at the top.
- Glue the Christmas tree to the postcard, decorate with carnations and pins. That's all and ready.
Children's card with fingers
With this method of creating postcards, children get acquainted in kindergarten try doing this at home.

These photos show how you can keep the kids busy and prepare for the New Year, for this you need to prepare paints and paper or cardboard.

Postcards with "potato print"
If you don't know how fun it is to celebrate 2019 year of the pig, then get creative with the kids. This master class demonstrates original creation holiday postcard.You will need:
- Raw potatoes;
- Paints.

How to do:
- Cut the potato in half, dip it in the paint, make an imprint on the cardboard.
- Now it remains to finish the details of the picture, you get a cute penguin or a snowman.

From felt, you can make the following design:


Ideas for inspiration


Quilling:


Video about creating a scrapbooking postcard:
Origami crafts for postcards:


The best gift for the New Year is, of course, a handmade gift. And if socks or a sweater are on this moment for you an unbearable option, then even a child will cope with a postcard. A do-it-yourself New Year's card is suitable as a gift for absolutely everyone: friends, relatives, the dearest and closest people.
Postcards for the New Year can be difficult to make, or they can be very simple, but at the same time not devoid of taste. In creating a New Year's card, the most important thing is a flight of fancy. In this article, we have collected for you more than 30 original ideas for New Year's cards that you can make yourself.
Pretty simple to make, but very original New Year's card. For manufacturing you will need: thick paper for the base, corrugated paper, scissors, jewelry.
#2 DIY New Year card using scrapbooking technique
IN Lately Scrapbooking is especially popular, so why not use this technique to create a postcard for the new year. You will need: thick paper for the base, scrap paper (you can limit yourself to plain wrapping paper), PVA glue, pen or felt-tip pen, decorations.

#3 New Year's card from threads
The postcard made with the help of threads looks original. Drawings can be completely different: Christmas tree, deer, Santa Claus, just the inscription "Happy New Year". To make such a postcard, you will need: thick paper for the base, thread, needle, pencil, ruler, sequins for decoration.


#4 New Year's card handmade in origami technique
An excellent option for a New Year's card will be a three-dimensional postcard made using the origami technique. For manufacturing you will need: thick paper for the base, colored paper, glue, buttons, sequins, ribbons, etc. for decoration.

#5 Postcard for the new year in quilling technique
You can surprise your loved ones with a postcard made using the quilling technique. It will take a lot of time, but it's worth it. You will need: thick paper for the base, paper strips for quilling, scissors, glue, corrugated paper or napkin, toothpicks.

New Year is the most fabulous holiday of the year, on this day everything becomes magical, so it will be very symbolic to give a voluminous postcard that seems to come to life. To make a New Year's 3D postcard with your own hands, you will need: thick paper for the base, scissors, a pencil and a ruler, decorations.

For those who love order and control, a handmade Christmas card with a geometric Christmas tree will be an excellent gift option. To make such a masterpiece, you will need: thick paper for the base, a clerical knife, a pencil and a ruler, PVA glue or double-sided tape.

For romantic natures, strict geometric shapes are not suitable. It rather needs smooth lines, curves, additional decoration. In this case, you can give a handmade postcard made with a ribbon and buttons. You will need: thick paper for the base, ribbon, buttons, scissors, glue.

#9 Postcard for New Year from a napkin
To make such a postcard, you will need: thick paper for the base, a napkin or double-sided paper, glue or double-sided tape, scissors, decoration elements (beads, rhinestones, buttons, etc.).

#10 Christmas tree card from colored tape. Preparing postcards for the new year with the children
If there are small residents in the house, they should definitely be involved in creating New Year's cards with their own hands. Doing something difficult is not at all necessary, the kids will be delighted with simple crafts, for example, a New Year's card with a Christmas tree made of colored tape. You will need: thick paper for the base, scissors, glue, multi-colored tape (also suitable decorative ribbons, strips from old magazines and postcards), stickers or other decorative items.

Another option for a New Year's card that you can make with your own hands with your children will be a card with a Christmas tree fan. You will need: thick base paper, glitter or rhinestones, wrapping paper, scissors, glue, stapler.

Another simple but very original idea creating postcards for the new year. You will need: thick base paper, buttons, glue, ribbon, pencil or compass.

A great idea would be a postcard with a hand-drawn drawing. For example, you can draw New Year's lanterns: it is not necessary to have the skill of an artist.

With kids, you can draw a New Year's card. You will need: thick base paper, marker, ruler, paint.

To create such a postcard, you will need: thick paper for the base, colored paper, scissors, glue, sparkles, rhinestones and sequins.

What you need: thick paper for the base, colored paper for the Christmas tree, pencil, scissors, glue, decor elements (beads, sequins, stickers, etc.).

For such a postcard you will need: sequins of different shapes and sizes, a needle, thread, glue, ribbon for decoration.

New Year's cards decorated with felt look very original. We will make postcards with Christmas trees from pieces of fabric, but you can turn on your imagination and make something more complex. You will need: thick paper for the base, felt, scissors, glue.

#19 Very simple do-it-yourself New Year card
You will need: thick paper for the base, cardboard for round blanks, colored decorative ribbons, glue, glitter, felt-tip pen.

You will need: 3 sheets of colored paper different sizes, glue, thick paper for the base.

If there is not much time left for postcards, you can try this option. You will need: thick paper for the base, Christmas tree template, pencil, glitter, glue, stationery knife, sequins or beads for decoration.

#22 Postcard for the New Year with a voluminous Christmas tree made of paper for scrapbooking
Very cute and easy to make Christmas card. To create it, you will need: thick paper for the base, thick paper for scrapbooking or cardboard, glue, ribbon for decoration.

#23 Postcard for the New Year with a three-dimensional Christmas ball
And here is a New Year's card with a voluminous christmas ball. The manufacturing principle is the same as in the previous postcard, the only difference is that instead of triangles from colored cardboard, you will need circles. By the way, you can use old postcards as consumables, but only those that are not valuable to you as memories!

#24 New Year's card to the garden
Such a New Year's open made literally with your own hands is perfect as a gift for grandparents, as well as in kindergarten. Kids will love to create! You will need: thick paper for the base, paints, felt-tip pens.

#25 Beautiful vintage New Year card
A vintage postcard for the New Year can be made from the most common materials: old notes, thick paper, beautiful old postcard(you can cut out any picture from a magazine), glue and some glitter. Step by step instructions in the picture below.

#26 New Year card with 3D garland
New Year is, of course, a Christmas tree and Christmas decorations. In fact, Christmas decorations come in a variety of shapes, but the most common are balls. That is why we associate Christmas decorations and the New Year with balls. So let's make a postcard with a voluminous garland of Christmas balls.

If postcards with Christmas trees are unacceptable for you, then you should pay attention to other attributes. new year holiday, for example, garlands. We will make a garland from pieces of felt and literally “hang” it on a postcard.

#28 Postcard from felt
For making postcards with your own hands, you can and should use various materials in particular, pay special attention to the felt. No, no, not the whole card will be made of felt, but only some decorative elements. In this case, a Christmas tree. How to make a postcard from felt - see step-by-step MK with a photo.

#29 Original postcard in the shape of a Christmas tree
A New Year's card does not have to be square or rectangular at all. Dream up and make a card, for example, in the shape of a Christmas tree. The idea is not new, but you must admit, it is very, very original! By the way, with such a postcard you can safely go to the competition in the kindergarten.

#30 Herringbone-accordion: making a card with children
A Christmas tree accordion card will be a great gift for grandma and grandpa. The child can make all the elements of the craft on their own. Mom's help may be needed, except for gluing. Take note of the idea and have fun with your child.

#31 New Year card from different materials
And here is an idea for those who want to make a beautiful, simple and unusual craft- postcard from different materials. You will need colored paper, fabric, you can also use fringe, braid and other unnecessary little things that are lying around idle, but your hands don’t reach. Step by step instructions in the photo below.

#32 Sequins and nothing more
A stylish New Year's card can be made using sparkles. For a greater effect, take dark paper for the base, although you can do it on light paper, only in this case, take dark sparkles, gold will be lost on a white background. For making you will need glue, brushes and sparkles. Step by step master class see below.

#33 Postcard for the New Year from improvised materials
But a great idea for those who do needlework once a year. Of the materials for postcards in the house, is there only paper? No problem! You can make a great postcard from a coffee package. How to do - look at the photo.

#34 Simple card for kids
Making crafts with children is a real pleasure. Here you are, mom, when was the last time you made something with your own hands? In kindergarten, primary school, on the final exam in art school? There you go, this is so much fun! Children are not only our joy, but also our teachers, who give us the opportunity to remember what we sometimes forget about!

#35 For the little ones
And here is another version of the postcard for the smallest, for those who still don’t really know how to hold a brush in their hands. Well, let the child begin to learn art from the art house!) simple postcard with a Christmas tree made from a handprint.

#36 Unusual postcard snowman with your own hands
And here is another idea for an original postcard in the shape of a snowman. Simple Ideas the good thing is that they are simple in execution, but at the same time they are not devoid of grace.

#37 Unusual card for New Year with children
And another version of a simple postcard for making with children. This craft looks very, very original and is quite suitable for competitive work. Prepare a thick sheet of paper and many colored scraps (colored paper, foil, pieces of fabric, etc.). Glue all this stuff onto the base, and then cut out elements for postcard decor from the resulting panel: Christmas trees, gifts, balls and more.

Photo. 40+ DIY Christmas Card Ideas for Inspiration


A card for the person you are dating or married to is a great gift that reflects your better feelings to him. And to convey these feelings in at its best, such an item in the form of a gift for an anniversary of a relationship or wedding, for a birthday or for another holiday must be created by yourself.
Postcard on the day of the anniversary of the relationship or wedding
If you are already celebrating the holidays with your loved ones in the form of a wedding or relationship anniversary, you probably have a lot of photos that capture the most beautiful moments that cause a storm of positive emotions. All of these photo cards can be used to create an incredibly romantic postcard.

The first thing you need is double-sided cardboard. Its color should be determined by you, but it will be better to choose something bright or light. It should be bent in half so that the shape of a book is obtained.
The next step is decorating with photos suitable for a relationship or wedding anniversary. In order not to spoil the finished photographs, it is better to print new ones. An important condition is that your images must be small so that they can fit on cardboard. It is not necessary to try to cut out your images without a background, because without it they may look inharmonious.

Before pasting the cover of the photo, you need to write in the middle something like the sentence “Happy day, my love!”, And then place the photo around the inscription. Next, write some congratulatory text on the first page. On the second page we attach a photo with your image cut out in the shape of a heart.

If it seems to you that there are too many gaps left, you can fill them in with hearts. different colors from colored paper. And now, a gift for the anniversary of the wedding or relationship is ready!

Birthday card for my love
Do-it-yourself certificate card - interesting option. A loved one is unlikely to be delighted with such a gift!
The basis will be double-sided cardboard, which should be folded in the form of a book. Its color is your choice. On the cover you need to place multi-colored envelopes under the numbers. A convenient option is to make nine envelopes three in a row.

Making envelopes is simple - we take a small rectangular leaf, put it in a vertical position and make three folds dividing it into three equal parts. We bend the lower part inward and glue it on the sides to the middle one. We bend the upper part down and make a triangle out of it with scissors so that the fold line is the base. We attach the resulting envelope.

In the envelopes you need to put hearts denoting certificates. On the first page we write a congratulation, and on the second we indicate the purpose of the certificates by numbers. For example, certificate number 1 is a kiss, certificate number 2 is the preparation of a delicious preferred dish.

Universal voluminous card for a guy
Such a voluminous postcard can be presented to a guy for his birthday, and for any other holiday.

We take the cardboard in size A4, fold it in half. It is advisable to choose not dark and not red.
On the cover, you can depict you and your dear person from various details. Clothes are made from multi-colored pieces of fabric, arms, hair and legs can be created from woolen threads, and other parts of the body are easily made from paper. A suitable background is a huge heart. Do not forget to write something like the phrase "Happy Birthday, dear!" above.

From red paper, you need to cut out a heart that fits inside the postcard, draw a face on it and glue pens to it. The palms need to be glued to the inside. Volumetric postcard ready!
Postcards in the form shirts with a tie
A huge advantage of these cute men's paper shirts is versatility. They do not carry intimate, romantic and other specific hints, therefore they can be used as a present for a birthday or other celebration for a variety of men around you. Such an item will please both a brother, and a loved one, and a friend.
The material for the base of the shirt is ordinary thick paper. The use of thin cardboard is also possible. The choice of material color is up to you.
If you used an A4 sheet, fold it in half crosswise and place it in front of you in the form of a book. Place a ruler vertically at the top edge and measure about five centimeters. Then, attach a ruler vertically to this point and draw a straight line with a pencil.

The resulting thick strip must be cut off, but only so that it remains on half of the entire sheet. The cover of the postcard should be five centimeters higher than its last page. Next, you need to make two small cuts on the cover, as if we want to cut off another thick strip. We fold the incised edges inward, forming a shirt collar.
The next step is a tie. It can be made from paper or fabric in a color that contrasts with the shirt. We draw, cut it out and glue it to paper. Tip: first you need to make a square (the base of the tie), and then its main shape.
If the card is not intended for a too serious man, feel free to use bright colors and various decorations. Flowers on a tie, a pocket with a handkerchief, buttons - choose the best option DIY decor!
Postcards for fisherman do it yourself
A man who is a fisherman can be presented with a hand-made postcard with fish on the day of the fisherman or on his birthday. For the base, you need double-sided cardboard of any color, which should be bent with a book. On the top of the cover and inside we write congratulations on your birthday and wishes.

We cut out a rectangle or other figure that imitates water from blue or blue paper and glue it to the cover. We draw fish on colored paper, cut it out and glue it to the “water”. Fish can be made not only from paper, but also from fabric or draw with colored pens. In addition to fish, it is recommended to make algae, shells and sand.
The next step is to create a grid with your own hands. It will require ropes or thick threads. You need to cut and connect the strings so that they form a fishing net, and then glue them and attach them to the "water".
Fishing rods can be attached to any part of the cover. Their basis will be ordinary toothpicks with thick threads at the tip. We wrap them with thin ribbons or draw stripes on them.
The last step is decorating with your own hands. This will require paper or woven fish. They can be placed both on the inscription "Happy Birthday", and near the congratulatory text, and in free areas.
No matter how good a gift is, it is considered incomplete without a postcard. Range greeting cards very large today. However, if you want a unique unique postcard, then it is better to make it yourself with your own hands. This is exactly what we will do now: consider the ideas of greeting cards for the New Year with our own hands.
You will need: A4 thick colored cardboard, scissors, corrugated paper, PVA glue or double-sided tape, a simple pencil, decoration elements (sequins, beads, ribbons ...).
Master Class

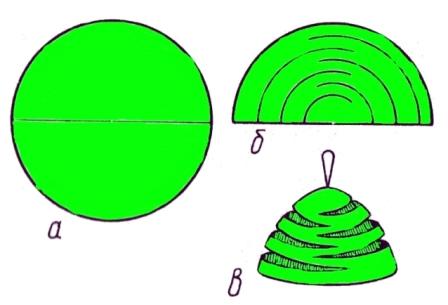
New Year card in scrapbooking style
scrapbooking- this is a whole art that teaches how to create and decorate photo albums with your own hands (in our case, a postcard). Scrapbooking has a whole story of how a notebook turned into an album. At the end of the 17th century, notebooks appeared with additional blank pages. Their owners pasted images, creating entire collections. This is how scrapbooking began.
You will need: thick colored A4 cardboard, PVA glue or double-sided tape, scissors, scrap paper, pencil, decoration elements (sequins, beads, rain, buttons, sequins ...).
Master Class
- Make 12 scrap paper rectangles. The size of each rectangle should be different, starting with the smallest and ending with the largest. (Width from 1 to 12 cm, length 5 cm for all rectangles).

- Roll each rectangle into a cylinder in the width direction, using a simple pencil to secure each cylinder with glue.
- Glue all the tubes together, starting with the largest and ending with the smallest, creating a Christmas tree shape.

- Let the Christmas tree dry well, then glue it on the right half of the card.

- Decorate the postcard to your taste with sequins, sequins, buttons, rhinestones ...
You will need: A4 color cardboard, wrapping paper or candy wrapper, thin black marker, scissors, PVA glue or hot melt adhesive, stapler, decoration elements (sequins, beads, rain, buttons, sequins, bows ...).
Master Class

New Year's card in the style of minimalism
Minimalism(from Latin - the smallest) - this is a style that is distinguished by simplicity and brevity of composition.
You will need: A4 color cardboard, a shaped hole punch or a stationery knife, thread, needle, sequins, a simple pencil, a ruler and scissors.
Master Class
- Make the base of the card by folding a sheet of cardboard in half.
- On the right half of the card, sketch out the Christmas tree and star tops. Use a ruler and pencil.
- Cut through the star with a shaped hole punch or a clerical knife.
- Make holes in the shape of a Christmas tree with a needle - a triangle.
- Take a thread with a needle and make stitches. String sequins after each stitch.
- Carefully fasten the thread from the back.
New Year card in origami style
Origami- This is a type of arts and crafts, literally translated from Japanese as "folded paper" into various figures.
You will need: multi-colored A4 cardboard, PVA glue, scrapbooking paper or thick paper, decoration elements (sequins, beads, rain, buttons, sequins, bows ...).
Master Class
- Make the base of the card by folding a sheet of cardboard in half.
- Take 3 squares of thick paper with sides of 20 cm.
- Fold the square diagonally, unfold and again fold diagonally across. (Conditionally marking 4 triangles).

- Fill 2 opposite triangles inward.
- Press the resulting triangle to the surface and conditionally mark the center.
- Bend the bottom corner parallel to the middle. Repeat this procedure with the second corner. The module is ready!

- Make 2 more of these modules, you can have different colors.
- Assemble the Christmas tree in this way: glue the origami module on the right side of the postcard, form the Christmas tree from top to bottom, put the next module into the previous one.

- Decorate the Christmas tree to your taste with sequins, sequins, buttons, rhinestones ...
You will need: A4 color cardboard, scissors, a simple pencil, ribbons, PVA glue, decoration elements (sequins, beads, rain, buttons, sequins, bows ...).
Master Class
- Make the base of the card by folding a sheet of cardboard in half.
- Glue the tree trunk to the right side of the card in the center. The barrel must be from tape Brown in the form of a trapezoid length.
- Cut 6 strips of ribbons 2 cm wide, 2, 4,6,8,10,12 cm long.
- Trim the corners of the ribbons on both sides.
- Glue the tapes from the bottom up, in the shape of a triangle.
- Decorate the Christmas tree to your taste with sequins, sequins, buttons, rhinestones, an asterisk, bows ...
You will need: A4 color cardboard, scissors, a double-sided round napkin, a ruler, a simple pencil, double-sided tape, decoration elements (sequins, beads, an asterisk, rain, buttons, sequins, bows ...).
Master Class

You will need: A4 color cardboard, A4 color paper, scissors, a ruler, a simple pencil, a stationery knife, flat paper decorations (snowflakes, stars ...), decoration elements (sequins, beads, an asterisk, rain, buttons, sequins, bows ...).
Master Class

You will need: colored cardboard and A4 paper, scissors, stationery knife, compasses, thick thread.
Master Class