Funny toys made of paper with your own hands. New Year paper crafts
Christmas paper toys are the easiest and most economical way to decorate your home for the holiday. Using one of the simple schemes or instructions, even a beginner in this type of creativity can make cute decorations.
Template does not mean ugly
One of the most simple ways manufacturing paper crafts is the cutting of scenery according to certain schemes or patterns. A real decoration of the interior will be even elegant ornaments or silhouettes simply attached to the window, the templates of which can be found in the section and printed. A similar decor is attached to the window with adhesive tape, clover or water - after the end of the holidays, there will be no traces left on the glass.

When working with templates big amount small parts, the cutting of which will require filigree precision, it is better to use a breadboard knife, and place the template itself on a special rigid base that protects the work surface from damage.


In addition to chains, garlands can be made up of any images: repeating or united by the same style or color scheme.
Manufacturing master class
To do christmas toys in the form of corrugated balls, you will have to work hard, but the result will exceed all expectations. Gathered in a garland paper balls will decorate any celebration, and the balloons made in pink are perfect for. The manufacture of such balls is a very laborious and complex process that requires strict adherence to the scheme. Something else for beginners step by step guide that does not require special training.
To create a simple garland you will need:
- 1 roll corrugated paper desired color;
- scissors;
- glue.
Progress:
- A part of the roll should be cut so that the width of the cut part is 3 cm. Do not unroll the roll before doing this.
- From the mini-roll thus obtained, you need to unwind a small amount of paper, while twisting the strip every 3-4 cm. The integrity of the tape should be maintained, preventing it from breaking.
- The paper between the places of the twists should be straightened and given a slightly convex shape.
- Repeat the required number of times until the desired length of the future garland is reached. Glue or fasten the joints of large fragments with glue.


We decorate the doors
The custom of decorating your home is becoming more and more popular. On sale you can find both jewelry made from real needles, and variety of options from artificial materials. Traditionally, a Christmas wreath is attached to the front door, which comes with some inconvenience, as commercial wreaths are quite heavy and difficult to attach to the usually metal front door, which cannot be nailed or drilled. New Year's wreaths made of paper are very light, so they can be fixed on the surface of the door even with adhesive tape.


How to do?
You can make and decorate a New Year's wreath yourself. This will require:
- a sheet of double-sided green A4 paper;
- pencil and ruler;
- scissors;
- glue;
- decorative elements.
Manufacturing:
- Fold the sheet in half.
- From the fold, draw lines with a pencil so that the distance between them is 1.5 cm, and the 2 cm lines themselves do not reach the edge opposite the place of the fold.
- Without unbending the sheet, cut through each line, starting from the fold.
- Unfold the sheet and glue the edges along the long side of the sheet (its uncut parts).
- Connect the ends of the resulting cylinder to each other and glue.
- Decorate the wreath with beads, sequins, bows. You can also use decorations cut out of paper of other colors.

The process of creating a wreath from a cardboard plate will become very easy. The bottom of the plate should be cut out, and the remaining rim should be glued with green paper strips the same or different lengths.

Fabulously beautiful toys for children
A fascinating pre-New Year's activity for children will be the creation of beautiful fairy-tale figurines. One of the many layouts of paper toys should be printed, cut and glued in the places indicated on the template. If the child is still too small to cut with scissors, then adults should cut out the details of the toy in advance so that the child can glue them later.


From early childhood to old age next to us are toys. At first we play them ourselves, then with our children, and later with our grandchildren. On this moment the shops are filled with a variety of toys. Sometimes you get lost, not knowing what to buy. But each of us remembers the moment when we made a toy from the most ordinary paper at school in a lesson with our own hands. We offer to return to childhood and make his first product with your baby. To do this, you can use blanks, cut, glue and you're done. But it is much more pleasant to be smart and create something unusual. So let's get started.
We make a paper rainbow toy with our own hands
We offer to make a bright multi-colored miracle that your child will like.
We will need : colored paper and scissors.
Print or draw the template.
We apply a template, and cut out 10 multi-colored curls from paper.
The assembly instructions for this toy are very simple. We hook two parts together. Then alternately attach the rest until we connect in a circle. We turn the product. We connect the other side in the same way. The toy is ready.
We create original paper toys according to templates
This type of toy is probably the easiest to make. You just need templates, a printer to print them out, scissors and glue. The process is fascinating and your child will like it, because the end result is always interesting. Let's look at some patterns.
giraffe pattern
This unusual animal will definitely appeal to your baby.

Pets and fruits patterns
Invite your toddler to create a series of pets. Let's take a look at some diagrams.

You can also offer your child to “grow” fruits with their own hands.

We create a volumetric butterfly with our own hands in a minimum of time
It will take a minimum of time to make this toy.
You just need to cut out the details according to the template and fasten them. This type of toy is interesting in that you can stick a magnet to it and hang it in the most prominent place in the house - on the refrigerator.
There are several options for butterflies for your consideration.

As your little one grows up, he will need educational toys. In stores, you can be offered a wide selection for not small, unfortunately, money. But before you go shopping, think maybe you can make such a toy for your child. Let's look at how to make an interesting product for the baby.
Parking lot, maze and cardboard house
To do this, we need a cardboard box with low sides and a felt-tip pen.
You can also draw roads, put a couple of cubes in the form of houses and get a city.
labyrinth.You will need several boxes for this toy. You need to cut holes in them, connect them one by one, so that you can climb through, and there will be no limit to your baby's delight.
Cardboard house.
Invite your child to make a house for him. Take cardboard box, preferably very large. Cut windows and doors in it, decorate it. The child will be interested in hiding in such a house.

For your little princess, you can make a doll house. Invite her to arrange the furniture herself (you can also do it yourself).
All of us in childhood loved to launch paper airplanes and boats. These are the simplest origami toys. Try to make a couple of products and please your baby. He will enthusiastically watch the flight of an airplane or happily launch a boat in a puddle. If there is a reservoir nearby, then you can launch a whole flotilla. Let's remember how these products are made.
Airplane and boat
For this product, we need a rectangular sheet of paper.
We take a sheet of paper and bend the corners from above to the center of the sheet.
We bend the triangle that we got to the bottom edge of the sheet.
We lower the upper corners to the middle, so that there is a small triangle at the bottom of the bent corners.
We grab the bent corners with a triangle and turn the product over.
We bend to the outside in the middle and bend the wings down.
We bend the wings to the level of 90 degrees.
The plane is ready. You got a product, as in the picture.
We make a boat.We need a rectangular sheet.
We take a sheet of paper and bend it in half, and also bend it vertically.
We bend the upper corners in the middle of the sheet.
We bend the lapels on different sides, turn them back to their original position.
We bend the bottom corners.

We bend the lapels up and grab the corner of the product.
Turn over the formed pocket. Take the points of the central inflection and stretch to make a square.
We bend the lower corners of both sides to the top.
We pull the points of the central bend and rotate the product.
We bend the lapels up.
Take the edges and stretch the figure.
The ship is ready.
Video tutorials on creating origami toys from modules
Modular origami allows you to make voluminous toys. Since this art is not quite simple and you can’t tell in a nutshell, we suggest watching video tutorials on this topic.
Volumetric quilling star
With the help of quilling, you can get crafts that are amazing in their beauty, and even a schoolboy can deal with it. Of course, when making a voluminous quilling star, you will have to spend a little patience, but in just 20-30 minutes you will have a wonderful Christmas tree decoration ready.

Cut a thick paper sheet into strips, the width of which will be 1.5-2 cm, divide them into equal long parts. Using a special quilling tool (you can replace it, for example, with an awl), you will need to twist from one end, but you should not completely twist it.
Slightly loosen the curl inside, because for this work it should not be excessively tight. Take another strip and try on the length of the curl. Cut the strip and glue it to the free end with one side, and the other side to the roll itself to form a loop.
Prepare 5 pieces of such blanks and glue them together for a wide part, while in the center there should be some free space. Ready, it remains only to hang on a ribbon and you can decorate the Christmas tree.

In just 10-15 minutes, you can easily make a shiny Christmas tree decoration, you don’t even need paper Christmas tree toys. To do this, take a strip of thick paper, it should be quite wide so that the effect is better. Fold the workpiece in the form of a large accordion to form five corners. Apply glue to the strip and sprinkle with glitter. Glue the ends of the workpiece and form a star, it remains only to hang the one made on a ribbon.
Flashlights
Flashlights will charge with a great mood and give joy to both children and adults. You can hang them on the Christmas tree, or you can put them under it, along with the figures of Santa Claus and the Snow Maiden. And to make it even more fun, you can do Christmas tree toys made of paper Smeshariki.

Take a bright double-sided paper sheet and cut out a rectangle measuring 15 by 10 cm. Make cuts on the part, their width should be 1 cm, and 1 cm should also not reach the top and bottom edges.
Pass the ribbon through the resulting stripes, while alternating should be observed, one strip up, the other down, and so on. After you tie the ribbon, the flashlight will have an inner and outer layer. Raise the outer stripes, then glue the two remaining edges together.
flower ball
To make such a craft, you need to take thin crepe paper, however, ordinary table napkins are also suitable for this needlework. Usually, the manufacture of such a decor takes about half an hour (of course, everything will depend on the size here).
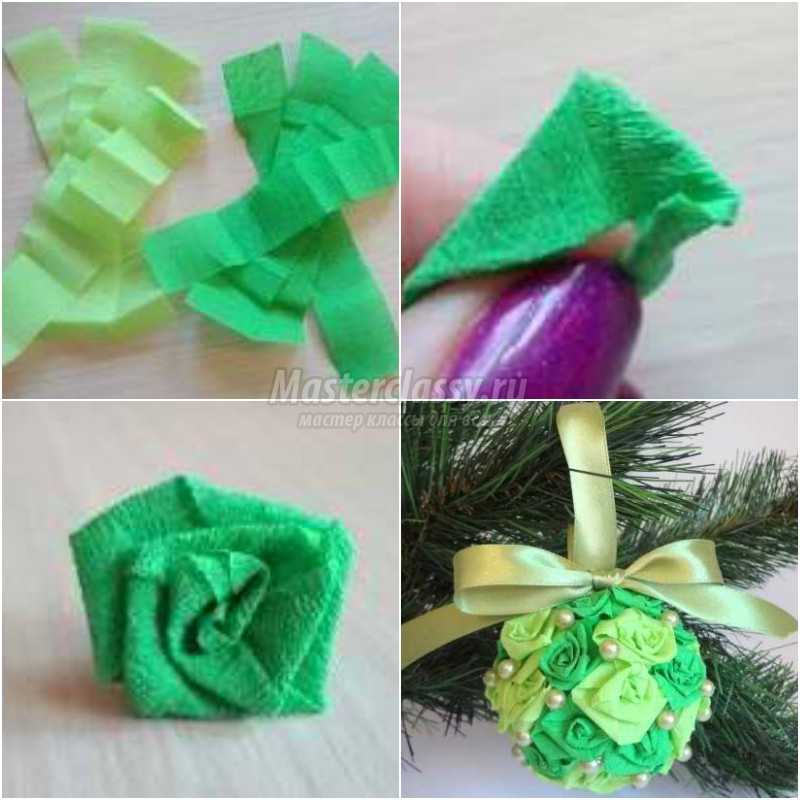
Cut the crepe paper into thin long strips (about 4 cm wide), fold the cut in half lengthwise.
On the right side, bend the end of the strip a couple of times into a triangle, such a blank will act as a rosebud. Now hold the bud with your hand and bend the strip back to fold the triangular petal. Wrap a petal around the bud and bend the next one back, these actions must be performed until the strip ends, the tip must be glued to the rose. Using this method, make a lot of roses and glue them over foam ball. For more decorativeness, glue beads between the roses, as well as a ribbon with which the flower ball will be hung on the Christmas tree.
Of course, these are not all options for handmade Christmas crafts, so, for example, you can make paper origami toys for the Christmas tree.

These "machines" look very attractive, but are quite difficult to manufacture, which is why you may need origami paper toys on the Christmas tree video.


Someone is preparing for the new year, decorating the Christmas tree with expensive designer decorations, and someone with cheerful multi-colored electric garlands and glass balls from the shop.
Such Christmas decorations, undoubtedly, will make the New Year's beauty stylish and beautiful, but, unfortunately, they will not be able to compare with hand-made toys. After all, the very process of their creation not only enhances the anticipation of the holiday, but also gives invaluable minutes of communication to all family members.


There are a lot of options on how to make Christmas tree decorations with your own hands for the new coming year, but the most affordable and not requiring special skill in manufacturing are New Year's paper toys. You only need improvised materials that can be found in any home, a little patience and creative imagination.
The most common and versatile toys on the New Year- This Christmas balls. You can make them with your own hands from any thick paper: colored cardboard, colorful postcards or old magazine covers. Monochromatic balls will give a single style to the room, and multi-colored - an atmosphere of fun and fabulous magic.

So, before you start making these paper toys, you need to prepare the following:
- thick paper with a pattern you like;
- scissors;
- PVA glue;
- a compass or any object, outlining which you can reproduce a circle (jars, lids, glasses, etc.).
How to do:
- Draw 21 identical circles on paper and cut them out with scissors.

Prepare the circles as follows:
- bend the circle twice in half (this is necessary to determine the center);
- unbend the circle and bend one side of it so that the edge of the circle is exactly in the center;
- bend two more sides of the circle to make a triangle with equal sides;
- cut out the resulting triangle, which will play the role of a pattern for the rest of the details;
- impose a triangle on the rest of the circles, circle with a pencil and bend the edges outward along the lines.
- Glue 10 circles together with two sides so that you get a strip: 5 circles on top, and 5 on the bottom. The strip must be glued into a ring. This will be the base for the ball.

- Divide the remaining 10 parts into 5 pieces, which are glued into a circle. Got two "caps".

- Glue the top and bottom "lid" to the base in sequence.
- The loop for hanging the ball can be made from a thread threaded through the top of the toy with a needle, or from beautiful ribbon. A loop of ribbon is fixed with a knot and threaded through the top of the "cap" of the ball before gluing it to the base. The knot stays inside the toy, and the loop stays outside.
original paper toy with your own hands for the new coming year is ready!
More paper balls for the Christmas tree


Volumetric snowflake
Another indispensable attribute of the new year is snowflakes. They can be the simplest, cut out from a sheet of paper with an arbitrary pattern, or they can be voluminous using the origami technique. We offer to make the last version of the New Year's snowflake with your own hands.

To do this, you need to cut six squares of the same size, fold each of them diagonally, and then in half. Parallel incisions are made along the fold. The square unfolds, the inner tongues are wrapped and fastened together.
The outer petals are connected to the same petals of the remaining squares. You can attach them both with glue and with a regular stapler.
You can make paper toys not only using the origami technique. If you want to try something new, complex and exciting - take up papier-mâché, with it, you can make very complex voluminous toys with your own hands that will delight not only you, but also your guests, as well as your children, who will be able to participate in the creation of such beauty, and use them in their games.
Materials for work:
- Old newspapers and plain paper (it should be different in color from newspapers);
- PVA glue and plain water;
- Scissors;
- Wicker basket or something similar to it;
- Thick rope (jute twine is also suitable);
- Twisted rope to decorate the edge of the product;
- Some colored paper;
The process of creating a toy
The most time-consuming in creating this do-it-yourself paper toy is the formation of the foundations. It should be strong, but not too heavy, so you don’t need to make more than 6 layers of papier-mâché, but more on that later.
First we inflate our balloon ik to the desired size and fix it on any surface. It is advisable to prepare the workplace so that it is not scary to get it dirty.
Next, we take PVA glue and mix it with water in proportions of 1 to 1, respectively. We moisten pieces of newspapers with this solution and begin to glue them to our ball from all sides so that the entire surface of the ball, with the exception of the place near the base, is covered with a layer of newspaper.
You need to do an equal number of layers on each section to get a perfectly even product without notches. This is very important, because after each layer of newspaper, be sure to use a layer of plain paper, otherwise you will not be able to determine which of the layers is already finished and which has not yet begun.
As mentioned above, it is enough to make 5-6 layers of papier-mâché so that the product keeps its shape after drying. Therefore, we postpone the workpiece until completely dry for a couple of days.

Tip: don't do this in a room that is too hot, or in a room where the temperature can change dramatically, otherwise the balloon inside will simply burst, and you will have to scrape the remnants of papier-mâché from the walls and surrounding furniture. Not very pleasant and very labor intensive.
When the base dries, the ball can be removed without cutting the workpiece. Alas, it will not be possible to reuse it, so you just have to throw it away.
We cover the ball with white acrylic paint in several layers and again leave alone until completely dry for at least one day.
The base is completely ready, it remains only to decorate it properly. First, we decorate the white canvas with colored inserts at our discretion, making them from colored paper, glossy magazines, or old envelopes.

Next, with a neatly twisted thread, we draw the edges of the opening of the balloon. Silicone glue along with a glue gun is perfect for these purposes, because after cooling it becomes transparent and invisible, so even if you overdo it with a layer of glue, it will not be noticeable.
Rainy days, according to our subjective feelings, last much longer than fine ones. It is especially difficult for children who for a long time are forced to ...
The next step is to fix the selected basket on thinner twisted threads or jute twine. Additionally, the basket can be decorated with small hand-sewn bags that will imitate the load.
Such toys for children with their own hands can be different, it all depends on your imagination and the availability of free time, especially since the materials used in the work are the most accessible and simple.
The finished balloon can be mounted on the ceiling or chandelier shade to decorate a children's room, or used in your own puppet theater, where the main characters will embark on brave adventures across the expanses of the apartment to the delight of both children and adults.
0 0 More related articles:
Not everything that is going on in the baby's head, parents can understand quickly and correctly. The following are 6 tests that will help determine the nature of the child ...
Many parents have found themselves in a situation where their tired child begins to act up, throw things, fight and is about to go into hysterics. Ta...


