A fabric rooster is a DIY gift. Year of the Rooster: DIY interior toys Attic toy “cockerel”
When New Year the door is knocking and there is less and less time left; we urgently need ideas that can be easily brought to life literally in one evening. It is believed that in order for the coming year to be rich and happy, its symbol must be present in the house - in 2017 it is the Red Rooster. If you don’t have time or don’t have enough skills, then this craft will come to the rescue.
These fabric roosters look so simple but so terribly cute. And most importantly, depending on the fabric and small details, they become completely different and unlike each other.
You will need:
- dense fabric - flannel, calico;
- pieces of felt for scallops, beaks and tails;
- buttons, rhinestones and other sew-on trinkets;
- padding polyester
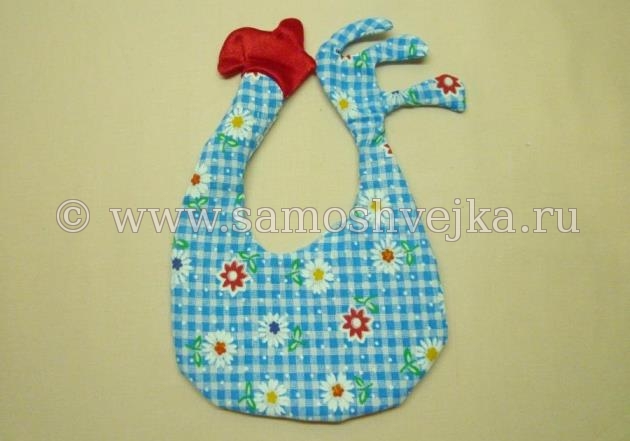
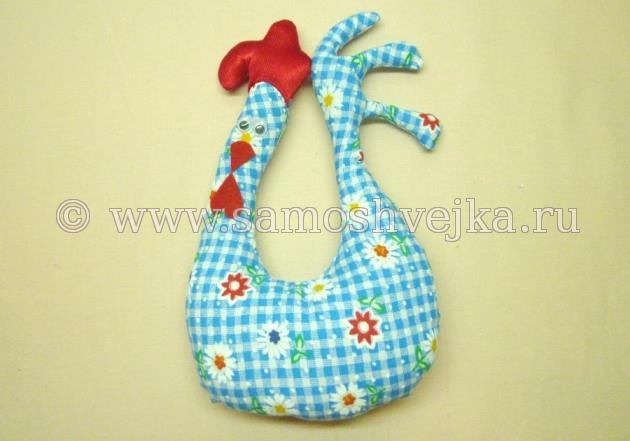
Sew a simple cockerel in 5 minutes
For one chicken you need a piece of fabric measuring 21 x 11 cm. The triangle is folded like this:

All seams, naturally, must be on the wrong side; the last side seam is sewn up by hand after stuffing the toy with padding polyester. Don't forget to put the comb, beak and tail of the future cockerel inside the seam.

Show your imagination in decorating the sewn cockerels - maybe you will give them the features of the people you are going to present them to?
By the way, such cockerels can be used as a bag for candy if you sew a lock into the side! Your friends and their children will definitely be delighted with this gift!
It would seem that there is nothing complicated here, all the components of the rooster costume are simple - wings, tail, beak, beard. But difficulties arise from the very beginning - if you make a tail, then it must be voluminous and keep its shape; the beak and beard in the form of a mask prevent the child from breathing; a hat with a scallop is too hot... But let’s still try to make something interesting with our own hands.
DIY rooster costume
Let's start with the head. One of the most beautiful options for a rooster costume for both boys and girls is to sew a full-fledged balaclava cap with a comb, beak and beard.
1. Measure the length from the top of your head to your collarbones; the cap will reach approximately there.
2. Use a thin mesh for making, then the child will not be hot. Cut out a rectangle with protruding slopes for a more convenient shape. Sew into a circle and cut out an opening for the face. Pull the top part of the cap - this assembly will not be visible later.
3. Cut strips with feathers from a variegated brown-yellow fabric and sew them onto the mesh so that there is a few cm of clearance between the strips (for ventilation).

4. It is better to cut out the beak, comb and beard of the rooster from felt, as it holds its shape well. If the beak is long enough and constantly lowers or folds, glue a wire to it on the underside and decorate it with ribbon to match the color.
On the details themselves, it is better to do stitching and embroidery with thick threads - it will look beautiful.
For more naturalness, you can sew some real feathers onto the hat.
This version of the top part of the rooster costume is good not only for its presentability, but also because nothing will interfere with the child’s face. But if it doesn't suit you, there are other ideas.
For example, you can make a cap like this:


You don’t have to sew it from scratch; you can simply paint a white cap with fabric paints (batik) and sew feathers into it as a comb.
And of course, masks are very common for costumes. They are also sewn either from felt or from other dense fabric. But do not forget that it is better to use a thin, body-friendly material as the base of the mask, onto which all other details will be glued.
Simple masks:


Complex masks:


Additionally, you can look at the elastic bands to wear as a mask.
Now let's move on to the middle part - that is, the body of the rooster.
A simple, but very convenient solution for a child is to sew the wings of a rooster into the sleeves of any jacket that matches the color - so that the wings unfold when the arms are raised.


And here is an example with a wedge-shaped cape:

You can also make wings in the form of mittens.


A complete but simple rooster costume: an elongated sleeveless T-shirt is sewn from two parts (you can even do it without undercuts) with a lock on the back back. It is embroidered with multi-colored feather details (you can sew them in whole stripes, as is the case with a balaclava cap). Wings made of thick fabric are sewn on top of the shoulders, and the wings are secured to the wrists with the help of ribbons. Yellow leggings are worn under the bottom of the sweater.


Paws for a rooster costume
Idea No. 1: sew paw-shaped covers on top of the boots. To do this, the fabric must be starched or glued. To prevent the paws from falling off the heel of the boot, it is better to sew ties from the back and wrap them around the ankle.
The pattern looks like this:

Idea No. 2: sew false paws with an ankle fastening. The downside is that the paws will constantly roll back when walking and dancing, so it is better to fix them on the shoe itself.

We think these ideas will be enough for you to create your own unique rooster costume for a child with your own hands. Just don’t forget that not only the beauty of the outfit is important, but also functionality and convenience!
According to the eastern calendar, the symbol of the next year 2017 is red fire rooster. Your loved ones will be very pleased to receive a homemade cockerel from you as a New Year's gift. The rooster pattern below will help you please your family and friends. A simple sewing tutorial is offered soft toy.
Instructions for sewing fighting cock Raymond
On various sites dedicated to sewing and needlework, there are many patterns for various toy roosters. The pattern of the toy Raymond rooster, which was invented by foreign craftsmen, is very popular. This product is characterized by the use of fabrics of different textures, such as felt, fleece, brocade, chintz, etc.
To create this cockerel, any colorful patches fabrics available. You can use various large buttons to decorate the toy. Thus, to create a rooster Raymond you need to have:
- toy patterns
- thread and needle or sewing machine
- scraps of various fabrics
- for stuffing - cotton wool, padding polyester or other.
The rooster's legs can be made soft from fabric or a wire frame can be built into the leg parts so that the toy can stand, depending on your wishes.
Toy pattern

The main stages of sewing a toy
- Print the proposed patterns, having previously reduced or enlarged them, or you can leave them as is.
- The patterns are transferred to cardboard and cut out, the required quantity is written on each.
- Patterns are placed on the fabric, outlined with chalk and cut out, leaving 1.5 cm for seam allowances. Paired parts are made from the same fabric.
- The parts are sewn together, leaving a gap for stuffing.
- All parts except the legs are filled with stuffing and the gaps are sewn up.
- All elements are connected to each other.
- At the last stage, eyes and other decorative elements are sewn on.
Rooster Raymond is ready
Toy for beginner handicrafts “Peter the Cockerel”
A very easy to make soft rooster toy with your own hands, its pattern has fewer details than that of Raymond the rooster. For its production, it is advisable to use any soft fabric: flannel, felt, fleece, etc. The number of elements is indicated on the pattern.
View pattern
 The procedure for performing the work is the same:
- print and cut out patterns;
- sew the parts together and stuff them with stuffing;
- sew all the elements of the soft toy together;
- decorate the cockerel by sewing on eyes, etc.
Tilde Rooster
 Thanks to the Norwegian sewing master Tori Finanger, dolls in the tilde style have received worldwide appreciation. For the production of which pastel colors are used soft fabrics, in addition, they are characterized by primitivism in execution and their eyes are always made in the form of dots.
Increasingly, for interior decoration of both living rooms and premises child care facility use an original design solution - interior toys, among which may be made from natural materials dolls or others. Particularly popular are those that can serve as a talisman for their owner’s room. These include toys - symbols of a particular year. On the eve of the coming New Year, the most popular will be the Rooster - the symbol of 2017. To sew a rooster from fabric yourself, you can use the presented master class.
To sew a textile toy you will need:
- variegated chintz or cotton;
- small multi-colored shreds, among which red and green are required;
- padding polyester or other kind of filler;
- scissors;
- gun for working with silicone glue;
- small buttons with a stem;
- threads to match the selected fabric;
- fishing line for invisible seams;
- artificial eyes of the future toy.

Rooster pattern:

How to sew a symbol of 2017: a rooster made of fabric with your own hands
The selected model consists of two pairs of parts: the first is a body sewn from the selected colorful fabric, the second is a red comb. Templates for both parts must be cut out of paper.

Using patterns, securing them to the fabric using bobby pins, carefully cut out the necessary parts from chintz or other material. For sewing a comb, silk or satin will be successful.

The cut out parts, folded with the right side inward, are sewn together, leaving a small gap on the upper bend of the body, so that in the future it will be possible to fill the body with padding polyester. The sewn product is turned outward and all elements are straightened.
The cavity of the figure is filled without leaving any voids in the elements, after which the gap left for these purposes is sewn up with a hidden seam using a fishing line.

After the work has been done, you can begin to design the front part of the toy and decorate it.
At the designated places, a beak and a heart-shaped beard of a rooster, cut out from red felt or other material at hand, as well as artificial eyes are attached using silicone.
Decorating the rooster with fabric flowers
Textile flowers will be used as decorative elements. They are very easily manufactured using the following algorithm:
A circle with a diameter of five centimeters is cut out.

It is gathered with thread along the entire edge.

The thread is pulled together to form a ball, straightened a little and a button is sewn in the center of the assembly.

Such flowers must be made in quantities of five or more pieces.

Two oblong leaves are cut out of green fabric. For greater effect, you can use scissors with curly blades.

In the last step, using glue gun, on the front part of the toy, first leaves are attached, and then sewn flowers.

A bright textile rooster will serve as a wonderful decoration and at the same time a talisman for its owner’s room.
Necessary materials:
Scissors
- a set of colored paper
- box
- PVA glue
Stages of work:
Prepare boxes of various sizes. Cut off the part that covers the box from the box, make cuts along the fold lines (they should be ½ the height of the box itself). Bend the parts of the box along the cuts. The two opposite parts will be the wings, and the rest will be the tail and head. Round the wings. Cut the tail down to the very base. Cut the head, moving from the top to the very base, to create a triangle shape. Decorate the craft: make earrings and a comb.
DIY cockerel craft
You will need:Plastic bottle – 3 pcs.
- ball yellow color from a dry pool
- red and yellow plates
- red and yellow disposable cups
- black marker
- stapler
- simple tape
- double sided tape
Work process:
Cut off the top parts of 3 bottles and fasten them together with tape. Cut disposable cups along the edge. They must be attached to the rooster's neck using tape. Colors must be alternated. Cut off the edge of disposable plates and make cuts on the inside. As a result, you have feathers. Gather the tail and feathers with a stapler. Insert the tail into the cut. Cover the connection point wrapping paper. The wings also need to be cut from disposable plates. Attach the head with double-sided tape. Cut out the comb, beak and beard from red disposable plates. Insert the cut pieces into the cuts on the head. Eyes are also created from disposable plates.
DIY Cockerel 2017
You will need:Beads for eyes
- hot glue
- egg cartons
- primer
- acrylic paints
- balloon
- old newspapers
- scissors
- 2 beads
- PVA glue
How to do:
Two cones from a tray from egg eggs cut, cut one side of each cone. Connect the cut cones with the cuts facing down. You will end up with one large cone with 4 petals. To create the neck and head, connect 5 cones together. Towards the top they will expand and become larger in size. Cut a comb from the side of the tray. Cut out a beak from the lid, which will consist of two parts. Feathers are also created from cones. They are fixed on top of the cardboard with hot glue. The length of one wing is 15 cm. Make blanks for the tail in a similar way.
The next stage is creating the paws. From copper wire bend the shape of the paws. In order to give the desired effect, twist the corrugated tube. Insert the remaining tail between the corrugated and metal tube. For strength, fill the lower part with glue. Cut the claws from the bottom. They should be long and narrow. They need to be secured with glue. Paint the legs and torso with spray paint.

Prepare a utility knife and construction foam. All cuts should be neat and even. You can cut out the parts separately. Finally, glue them together with glue. You can bring it to the desired shape with sandpaper. Additionally, treat with acrylic putty, wait until it dries completely, plaster again and treat with PVA glue. This will allow the paint to adhere better.
Start coloring from the head. Glue the eyes on the head. To create a beautiful scallop, make a pattern on paper, transfer it to polystyrene foam, cut it out, and glue it to a suitable place. Start preparing the mold for the wings. Leave the back open. Cover the upper part of the wings with feathers made from corrugated bottles. Fold the last row inside the wing. Paint over it, leave to dry, attach with perforated tape and a self-tapping screw. Make a tail. Take the mesh and bend it. Cut feathers from bottles. Paint them separately on both sides. Apply black first, and then a little blue. Attach the feathers with wire to the mesh. Once the paint has dried, cut the feathers into two more pieces to make the tail appear even fuller.

You will like it too.
For the back, cut feathers from a clear bottle. The width of one feather should be approximately 2-2.5 cm. Attach them to the back, 3-4 pieces at a time. Use self-tapping screws for fastening. When you fix the feathers on the neck, cut off the top part. Glue the last row of feathers to hide the screw heads. Glue smaller feathers in the back of the head and on the side of the crest. Cover all parts that you painted with construction tape and bags. First apply the yellow paint and let it dry. Add a few orange stripes.
The finishing touch is blinders. Cut 2 strips, make a cut with a stationery knife. Insert them between the metal-plastic and corrugated pipe. Paint the craft with yacht varnish.
How to sew a cockerel with your own hands
You will need:Cardboard
- threads, scissors
- orange, blue-green, black and white fabric
- tweezers
- cotton wool
- scotch
- glue
- colored paper

Draw a sample of the toy on a piece of cardboard and cut it out. Draw the wing separately, cut it out, and see how they look. Cut the sample into separate parts so that it is more convenient for you to work further. Match each piece of the sample with a separate piece of fabric, cut out each piece in turn from the fabric. There should be 2 of each part. Cut the head from white fabric, the upper part of the wing and body from blue-green fabric, and the lower part of the wing and tail from black fabric. Make the beard, paw, beak, comb and eyes from colored paper. Sew all the details for the head. Sewing the comb can be a little difficult. The fact is that it is wider than the head. It is better to sew it on the outside. Glue the eyes from colored paper.
DIY cockerel costume:

For the body, make allowances of 1.5 cm. Connect the parts from the inside. Sew the tip of the foot inside. Sew the wings on the outside, put soft filling inside. If you don't have it on hand, regular cardboard will do. Sew the bottom half from the outside, sew it to the body, and connect it through the cardboard with a seam. Try the torso to the head. Sew the neck to the body. Fill the connected parts with cotton wool. You need to fill it through the hole in the tail. The hole is very small, so you need to fill the craft with cotton wool in small portions. You may need to use tweezers. Sew the tail parts using an outer seam and fill it with cotton wool.
The paws can be made from cardboard or a piece of fabric. Select the fabric of the desired size and color, and make several square pieces. Trim the ends and sew the oblong legs. Fill with cotton wool. Sew the legs, wings, and tail to the body. Cut without touching the seams. The do-it-yourself cockerel toy is ready.
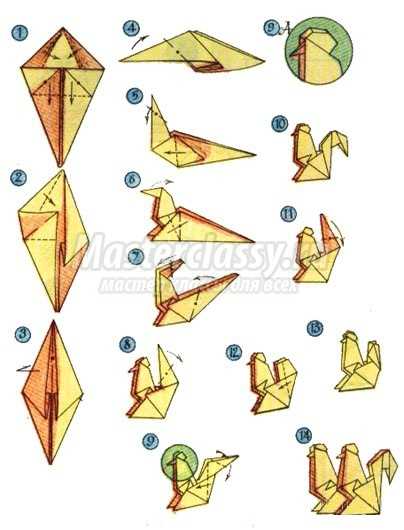

This is the easiest way to create crafts. There are several ways. You can use the techniques of origami, quilling, cutting with scissors, etc. Paper craft can be placed or hung on the Christmas tree, glued to the window, decorated festive table. An excellent solution is the decor of napkins. It will look quite restrained and at the same time original. If you use origami, then the napkin can be immediately folded into the shape of a cockerel. We will provide you with the diagrams.
DIY cockerel patterns.


