Crafts from various seeds and cereals. Do-it-yourself cereal crafts for children - simple, cheap, interesting
Making crafts from cereals with your own hands is much easier than it seems at first glance, it is interesting for both children and adults. The main advantage of crafts from cereals is originality, because even adults will examine the finished work, peering into the details. Not everyone can guess what material was used, especially if you look at it from afar. If a picture made with cereals hangs on the same row as standard drawings, it will look brighter and more memorable.
Advantages of the idea
Originality is not the only reason to teach a child to make such crafts. Today, many parents teach their children to use gadgets from childhood, so that they quickly master the technique, while mental development suffers, which directly depends on fine motor skills hands Simply put, children are not accustomed to working with small details, because of this, their ability to learn and develop is rapidly declining.
Especially often such problems arise in families living in apartments, in such conditions, children may not even have the opportunity to play in the sand. Caring parents understand how important it is to take care of the development of the child, so the idea of making crafts from cereals attracts them. A nice plus of such an activity is that the finished work is a great option for a gift to grandparents and other relatives, so that a child learns to please others from childhood.
Psychologists say that children with whom parents are engaged in needlework from an early age tend to learn new things faster, perceive information, and develop in the future. Even in adulthood, they will be helped by the perseverance acquired from childhood, diligence and diligence.
Where to begin?
First you need to make sure that the child is at the age when such an activity will be not only useful for him, but also interesting. Forcing children at a very young age to do something together is dangerous, as it can discourage them from spending time with their parents in the future.
There are no specific age restrictions. Every kid has a moment when he begins to be actively interested in drawing: a pack of clean paper can be enough for a day, while the notes of the young “artist” appear on the wallpaper and other furniture in the house. This is the time to channel the child's energy into creative development.
At the same time, children who go to kindergarten and primary school, there is also a need for the development of fine motor skills and perseverance. It happens that a child seems to be an uncreative person - nothing related to drawing arouses his interest. Then parents have to invent something, the original idea will be crafts from cereals.
The first thing to start with is to choose the right cereal. It is better not to be guided by the principle of “what is not a pity”, but to think about how it will be more convenient for a child to work.
The main rule for choosing a material is the smaller, the better.
Using one cereal will be boring, so after coming up with an idea for a drawing, you need to choose different options. You can dye the selected material in different colors, some people like to paint semolina. You also need to prepare a flat surface, it can be part of the table or a tray, a dish, another flat dish.
Templates
Preparing a template is the task of parents, because the child will not cope with it. Finite appearance The finished work will depend on the selected and drawn template. It is important that the drawing consists of large details, it is necessary to calculate that there are no more of them than there are variations available. different cereals.
Advice
It is easier to pick up a drawing from coloring pages or children's books than to invent it yourself. Most coloring pages designed for childhood up to 3 years old, contain just simple pictures with large details, they can simply be redrawn.
Together with the choice of a template, you need to prepare the basis, it can be anything:
Of course, the more complex the base, the more difficult it is to apply the drawing, so if you are practicing crafts for the first time, it is best to use thick cardboard. For such a base, you will need PVA glue and a brush for applying it.
An alternative to gluing the cereal is to press it into plasticine. This execution technique also looks bright and original, but for the first time it is better to do with gluing, and then experiment.
How to do?
Let's look at an example of how to embody the ideas of an application according to a template. The whole process of making crafts consists of several stages:
Choose and print a template. This way of preparing a template is the easiest, you can find a lot on the Internet simple drawings with large details and print them out. You can use other methods - redraw, and if you have artistic inclinations, even draw by hand, but it is important to try to make the contours and lines as even as possible.
We blow off the remnants of cereals that accidentally fell on the drawing, leave it to dry. This may take about 10 minutes, if a lot of glue was applied, then more.
After that, you can use paints, you need to do this if you did not initially paint over the cereal, but there is such a need. It is also convenient to paint small details with paints.:
- eyes;
- buttons.
It is best to use acrylic paints.
After the final drying of the work, it can be hung in a frame or used as a decor for a child's room.
Advice
The easiest cereal to use is semolina. It is easy to paint, it is easy to apply, it keeps well in the little fingers of the child.
From cereals and pasta
Pasta is a great craft tool. Many use them for various decorative purposes, such as decorating a Christmas tree, making candlesticks, and many other crafts. And all because the variety of forms of pasta allows you to do this.
Such crafts are performed according to the same principle as simply from cereals. To begin with, a template is selected, then the parent determines which parts of the pattern will be made with cereals and which with pasta. Then, with the help of glue and a brush, first large, then small details are painted in turn, the prepared material is glued.
However, some types of pasta are difficult to glue due to their weight, so the material chosen for the base of such an application must be durable, ordinary paper will definitely not work, and if you choose cardboard, then hard. If it is not possible to glue the product, it can be sewn on. The pasta of the shape of wheels, spirals looks beautiful, you can simply grab them with a few stitches of a needle and thread.
Of course, this part of the process is carried out by parents, especially if the children are very young. If the child is already entering school, then doing such a craft may be a suitable occasion to teach the child how to use a needle. Usually pasta is attached to the finished drawing at the very end of the work.
The advantage of pasta is that they are easy to color in desired color. Therefore, when doing cereal crafts, think about what you can decorate in it and try using pasta for this.
If you chose a puppy template, why not add a leash with a "badge" - a wheel-shaped macaroni, or why not use them for snowman buttons.
Advice
Many stores sell multi-colored pasta - they look great crafts.
Crafts-hair ornaments from pasta
Pasta can be used not only with cereals, but also as the main material for work. Manufacturers of pasta, as if specially developing Beautiful design so that craftsmen can use them not only for cooking.
Hair ornaments with pasta look especially original. Few will guess how they were made, but no child will definitely have the same accessory. There are several options for using pasta for making jewelry:
1 Hoop. All you need is to buy a solid color headband, it should not be too thin so that the pattern can fit on it. Pasta in the form of spikelets glued along the entire length looks beautiful, especially if they are pre-painted in silver or gold.
2 Crown. Using the same plain headband, you can make a crown for a little princess. To do this, you need to pick up several types of pasta, it is convenient to use wheels different sizes. You need to design the shape in advance, and then glue them in rows.
3 small hair clips. A suitable form of pasta for this is bows, they can be decorated in any color, even with patterns. After that, the bow is attached with glue to an invisibility or a small hairpin so that it is not visible.
You can prepare several hairpins for different outfits. Under blue dress with white peas, make a bow of this color, under striped - striped and so on. A young fashionista will be delighted with such an abundance of jewelry.
Pasta accessories
You can make more than just hair ornaments from pasta. Everything that girls like to wear so much, beads, bracelets, earrings, can be made from this material. How much joy the child will have if the parents do not just buy jewelry in the store, but take the time to make it on their own with the children.
Beads are easiest to make from pasta of a shape that is strung on a thread. Can be used different types painting them in different colors. It is important that the thread is strong, if it is thick and ugly peeks out from under the "beads", you need to pick it up in color or just paint it.
Beads with pasta in the form of bows look beautiful. It is impossible to string them on a thread, so this work is more painstaking and takes more time.
Advice
Each bow must be tied in the middle with a thread, fastened to a knot, then move on to the next one.
You can make beads and bracelets by combining pasta with ordinary beads. You can decorate not only one thing, but a whole set, supplementing it with a hairpin in the same style. Such sets jewelry» look stylish and original.
New Year crafts
The easiest way to use cereal for New Year's crafts- do New Year cards together with a child, which he will be able to give on his behalf to relatives and friends. To do this, you need to select a simple drawing template on New Year theme, print, transfer to cardboard, decorate with cereals.
Common idea - Christmas tree. You can draw it yourself without using a template. The selected small groats must be pre-painted in green color, let dry and use for drawing, in this case it consists of one great detail.Decorate the Christmas tree with pasta beautiful shape, for example, bows.
Small crafts that can be hung on a wall, window, Christmas tree look original. To do this, cut out of cardboard christmas figurines. You can make many different options and hang them together like a solid garland. Good options would be:
- mitten;
- skates;
- felt boots;
- Christmas decorations.
It is easy to draw and cut out all these figures along the contour, and you can decorate with cereals in different ways, because each of them is one continuous piece. For example, a mitten can be made "fur" from rice, and the rest - from any other cereal. If there are many children in the family, this idea will be especially good options, because every child will be able to show creativity, sometimes parents themselves are surprised how much little dreamers can come up with.
Christmas toys from cereals
Typical glass Christmas decorations are a thing of the past, there are many creative ideas which can be used. One of the most popular is the use of cereals. For many, it is surprising that it can not only decorate a finished ball, but make it from scratch.
This craft will not take much time, if at first glance the idea seems complicated, just try it. Production takes place in several stages:
- We take a newspaper, roll it into a ball. How much material to take depends on the size of the expected toy. If you are making it for the first time, you should not immediately make a large one, but you don’t need a very small one either - it will be inconvenient to hold it in your hands.
- We give the ball the correct round shape using threads. To do this, you just need to start winding them in a circle, periodically changing direction, as if rolling into a ball. When the shape is even, we fix the ends of the thread, making a small knot.
- We prepare the cereal, which we will use for decor, pour it into a plate. Buckwheat toys look elegant.
- We spread PVA glue on top of the threads with a brush, wrap it in a plate. If there are empty places to which the grains have not attached, grease them with spot glue and add them with tweezers.
- We take spray paint, preferably gold, spray the toy, leave to dry. It is advisable to choose the color of the spray according to the color of the cereal used, gold looks good on buckwheat, silver on rice and semolina.
You can choose any animal, imagine with the help of what kind of cereal or pasta of a certain shape it will be possible to make it. All you need is to turn on your imagination, look at the picture of the animal, think about what its coat, body shape, and other features look like. Consider for example a hedgehog based on puff pastry, but using this idea, you can come up with your own options:
- Cooking salty dough: for 2 cups of flour, take 1 cup of salt and 250 water at room temperature. Knead the dough, give it the desired shape. This is easy to do, as the softened salt dough looks like plasticine.
- For needles, oblong-shaped pasta is best - take spiral ones. Paint them silver with spray paint. When they dry, you can make needles.
- Visually draw a line that separates the muzzle from the body, lubricate the edges of the pasta with glue, put a “needle”, lightly press down. We start moving from the muzzle, because if the last row turns out to be uneven, it should not be visible.
- We paint over the rest of the dough with silver spray paint, make eyes, nose, mouth. To do this, you can also take pasta - star crayons, if they are not painted, they will stand out so well. You can also take beads by putting them on glue.
You can decorate such a hedgehog as you like: make a pasta bow for it, put some small craft on needles, or simply make it colorful.
From grain
The most original idea grain crafts - making bird feeders. Such work will take time, require perseverance and patience, but the result is worth it. You can make a grain feeder for a child at school, children are often given similar tasks at labor lessons, or you can hang it on your own balcony or in the courtyard of a private house.
The basis can be any, some buy a ready-made feeder, the most ordinary, nondescript building at first sight will do. Others make it from wood or other improvised means.
A popular way is to cut open a juice can, making a hole in it for the birds. The material for the feeder is unimportant, decor with grains will give an original look and beauty.
It is undesirable to use glue, although this is the easiest option, but it can be toxic to birds. Even a small detached particle can harm birds. So it's better to use natural remedy for gluing - flour.
Preparing such an environmentally friendly paste is simple: you just need to boil the flour with boiling water. This method is often used in construction, for wallpapering and not only, instead of flour, starch can also be used.
It is best not to brew a lot of paste at once, but to do it in parts, since it is important to have time to lay out the pattern until it has frozen. The drawing and ornament must be thought out in advance, it is better to draw it on paper so as not to lose sight of it. We process one side of the feeder with a paste, apply the grits, just sprinkle the chalk, and spread the large one with tweezers, leave to dry.
Some use these feeders only for decoration, as they are worried that the birds will ruin their work. In fact, it is difficult to pick out well-glued grains, especially since they will not do this if there is always food inside.
From coffee beans
This type of craft is more suitable for adults, because among them there is also a fan of doing something with their own hands. A distinctive feature of such souvenirs is that the aroma that comes from coffee beans is stored for a long time. The craft will become great idea gift for a coffee lover, you can make it for yourself.
It is believed that coffee is a drink that brings people together, so this gift will show the right person that you value them.


It is best to choose as a basis not just cardboard, but burlap or other similar material. Making crafts takes place in several stages:
- We cut out a sheet of cardboard and a piece of burlap a couple of centimeters larger on all sides. We cover the cardboard with a cloth, glue the corners at the back. It is important to use a smooth fabric, if it has been lying for a long time, it is better to iron it.
- After the glue has dried, we begin to work with the grains. We measure the same distance from the edge, about 2 cm, draw with a simple pencil under the ruler straight lines. Then we draw any drawing in the center, a cup of coffee on a saucer looks beautiful.
- Lubricate each grain with glue, first lay out the pattern inside the picture with them, then the frame. Lightly press each time after gluing the grain. We leave to dry.
Sometimes, in order to decorate a home or captivate a child with creativity, it is enough to look into the kitchen. After all, from cereals, spices, seeds and beans you can make exclusive decor in the style of Provence or eco, as well as entertaining children's crafts. Editorial "With taste" I've got some cool crafting ideas for you. crafts from cereals and seeds with their own hands, which will captivate adults and kids.
The shape and size of materials matter: the larger and more varied, the better. By combining beans, peas, rice, buckwheat, corn grits, semolina, you can experiment with color gradients and textures. Get inspired with us, and forward to creativity!
Do-it-yourself cereal paintings
To create a picture or panel from cereals, you will need:
- legumes of different colors and sizes, pasta, seeds and cereals;
- glue gun or regular PVA with a brush;
- thick cardboard / canvas / piece of plywood;
- sketch of the future picture;
- brushes and paints.
- If necessary, paint the background of the canvas in the desired color.
- Examine the sketch, select the appropriate materials and sort them into saucers.
- Transfer the sketch to the canvas by hand or using carbon paper.
- Apply a drop of glue to a small area of the picture and immediately sprinkle it with grits. Wait a few minutes, then shake off excess material and continue to "paint". After 2 hours, the glue dries completely.
Experiment and improve your skills with each new painting. For starters, try something simple.


Having stuffed your hand, you can "draw" plots more difficult.


Decorating bottles and vases with cereals
Cereals can serve as a decorative filler for transparent bottles and vases for artificial flowers, twigs, candles, and even makeup brushes.


Containers in which layers of multi-colored cereals alternate also look very beautiful. For example, here are decorative bottles for the kitchen very easy to do at home.


To create beautiful composition, use 4 hints:

To do this, take 2-3 handfuls of cereal and put in a plastic bag. Pour in 3 tablespoons of vinegar, 2 tablespoons of alcohol, and a couple of tablespoons of diluted food coloring. Then tie up the bag and shake well to Rice is evenly dyed. Then put the cereal on the saucers covered with napkins and let dry.


Use these simple ideas, create, experiment and come up with new non-standard ways to use cereals. Trust me, it's amazing! Once I tried to create a picture of cereals, you will be carried away in earnest. Share this material with your friends, and also send your work in the comments.
Our kids have so much energy and curiosity! This can and should be used: let the child make something on his own, create his own naive children's masterpieces. Of course, with your help and active participation, small touching gifts for parents or grandparents can appear - for the holiday or for no reason at all, just to say: "I love you."
Magic transformation of ordinary objects
When a picture emerges from several types of cereals and seeds, it is akin to a miracle. Indeed, it is traditionally believed that we cook porridge from buckwheat and rice, and we throw away melon and watermelon seeds, if we are not going to plant them, without hesitation. But it will not be difficult to look at it differently - and try to use non-traditional materials to create crafts.
Then cereals, legumes, seeds will magically turn into paints, and fantasy can suggest very unexpected solutions, and your baby will receive the first skill lessons ... But before you start mastering crafts from cereals, arrange for children a small drawing lesson on ... semolina. Pour it into the tray and show how a finger can create a picture: the sun, a Christmas tree, a mushroom ... The kid will be delighted!
What might come in handy
Just imagine: for creativity, you don’t need any special devices or materials at all. Everything you need, you most likely already have in the house:

When creating crafts from cereals for children with your own hands, you can use natural colors inhabitants of the kitchen cabinet:
- brown - buckwheat, tea leaves;
- shades of white - rice, semolina, pumpkin seeds, zucchini;
- yellow - peas, millet;
- sand - wheat groats;
- black, gray - seeds.
From a variety of colors of beans, you can create a whole picture!
DIY rainbow
But if you want brighter tones, like reds or blues, the solution is simple: change the color of white raw materials with food coloring. Even if suddenly a young creator dares to try a grain or a seed for inspiration, you will have nothing to be afraid of.

However, if you need to dye semolina, you need to use a different technology. To dissolve gouache, you need to mix equal volumes of water and alcohol. in glass or plastic plate add the resulting liquid to the paint to achieve the desired shade.

Advice. The most convenient option is to paint large quantity cereals: not for one application, but with a margin. Then in jars you will always have a multi-colored palette ready.
basis for crafts
 You can draw a sketch of the future picture yourself or choose an image on the Internet and print it. This is a good outlet for adults who are not artists at all.
For starters, you should try your hand at creating small applications from pumpkin seeds, sunflower seeds, beans and peas. In this case, plasticine applied to the base inside the contours of the figure can act as glue. For legumes, the retaining layer is needed thicker than for light seeds.
Of course, nothing will work on thin paper, it simply cannot withstand the load. To still use the printed stencil, it is better to stick it on cardboard, and then wait until the glue dries.
Fantasy and creativity
What kind of materials do enthusiastic people create their works from: scraps of fabric, pieces of paper, small stone chips ... The list can be continued for a long time. And to name all the varieties of crafts is almost unrealistic, there are so many of them!
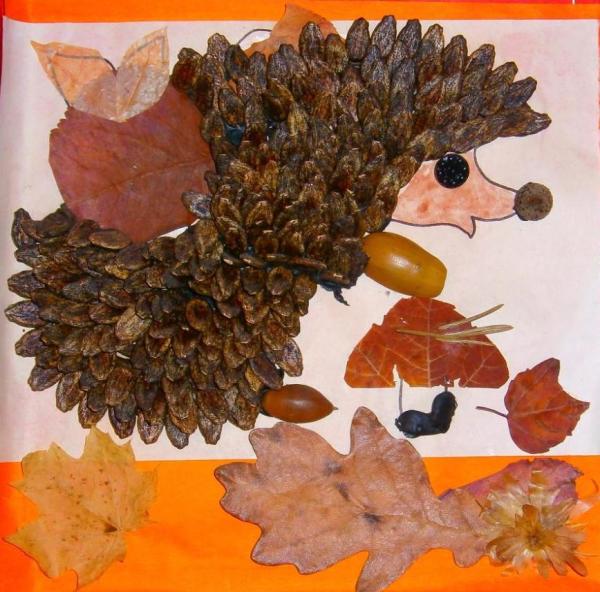
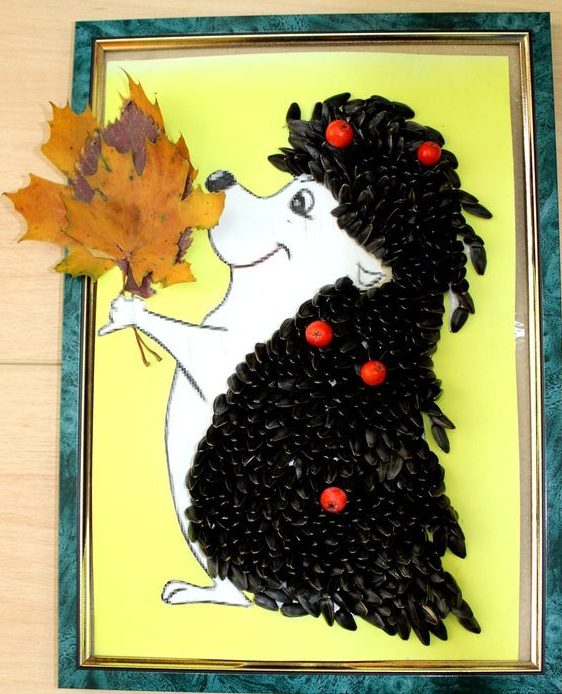
Hedgehog from seeds
 You can simply make a portrait of a handsome man with a prickly back, or, complicating the task, draw another path along which the animal goes to its house.
The craft "Hedgehog" from seeds is not very difficult to make with a child. Of course, you have already prepared a stencil on cardboard in advance, kneaded plasticine until soft and poured seeds, buckwheat and rice into bowls.
After executing each fragment filled with cereals, shake off the excess on a dish or tray. If you do everything step by step, carefully, the result will surely please both you and the baby.

Is the hedgehog ready to stock up for the winter? Then blind a few plasticine mushrooms and apples and attach them to the needle seeds.
The works “Chicken”, “Mushroom family” are performed similarly.
Craft "Flowers in a vase"
 And now it's time for men (in this case, age is not the main thing, it's about the state of mind) to get down to business. To make women smile and feel happier, there is one recipe: give them flowers more often. Having received your bouquet, mother and grandmother will be touched, and sister or girlfriend will reward you with a radiant smile.
Making crafts from seeds and cereals with your own hands is not at all as difficult as it might seem at first glance. And if plasticine was needed for the hedgehog, then this time you need PVA glue.
In the process of work, all elements of the drawing must be done in turn and do not apply glue to several fragments at once: it can dry out, while you will be engaged in some one flower.
To make each flower neat, shake off excess grains - this way you will see where they have not stuck, and correct the situation in time.

To make the application look like a picture, you can create a background for a bouquet in a vase. It's easy: just apply glue to the free areas of paper and sprinkle with semolina or dried tea bags. If at the same time the color of the background changes from the perimeter to the center and becomes lighter, the picture will “come to life”.
Panel "Cats on the Night Roof"
 It is permissible to perform a drawing according to your desire schematically and make purring silhouettes on both sides of the pipe against the background of the moon and starry sky. Or you can try to create more detailed images - it's up to you to decide how difficult the work will be.
For manufacturing, you can use colored semolina and rice. Using something more massive is not entirely justified, since the panel is made on canvas. It is known that overloaded tissue can sag, deform and completely spoil the whole work.
If for some reason it is difficult to draw a plot picture on your own, you can print several templates from the Internet, and then transfer the contours to the prepared base.
The panel is characterized by two features: canvas and frame. Whether your work will be enclosed in a finished wooden structure, or it will be applications from seeds, pasta, strips of cereals - it's up to you. After all, you are the author and have every right to your own idea of \u200b\u200bbeautiful.
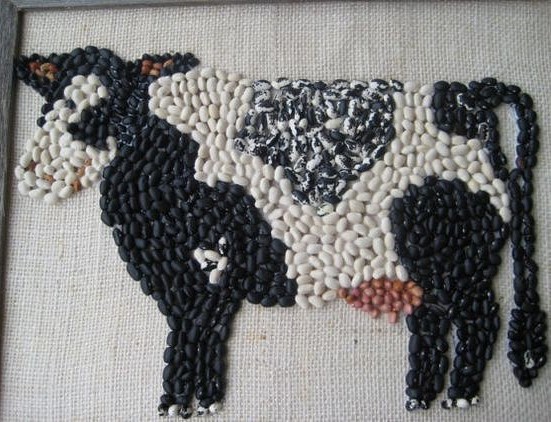
 If you decide to make a picture of colored beans, it is better to take cardboard and plasticine (hot glue). Just keep in mind: in this case, the process of creating a man-made masterpiece will be more like making a mosaic. Or perhaps it will remind your child of putting together puzzles ... In any case, this will be an exciting activity. This picture and the frame can be made of beans in a contrasting color.
It is quite possible that you will want to create new works with other characters: "Geese-swans", "Fox Patrikeevna and Kolobok" ... But you never know the plots!
Crafts from different cereals, plant seeds are always original and can be used not only as exhibition objects, but also as full-fledged bright accents in the decor of the kitchen or on the desktop. Well, if you are “dragged” into the creative process, then, probably, a variety of ideas may soon arise and come true: from topiary and napkin clips to decorated countertops. Why not?
Attention, only TODAY!
It is known that the development of fine motor skills of a child directly affects his speech and mental development, therefore, in order for a child to develop correctly, you need to constantly occupy his playful hands with something. Today we will be engaged in the manufacture of crafts from cereals and seeds. They are textured, they are different, they are small and perfect for developing motor skills. One problem is that seeds and cereals do not adhere well to ordinary paper glue, they will fall off, so we glue it on plasticine or take glue "for wood and plastic". Beans, beans, rice and buckwheat, peas, sunflower seeds and pumpkin seeds will be used - any seeds and cereals that match our picture in color and size.
Where to begin
If this is a craft - an application or a relief on a flat surface, you need to prepare that very surface. On a sheet of cardboard we draw the outlines of the craft. We lay out everything inside the contour with plasticine. The larger the seeds, the thicker the plasticine layer. Now you can carefully, one at a time, stick cereals or seeds. Pour small cereals onto the surface to be covered, and then slightly press them into the plasticine.
They also decorate vases and pencil holders with seeds and cereals. Then you will need to stick plasticine around a tin or glass jar, and then stick seeds on it.
Ideas for crafts from cereals and seeds


When the craft is ready, we cover it with varnish, and it will not lose its appearance longer.
To make an original and interesting children's craft, it is not at all necessary to purchase special materials for arts and crafts, because you can find everything you need at home! Or better yet, have a good look in the kitchen!
Crafts from cereals
Craft Banks with cereals
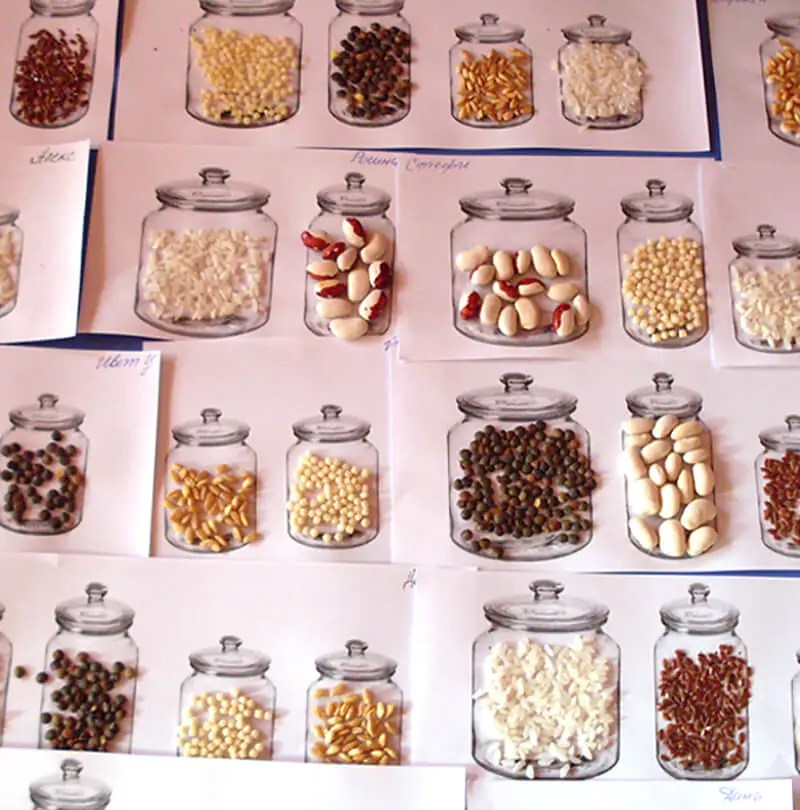
Even the smallest creator will cope with the creation of such crafts from cereals. Especially the lesson should be enjoyed by little girls, who already from an early age feel like real housewives.


Print ready-made glass jar templates on white paper, cut out jars and glue them to a sheet of white cardboard. Thus, the craft will be more reliable.
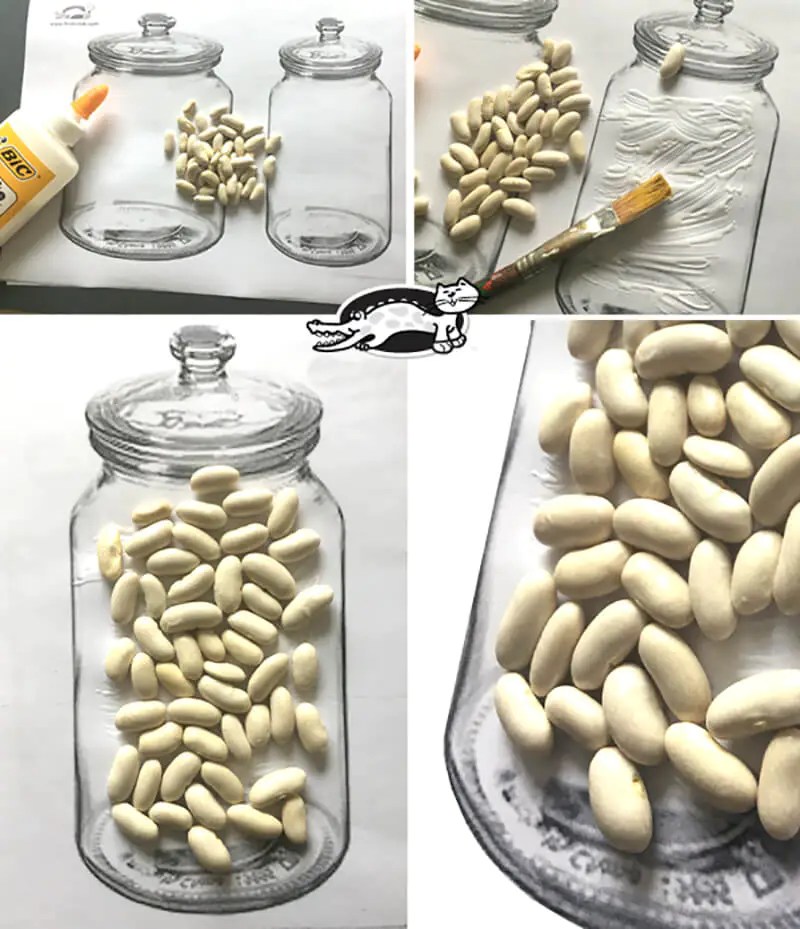
Now grease the surface of the painted glass jar with PVA glue and start filling. Glue a wide variety of cereals to a glass jar on paper. It can be beans, rice, peas, millet, and even pasta!

Crafts from cereals
Crafts from cereals with their own hands
Craft Birds from cereals

To create such unusual crafts from cereals You will need the following materials: A sheet of thick cardboard (perfect cardboard box), a sheet of cardboard for children's creativity, a stencil of any bird, scissors, a pencil, PVA glue and cereals.

Using a stencil of the bird you like, cut out its silhouette on a sheet of thick cardboard. Then glue a sheet of cardboard for children's creativity and a sheet of thick cardboard. In the place of the silhouette of the bird, you will have a depression, which will need to be filled with patterns from cereals.
Glue the grits on PVA glue.

And if you want to make the craft simpler, then print out the finished bird template, grease it with PVA glue and glue the grits.