Do-it-yourself plastic bottle box step by step. Do-it-yourself round box from a plastic bottle
I was inspired by a square box that I found on the Internet. I immediately liked the gift idea as soon as I saw the photo and description of the workmanship. Most of all, I was impressed that all the materials and tools are in almost every home! The most important thing is a plastic bottle and woolen threads. Who does not have an empty house plastic bottles?! And the threads are disassembled knitted clothes. I made my first box from threads Brown. I never thought it would turn out so beautiful! And my first box was very happy, and for the second, the description of which is here, my sister thanked many times. And it's not easy to surprise her! So the best gift than a round box can not be invented! For any occasion, for any age…. You can also decorate the box so that it looks like a man's. For example, for a boy you can paste over cars, and for a man in restrained colors and concisely ....
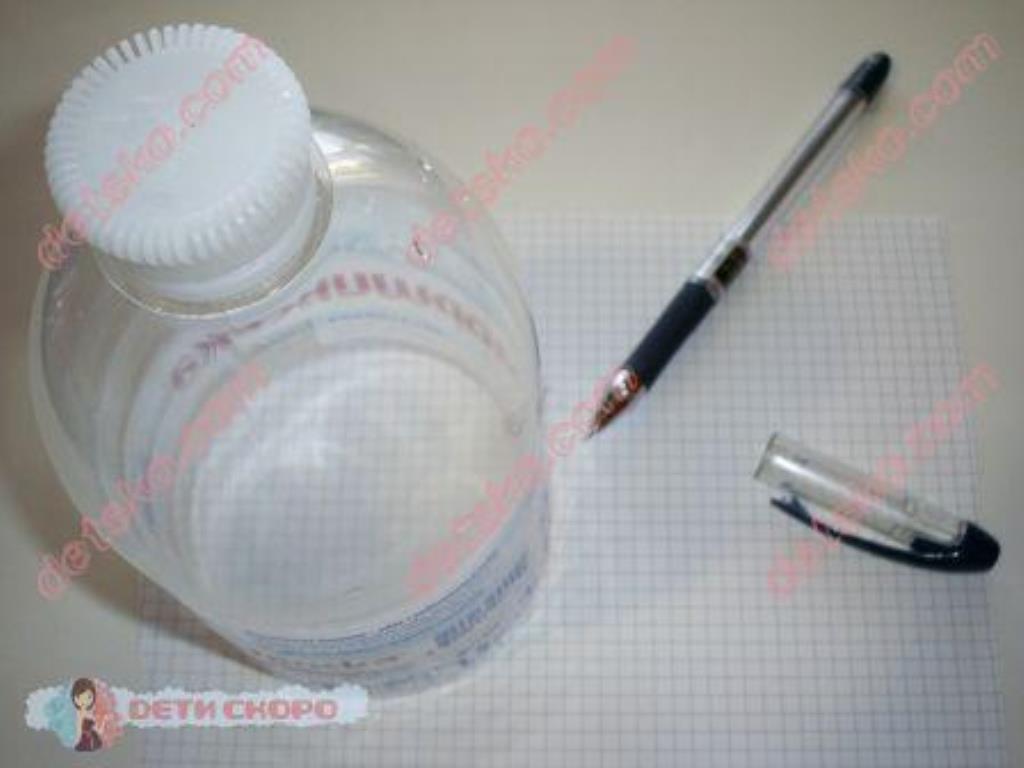
Well, let's get started! In the photo, all we need is:
List of tools and materials:
- Plastic bottle
- Packing from a pad for an optical computer mouse. Although you can take any other material, transparent, durable, similar to a plastic bottle from which we are going to make a round box.
- Lace ribbon. You can use any other tape that you can find at home. It will be the handle for the box.
- Scissors
- Glue with glitter
- Hole puncher
- Wool thread
The following are not in the photo, but these are simple tools in every home:
- Pen
- Ruler
- Paper
- Marker
- stapler.
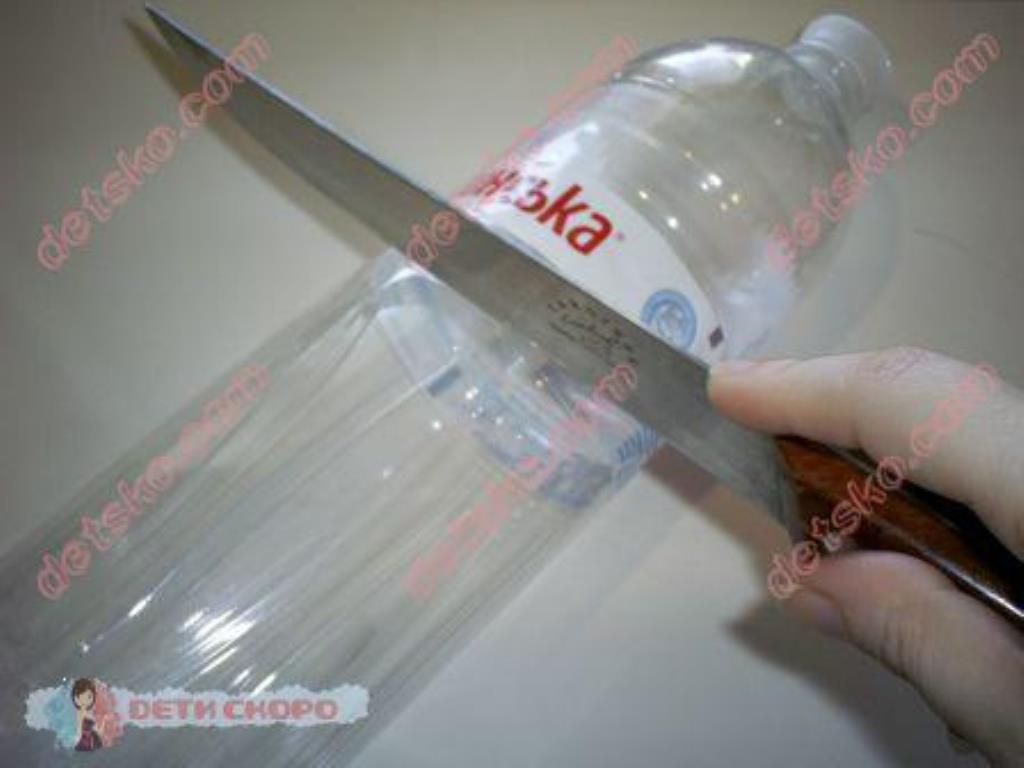
Cut the bottle with a knife along the edge of the label.

We determine how high we want the box, and using a ruler around the circumference, mark with a dotted line where to cut.
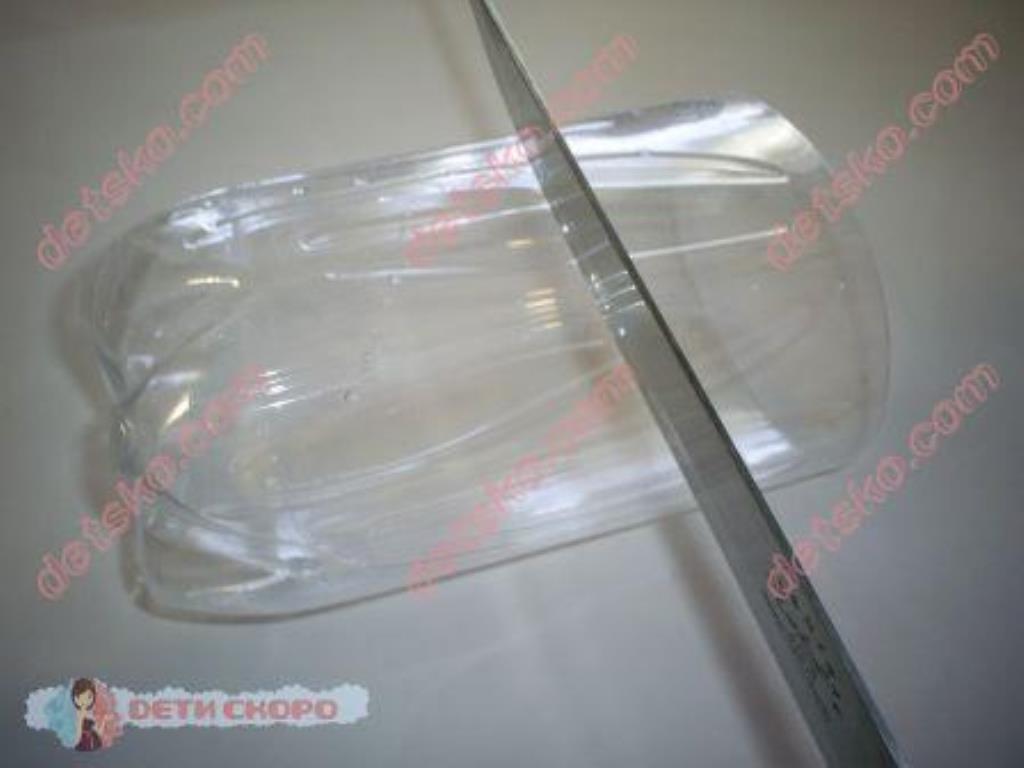
Cut off the plastic.
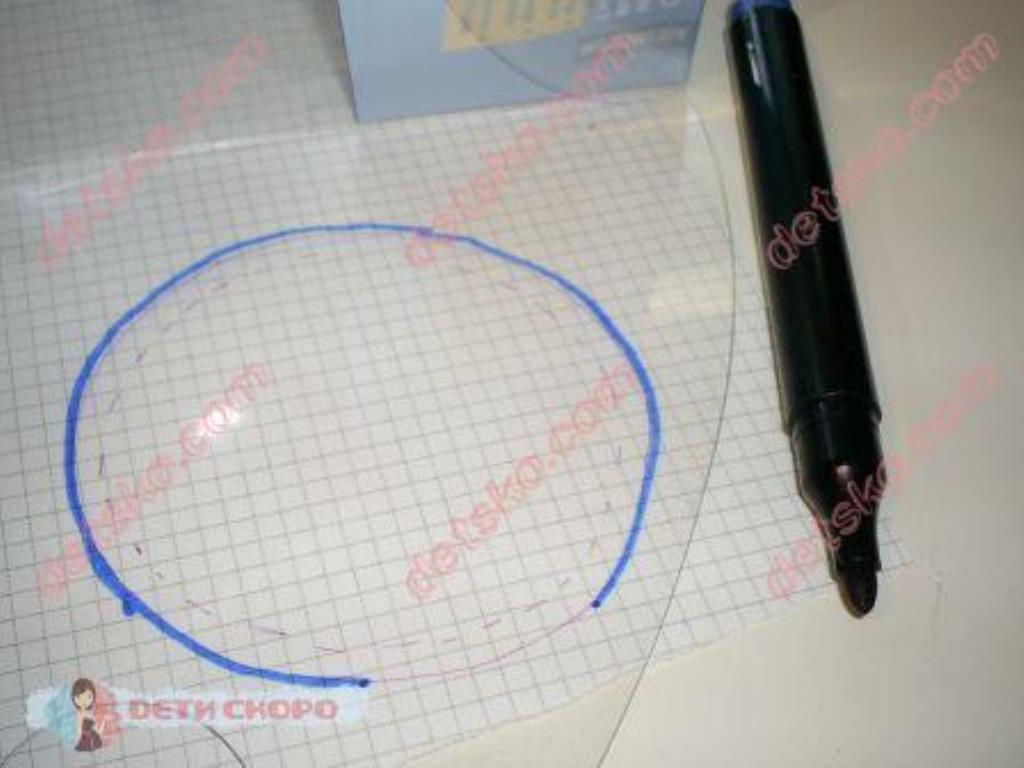
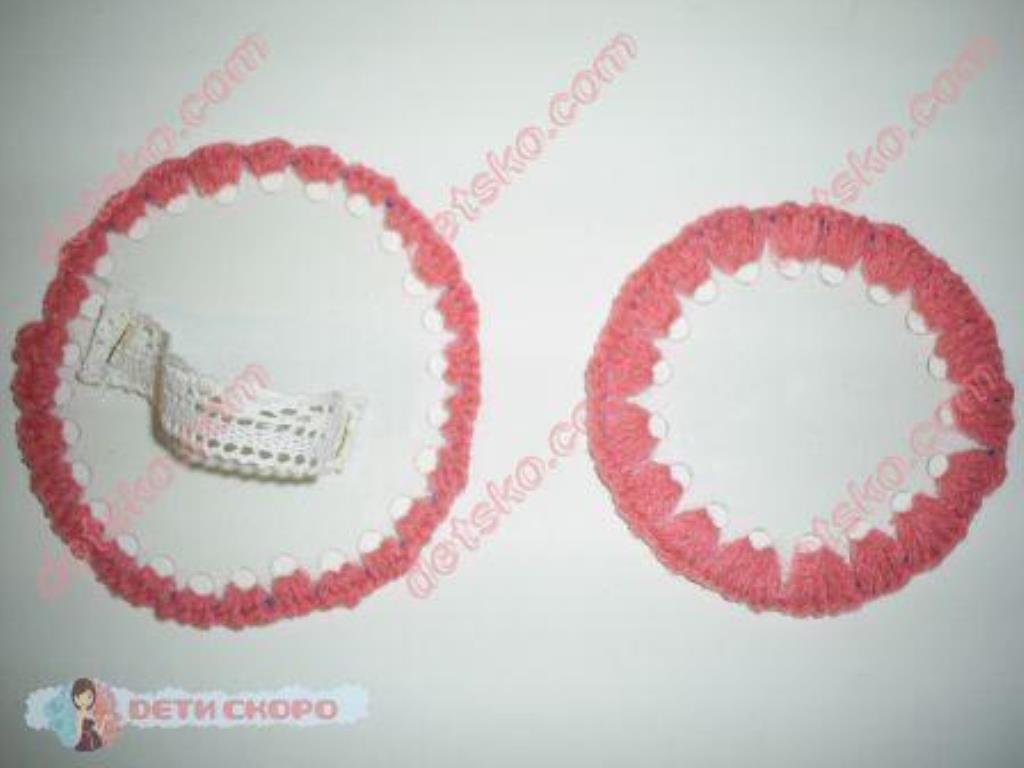
Using the top of the bottle, draw a circle.
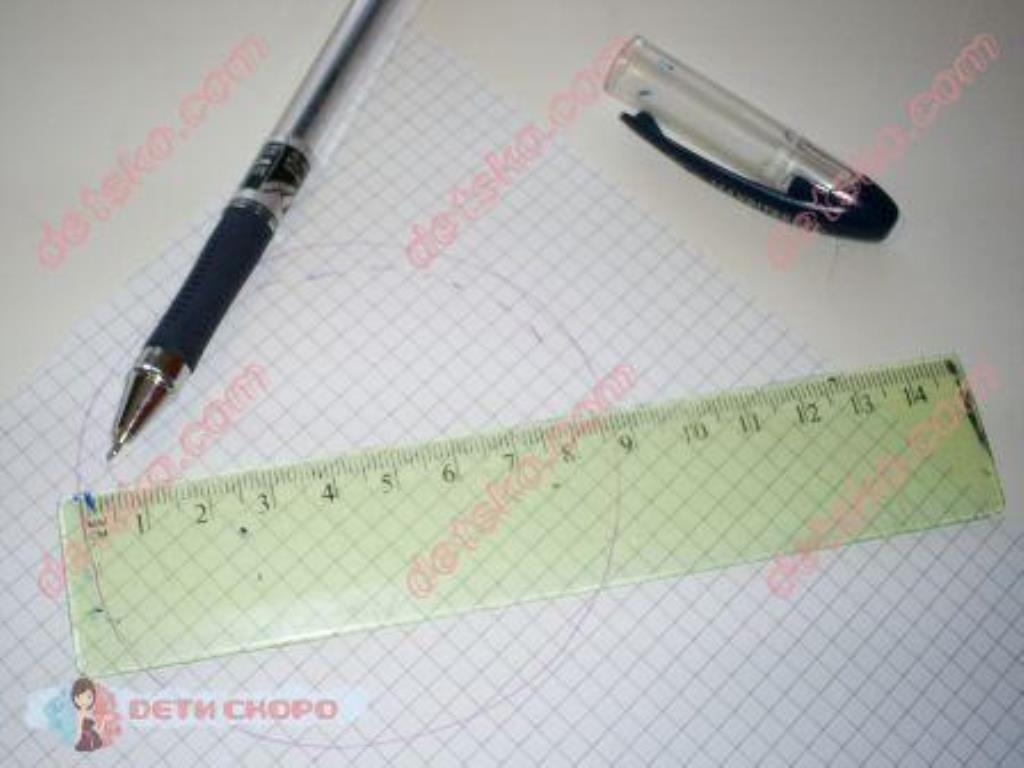
In the middle of the circle, retreating half a centimeter, using a ruler, draw a circle of a smaller diameter with a stroke.
We put the drawn circles under the packaging for the rug, translate with a marker larger circle for packaging.

Draw a smaller circle next to it.
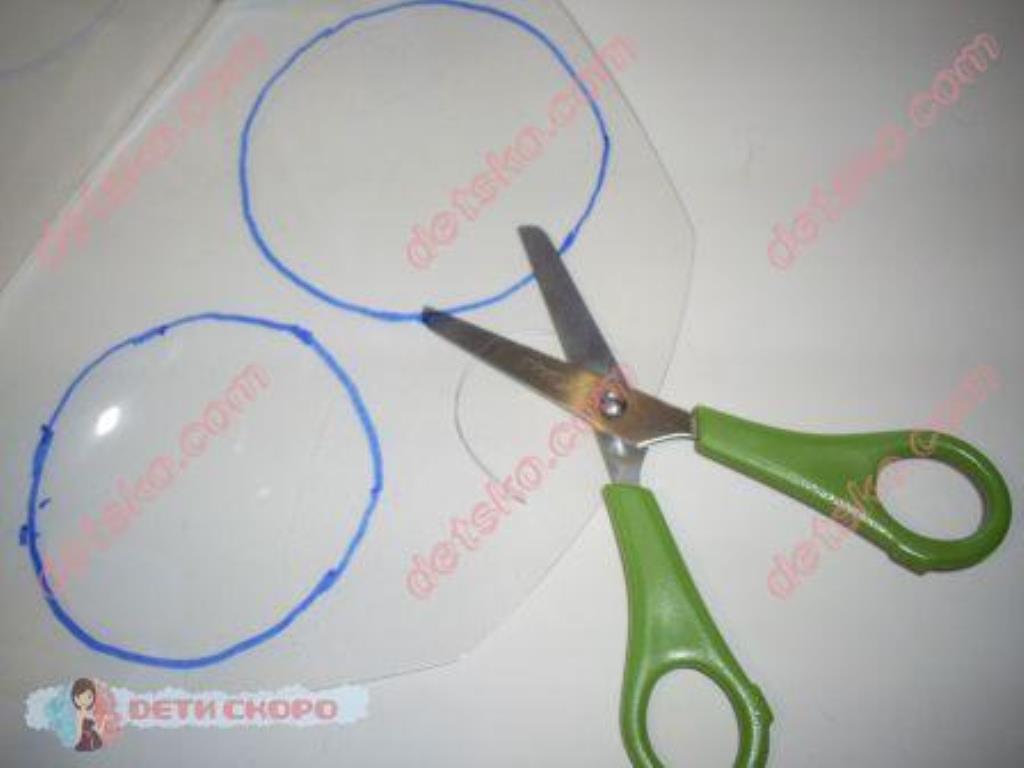
Cut out circles with scissors.
.jpg)
Here's what should happen. This will be the bottom and lid of the box.
.jpg)
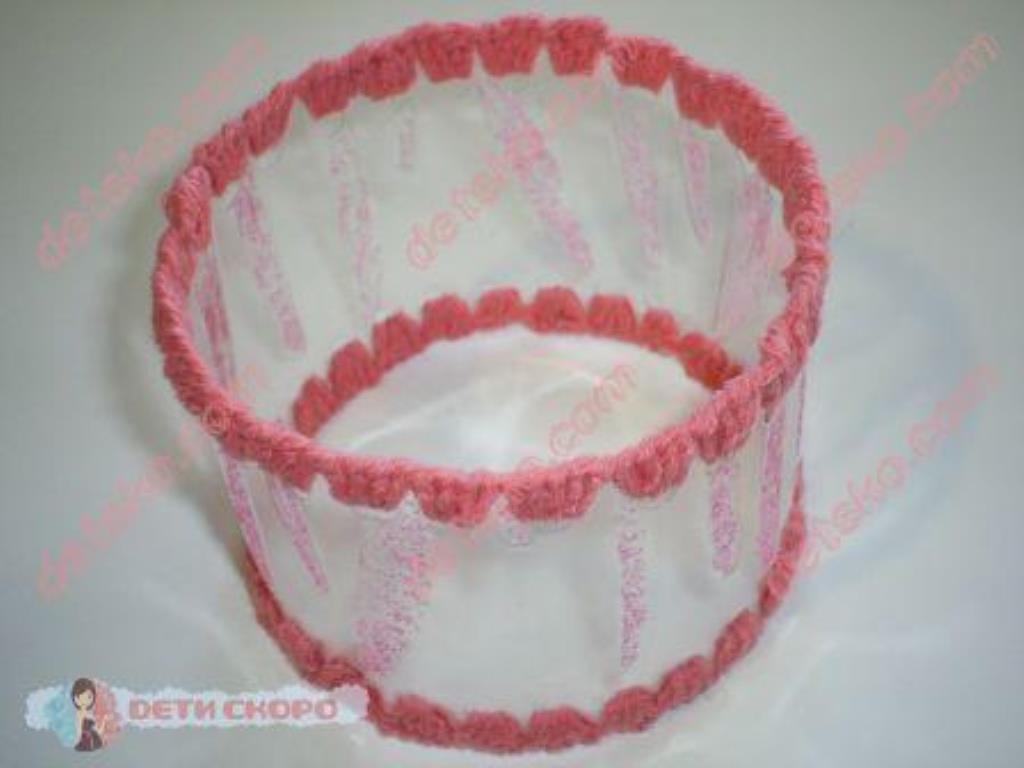
We wash all the plastic parts that were cut out.
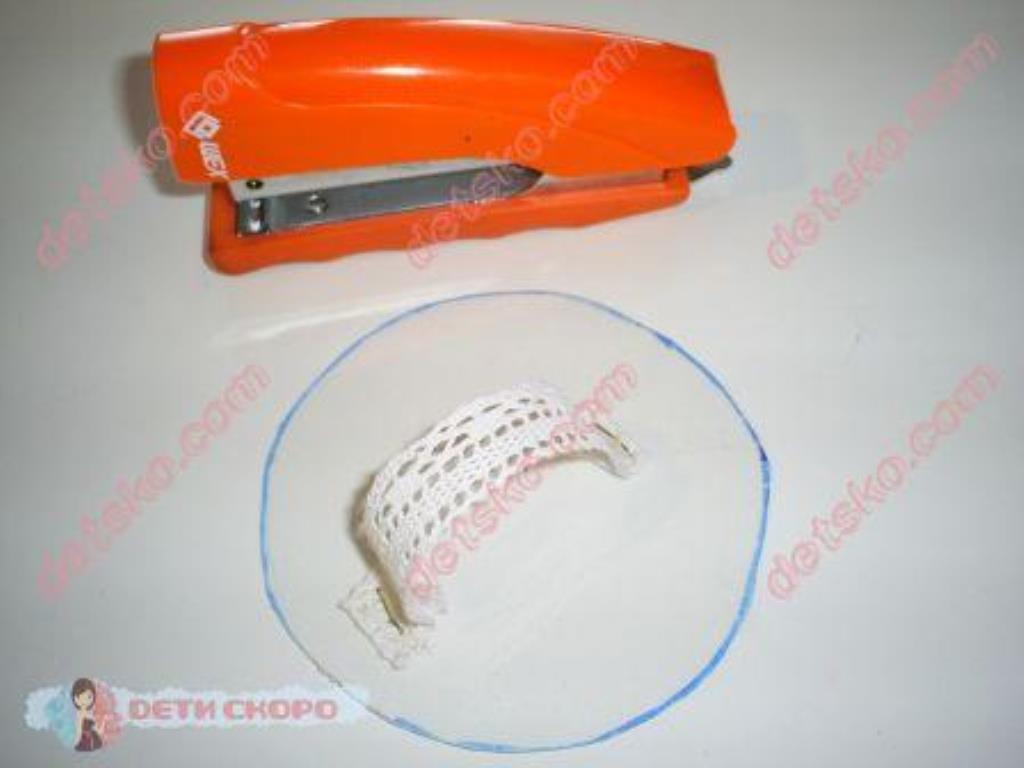
With a stapler we pin a “handle” - a beautiful ribbon.

We pierce holes along all edges of the lid, bottom and walls of the box with a hole punch. All holes should be at the same distance from each other and from the edge.

We decorate the walls. In my case, I specifically cut off a part of the bottle with bumps in order to apply glitter glue in them. You can stick or draw something.
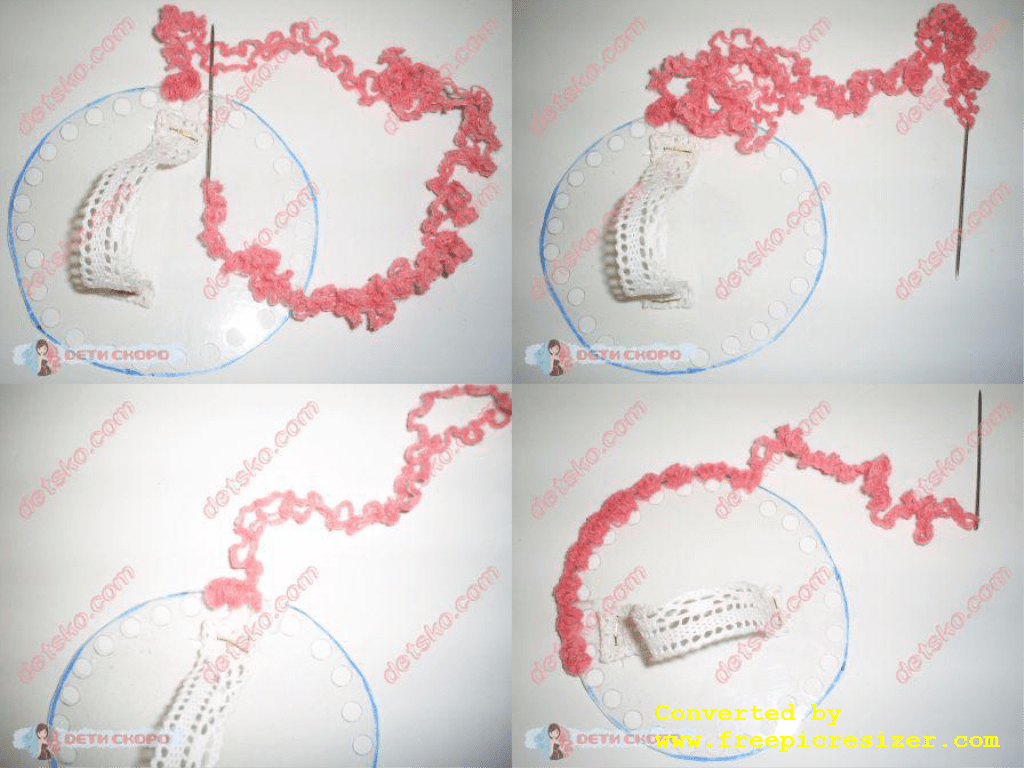
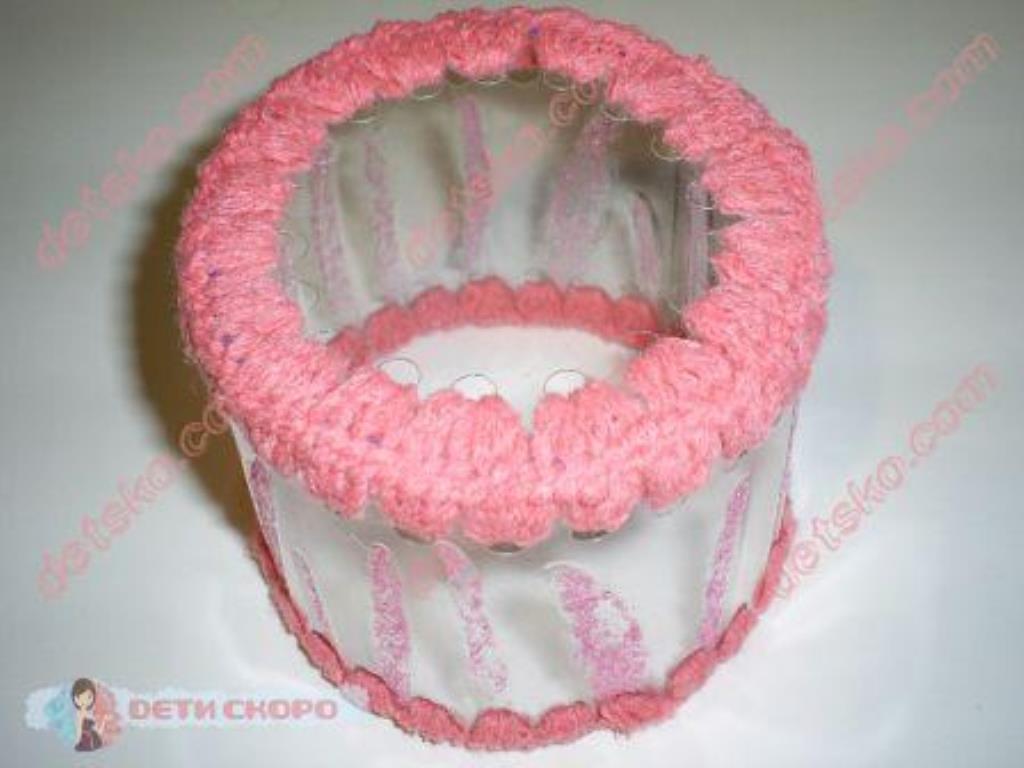
While the glue dries, we wrap the lid with a woolen thread, for me it consisted of three thin ones. We sew with a double folded thread, as a result of my thickness, it turned out to consist of six. We put the thread under the bottom, pull the needle through the hole in the cap and the resulting loop, tighten it. We repeat ... The number of loops in each hole should be the same. I had four loops in one hole. In the description, according to which I made a square box, there was something written about a hook. But I don’t have it, and I think not everyone will find it, but a larger needle - so that you can thread the thread, is indispensable in any home.
We also sweep the bottom.
After the decor has dried, we overcast the walls.

As a result, the bottom will turn out to be just such a size that it can be inserted into the walls. My decor turned out to be like dripping droplets, so I inserted the bottom from this side.

We sew the bottom. In my case, I simply divided the thread with which I overcast - I took one of the three. If you had a uniform thread, choose a regular sewing thread that is the most suitable in color so that it is not visible. We sew the bottom from the outside - in order to see the result and correct the irregularities that could have happened when overcasting.
This is how the bottom is.

Sew the lid on the inside. As a result, the lid turns out to be slightly larger than the box, it should cover, go beyond the edges everywhere the same. Therefore, sewing over the edge will not work, you must try to sew as close as possible to the center of the cover. We sew a small area - so that it opens easily. I only have four holes.
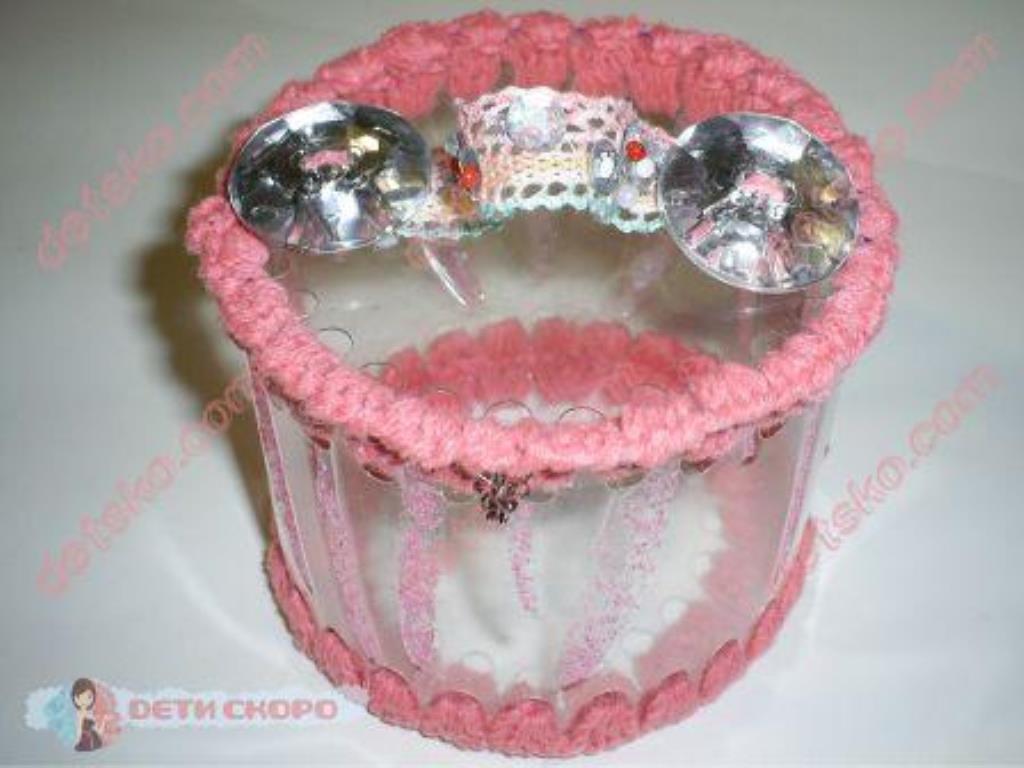
Here is a wonderful gift! You can leave it as it is, or you can decorate with something else. I also added a hook to close.
I chose this one color scheme because I know that my sister likes the color pink. And the colors of plastic bottles are not so diverse. For example, I only know transparent, blue and brown. For your convenience, I will compile a table of colors that can be combined with three colors of bottles.

Derived tones and colors from these basic ones given in the table should also ooze with the same colors of the plastic bottle. Although it varies... When choosing - to look good, you can use the designers tool - the “color wheel”. There is a lot of information on the Internet about color combinations. But if you still have doubts, write to me, I will be happy to select the best option! :)
The round box is easy and quick to make. I did this one for only one day, while the square one took three whole days. So if you have a dilemma: you don’t know what to give as a gift, there is little time left or no money for purchases…. Making a round box from a plastic bottle will be the best option for you!
Now very popular different kinds needlework. The art of making something beautiful from improvised materials will never go out of fashion, in other words, from what some people throw in the trash, while others use to create real masterpieces. For example, a do-it-yourself box of plastic bottles is made quickly and simply. Having mastered the technology, you will be able to make a variety of products: from everyday containers for storing small items to gift souvenir options.
Possible types of products
Any do-it-yourself plastic bottle box is made using a similar technology. The design is made up of individual elements, such as rectangles, interconnected by crocheting with simple single crochets. Accordingly, the plastic base is pre-punched along the edges.
Using this technology, you can make caskets of various shapes:
- rectangular;
- square;
- oval;
- cylindrical.
It is also interesting to use curly lower parts of the bottles.
The design of the boxes also choose any:
- open;
- with lid;
- with several departments;
- completely transparent or colored plastic;
- painted with acrylic, nail polish;
- decorated with paper appliqué, including quilling technique;
- decorated with kanzashi elements;
- with color patterns from scraps of the same plastic bottles.
As you can see, there are many options. On the basis of any, everyone is able to develop their own unique souvenir.

Materials and tools
In order for you to get a beautiful box of plastic bottles with your own hands, you will need to prepare the following:
- transparent or colored blanks;
- means for removing dirt from the bottle (soap, water, sponge);
- marker for marking;
- scissors;
- hole puncher;
- colored paper and paper clips (for some options);
- crochet hook;
- yarn or kapron threads (the latter are stronger);
- paints, nail polish, pattern templates and other decor if you decorate the product.
There is nothing complicated or unusual. Everything you need is in the house of every needlewoman. And if not, then buying it will not be difficult and costly.

How to make a box of plastic bottles with your own hands step by step
So, the work will be performed in the following sequence:
- Preparation of bottles (wash, dry, remove labels).
- Production of plastic blanks of the desired shape and size.
- Straightening details.
- Making holes around the perimeter of the elements.
- edges.
- Connecting parts.
- Product decoration.
There are not so many actions, but each stage has its own nuances. Detailed recommendations are provided in the next section.
Do-it-yourself plastic bottle box: master class
Try to create a simple souvenir first rectangular shape, for example, with a lid.

Proceed as follows:
- Prepare those bottles from which you can cut even rectangles, and do it. For a product with a lid, you will need two bottom parts and at least 7 or 8 side walls. This is if the object is made transparent single-layer. There is a variant of a two-layer box, when to make one part, for example, a lid, bottom or side wall, two identical rectangles are connected, and a sheet of colored decorative paper is placed between them. For the second method, details will be required twice as much.
- When the elements are cut out, straighten them by drawing them with force along the curved side, for example, with a knife. Double-layer parts must be folded with the concave sides inward.
- Process each blank in turn with a hole punch along all sides. First, you should practice on plain paper of the same size.
- Crochet the perimeter of each workpiece with single crochets, leaving after fixing a thread about 20 cm long for stitching the elements. It is worth noting that in the corners you will have to make two columns in one hole to go to the next side of the rectangle.
- Sew the elements sequentially into a three-dimensional design.
- If you are making a lid, you should start sewing it to the box with great detail, and the three side parts - in the second place.
- So your box of plastic bottles is ready. With your own hands (photo above), you can make absolutely any decor, or leave it as it is. If you decide to decorate the product, read on.
- Prepare templates with patterns for the surfaces of the souvenir. Draw them on paper or print them off the internet. If your box is transparent, just place the blank and circle the drawing with a marker.
- Lay the outline with a second layer (volumetric decorative) using nail polish (preferably with a thin brush) or a special composition for stained glass from sets for needlework and children's art.
- Paint the pattern with different shades of nail polish, acrylic or stained glass paints.
- After drying, you can decorate the surface with glitter varnish, as well as stick beads, sequins, and small decor.
Your masterpiece is ready.
So, you have learned how to make a box of plastic bottles with your own hands. Having mastered the basic principles of work, you can easily make many such souvenirs of various shapes, purposes and appearance.
Good day, my dear friends!
In today's master class, we will make a box from a plastic bottle. In which you can store various trifles, or you can use it as a gift box.
We have already made caskets from different materials(), and today we will do it from a plastic bottle.
To make the box you will need:
- Two plastic bottles;
- Zipper;
- hot glue;
- Stationery knife, scissors;
- Openwork braid.
If you have all this at hand, then let's start manufacturing.
1. Cut off the bottoms of the bottles. There is a strip on the bottom of each bottle, that's exactly what you need to cut along it.


2. Take the zipper longer, then cut as much as we need. Glue on the inside with hot glue. Glue first on one bottom.


3. After the second step, open the zipper and glue the other half in the same way.

This is the kind of preparation we get. Let's decorate it.

4. We glue the openwork braid on the outside to hide the zipper. Glue so that it does not fall on the teeth.

Here is such a wonderful and unpretentious box came out.

If you want, you can decorate it, for example, make decoupage.
Here is such a short MK turned out today. I hope you found it interesting and useful!
Pleasant little things can be created from the most unusual materials and tools. In our master class, we will tell readers about creating such an element as a box from self-decorated plastic bottles quickly and easily with our own hands.
Master class on creating a box of plastic bottles with your own hands
A box made using such non-standard materials and tools will allow you to keep your jewelry and accessories in order. Let's learn how to do it, because it is for this that we offer you the following detailed master class.
Before starting all work, prepare all the material you need:
- Plastic bottle with a volume of two and a half liters;
- Sharp knife;
- Sheets of thick cardboard;
- Fabric in several colors of your choice;
- Threads;
- Centimeter tailor's tape;
- Glue or glue gun;
- Lighter or candle;
- Thick sewing needle;
- Sharp awl;
- Decorative items such as lace, beads, sequins, rhinestones and so on.
Start creating a decorative box:
- Take a plastic bottle with a volume of two and a half liters to a height of eight to nine centimeters. At the edges, melt small holes around the entire circumference of the bottle with a hot knitting needle.
- Cut out two circles from thick cardboard sheets. One large diameter of eleven and a half centimeters for the lid of your box and one small circle with a diameter of eight and a half centimeters for the bottom.
- From the fabric that you have chosen as the main decoration for your plastic box, cut out a large circle for the lid with a diameter of about twenty centimeters.
- Then cut out the largest circle for the box itself from the same base color fabric. Its diameter should be about twenty-six centimeters.
- Now with glue or glue gun glue a cardboard circle to the plastic bottom of your bottle.
- Sew a large circle of fabric with threads and gather into a frill along the edge of the fabric.
- After that, insert the base from the plastic bottle into it and tighten the threads so that the fabric is tightly distributed around your plastic base.
- Distribute all the formed folds evenly over the base of the box, and sew the main fabric to the cut-off bottle base. It was for this process that small holes were made around the entire perimeter of the plastic bottle.
- Wrap the upper part of the fabric inward and sew again. Now you have a beautiful blank for your future box.
- Now you need to cover the cardboard cover with a fabric of the main color and sew it with threads. After that, gently sew along the edge of the fabric again to achieve a better fastening of the ruffles.
- Let's start decorating your blanks. Take a fabric in a contrasting color and cut out circles. The size of the lining will depend on the size of your base. The length of the lining will be equal to the circumference of the plastic bottle, the height of the lining will be equal to the height of your box plus seam allowances of about one centimeter or one and a half centimeters. The circle is equal to the diameter of the bottom of the bottle plus a seam allowance.
- Lay the finished lining inside your box. Sew on the contrasting fabric, while carefully pinning it together with the lace. Also sew lace on the bottom of your jewelry box. At the same stage, if desired, you can start sewing decorative beads on the walls of the box.
- Also attach lace to the lid of the plastic box. Cut out a circle from your base color fabric and sew onto the hole in your lid. Decorate it with beads, rhinestones or beads.
- Add a little decoration to the lid of your jewelry box. As a decoration on a plastic bottle box, a voluminous flower. Cut five larger petals and five slightly smaller ones from crepe satin. Burn the edges of the petals with a lighter or candle flame. Then collect all the prepared petals into a single flower.
As a result of such simple manipulations, you will get such an unusual plastic bottle box as in the photo below.

You can use your imagination and creativity to create unique and variety of options boxes. This master class gives basic knowledge on the manufacture of this element of decor.

A selection of videos on the topic described
In the final paragraph of our article about creating a box of plastic bottles with your own hands, we recommend that you watch a small selection of interesting videos on the topic described in the article. We will be glad if the presented material will be useful to you. Happy introduction!


