The most original candy gifts. The most original candy gifts Do-it-yourself candy bouquets for March 8
March 8 is approaching and it's time to take care of an original gift for our mothers, grandmothers, sisters, teachers, educators and beloved women. Today we will learn how to make gifts with our own hands, you will see detailed master class from the needlewomen of the country-masters, you will learn how to make a sweet present from sweets. For those who have little time, we have prepared photo instructions to make beautiful gift on March 8 quickly.
Do-it-yourself gift for March 8 - a master class from the Land of Masters on how to collect a bouquet of roses from satin ribbons
An excellent gift for mother, girlfriend or lover on March 8 will be a bouquet of roses from the Land of Masters.
Step-by-step instructions can be noted by older schoolchildren for their mothers and grandmothers, women for congratulating colleagues or relatives, as well as men who want to surprise their soul mates.

What materials are needed to create a bouquet of roses from satin ribbons according to the master class of the Land of Masters
So, to make 1 rose with our own hands, we need:
- 3 satin ribbons in different colors and widths (as shown in the picture);

- glue "Moment";
- stationery scissors;
- thread and needle for sewing;
- matches or lighter;
- long skewers for canapes.
Do-it-yourself step-by-step instructions for making a gift for March 8 with a photo
- The first step is to wrap the skewer thin ribbon green, the workpiece will act as a stem.

- Singe the ribbon at both ends with a match so that the fringe does not come out.

- Tightly pressing the ends of the tape, use glue to attach them to the stick.
- We also lubricate the wide tape with glue and apply it to one of the ends of our stem.

It is important to know! The widest ribbon for a bud can be any bright color. If you make a lot of roses to put together in a bouquet, wide ribbons may be of different shades, or may be of the same color (for example, white, yellow, pale pink or scarlet).
- After the glue has set, we wrap the tape several times around the skewer.

- Next, we bend the upper edge of the satin ribbon and glue it so that it does not unravel in the process of further work.

- Now you can start twisting the flower and creating a beautiful bud. It is necessary to twist the corner of the tape away from you so that rose petals form step by step.

It is important to know! To prevent the bud from falling apart during twisting, it is worth holding its lower part with your fingers.

- Each turn of the twist (i.e. each new petal) is best sewn with a thread.
As you twist, you get quite voluminous petals and a very beautiful realistic bud.

- At the final stage of twisting with a needle, all the petals are pierced through the perimeter at the bottom of the bud, the ribbon is well stitched with threads.

After such manipulations, the rose will always keep its shape.
- Now we just have to make the base of the bud from a piece of wide green ribbon, which will close all the seams and give the rose a complete look.

To do this, cut off a small square piece of satin ribbon, apply glue to the inner surface, wrap the workpiece around the bud, as shown in the figure, then press it tightly to the surface.

To decorate one rosette, the stem from the skewer can be tied with a bow from the remnants of a thin satin ribbon.

Such an element will ideally replace the leaves of a flower.

And if you have enough time and patience, and you want to get even more delight from a woman on March 8, do big bouquet from satin roses.

Your mother, grandmother or spouse will definitely put such a gift in a vase in the most prominent place in the house in order to always remember your love.

Another version of the original beautiful design from small rosebuds as a gift on March 8, you can watch the master class in the video below.
We make a gift for March 8 to mom with our own hands - a bouquet of gerberas from paper strips using the Quilling technique
Such a gift will be original not only for mom on March 8, but also for Teacher's Day. Following our instructions, any student can make a bouquet of gerberas using the Quilling technique. Translated from English, the word "quilling" literally means "bird feather", and in Russia the technique is widely known as "paper rolling". The master class will teach you the art of paper rolling and help you create a unique gift for the World women's day. From long and narrow strips of paper twisted into spirals, interesting flat or voluminous compositions are obtained, and in our case it will be a cute bouquet of five gerberas.

What materials are needed to create a bouquet for March 8 for mom with her own hands?
For original crafts we will need:
- corrugated cardboard;
- colored paper(different shades of the same color, for example, pink, will look organic);
- small pieces of green corrugated paper;
- wire;
- scissors;
- glue.
For 1 flower as a gift to mom on March 8, you need to make 5 blanks:
- Roll a strip of corrugated cardboard 1 cm wide into a small roll.
- Finely cut two strips of colored paper measuring 30 × 0.5 cm along one side to make a fringe;
- Cut two strips 15 × 0.7 cm into small petals with pointed tips;
- Cut one strip of 30 × 1 cm with medium-sized petals;
- Cut two strips 30 × 3 cm into large petals with triangular ends.

Step-by-step instructions for making a bouquet of flowers for March 8 with your own hands from paper
After all the elements for the future gerbera using the Quilling technique are ready, you can start assembling a paper flower.
- We take a cardboard roll and the first, finely trimmed strip, glue it along the diameter to the side so that the fringe looks beyond the upper edges. We smooth the petals towards the core of the flower.

- We take the second strip, glue it to the roll in an identical way, but smooth the fringe in the opposite outer direction.

- In the next step, we glue 2 strips of bright pink and pale pink shades around the circumference of the roll diameter, which were also cut into small fringes.
- We fix a medium-sized strip on the bud.

- We twist the last 2 strips with large petals at the tips with scissors and attach them to the bottom surface of the bud.

- Next, take a piece of green corrugated paper and cut out the stem from it, as shown in the figure below.
- Then glue it on the bottom of our gerbera.
- We wrap the wire of the length we need with the same green corrugated paper, pierce the middle of the bud with the stem.
After the first gerbera is ready, we make the rest of the flowers, making the stems different lengths. For a gift to mother, teacher or grandmother, there should be an odd number of gerberas in the bouquet: 3, 5 or 7 pieces.

A pretty bouquet can be placed in a narrow vase, and it will definitely fit into any cozy interior.
And you can make a simpler version of plasticine and paper gerberas with your child senior group kindergarten, but in this case, you need to actively help him so that the baby can cope with the task. Step by step master class featured in the following video:
Do-it-yourself Sweet Gift for March 8 for mom, godmother, grandmother, sister, wife, teacher from delicious sweets - Sweet basket design - a step-by-step video master class
The next Sweet Design Master Class is designed for schoolchildren, as well as men and women who want to surprise their loved ones doubly. A sweet basket will not only delight the eye of the female half on March 8, but will also bring a lot of pleasure, because it contains chocolates that can be eaten by the whole family at the festive table.

What materials are needed to create an original gift for March 8?
A sweet gift of sweets for March 8 is made using the paper plastic technique. It is worth preparing for the process in advance, since the creation of such a masterpiece takes a lot of time. So, for a sweet decor style basket, you will need:
- floral (corrugated) paper different colors;
- thin brush for drawing;
- watercolor paints;
- scissors;
- Double-sided tape;
- wire or floss threads;
- toothpicks;
- stationery glue;
- tin box for cookies in the form of a tablet (without a lid);
- 10 meters satin ribbon under the color of candy;
- a skein of openwork floral tape;
- stationery gum;
- pieces of foam;
- small artificial flowers for needlework (daisies, roses) or beads;
- plastic rim around the diameter of the box;
- a large number of chocolates.
To fill the basket internally, stock up on round-shaped sweets with a nut inside:

As well as small chocolates in the form of rectangular flat tiles with filling for the outer sides:

Creating sweet flowers with children's hands - step by step instructions
- First of all, we make flowers. Depending on the size of the candy, we take 1.5 or 2 divisions of corrugated paper (there is always a markup on the floral wrapper). We bend the strip, then paint the edges on both sides with small strokes.

- As soon as the corrugation dries, we begin to stretch the painted part in different directions (left and right) in such a way that we get the effect, as in the picture below.

- We take a round candy, fasten a thin strip of double-sided tape along the diameter, glue a floral strip.

- We tighten the base of the flower with threads or a piece of wire to make a stem.

- Dip the tip of the toothpick in glue and insert into a thick paper stem.
Video of creating a sweet basket for March 8 with your own hands from sweets
Now it remains to decorate the basket.
- Using glue or double-sided tape, glue the outer edge of the tin box with rectangular sweets with filling. On top we put on a clerical gum and close the unaesthetic look with an openwork floral tape.

- We wrap the plastic hoop with a satin ribbon, for this we divide the long ribbon in half and tie knots, as shown in the figure.

- We attach the finished rim to the box with a wire so that we get a basket.
- We fill the box with polystyrene foam, glue on the sides with petals made of green satin ribbon.

- We insert sweets on toothpicks inside the basket, decorate the gaps with artificial daisies.

A bright basket for March 8 is ready, not a single sweet tooth will remain indifferent to this sweet gift.


An original Origami photo frame as a gift for March 8 with your own hands quickly - a master class on paper crafts on video
The next gift is perhaps the simplest of all presented and is suitable for small children, schoolchildren or men who want to congratulate a woman in an original way on March 8, but are not “friends” with crafts.

How to quickly make a photo frame as a gift for mom with children's hands?
To make your own photo frame using technology modular origami you only need 6 sheets of paper measuring 8 × 8 cm and a few minutes of positive mood. You can do the manufacturing steps yourself, as well as with your children, by repeating all the steps from our video instruction:
A self-made photo frame will allow you to save the most important points from the life of your loved ones, so any woman, be it a mother, sister, or your bride, will remember such unusual gift on March 8th.
A simple gift for March 8 - we draw a postcard with our own hands from paper for kindergarten - we cut out simple applications
An ideal option for the little ones to make a gift for mom, teacher, sister or grandmother would be an application card made of colored paper. All that is required is to help the child draw, cut and paste the details, as in the pictures and video tutorials below.
What postcards for March 8 can mom quickly make in kindergarten?


We make a gift for March 8 to grandmother from grandchildren with our own hands - an original flower pot made of clothespins
Another unusual accessory can be made from items that can be found in every home. Any child in kindergarten with the help of a teacher, or with the tips of parents at home, he will be able to make a stylish pot for your grandmother's houseplants on March 8.

Materials and step-by-step instructions for a DIY gift to a grandmother on March 8
To create a pot, you will need a tin can without a lid, wooden clothespins and red paper.
- First of all, carefully separate the lid from the can for the child so that the edges are even and the baby cannot get hurt.

- Then you need to hook each clothespin on the side along the entire diameter of the future pot.

- We cut out hearts from scarlet paper and thread them through the openings. An original gift for grandmother's indoor plants for March 8 is ready.

Thanks to wooden clothespins, the pot turns out to be very stylized, cozy and eco-friendly.
Candy bouquet is great gift on March 8th. However, it can be presented for any holiday, for example, for a birthday or as a romantic gift.
The most beautiful and noble flower is the rose. This flower comes in a variety of colors. Some even combine two colors at once. And it is from two-color roses that a spectacular sweet bouquet can be obtained.
materials:
- candies;
- crepe paper;
- bobbin threads;
- Paper cup;
- Styrofoam;
- toothpicks;
- cargo (stones, sand);
- scotch;
- scissors.
Operating Instructions
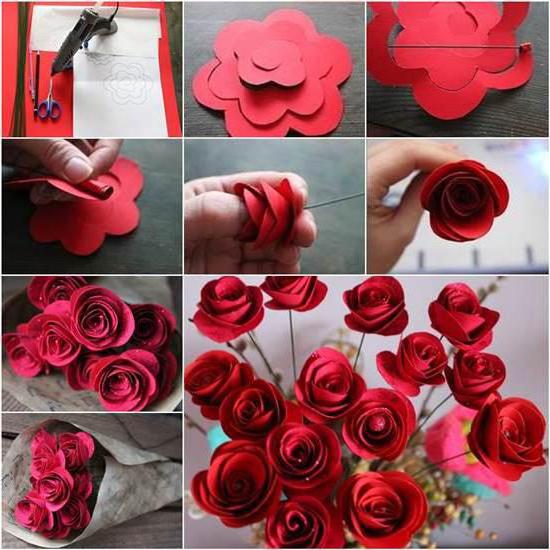
The basis for the rose will be candy. It is more convenient to work if the candy has a round shape. We unwind the wrapper, insert a toothpick into the hole, tightly twist the paper around it, fix everything with tape. We press the second tail of the candy wrapper tightly to the side of the candy, glue it with tape. We got blanks on sticks. We make them as many as we want to put roses in a bouquet.

Cut out rose petals from crepe paper. Each rose petal will consist of two elements: the outer part is pink, the inner one is bright yellow. Curl the edges of the outer rose petal with a toothpick in two places.

We put the yellow petal in the pink one. We fill it under the twisted edges.

Stretch the paper a little in the center of the double petal. We put candy on a toothpick into the resulting recess. We wrap it with a petal. We fasten the bottom edge of the paper tightly to the wooden leg. We wrap this place with several turns of thread, it will secure the entire structure.

We continue to wind the double petals to the bud, gradually forming a rose. The splendor of the flower will depend on the number of petals. For a bud, one will be enough. For a blooming rose, you need to take about nine petals. 
On a wide strip of green corrugated paper (about 10 cm), cut out the teeth. They should not reach the edge of 2 cm. The sharp end of each clove is slightly twisted with your fingers.

We wrap the rose flower that we made earlier with a green blank. We fix with threads.

One two-tone rose for a sweet bouquet is ready.

We will make a vase for a bouquet from a disposable paper cup. To make it stable, we put a load inside. It can be sand poured into a plastic bag, or ordinary stones picked up on the street.

Cut out a circle from the foam. Its diameter should match the diameter of the top of the glass. We insert the foam circle into the future vase.

Let's decorate our vase. From gift paper cut out the rectangle. Its width should be several centimeters larger than the height of the glass. The length will depend on the thickness of the glass.

Wrapping the vase wrapping paper. We fix everything with glue or tape. We bend the top edge inward, glue it.

Each rose must be placed in a vase. We stick a toothpick of each flower into the foam. Next we attach the next flower.

Gradually fill the vase with flowers. We place each flower close to each other so that there are no gaps.
We will additionally decorate the vase with a bow. You can make it from scraps of corrugated paper.

Such candy roses will not wither without water. Thanks to a stable vase, the bouquet can be placed in the office or at home.
Sweet design - the art of creating compositions from sweets - allows you to make unique bouquets with your own hands and delight your loved ones with sweet gifts.
Bouquets and compositions of sweets are increasingly used as gifts, add-ons to gifts and just signs of attention that are presented to beloved girls, mothers, mothers-in-law or colleagues.
Unlike the traditional and somewhat banal box of chocolates, the original bouquet invariably attracts attention, creating a festive mood and causing delight. The interesting thing is that making candy compositions for March 8 or another holiday is not as difficult as it might seem at first glance. In addition, each such present is unique, even if the craftswoman performs it for the tenth time.
What is required for a bouquet
The main component will, of course, be sweets, as well as packaging materials and tools:
- Corrugated paper. Its color and quantity should be chosen in accordance with the type of flowers produced and the size of the bouquet.
- Wire, toothpicks or wooden skewers.
- Strong thread.
- Scissors.
- Ruler and pen for marking.
Sometimes additional items may be required:
- Styrofoam.
- basket or flower pot.
- Glue gun.
- Insulating tape or tape.
- Satin or lace ribbon, pieces of shiny fabric, foil.
Candy compositions: a master class on making bells
A paper bouquet with a sweet filling does not have to consist of a large number twigs. Even one rose or a stalk with several bells will perfectly cope with the congratulatory task.
Such a composition of sweets, created with your own hands, will require the presence of green and purple paper. Sweets are better to choose small, in yellow or white foil. If the color of the wrapper is too colorful, they can be wrapped

flower making
First of all, you should draw a pattern for the petals on thick cardboard. Candy compositions for March 8 should be neat, so you need to make sure that all the petals have the same shape.
Their size is 4x6 cm. For one flower, you need to cut out four parts.

In the next step, at the top of each part, you will need to form a sharp corner, as shown in the photo.

How to make green leaves
Any flower arrangements from sweets come to life before our eyes and instantly bloom - you just need to add green leaves to them.
For a bell, you will also need four of them. First, a rectangle 4 cm long and 2 cm wide is cut out of green paper, and then it is given a sharp shape.

Finished leaves should be attached to the stem in the same way as purple petals.

Assembling a branch of three flowers
Similarly, two more flowers should be made on stems of different sizes.

For a change, they can be straightened to a greater or lesser extent (blossoming flowers and buds). Of course, in each of them there should be a candy.
Compositions of sweets for March 8 in the form of a bell are a great idea, because these flowers are one of the first to appear in spring.
Having connected all three stems, they must be firmly wrapped with green electrical tape. For a picturesque effect, you can add a few leaves.
Alternatives
For those who want to see the recipe in a simpler way, there is an opportunity to create a bouquet of sweets in just half an hour.

Here you will need paper of the same color, a piece of organza or the same paper, as well as a decorative ribbon.
Each candy is attached to a wooden skewer rod. Then you should cut out four identical squares (approximately 6x6 cm), make a hole in their center with the sharp end of the stem and move the paper to the candy.
When all the "flowers" are ready, they should be firmly fastened together with an elastic band, wrap the bouquet with decorative packaging and present it to the hero of the occasion.
It is also easy to make a bouquet of these roses. They are cut in a spiral pattern.
picturesque sunflowers
For such a composition of sweets for March 8, you will need a small basket with foam at the bottom. Sweets should be wrapped with brown paper and mesh to give a resemblance to the middle of a sunflower.
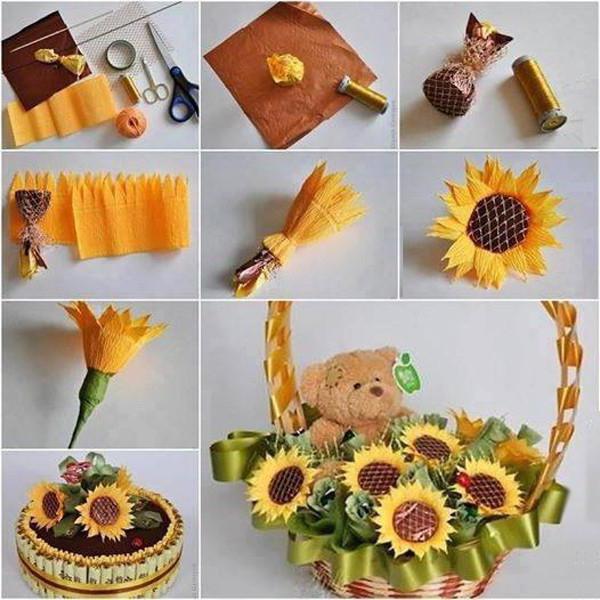
In fact, the flowers are made on the same principle as the bells. The difference is that all the petals are one strip, and not separate elements. After the tape is cut, it should be wound on a skewer with a fixed candy and fixed with a thread.
The stalk is wrapped with green electrical tape or paper. The required number of sunflowers is placed in the basket, the sharp ends of the skewers are held tightly in the foam. To fill the free space, you can use small rolls of green paper, decorative tape or fabric.
Who does not risk, does not drink champagne!
A wonderful and unusual composition of sweets, made on the basis of a bottle of alcohol, will delight most girls, as well as their husbands or boyfriends.

It is better to choose sweets in a golden wrapper to increase the resemblance of a present to a pineapple. To design each of them, cut out four identical squares from yellow or orange corrugated paper.
Then you need to glue the candy very firmly to the paper, and it, in turn, to the bottle. The best way is to use In order to better hold on the glass, it must first be wiped with alcohol or acetone.
The leaves of the "pineapple" are cut out of thick green paper, folded in half and smooth the fold line. After that, they are attached to the neck of the bottle and fixed with twine or twine.
The described ways of completing candy compositions can serve as a detailed instruction or be an impetus for the development of other options.
Spring has just set foot on the threshold, the sun is visiting us more and more often, but flowers and greenery are out of the question. There is still a lot of snow on the street, but I really want everything to bloom and breathe with warmth and tenderness!
To do this, you can create this wonderful atmosphere of flowers yourself, but flowers are not ordinary, but sweet and tasty.
See what bouquets you can create from sweets. This would be a wonderful gift for any occasion.
We will need:
A small plank (the whole bouquet will be attached to it). It is possible to replace it with a plastic plate.
Fabric or thread for finishing the plank
Sweets (preferably truffle)
corrugated paper
Scissors
Glue
Wire thin
white electrical tape
skewers
Foam rubber
Step 1
prepare a template for leaves 
We take corrugated paper white color and cut out 6 petals, namely 3 in size 5 × 6 and 9 × 4. This is for one flower only. 
Step 2
We take a thin wire, wind a white electrical tape, take glue, glue it. 
Step 3
We bend our petal into such a bizarre shape. 
Step 4
Approximately it should turn out like this, but we do not connect the petals. We take a skewer, fix the candy and drip glue on the edge of the wrapper, twist it. Next, we attach the petals alternately with wire or double-sided tape to the skewer. 
Step 5
It turns out something like this bouquet. 
Watch an interesting video that explains how to make DIY buds and open rose flowers with sweets inside, as well as how to properly arrange a bouquet.
Rose bud for a bouquet of sweets
see also step by step instructions making candy bouquets:
An error has occurred; maybe the ribbon is not available. Please try again later.
A bouquet of sweets is an original holiday gift for the 8th of March. This exclusive bouquet will be a gift or table decoration. With the help of this article, you can easily become a designer or constructor and create a real work of art.
The article will reveal the secrets of the new fashion technology in creativity - suite design.
It was described in detail - what materials and tools you need to have to create bouquets of sweets with your own hands.
A gift for March 8 with your own hands - a bouquet of sweets
You will need:
- 75 medium round candies
- basket
- floral foam for dried flowers or penoplex
- pink or green crepe paper
- green and white organza
- barbecue sticks
- threads
- green paper filler
- beads
Master class on creating a basket with bouquets of roses
1. Prepare tools and materials for work. From pink and green paper, cut out two rectangles measuring 7.5 x 6 cm and 7 x 6 cm, respectively.

2. Fold the pink rectangle in half and cut off the corners, as shown in the photo.

3. Twist one tail of the candy and, if necessary, fix it with a drop of glue. Put the candy in the center of the pink blank.

4. Strongly stretching the paper, wrap the candy. Twist the tail, thus fixing the wrapper.

5. Pinch the edge with two fingers to give it a wavy curve. Get a rosebud.

6. From the green rectangle, cut out the jagged blank for the sepal.

7. Give the cloves a curved shape by stroking the workpiece several times with a barbecue stick from the bottom up.

8. Twist the ends of the teeth with your fingers.

9. Wrap the workpiece around the bud and fix it with a thread or thin wire.

10. Cut the ponytail diagonally.

11. With the blunt end, insert a barbecue stick into the ponytail and fix it with glue.

12. Glue the tip of the tape at the base of the bud and wrap the resulting stem with it.

13. Cut out a 10 cm square from the organza. Fold it so that all corners are open.

14. With a drop of glue, attach the fabric to the blunt end of the barbecue stick.

15. While the glue is still warm, fold the outer corners in the opposite direction and press them down with your fingers.

16. Tape the stick on which the organza is attached. Prepare 75 rosebuds and the same number of green and white organza sticks.

17. At the bottom of the basket, place a circle of floral foam or foam plastic a few centimeters thick.

18. Close the foam with paper filler.

19. Arrange the buds and organza sticks in the basket, sticking them into the base.

20. At the end of the assembly, glue a few beads on the corners of the organza pieces.

A bouquet of sweets is ready.

creative and delicious gift will surprise all the guests of the festive table.
Note: The material for writing this article is taken from the book "Bouquets of Candies" by Tatyana Malinovtseva.
Candy bouquet master class - video


