Openwork jacket crochet diagrams and description. Openwork crochet blouse
Please note that the mounts of the motifs are different. Vertically, the motifs are attached to the arch, horizontally - butt-to-leaf, and on the shoulders - also under the arch in all directions.
In order for knitting to be certainly continuous, you need to start from the lower left back motif, if you look at the product. Here I drew an arrow 
Now let's get back to the diagram. Explanations:
1. If you knit the first (lower left) motive according to the scheme, then by knitting the second row, you find yourself in the gap between the petals. And in order to move to the next row, you need to tie as much as half of the petal, and we don’t need this extra thickening. So I suggest a little feint. Start the first motive with a chain of 10 air. loops (marked in black on the diagram) plus 6 for the center. Close 6 loops in a circle, knit 3 air. loops, fasten into the fourth loop of the chain. You get two chains together, which replace two columns. Then leave the remaining chain of 6 loops hanging to the right and knit the first row according to the scheme (yellow arrow). For the last arch of the first row, knit 5 loops and close in the last loop of the dangling chain (pink arrow). You find yourself in the middle of the petal, from where it will be convenient to go to the last row later.
2. In the last row of the first motive, knit two ears along the blue arrow. Closing the chain of the last ear in the middle of the petal, go to the next motif. The transition chain is marked in dark blue. For the transition chain, knit 9 air. loops - half of the arch of the first and second motives (on the diagram - type letter P between the motives) plus 15 loops and plus 6 loops for the center. Knit the first row of the second motive as in the first motive - three air. fasten the loops into the fourth loop of the chain, then along the yellow arrow, for the last arch of the first row, knit 5 loops into the sixth loop of the chain (pink arrow). Then again, leave the chain on the right and tie the petals with columns along the yellow arrow. Knit half of the last petal like this - after knitting all the columns, knit one loop (pink arrow) and fasten it to the second loop of the chain. Next, knit 4 loops and fasten along the green arrow to the fifth loop of the arch of the previous motive. In this case, your motives will be connected by the 9th air. loops (letter P). Then knit along the blue arrow, fasten the ear - along the green, then again along the blue. Then move on to the next motive. So knit 8 motives.
3. Knit the last row of the eighth motive in the orange arrow. Having knitted the second ear, knit 4 air. loops and fasten in the middle of the letter P. Then again 4 loops, half of the ear, fastening to the previous ear (green arrow). And so, along the orange arrow, you knit the upper part of the motives to the first motive. Knit until where the orange arrow ends. Then follow the bright red arrow to go to the second row of motifs. Please note that the number of loops in the transition chain between rows will be less than along between motifs, since the fastening between the rows will be butt. Here, for the transition chain, you dial 15 air. loops and knit as before. Only in the last row knit one ear along the burgundy arrow, not forgetting to attach it to the lower motives (green arrow). Then again the transition to the next motive (bright red arrow - the transition chain). Knit in the same way as the first row, only in the second row you still knit attachments to the lower motives (green arrows). Only in the fourth motif of the second row, the fasteners will differ (marked with blue arrows) - under the arch. In the fifth fastening motif as in the fourth. The remaining three motives are like the first three.
4. Return along the purple arrow, not forgetting to knit the bindings.
5. Next, knit two rows of four motifs, and in the fourth motif, in both cases, knit fastenings under the arch. Then knit two more rows of 8 motifs (in the fourth and fifth motifs for fastening under the arch).
6. Turn the knitting 90 degrees and follow the brown arrow (in the diagram on the left) to finish the left edge ..
Uhhh... already tired. I hope I explained clearly. (I save all the comments of JULIA. NGraf) 

Girls, why do the Japanese have such schemes that are not Russian, everything is from right to left or are they all left-handed 
To make the motive look more like an asterisk, three air. the loops that are needed for the connection do not need to be knitted. Instead, you need to knit three air. loops in the middle of the petal (indicated below by burgundy arrows) When you return, knitting the upper part of the motifs along the red arrow, knit a chain of 8 air at the junction. loops (their number may be different, you need to see how many loops you need so that the canvas lies flat and does not tighten anywhere), then close 4 more loops in a circle (red arrow to the center between the motifs), then 16 loops (8-there, 8- back) along the purple arrow, then 16 - along the green and 16 - along the blue, and at the end 8 - along the red. Received this type of cross. Continue to knit, not forgetting to attach to the ears of this cross in the right places.
In principle, this cross can be connected from any junction of motifs. I hope it helped.
http://club.osinka.ru/topic-20021?&start=1665
(I save all the comments of JULIA. NGraf)
Cambalina, your motive can be connected without interruption, but .... Firstly, it is large, and secondly, it is very openwork. It has a lot of arches from the air. loops. And if you knit without interruption, then the transition chain will be very long and you will need to climb many loops, which means that some arches will be thickened and will catch your eye. And the product itself will lose tenderness and delicacy. And if, God forbid, you make a mistake, then you will have to dissolve a lot. Therefore, I advise you to tie the motifs separately, but without the last row, and then tie them with the last row without interruption. Kill three birds with one stone - firstly, you don’t need to sew, secondly, tie everything with one thread and, thirdly, hide the tips of the campaign. If you want, I can draw a wiring diagram for you. 
The black arrow marks the beginning. Knit three sides, fasten the last arch of the third side with two double crochets to the right place of the next motive. Next, knit the second motive, attaching to the first. Attachment points are marked with green dashes. The principle of fastening is half an arch, fastening to the previous motive, half an arch, double crochets to the current motive, etc. Kind of a zigzag. Knit on the purple arrow. Knit the upper part of this row of motifs along the orange arrow simply with arches, without attaching anywhere. Go to the second row of motives. The diagram is drawn for a flat canvas, so half-motifs are shown in the second row. If you need a round canvas, then there will be no half-motif with the number 1, but there will be a whole motif on the left in the second row. Knit along the orange arrows, to the place indicated by the red type "asterisk", in this place you knit air. loop half of the arch and fasten along the red arrow, so three times and again you get to this place from where you started, then you knit the fastening to the lower motive and further along the arrow. This "feint" is needed so that there are no holes in the corners. You tie the semi-motive on the right with single crochets. If you have a round canvas, then the second and all even rows will be shifted to the left. Well, follow the arrows. When everything is knitted, turn the fabric 90 degrees and knit left side- in the case of a flat fabric, or wrap the fabric in such a way that the right side is on top of the left and tie the left side, attaching to the right one - in the case of a round fabric. Good luck. 

It seems to me that this tunic is not entirely knitted, but cut from a knitted fabric. Moreover, the armhole is lowered, but not framed. Here I drew an arrow 
And here is the side view  here and the side seam is visible. Something tells me that you will not cut the knitted fabric.
And if you want the tunic to be in shape, then you need to change the hook number. Those. let's say you knitted on the hips with number 3, the next row should be knitted with number 2.5, and even the waist line - with number 2 or 2.25. Need to try. Link motifs different hooks and measure the length of the motif. Well, count it.
And in order to tie the armhole honestly, make a pattern of the armhole line and the line of the armhole of the sleeve and apply it to the knitted fabric. And knit motifs according to the pattern, somewhere in half, somewhere without a quarter, somewhere without an eyelet. 
Here are very rough armhole lines in red and sleeves in blue. 

Knit the first motive from ear to ear along the blue arrow. Having connected half of the right upper ear of the first motive, go to the next motive, for this you gain 18 air. loops plus 6 loops for the center. The transition chain is marked in dark blue in the diagram. Knit the last row of the motif along the blue arrow, remembering to attach to the previous motif in the places marked with green dashes. Having connected half of the upper right ear of the second motive, go to the next motive. And so on until the desired length. Come back, knitting the upper quarter in the orange arrow. Having connected half of the upper left ear of the first motive, go to the next row of motives. The transition chain is marked in yellow. Knit the second row of motifs as the first, not forgetting to knit the fasteners. Knit along the pink arrow (although it is not very visible, here I stratified with color), return - along the burgundy one.


Here she is 
Small, really. Copy to your computer and enlarge. The lifting chain is marked in black. Knit the last row along the blue arrows, the transition chain is indicated in bolder blue. Come back - on the red arrows. Go to the second row, the transition chain is highlighted in bold red. Come back - on the purple arrows. Mounting points are marked in green. True, I have not seen the product, so I doubt that the motifs are attached in the middle of the side, it seems to me that they should be attached only by the ears. But in the middle I drew fasteners just in case. 


Explanations:
The first motif is the bottom left. The lifting chain is marked in black. Knit a motif, knit the last row of the motif (in your case, it is a pico harness) along the blue arrows to point 1. Ie. the lower part of the motive turns out to be tied, but the upper one does not. At point 1, go to the next motive, for this you knit 3 air. loops (half of the "pikoshka" of this motive) plus 15 air. loops (transition chain) plus air. loops for the central circle (most likely there are 4 of them). Total 22 loops. The transition chain is highlighted in blue. Knit the second motif, weaving the transition chain into it or climbing it if necessary. Knit the last row along the blue arrows to point 2. Etc. to the required length. Knit the last motif in the row completely. And on the orange arrow you begin to knit the last row of all already connected motifs. At point 3, go to the second row of motifs. Again cast on 22 stitches for the transition chain (marked in orange) and knit the motif. The green arrow indicates the place of attachment to the bottom row of motifs. Knit to point 4, here you need to tie a "snowflake". Dial 2 air. loops - half a pico plus 25 air. loops plus 4 loops - central. Total 31 loops. Knit a "snowflake" along the red arrows, not forgetting to knit the bindings marked with green arrows. Having connected the "snowflake" completely, you get to the place where you started knitting it and continue to knit the last row of the motive to point 5. Then again go to the next motive. Knit, not forgetting to knit the fasteners, to point 6. Here again you knit a "snowflake", etc. Having knitted to the required length, you return, knitting the last row of motives, along the purple arrow. And so on to the desired height. When you have knitted the entire fabric, turn the knitting 90 degrees and knit the left side. Something like this. 

I chose a motif of 6 central loops and 18 columns with crochets around. It is clear that you can choose your own number of loops and columns. On the left, the red dash indicates the lifting loops. We knit along the blue arrow, for the transition we collect 3 air. loops plus 6 center. loops. We knit the motifs marked with numbers 1, 2, 3 and 4 completely, returning to the same place from which we started knitting this motif. Then again follow the blue arrow. Please note that due to the specifics of the location, the motives do not fit in half, but a little more, and in some places - a little less. The number of columns for this "more" and "less" will need to be calculated empirically. Having connected the desired length, we return along the red arrow. In the place where the arrow leads to the center of the motives, we knit 5 air. loops plus 4 central loops, then we knit around these 4 loops 7 "petals" out of 10 air. loops each, then another 5 air. loops and we get to the place where we started knitting the connecting motif. In the diagram, this motif (asterisk) is indicated by orange dashes. Next, we knit along the red arrow, not forgetting to attach to the asterisk in the places indicated by green dashes. We pass to the second row. We knit along the purple arrow, we return along the brown one. I think this diagram will be useful to someone.
Girls, I came up with another pattern for knitting a stole from the previous post. Seems simpler to me. I even wanted to delete the previous post, but then I thought that what is simple for me will seem difficult to someone and vice versa. Therefore, let there be two schemes. Some will like one, some the other. 
Beginning of knitting - 4 air. we close the loops in a circle, 5 air. loops, knit in the blue arrow, i.e. we knit the whole circle and return back to the 5th air. loops. Then along the red arrow, again we knit the whole circle and back. Then blue. Here we knit two circles in succession (first half of one, then the whole second, then again half of the first) and return again. Next, the orange arrow, purple, then go to the next motive along the brown arrow. Further along the red, blue, orange, purple and brown arrows. We tied the desired length, we return along the pink arrow, then along the yellow, lilac, pink again. Returning to the very first motive, we go to the second row along the green arrow. Further on the drawing. Where the circle is already connected - we attach to it and return to the center, where it is not connected - we untie it and again return to the center. Please note that when knitting circles, you must not forget to attach to the previous circle. Something like this . I hope it's understandable. 

Lift loops are marked in black. The last row of the motif (single crochet with picot) is knitted along the orange arrow. Having reached the transition point, knit an incomplete pico - 2 air. loops plus 14 air. transition loops plus 6 air. loops for the center. mug. Knit the entire motif, the last row - again along the orange arrow, not forgetting to attach to the previous motif (attachment points are indicated in green) . Knit the required number of motifs in length. Return on the blue arrow. Move to the second row. Be careful in the second row there are a lot of attachment points. And further along the arrows different colors. I specifically marked three rows of motifs so that you imagine that knitting is not even, there will be a shift in motifs. When you knit the required number of motifs in height, close the left edge of the motifs along the burgundy arrow. If you need to close the canvas into a pipe, at the time of return (burgundy arrow), attach to the rightmost motifs of the canvas. Good luck 


Blue color indicates the lifting loops in the first motive. We knit in the green arrow. In the course of knitting, we knit the "ear" - we knit 5 air. loops, a circle of 4 air. loops (I saw that there is a circle in the photo of the bag in this place), a column with 4 crochets attached to the right place and then carefully return 5 air. loops. Mounting points are marked in blue. To move to the next motive, we dial 17 air. loops plus 6 loops for a circle. If necessary, in the course of knitting, we climb along the already connected transition loops. We knit to the desired length. We return to the red arrow. We knit the second row of motifs along the purple arrow, we return along the orange one. Do not forget to tie the "ears" and fasteners in the right places.


Explanations
1. Knit a motive, in the last row you knit 10 arches
2. Knit 5 air. loops (two - half of the 11th arch, one - the connection loop and two more - half of the arch of the next motive) plus 15 air. loops and plus 5 air. loops for the central circle. Total 25 loops.
3. Knit the second motive. When you knit the penultimate row, a chain of 25 air. loops should be reduced to 8 loops. Here you need to knit three double crochets with one vertex. You knit two lifting loops, one unfinished double crochet and knit all this pleasure through the third loop of eight one loops, then 2 air. loops, attach to the arch of the first motive, 2 air. loops, 3 double crochets with one top, 2 air. loops and again fastening to the arch of the first motive, 2 air. loops and further according to the scheme.
4. Knit 8 more arches, and then see point 2. .
5. Knit, repeating points 2 to 4, to the length you need along the blue arrow.
6. Come back, knitting the upper parts of the motifs, along the orange arrow
7. Go to the next row along the red arrow, return along the brown one.
The green dashes indicate the places where the motifs are attached.
Good luck.
SINCERELY , T.E. NATALIA GRAF.
Before needlewomen who own a hook, almost endless possibilities in creativity open up. This simple tool allows you to create truly amazing things. The openwork crochet pattern is suitable for all types of knitting clothes, as well as for giving it a complete look. We invite you to familiarize yourself with big selection pattern patterns that will be ideal for a certain type of knitted items.
The emergence of knitting
Knitting with a hook originated quite recently. Its strengthening and development was facilitated by industrial Revolution, which helped make creative material available to the public. The natural fibers used by our ancestors were quite difficult to obtain and process. With the advent of mechanisms for cleaning cotton and spinning thread, the process accelerated significantly and expensive threads fell in price. Now they were no longer the privilege of rich ladies; even peasant women could use yarn.

Lace was very popular. The finest openwork, created by the caring hands of craftswomen, was very expensive. This allowed the poor to unite in artels and produce lace for a living. During the famine in Ireland, needlewomen invented the new kind lace, which is called Irish lace. It is made up of tiny details that are combined in various ways to form a single canvas of incredible beauty. A great variety of different schemes of motives have been developed for this technique.

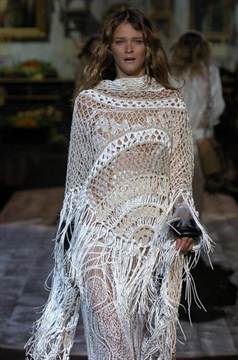
Now crochet is very popular. Even schoolchildren can master this simple tool. The main thing is to have a little patience and everything will work out! Even fashion designers do not bypass the openwork manual work. Every year their collections are replenished with new ones. knitted patterns like the photo below.
Pattern Features
Even if you do not fully master the art of knitting, you can create incredible patterns based on ordinary columns and loops. All patterns are conditionally divided:
- Embossed;
- Openwork.
Relief is a dense canvas with a massive ornament. Openwork in translation from French - "through, translucent." This means that the openwork fabric must have through holes. They are used for knitting both light summer and winter things. Even dense yarn can create an openwork fabric.

For the manufacture of winter clothes, threads from mohair, wool, and angora are used. It is desirable that they are combined with artificial fibers such as acrylic or polyamide. Such a neighborhood will make the result of work strong and durable, help to calm the "prickly temper" of the wool.
In the creation of summer lace, preference is given to natural cotton, linen, viscose, silk. They will give the product lightness and tenderness, will be pleasant to the body and will not cause allergies.
Create a sample
Before starting work on a product, even experienced craftsmen try to knit small samples. They will help:
- "Fill your hand" in the execution of the pattern;
- View the properties of the selected yarn and determine its compatibility with the ornament;
- Calculate the knitting density.
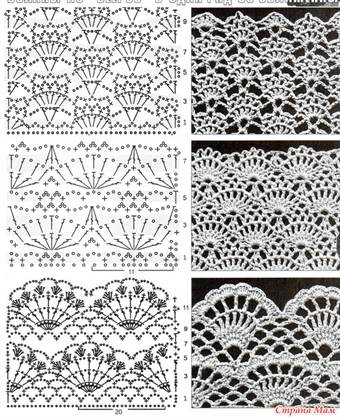
We invite you to familiarize yourself with the popular peacock tail pattern.
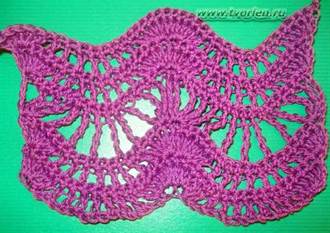
The rapport is 19 loops. Knitting is performed according to the following pattern.

The diagram shows 38 air loops of the initial chain. Pick them up with a hook. Remember that the size of the hook and the thickness of the yarn must match. Add three lifting air loops. In the fifth loop from the hook, double crochet 4. In the sixth loop, knit one double crochet. The next 8 columns are knitted through one loop. In the next loop, a bunch of 5 double crochets is knitted again. The rapport is over, now you need to repeat exactly the same sequence to the end of the row. Please note that at the beginning of the row, the cast-on lifting loops have replaced the double crochet for you. When performing the second rapport, the first beam should consist of 5 columns, not 4. The first row is over, and the canvas has acquired a wavy shape.
In the second row, you need to climb one loop and knit over each column of the previous row in a single crochet. You also need to knit all even rows. The third row is performed according to the description of the first row. In the fifth row, work 5 lifting loops (these will replace the first column with 3 yarns), add an air loop and knit a bunch of 3 columns with three yarns separated by a chain loop in the last column of the third row. Skip two loops and double crochet in the third. Repeat 4 times. Skip 2 more sts and make a bun of 5 treble crochets separated by air loops. Knit a second rapport. Perform an even row with single crochets.
The vertical repeat consists of 6 rows that you just knitted. To continue knitting the fabric, you need to repeat vertical rapports until the desired length of the product is reached. You can use this lace for a stole or scarf.

For the characteristic shape of the canvas this pattern also called "waves". If the description caused you questions, we recommend that you watch a video that clearly shows the knitting process.
Patterns for beginners
Even beginners can create simple openwork patterns, although they are easy to perform, they give the canvas a neat and beautiful view. For beginner needlewomen, the following patterns are suitable.
Nets and cells.
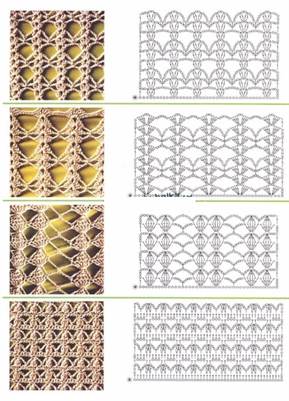


Such fabrics can be used when knitting summer tops or for tunics.
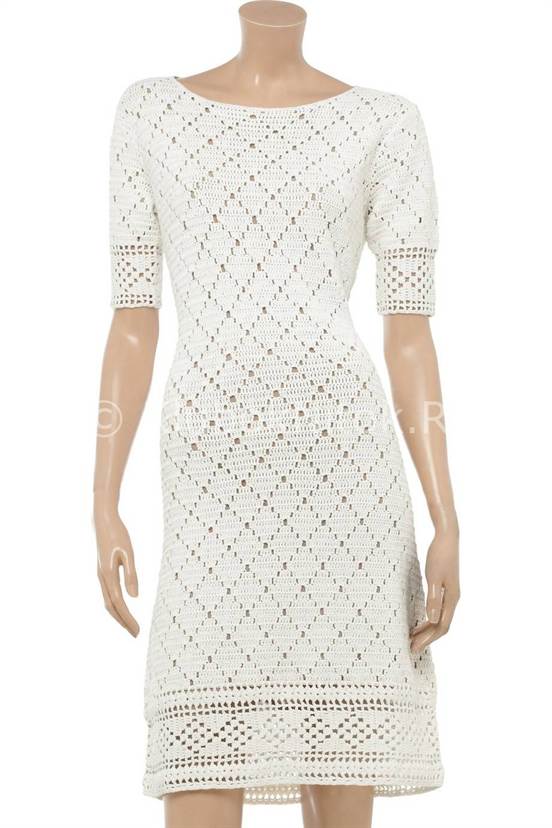
Diamonds, squares.
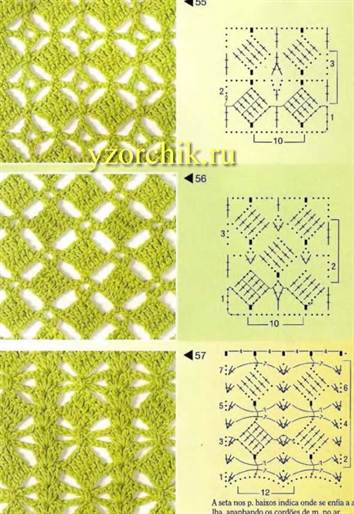

They are perfect for both a summer blouse or dress, and for winter things - shawls, sweaters, cardigans.


Fans, waves, zigzags. They belong to the “peacock tail” pattern we have considered in detail.


They will be an excellent backdrop for a large plaid or for a snood, as well as for a dress of a little princess.


Sophisticated knitters
For those who have mastered the art of crocheting to perfection, the following openwork patterns can be advised:
Christmas trees and waves.

Used for finishing summer things.

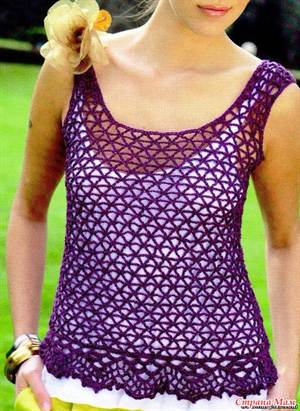
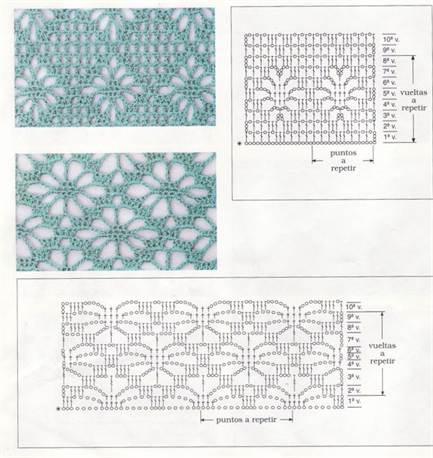
Floral patterns.

Women's tops and openwork blouses are the highlights of the wardrobe. Usually there are a lot of these things and it is they that allow you to be always different. Often they are bright, attracting attention. They form the perfect combination with all basic elements clothes: trousers, jackets, skirts. Do you love tops and blouses, but there is nothing in stores that suits your style? Want even more variety? In this case, our site will become your guide to the world of beauty.
How can our site help in knitting tops and attractive openwork blouses?
Here you will find patterns that will help you knit these things with knitting needles or crochet. The catalog contains a wide variety of models that differ in style, color. Women who love bright colors, will be able to find women's tops that incorporate the most juicy tones. Ladies who prefer coquetry and lightness will be able to pick up women's openwork blouses, both attractive and restrained.
Our models have different patterns, cuts. Some are tight fitting, while others are loose. Craftswomen who have been knitting for a long time will be able to find patterns that allow you to get a real work of art that will be appreciated even by a person who is far from knitting. Beginning girls who have recently taken up the knitting needles will appreciate the easy schemes that will allow you to practice and knit the desired thing.
Camping or a walk around the city, working in the office without a strict dress code and even visiting the theater - everywhere a handicraft thing of decent quality suitable style fit and grab attention.
Jackets and sweaters can be knitted:
- solid canvas different patterns(including jacquard);
- separate motifs connected in a certain sequence or arbitrarily (“Irish lace”);
- bruges style.
The preparatory stage of knitting sweaters and jackets:
The choice of yarn composition and its thickness depends on the intended model. You can knit from wool, acrylic, cotton, linen, blended and even thick "knitted" yarn.
Delicate silk (artificial and natural), viscose, bamboo fiber, thanks to crocheting, “keep their shape” better, but if necessary, they drape beautifully.
It is advisable to choose a yarn that is not very twisted. But this is not an absolute ban. You just have to interrupt knitting, fasten the thread and let the piece straighten out in a suspended form.
The material of the tool (metal, wood, plastic), the shape of the handle and head do not play a special role. Each needlewoman has her own preferences. The main thing is that the hook lies comfortably in the hand, does not have “burrs” scratching the hands and yarn. Then the knitting process will be a joy. In addition to the usual short ones (up to 16 cm), there are long hooks(usually 30 cm) for the so-called Tunisian knitting.
Kaleidoscope of models of jackets and blouses
The variety of crochet techniques allows you to create women's jackets and blouses, combined with almost any wardrobe item. The style can be straight or fitted (by changing the hook to a smaller one or by making tucks).
When using a dense pattern that imitates tweed material, Chanel-style products are created. Such a stylish thing can be combined with a pencil skirt, sheath dress, classic trousers.
The original crochet transformer jacket is often knitted on the basis of round napkin or tablecloths. Holes are left in place of the armholes, sleeves are subsequently knitted or sewn on. Enchanting patterns, rounded shelves turn this jacket into a top-class model for beauties with a non-trivial taste.
As the great trendsetter said: "Lace is the most beautiful imitation of nature's fantasy." Crocheted jackets and sweaters, made with elegant lace weaves, look extremely feminine. Lace models harmoniously fit into the multi-layered style.
Often several patterns are combined in one model. IN Everyday life image addition knitted things even jeans adds a romantic charm.
Techniques that are convenient for recycling yarn residues are raglan knitting from above, or motives. At the same time, the probability of meeting an identical thing on someone is minimal.
Knitting from idea to implementation is a fascinating process. It remains only to find time for a useful hobby.
A do-it-yourself crochet knitted sweater is always original. There won't be a second one for sure. Models are openwork, delicate and very feminine. Crochet can be connected not only women's blouses, he also creates elements of children's and men's wardrobe. Let's consider some of them.
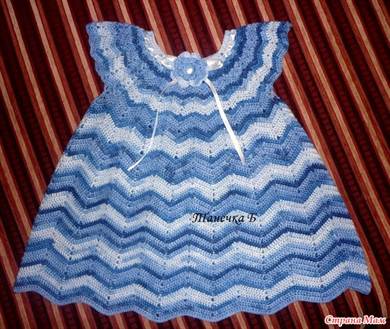
Crochet a tunic for full ladies on one shoulder
Women with magnificent forms it is usually difficult to find the right clothes in the store. The color is not the same, it sits badly. The ideal option is to knit clothes yourself. Flights are excluded. This tunic model is made from motifs, in two colors. Can be worn on one shoulder.
Description
For size 50-52 we need to prepare: 200 g of cotton yarn "Iris" blue and light blue, hook No. 2.5
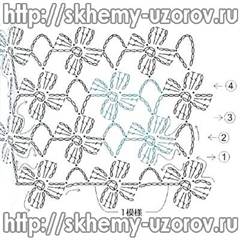
We start knitting a tunic for full ladies with a hexagon motif. We collect a chain of 10 in. P. blue color, close it in a ring and then knit in a circle as the diagram shows.
Hexagons should be 19 pcs.
Now let's move on to pentahedrons. We need 3 of them. We collect a chain of 10 in. P. of blue color, close it in a circle and knit according to this pattern
Assembly of motifs into a single piece for obese women done according to drawing
The binding of the tunic is performed according to the following scheme:
The product is ready. As it turned out, knitting a tunic is not at all difficult, which is quite suitable for beginners.
Women's jacket - cardigan: video master class
Elegant jackets for obese women
Jackets are kept strictly classical style. They are devoid of pretentiousness and excesses. Jackets of this model are suitable for women of any age.
Description
The number of loops of this product is calculated for the following measurements: exhaust gas 120 cm, product length 64 cm, inner sleeve length 47 cm.
To knit jackets for full ladies you need to prepare: 500- 600 g beige yarn Novita Bambu (which includes 68% bamboo, 32% cotton), as well as hook No. 3, 8 buttons.
Before we start knitting jackets, it is necessary to make a pattern for each detail according to our measurements. We start knitting from the back. We collect a chain of 172 ch. and continue knitting with the main pattern according to cx 1.
At a height of 39 cm, we decrease 1.5 rapports on both sides and continue knitting according to cx 2. All decreases and additions of the part are checked against the pattern.
At an armhole height of 25 cm, we perform the 8th row of the scheme and cut the thread. We perform the other side in the same way, but we do not cut the thread, but we knit the 8th row of the pattern along the entire edge of the part (first one shoulder, and then the other).
Please note that the pattern diagram shows 4 values of the same segment, they correspond different sizes clothes. We are interested in the largest values, because jackets are designed for full ladies.
To knit the left shelf, we collect 84 in. p. and knit with the main pattern. We perform reductions according to cx. 2. At an armhole height of 25 cm, we perform the 8th row of the scheme and cut the thread. The binding of the front edge of the part is performed with the main pattern 1-3 rows. right shelf make it symmetrical.
For the sleeve we dial 76 in. p. and knit, as diagram 3 shows
We perform reductions according to cx. 2 and pattern
We collect all the details in the finished product. Art. from n. tie the collar and tie around the edges of the jacket, leaving holes for the buttons.
Crocheted raglan for children
This raglan for children is suitable for the age of 3 months. Knitting is easy and perfect for beginners.
To knit a raglan for children you need to prepare: 100 g of medium-weight blue yarn, which includes 40% wool, 60% acrylic; some white, blue, black yarn (for appliqué), 4 blue buttons and 1 black bead.
Description
We start knitting raglan for children from the back. Recruiting 37 in. p. and knit 3 cm with an elastic band according to the drawing of scheme 1.
Then we continue knitting according to cx. 2.
Before we perform similarly to the back, following the schemes.
To knit the sleeves, we raise 27 sts along the edges of the armholes and put the front shoulder strap on the back shoulder strap. We continue to knit raglan for children according to cx. 2.
Perform neck strapping according to cx. 1. With a white thread, tie the edges of the front, neckline and shoulder straps in this way: * 1 st.b.n in a loop, skip 1 p., repeat from *.
According to cx.3, make an applique and decorate with it a raglan for children.
Knitted children's jacket with raglan ears: video mk
Stylish women's sweaters with a round yoke for beginners
White jacket with round yoke and pineapples will always favorably emphasize the advantages of the figure, and the patterned border will add tenderness to the image.
Sweatshirt size with round yoke and pineapples 44-46
We will need: white viscose yarn, hook No. 1.5
Description
We start knitting from the neck. We collect the number of loops so that 12 motifs fit.
Next, we knit according to cx.1, after which we collect 24 arches for the coquette and close them in a ring. Then we continue knitting in a circle in cx1a. At a height of approximately 19 cm, we divide the product into 3 parts (front, back, sleeves) so that each of them gets 3 motifs. Before and back we continue to knit in a circle in cx. 1c. We perform sleeves according to cx.1b, and decreases and increases according to cx. 1g The border of the lower edge of the sleeves is made according to cx. 1v
White sweater with pineapples is ready. Its simple knitting is suitable for beginners.
Women's blouse from square motifs for beginners
Schemes and description of a jacket from square motifs are given for clothing sizes 44-46, 48-50.
For work we need to prepare: olive and light green yarn 150g each (composition: 55% cotton, 25% polyamide, 20% silk), hook No. 3.5 (4.5).
For knitting square light green motifs, we collect a chain of 6 ch, close it in a ring and knit according to the pattern. The binding of the edge is done with olive thread.
There should be 46 square motifs. They must be placed on a flat surface according to the pattern and tied together.
The jacket of square motifs is ready.
Openwork crochet blouse: video mk for beginners
Unusual summer crochet top on one shoulder
original women's jacket Suitable for everyday wear and for parties. It is easy to make, so it is suitable for beginner needlewomen.
Product size - S
For work we will need: white microfiber yarn 250g, hook number 2.
We begin work with the manufacture of patterns. We will then check with them in the course of knitting.
For the back, we dial 90 ch. and knit according to the scheme to a height of 45 cm. Then we retreat 12 cm on one side, and on the other, leave 5 cm for the armhole. We continue to knit one shoulder, performing the appropriate reductions. At a height of 17 cm, finish the work.
Before the product is performed similarly.
For the sleeve, we collect a chain of 24 ch, close it and knit in circular rows of 44 cm, as the diagram shows.
To give the blouse a more elegant look, its edges can be tied with a shiny thread. Tenderness and charm to the product will add an openwork strapping or border.
Fine sweatshirts and blouses from Japanese magazines
On the Internet, it is extremely rare to find a translation of the description into Russian. Perhaps because the Japanese give a lot detailed diagrams to their products, and everything is clear without a description.
Charming white blouse that can be worn on one shoulder
Blouse with a yoke from Japanese magazines
To knit such a blouse with a yoke need to cook about 300g of cotton yarn. The border is made separately and then sewn on.
Asian top from Japanese magazines with a round yoke
It is best to knit a sweater from Alpaca Baby Lux yarn in 2 threads. ¾ sleeves and piping add a touch of elegance
Openwork blouse from Japanese magazines
The border of two types decorates this product. It is tied along the bottom, neck, shelves and sleeves.
Women's blouse from Japanese magazines
The blouse is made of square motifs. As roundings on the sides - semi-motives. The bottom of the product is decorated with a border. The neck is tied with a braid through which a string is passed
Delicate blouse from Japanese magazines
The product is made of snow-white yarn. Its bottom and shelves are decorated with a strapping in the form of flowers.
Jacket Baby surprise: video master class
Men's crochet sweater
You can crochet not only women's or children's clothes, it can also be used to create men's wardrobe items.


